Amateur Radio Homebrew (Shack Culture)
-
PanBiker

- Site Administrator

- Posts: 16449
- Joined: 23 Jan 2012, 13:07
- Location: Barnoldswick - In the West Riding of Yorkshire, always was, always will be.
Re: Amateur Radio Homebrew (Shack Culture)
I took the upper case lid off the C58 last night and sprayed some switch cleaner into the sliding switch a couple of times operating it full throw each time. Didn't do any harm and it has had some slight effect on the meter function. I now see and indication of drive on speech peaks when operating. Better but not a full fix. Problem is the signal is derived from the IF stages of the transceiver and would really need aligning to completely check for full functionality. I have all the information for alignment but unfortunately don't have the full range of test equipment to undertake the job anymore. The variable resistor that I said was also suspect is just used to set up the correct deflection of the meter for the battery check facility. I have decided to leave it as it is a minor discrepancy really and I know that it is radiating a Q5 signal in all modes, I can live with not seeing it on the meter. I could always take my SWR/Power Meter with me when using it portable, as an antenna alignment device that takes it's drive directly from the output stages of the transmitter so will definitely show the drive to a correctly matched antenna.
I hooked it up to my old 7/8ths 2m vertical whip last night and tested it with Kevin (M0XLT) over in Gargrave. We had a successful contact despite the antenna system at my end not being optimum, ( no ground plane for the antenna and just propped against the wall indoors) not ideal but better than the 6" rubber duck antenna for when you use it as a portable. Not fantastic copy but my one watt output made it over the drumlins. It will be different picture when operated from the top of a hill and with a better antenna system. I feel a session from the top of Weet's coming on.
I hooked it up to my old 7/8ths 2m vertical whip last night and tested it with Kevin (M0XLT) over in Gargrave. We had a successful contact despite the antenna system at my end not being optimum, ( no ground plane for the antenna and just propped against the wall indoors) not ideal but better than the 6" rubber duck antenna for when you use it as a portable. Not fantastic copy but my one watt output made it over the drumlins. It will be different picture when operated from the top of a hill and with a better antenna system. I feel a session from the top of Weet's coming on.
Ian
-
Stanley

- Global Moderator

- Posts: 90301
- Joined: 23 Jan 2012, 12:01
- Location: Barnoldswick. Nearer to Heaven than Gloria.
Re: Amateur Radio Homebrew (Shack Culture)
You've reminded me of the 'improved' aerial my dad fitted outside my attic window at the end of the war. It was a wooden socket on a bracket and took a piece of copper cable core about a foot long which was fanned out like a brush. It certainly worked better than the long copper wire we had before that.
Stanley Challenger Graham
Stanley's View
scg1936 at talktalk.net
"Beware of certitude" (Jimmy Reid)
The floggings will continue until morale improves!
Stanley's View
scg1936 at talktalk.net
"Beware of certitude" (Jimmy Reid)
The floggings will continue until morale improves!
-
PanBiker
- Site Administrator
- Posts: 16449
- Joined: 23 Jan 2012, 13:07
- Location: Barnoldswick - In the West Riding of Yorkshire, always was, always will be.
Re: Amateur Radio Homebrew (Shack Culture)
With any end fed wire the radiation pattern fans out equally over the length of the wire like a bubble at each side. The wire is effectively a simple directional design so if it was orientated North to South the radiation pattern and also it's best reception would be from the East or West. Conversely if it was laid out East to West it best reception would be from the North or South. Patterns get a bit more complicated if you zig zag the wire or erect it in V formation etc.Stanley wrote: ↑08 Sep 2021, 02:50 You've reminded me of the 'improved' aerial my dad fitted outside my attic window at the end of the war. It was a wooden socket on a bracket and took a piece of copper cable core about a foot long which was fanned out like a brush. It certainly worked better than the long copper wire we had before that.
I assume the wire brush antenna you describe was mounted vertically with the fanned out wires horizontal? If that was the case the design would be more omnidirectional so would be a little better for all round reception on a domestic or broadcast receiver. If you want true omnidirectional you need a vertical antenna and to complement it a ground plane counterpoise for it to balance against. This can take the form of an earth mat or random length radials laid out beneath the vertical component.
If you take a walk along the Croft you will see my tri-band vertical antenna for 6m / 2m and 70cm. That will have various coils within the outer casing of the vertical component, (the white stick bit) and you will see that it has three different length counterpoise rods at the base cut to a length that is resonant on each band that the antenna is designed to operate on. The longest (6m counterpoise) has a coil built in to get a derivative of the correct length. Each of the counterpoise rods can be adjusted slightly in length for fine adjustment of the antenna.
Ian
-
Stanley
- Global Moderator
- Posts: 90301
- Joined: 23 Jan 2012, 12:01
- Location: Barnoldswick. Nearer to Heaven than Gloria.
Re: Amateur Radio Homebrew (Shack Culture)
The wires were fanned out in all directions Ian and it looked like a very large shaving brush but more semi-circular.
Stanley Challenger Graham
Stanley's View
scg1936 at talktalk.net
"Beware of certitude" (Jimmy Reid)
The floggings will continue until morale improves!
Stanley's View
scg1936 at talktalk.net
"Beware of certitude" (Jimmy Reid)
The floggings will continue until morale improves!
-
PanBiker
- Site Administrator
- Posts: 16449
- Joined: 23 Jan 2012, 13:07
- Location: Barnoldswick - In the West Riding of Yorkshire, always was, always will be.
Re: Amateur Radio Homebrew (Shack Culture)
Some kind of omni design no doubt the radiated leads would give more all round coverage than a single wire for the reasons posted earlier.
All interesting stuff, fag packet drawing?
All interesting stuff, fag packet drawing?
Ian
-
Stanley
- Global Moderator
- Posts: 90301
- Joined: 23 Jan 2012, 12:01
- Location: Barnoldswick. Nearer to Heaven than Gloria.
Re: Amateur Radio Homebrew (Shack Culture)

Stanley Challenger Graham
Stanley's View
scg1936 at talktalk.net
"Beware of certitude" (Jimmy Reid)
The floggings will continue until morale improves!
Stanley's View
scg1936 at talktalk.net
"Beware of certitude" (Jimmy Reid)
The floggings will continue until morale improves!
-
PanBiker
- Site Administrator
- Posts: 16449
- Joined: 23 Jan 2012, 13:07
- Location: Barnoldswick - In the West Riding of Yorkshire, always was, always will be.
Re: Amateur Radio Homebrew (Shack Culture)
That would do it Stanley, it's a basic omnidirectional design.
Ian
-
PanBiker
- Site Administrator
- Posts: 16449
- Joined: 23 Jan 2012, 13:07
- Location: Barnoldswick - In the West Riding of Yorkshire, always was, always will be.
Re: Amateur Radio Homebrew (Shack Culture)
I think I had mentioned before that the 40 year old 25W Linear Amplifier for my Standard multi-mode transceiver had developed a fault. Reports say that in use the signal is distorted. I built the dummy load a while ago so that I could have a go at the repair on this bit of kit. I set about it yesterday. Here is the set up for test with the lid off the amplifier.
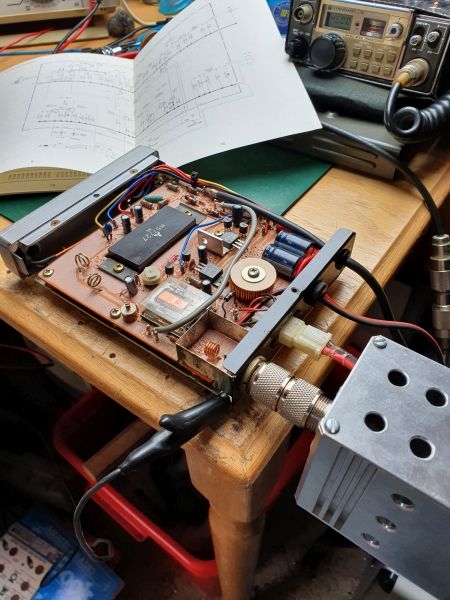
I have the dummy load connected directly to the output of the amplifier. This will provide both a 50 ohm load to the amplifier and absorb the RF generated by the device without radiating a signal. The negative of my bench meter is connected to chassis and I am powering the amplifier directly from my regulated bench supply. The C58 transceiver is providing the 1W of RF drive into the amplifier.
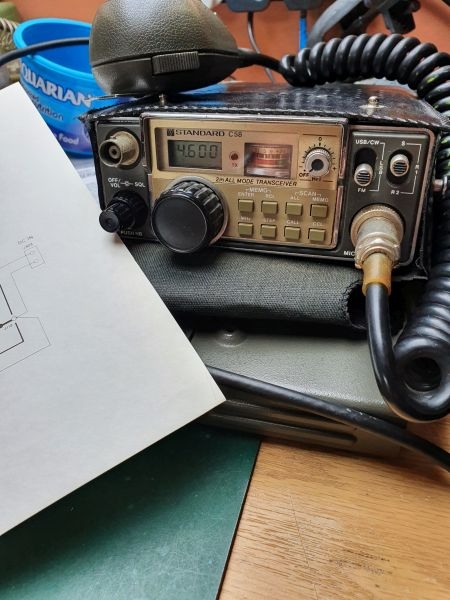
I have it set to 144.660 MHz which is in the all modes portion of the band. I am using FM modulation so I get a full carrier drive and so positive and constant switching for the amplifier.
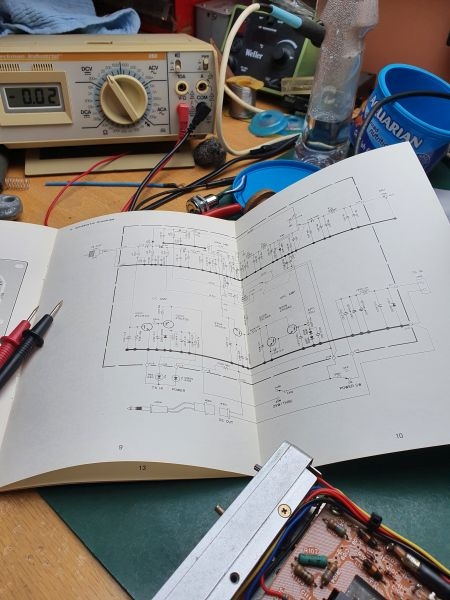
The manual has a full schematic circuit diagram.
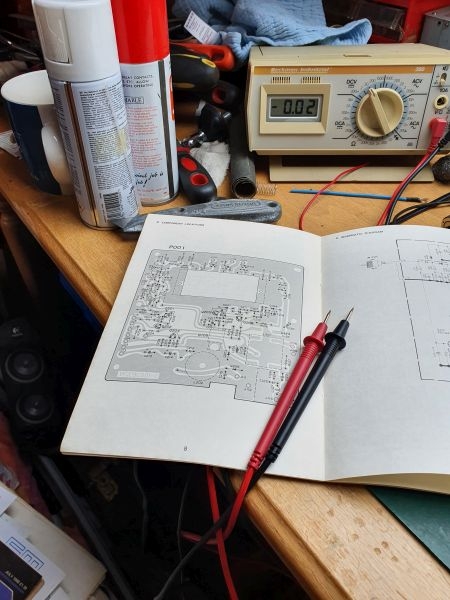
also a PCB/parts layout diagram. My Beckman DV meter in the background at the ready.
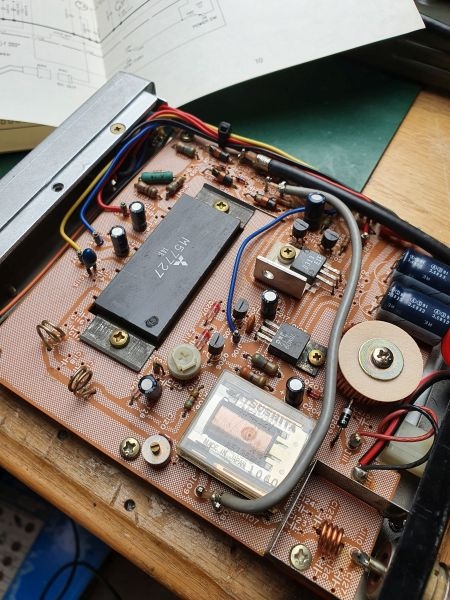
Here is a close up of the PCB. You can see that it consists of a single LSI (Large Scale Integration) IC which is a complete two stage RF amplifier IC manufactured by Mitsubishi. All the other components are standard passive as this unit pre-dates the advent of surface mount technology.
I have checked both the diode switching circuit on the input side and the relay switching on the power output side. Both are functioning perfectly. I checked all the resistors in circuit and they are all within tolerance of their nominal values, non high or open circuit. All the diodes are functional as well, all checked, resistance one way, open the other which is the characteristic of diodes. All the voltages are correct in both the receive and transmit modes. Th electrolytic capacitors can be suspect in equipment of this age but I cannot see any tell tale signs of failure. There are only 8 electrolytic's anyway. The two large ones are the smoothing for the DC supply, all the others are doing minimal decoupling roles in the design.
One thing I have noticed though is that the main IC has a small round blemish on the encapsulation of the device. You can see this quite clearly on the last image. This could be indicative of the problem. It could have developed an internal fault and overheated at some time. I can't see anything else wrong with the circuit, the APC (Automatic Power Control) feedback loop in the amplifier seems to be working. The only other bits in the amplifier are low pass filters on the input and output which are just simple standard capacitor / inductor design. These would not contribute to a distortion fault though.
My money is on the main IC which after a quick Google search is still available from a few different Ebay suppliers (all based in China). Just over £30.00 or thereabouts. Six to eight weeks on the lead time for delivery. I can't replace this little linear amplifier for a comparable model for less that £150 - £200 so a £30 IC looks very attractive. I will probably order and put my theory to the test.
I have the dummy load connected directly to the output of the amplifier. This will provide both a 50 ohm load to the amplifier and absorb the RF generated by the device without radiating a signal. The negative of my bench meter is connected to chassis and I am powering the amplifier directly from my regulated bench supply. The C58 transceiver is providing the 1W of RF drive into the amplifier.
I have it set to 144.660 MHz which is in the all modes portion of the band. I am using FM modulation so I get a full carrier drive and so positive and constant switching for the amplifier.
The manual has a full schematic circuit diagram.
also a PCB/parts layout diagram. My Beckman DV meter in the background at the ready.
Here is a close up of the PCB. You can see that it consists of a single LSI (Large Scale Integration) IC which is a complete two stage RF amplifier IC manufactured by Mitsubishi. All the other components are standard passive as this unit pre-dates the advent of surface mount technology.
I have checked both the diode switching circuit on the input side and the relay switching on the power output side. Both are functioning perfectly. I checked all the resistors in circuit and they are all within tolerance of their nominal values, non high or open circuit. All the diodes are functional as well, all checked, resistance one way, open the other which is the characteristic of diodes. All the voltages are correct in both the receive and transmit modes. Th electrolytic capacitors can be suspect in equipment of this age but I cannot see any tell tale signs of failure. There are only 8 electrolytic's anyway. The two large ones are the smoothing for the DC supply, all the others are doing minimal decoupling roles in the design.
One thing I have noticed though is that the main IC has a small round blemish on the encapsulation of the device. You can see this quite clearly on the last image. This could be indicative of the problem. It could have developed an internal fault and overheated at some time. I can't see anything else wrong with the circuit, the APC (Automatic Power Control) feedback loop in the amplifier seems to be working. The only other bits in the amplifier are low pass filters on the input and output which are just simple standard capacitor / inductor design. These would not contribute to a distortion fault though.
My money is on the main IC which after a quick Google search is still available from a few different Ebay suppliers (all based in China). Just over £30.00 or thereabouts. Six to eight weeks on the lead time for delivery. I can't replace this little linear amplifier for a comparable model for less that £150 - £200 so a £30 IC looks very attractive. I will probably order and put my theory to the test.
Ian

Re: Amateur Radio Homebrew (Shack Culture)
£30 is a reasonable 'gamble' to take. There's always the potential to sell it on if it's not that.
The tv I replaced the power board in is still OK (you helped me identify the issue). The board I bought was a used item on Fleabay, straightforward swap out with plugs and four screws.
The tv I replaced the power board in is still OK (you helped me identify the issue). The board I bought was a used item on Fleabay, straightforward swap out with plugs and four screws.
Kev
Stylish Fashion Icon.

Stylish Fashion Icon.

-
PanBiker
- Site Administrator
- Posts: 16449
- Joined: 23 Jan 2012, 13:07
- Location: Barnoldswick - In the West Riding of Yorkshire, always was, always will be.
Re: Amateur Radio Homebrew (Shack Culture)
This is a bit more involved Kev. I doesn't have many leads but as the main power stage in the amplifier it has specific heat sinking requirements. You have to get that right or it will fry itself. It's built with overkill though as the IC is capable of delivering 40W of RF drive but is only used at 25W.
Quite a bit of stripping down as well to get at the bottom of the board for the mounting.
Quite a bit of stripping down as well to get at the bottom of the board for the mounting.
Ian
-
Stanley
- Global Moderator
- Posts: 90301
- Joined: 23 Jan 2012, 12:01
- Location: Barnoldswick. Nearer to Heaven than Gloria.
Re: Amateur Radio Homebrew (Shack Culture)
Good job you aren't relying on me for help! This all above my pay grade!
Stanley Challenger Graham
Stanley's View
scg1936 at talktalk.net
"Beware of certitude" (Jimmy Reid)
The floggings will continue until morale improves!
Stanley's View
scg1936 at talktalk.net
"Beware of certitude" (Jimmy Reid)
The floggings will continue until morale improves!
-
PanBiker
- Site Administrator
- Posts: 16449
- Joined: 23 Jan 2012, 13:07
- Location: Barnoldswick - In the West Riding of Yorkshire, always was, always will be.
Re: Amateur Radio Homebrew (Shack Culture)
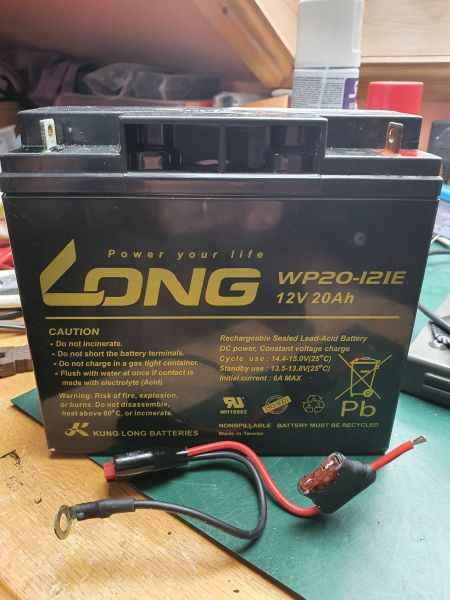
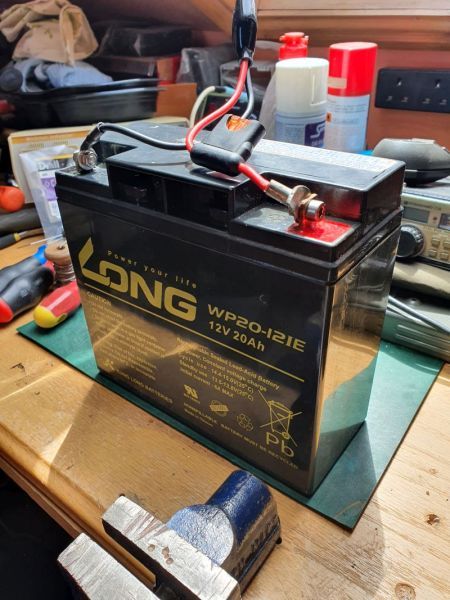
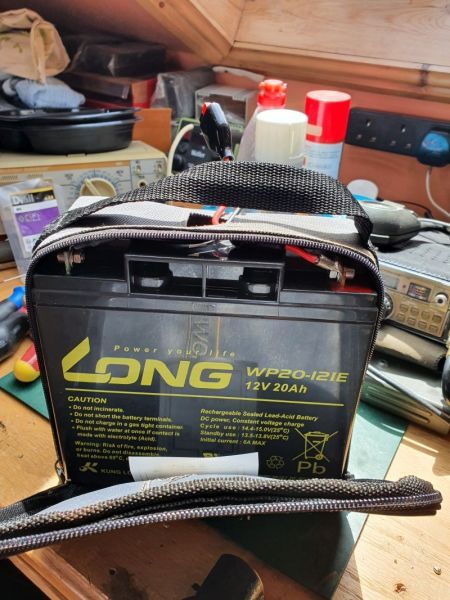
A bonus came my way the other day in the shape of a 12v 20Ah Sealed Lead Acid Battery. Previously part of a motorised golf trolley I think. Guessing at that as the wheels, motor and gearing that it came from are about 8" in diameter and only set about 6" apart. This was the portable battery stack that powered the unit. It has a plugged and fused lead attached that acts to connect its bespoke charger and doubles up as the feed connector into a corresponding socket which is part of the motor power switching. I have the charger to go with the SLAB. The battery is encased in a heavy duty rip stop zipped nylon case which has a Velcro strip on the back to fasten it to the unit. Just the lead poking out for connection or charging as required. The case has a carry handle as well. Perfect for my usage which will be to power my little C58 multi-mode transceiver and linear amplifier. Described above the linear is under repair and when operational the combination draws about 7A on 25w FM but less on SSB which is how it would be use at the top of a hill or when I am camping.
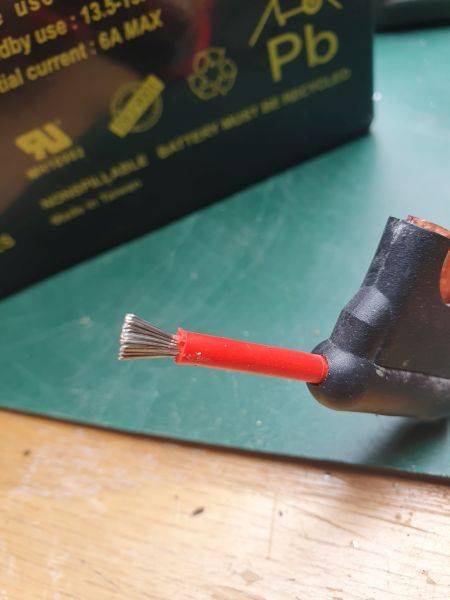
Apparently it has been sitting in garage for a couple of years. First job was to get it out of the case. The positive connection to the battery was fully rusted, the hex nut and bolt were solid so I got the drill out and drilled the head off. The corrosion had rotted the connector ring and that snapped off the lead. Here it is with the terminals cleaned up and its fused charge / feed lead in front.
I had a rummage in my crimp terminal connector box but didn't have a ring connector heavy enough for the job. I found a nice metric washer though which would do the job so I prepared the lead accordingly and fanned out the stranded lead and tinned it up. I popped the washer in the vice and gave a good filing to accept the connection.
I got my Weller soldering gun out which gives 100w of instant heat. Unfortunately the job took a downer here, no power to the Weller! No light on the iron and no heat, checked the fuse, perfectly OK so I opened it up for a poke around with the meter.
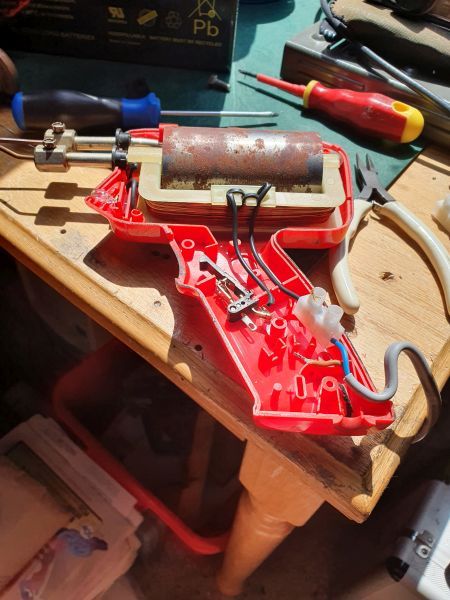
Input and out put windings tested OK on the meter so I checked continuity on the micro switch trigger in the live line. It read open circuit in both states. The micro switch is an open design and is actuated by the front trigger on the iron. I took the switch out and held it in the vice for easier access.
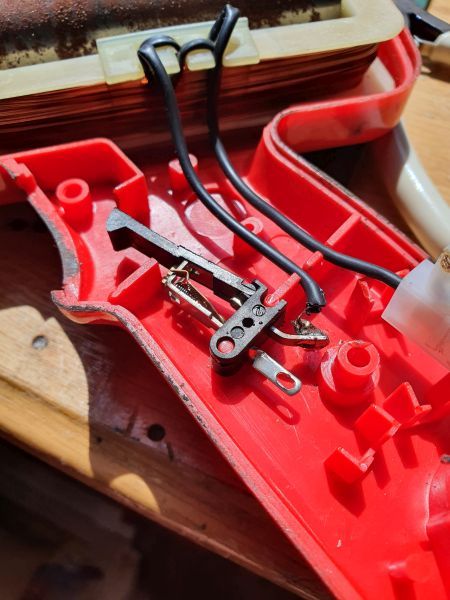
Close inspection looked like the contacts were a bit dull. I cut a very thin strip of fine emery and attempted to clean the contacts. The fixed contact was fine but when I tried the switch contact it all went belly up, there was a click and the small actuating spring in the switch pinged out and landed on the floor, (beige carpet). The spring is not even 1/4" long and was lost!
I had a good look but no joy then I remembered I have a stack of small neodymium magnets so I swept the carpet under the vice with those then spent a couple of minutes sifting through the fluff, filings and the rest of the ferrous stuff that it found. Nothing, so I swept it again and bingo! spring recovered. I cleaned up the switch contact before spending the next half hour and various attempts including losing the spring again reassembling the switch. I popped it back in, one tab in its chock block and the other with one end of the primary winding soldered directly. I tested it and I now had continuity on the switch. Job done so I reassembled it, plugged it in and it still doesn't work! I have no light on the unit so I need to have another go at that.
I shoved the largest bit I have on my Antex soldering iron and let it heat to maximum. I can get the solder to flow on the surface of the washer but it wont tin, no adhesion at all. I reckon my nice washer is nickel or some other alloy not receptive to solder. Temporary setbacks aside I thought it best to test the battery to see if it is fit for purpose.
I cant use its own charger as it needs the bespoke lead connecting to the battery. No worries, I have my motorbike battery charger which is an automatic battery analyser and charger. It can de-sulphate if required as part of the charge cycle. I handles all 12v battery types wet, dry, gel etc. I connected it up yesterday afternoon and left it to do it's stuff. I checked on it a couple of times and it cycled through its testing phase which includes a partial charge and discharge cycle. Last night before bed it had just flipped into charge mode. Checked this morning and it has fully charged with no errors so it looks like it will be a goer.
I will refit its bespoke charging / feed lead when I have sorted the positive connector. I will take the mating socket and lead and alter that so that I can connect the lead for my linear amp.
Apparently it has been sitting in garage for a couple of years. First job was to get it out of the case. The positive connection to the battery was fully rusted, the hex nut and bolt were solid so I got the drill out and drilled the head off. The corrosion had rotted the connector ring and that snapped off the lead. Here it is with the terminals cleaned up and its fused charge / feed lead in front.
I had a rummage in my crimp terminal connector box but didn't have a ring connector heavy enough for the job. I found a nice metric washer though which would do the job so I prepared the lead accordingly and fanned out the stranded lead and tinned it up. I popped the washer in the vice and gave a good filing to accept the connection.
I got my Weller soldering gun out which gives 100w of instant heat. Unfortunately the job took a downer here, no power to the Weller! No light on the iron and no heat, checked the fuse, perfectly OK so I opened it up for a poke around with the meter.
Input and out put windings tested OK on the meter so I checked continuity on the micro switch trigger in the live line. It read open circuit in both states. The micro switch is an open design and is actuated by the front trigger on the iron. I took the switch out and held it in the vice for easier access.
Close inspection looked like the contacts were a bit dull. I cut a very thin strip of fine emery and attempted to clean the contacts. The fixed contact was fine but when I tried the switch contact it all went belly up, there was a click and the small actuating spring in the switch pinged out and landed on the floor, (beige carpet). The spring is not even 1/4" long and was lost!
I had a good look but no joy then I remembered I have a stack of small neodymium magnets so I swept the carpet under the vice with those then spent a couple of minutes sifting through the fluff, filings and the rest of the ferrous stuff that it found. Nothing, so I swept it again and bingo! spring recovered. I cleaned up the switch contact before spending the next half hour and various attempts including losing the spring again reassembling the switch. I popped it back in, one tab in its chock block and the other with one end of the primary winding soldered directly. I tested it and I now had continuity on the switch. Job done so I reassembled it, plugged it in and it still doesn't work! I have no light on the unit so I need to have another go at that.
I shoved the largest bit I have on my Antex soldering iron and let it heat to maximum. I can get the solder to flow on the surface of the washer but it wont tin, no adhesion at all. I reckon my nice washer is nickel or some other alloy not receptive to solder. Temporary setbacks aside I thought it best to test the battery to see if it is fit for purpose.
I cant use its own charger as it needs the bespoke lead connecting to the battery. No worries, I have my motorbike battery charger which is an automatic battery analyser and charger. It can de-sulphate if required as part of the charge cycle. I handles all 12v battery types wet, dry, gel etc. I connected it up yesterday afternoon and left it to do it's stuff. I checked on it a couple of times and it cycled through its testing phase which includes a partial charge and discharge cycle. Last night before bed it had just flipped into charge mode. Checked this morning and it has fully charged with no errors so it looks like it will be a goer.
I will refit its bespoke charging / feed lead when I have sorted the positive connector. I will take the mating socket and lead and alter that so that I can connect the lead for my linear amp.
Ian
-
PanBiker
- Site Administrator
- Posts: 16449
- Joined: 23 Jan 2012, 13:07
- Location: Barnoldswick - In the West Riding of Yorkshire, always was, always will be.
Re: Amateur Radio Homebrew (Shack Culture)
Well one mystery solved. I opened up the Weller again and checked around with the meter. Switch working in the live side. Primary winding OK. I checked for 240V across the live and neutral lines and got a 0V reading! I metered out the live and neutral lines from the plug pins to the bare end feed points and both showed OK. Had another look in the plug and all seemed OK, fuse intact and both connections solid. Totally illogical, both lines showing continuity but no voltage at the feed? I disconnected the lines at the plug chopped about 3" of cable off and remade. Boom, sorted, I cant explain it but I have a fix.
I still cant solder to the washer so will have to find a heftier ring connector or a better washer.
I still cant solder to the washer so will have to find a heftier ring connector or a better washer.
Ian
-
PanBiker
- Site Administrator
- Posts: 16449
- Joined: 23 Jan 2012, 13:07
- Location: Barnoldswick - In the West Riding of Yorkshire, always was, always will be.
Re: Amateur Radio Homebrew (Shack Culture)
I have recovered this free socket on a short length of lead and have trimmed back a bit of the insulation on each lead and tinned them up. I have kept my linear amplifier power cable with a free end as well so I have fitted the short stub into a 20A chock block which I can then use to connect the linear feed cable. This will give a totally pluggable system and I will be able to use the bespoke charger that came with the battery system.
Ian
-
Stanley
- Global Moderator
- Posts: 90301
- Joined: 23 Jan 2012, 12:01
- Location: Barnoldswick. Nearer to Heaven than Gloria.
Re: Amateur Radio Homebrew (Shack Culture)
If you had a word I could sort the washer even if it meant making one Ian.
Stanley Challenger Graham
Stanley's View
scg1936 at talktalk.net
"Beware of certitude" (Jimmy Reid)
The floggings will continue until morale improves!
Stanley's View
scg1936 at talktalk.net
"Beware of certitude" (Jimmy Reid)
The floggings will continue until morale improves!
-
PanBiker
- Site Administrator
- Posts: 16449
- Joined: 23 Jan 2012, 13:07
- Location: Barnoldswick - In the West Riding of Yorkshire, always was, always will be.
Re: Amateur Radio Homebrew (Shack Culture)
Thanks, you might have one in your crimp connectors Stanley. The hole in the ring needs to take an M5 bolt, the one that is intact has about an M7 hole.
Ian
-
Stanley
- Global Moderator
- Posts: 90301
- Joined: 23 Jan 2012, 12:01
- Location: Barnoldswick. Nearer to Heaven than Gloria.
Re: Amateur Radio Homebrew (Shack Culture)
None that size Ian but plenty of bar stock so I can make one. I'm here if you want to call in. If not here I'll be on the bench opposite the bookies....
Stanley Challenger Graham
Stanley's View
scg1936 at talktalk.net
"Beware of certitude" (Jimmy Reid)
The floggings will continue until morale improves!
Stanley's View
scg1936 at talktalk.net
"Beware of certitude" (Jimmy Reid)
The floggings will continue until morale improves!
-
PanBiker
- Site Administrator
- Posts: 16449
- Joined: 23 Jan 2012, 13:07
- Location: Barnoldswick - In the West Riding of Yorkshire, always was, always will be.
Re: Amateur Radio Homebrew (Shack Culture)
I will try and pop round in the morning Stanley. I have to open up the Bosom Friends shop at at around 09.50 for the volunteers. I will check the benches first as I come off Albert Road. I will put the lead with the other ring fastener so that you can see the rabbit.
Ian
-
Stanley
- Global Moderator
- Posts: 90301
- Joined: 23 Jan 2012, 12:01
- Location: Barnoldswick. Nearer to Heaven than Gloria.
Re: Amateur Radio Homebrew (Shack Culture)
Come to East Hill Ian. I'll wait until you come.... We'll sort something out.
Stanley Challenger Graham
Stanley's View
scg1936 at talktalk.net
"Beware of certitude" (Jimmy Reid)
The floggings will continue until morale improves!
Stanley's View
scg1936 at talktalk.net
"Beware of certitude" (Jimmy Reid)
The floggings will continue until morale improves!
-
PanBiker
- Site Administrator
- Posts: 16449
- Joined: 23 Jan 2012, 13:07
- Location: Barnoldswick - In the West Riding of Yorkshire, always was, always will be.
Re: Amateur Radio Homebrew (Shack Culture)
Been round to Stanley's and the treasure chest has yielded the desired fastener, I had no doubt that it would.  I will pop a picture up when I have finished the job.
Ian
Re: Amateur Radio Homebrew (Shack Culture)
Kev
Stylish Fashion Icon.
Stylish Fashion Icon.
-
Stanley
- Global Moderator
- Posts: 90301
- Joined: 23 Jan 2012, 12:01
- Location: Barnoldswick. Nearer to Heaven than Gloria.
Re: Amateur Radio Homebrew (Shack Culture)
And they didn't just happen. Years of collecting and looking after stuff. It can sit there twenty years and then suddenly save the day.... I must have got those Ripault connectors in about 1970 so those two little buggers sat there for over 50 years waiting for Ian to make the call.... 

Stanley Challenger Graham
Stanley's View
scg1936 at talktalk.net
"Beware of certitude" (Jimmy Reid)
The floggings will continue until morale improves!
Stanley's View
scg1936 at talktalk.net
"Beware of certitude" (Jimmy Reid)
The floggings will continue until morale improves!
-
PanBiker
- Site Administrator
- Posts: 16449
- Joined: 23 Jan 2012, 13:07
- Location: Barnoldswick - In the West Riding of Yorkshire, always was, always will be.
Re: Amateur Radio Homebrew (Shack Culture)
Just finalised the portable battery system.
It's a very tight fit in the case.
Complete with modified plugable output stub to a 20A terminal block for easy hookup to my 2M linear amplifier.
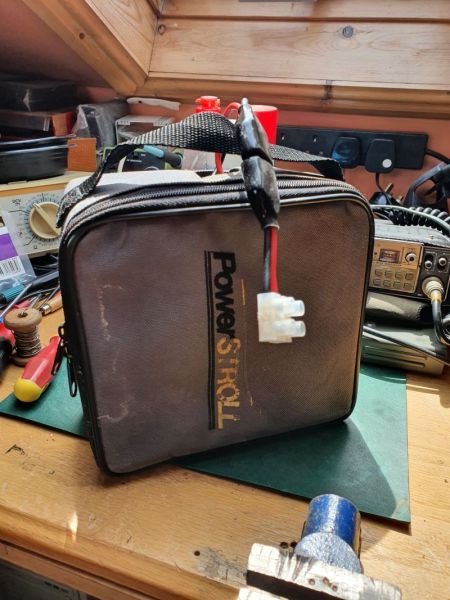
It's good to bring some 50 year old spares back into use as well.
It's a very tight fit in the case.
Complete with modified plugable output stub to a 20A terminal block for easy hookup to my 2M linear amplifier.
It's good to bring some 50 year old spares back into use as well.
Ian
-
Stanley
- Global Moderator
- Posts: 90301
- Joined: 23 Jan 2012, 12:01
- Location: Barnoldswick. Nearer to Heaven than Gloria.
Re: Amateur Radio Homebrew (Shack Culture)
"It's good to bring some 50 year old spares back into use as well"
A lot of my stock, particularly the non-ferocious, is a lot older than that. It has to get very small and manky before I scrap anything!
A lot of my stock, particularly the non-ferocious, is a lot older than that. It has to get very small and manky before I scrap anything!
Stanley Challenger Graham
Stanley's View
scg1936 at talktalk.net
"Beware of certitude" (Jimmy Reid)
The floggings will continue until morale improves!
Stanley's View
scg1936 at talktalk.net
"Beware of certitude" (Jimmy Reid)
The floggings will continue until morale improves!