SHED MATTERS 2
-
PanBiker

- Site Administrator

- Posts: 16488
- Joined: 23 Jan 2012, 13:07
- Location: Barnoldswick - In the West Riding of Yorkshire, always was, always will be.
Re: SHED MATTERS 2
Indeed I do Stanley and many thanks for that and your piecework this morning, I can press on now. What's betting my blowlamp turns up as well! I will put the evidence of your handiwork up in the AR thread when I have furthered the build a bit more.
Ian
-
Stanley

- Global Moderator

- Posts: 90439
- Joined: 23 Jan 2012, 12:01
- Location: Barnoldswick. Nearer to Heaven than Gloria.
Re: SHED MATTERS 2
Nice to be useful...... even at my age!
Stanley Challenger Graham
Stanley's View
scg1936 at talktalk.net
"Beware of certitude" (Jimmy Reid)
The floggings will continue until morale improves!
Stanley's View
scg1936 at talktalk.net
"Beware of certitude" (Jimmy Reid)
The floggings will continue until morale improves!
-
Stanley
- Global Moderator
- Posts: 90439
- Joined: 23 Jan 2012, 12:01
- Location: Barnoldswick. Nearer to Heaven than Gloria.
Re: SHED MATTERS 2
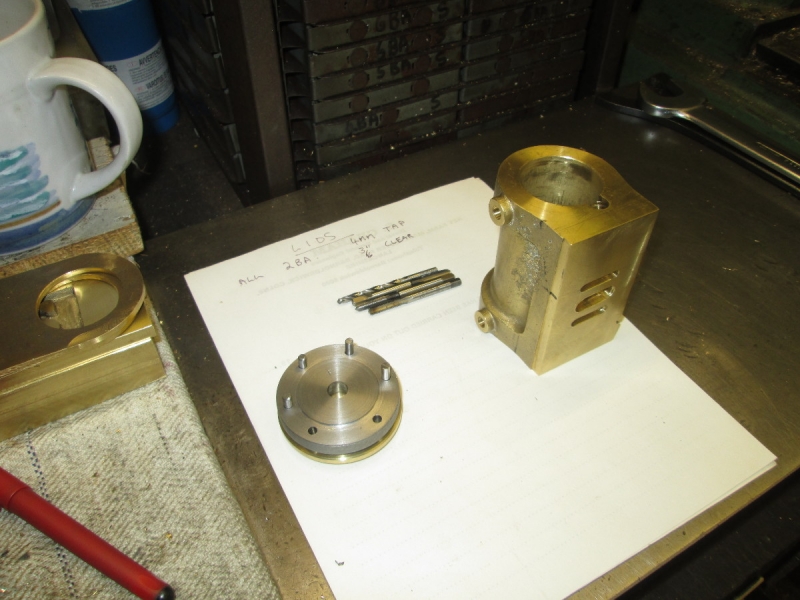
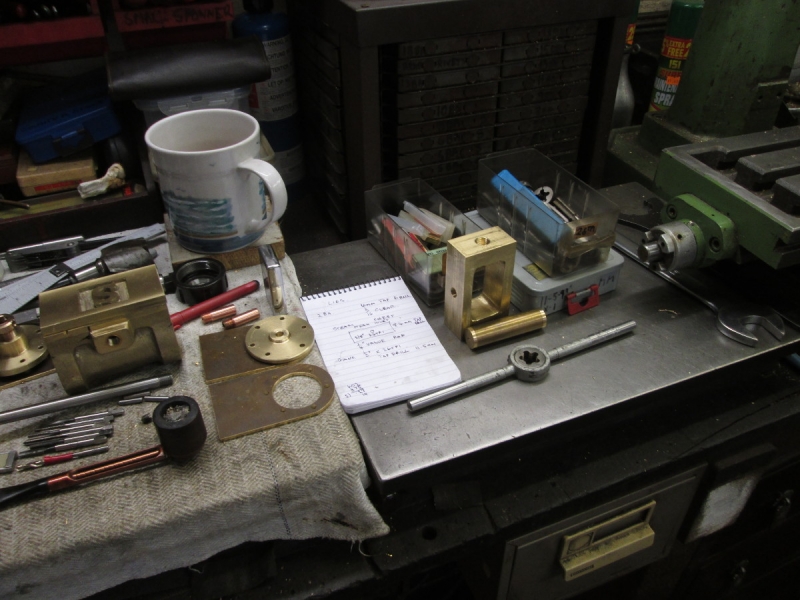
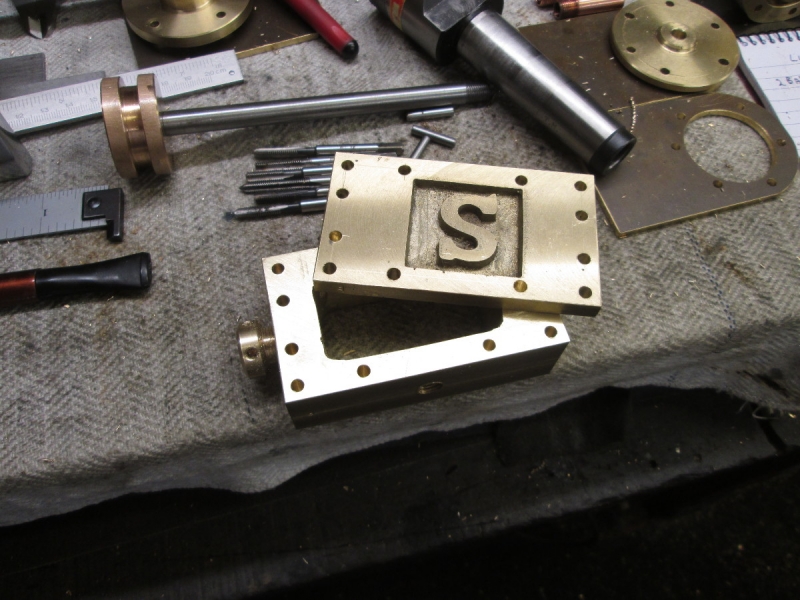
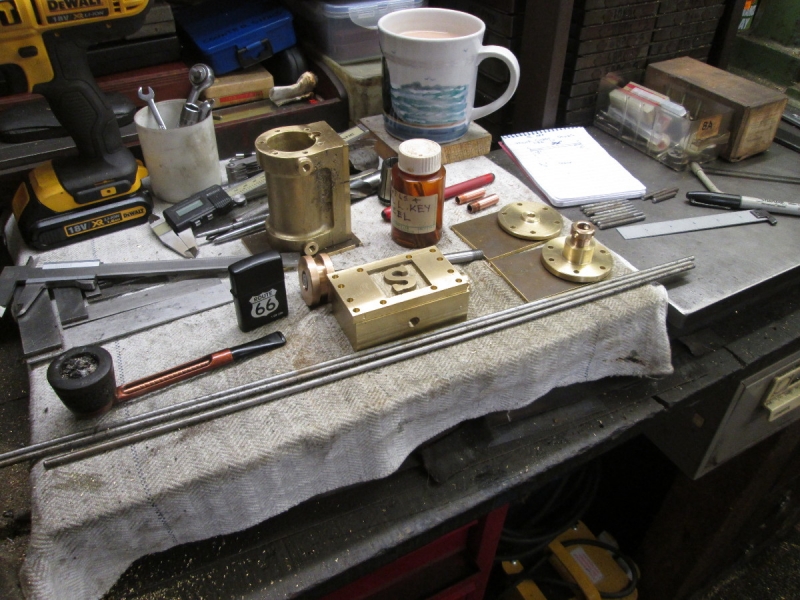
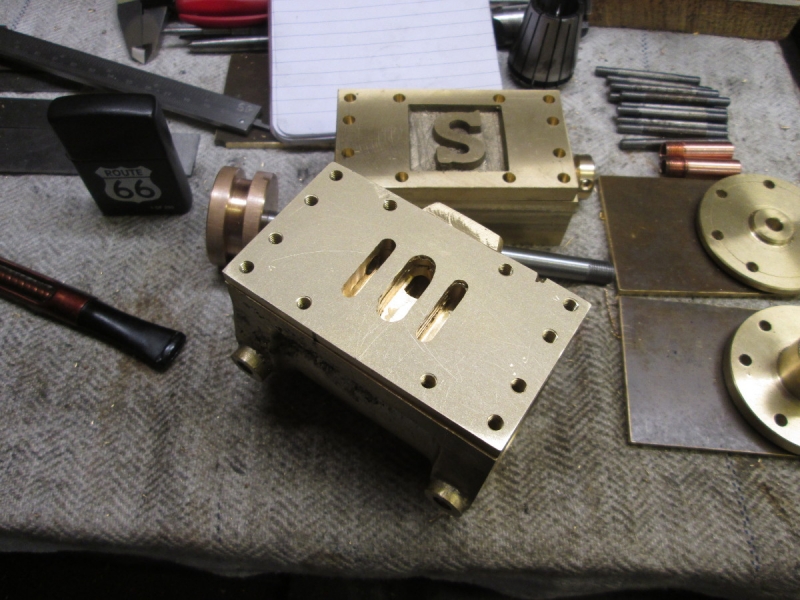
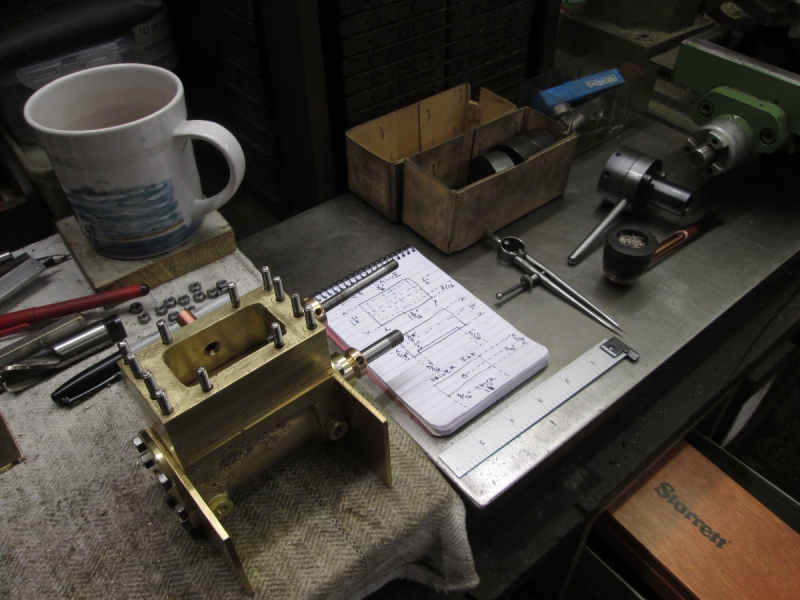
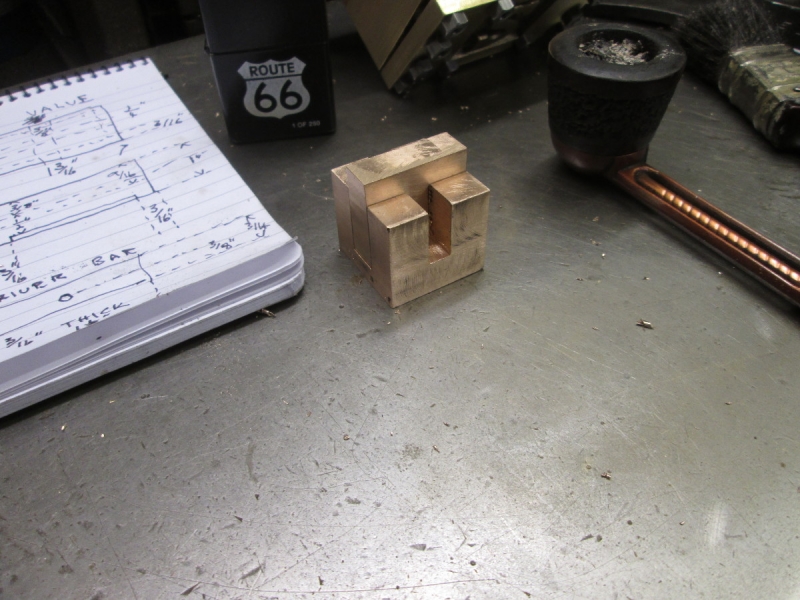
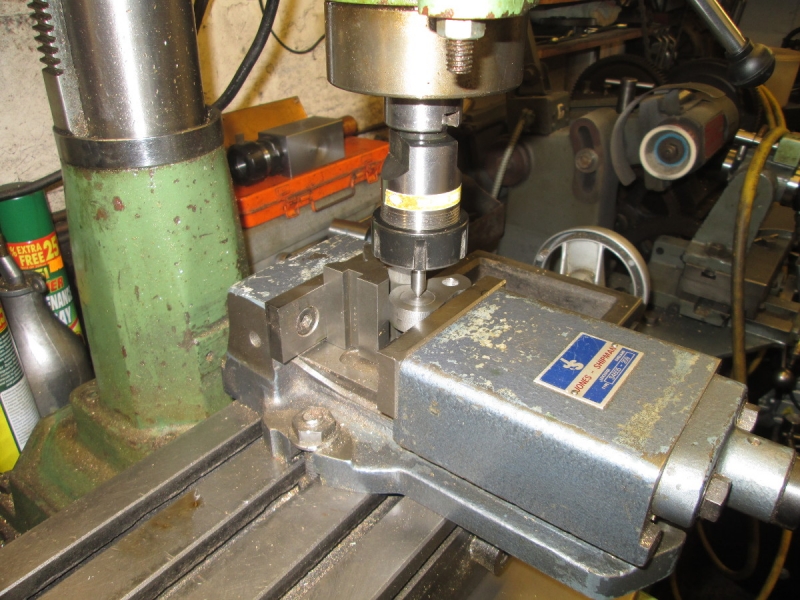
Today is holes in lids..... First thing was to check everything to make sure my memory was serving me well. 2BA set screws it is so check the tapping drill size and get that out then find my 2BA taps, start second and bottoming. Then I got my dowels out that fit the tapping size holes so I have them handy for making sure nothing has slipped, I've fallen into that trap before now.
I scratched a PCD on the first lid, a bit superfluous but belt and braces!
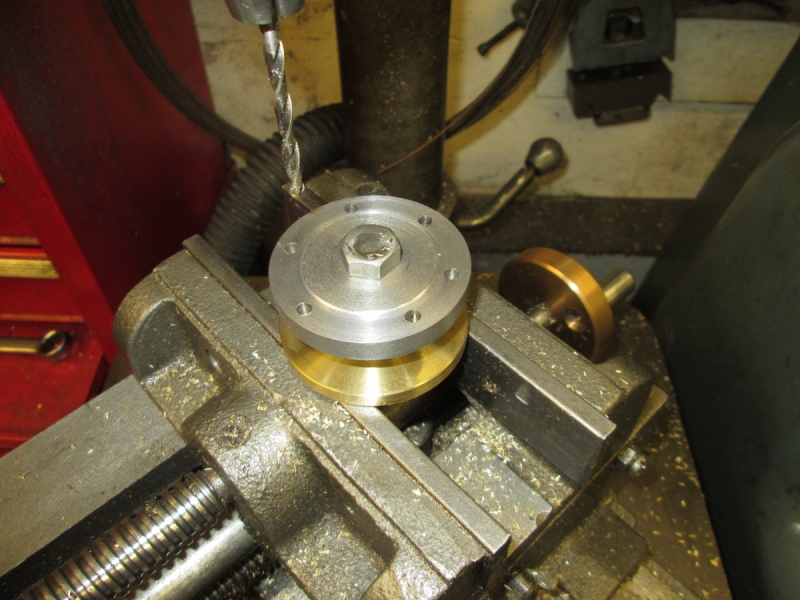
First job after yet another check was to make sure I had the template the right way round and then drill the back lid tapping size on the hole pattern. Remember that the PCD is staggered so I can miss the drain hole tappings. Easy to make a mistake!
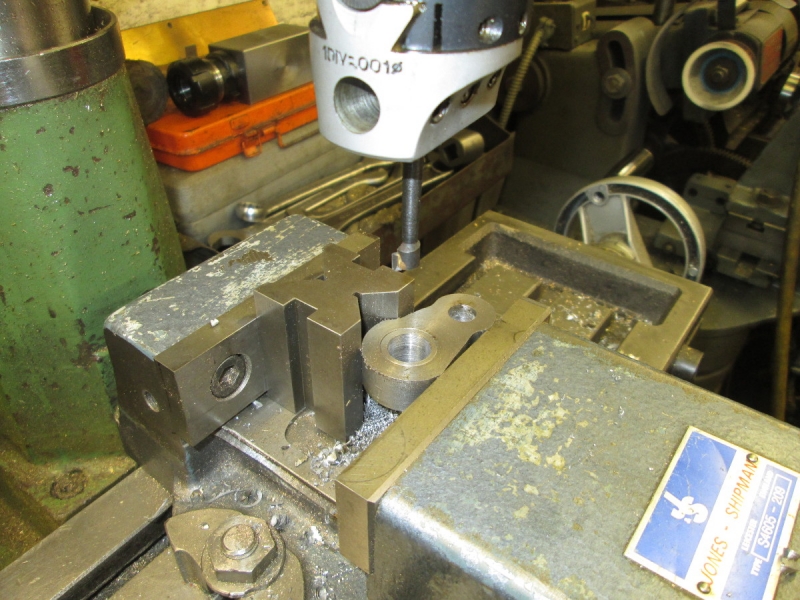
The back lid drilled ready to be used as a template.
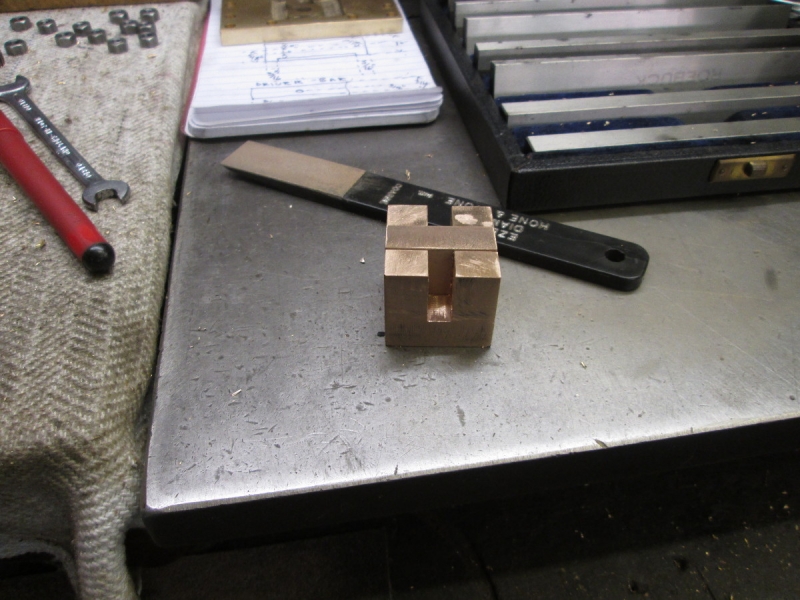
The front lid was easier because it has the 3/8" hole in it so I could bolt the template firmly to the lid.

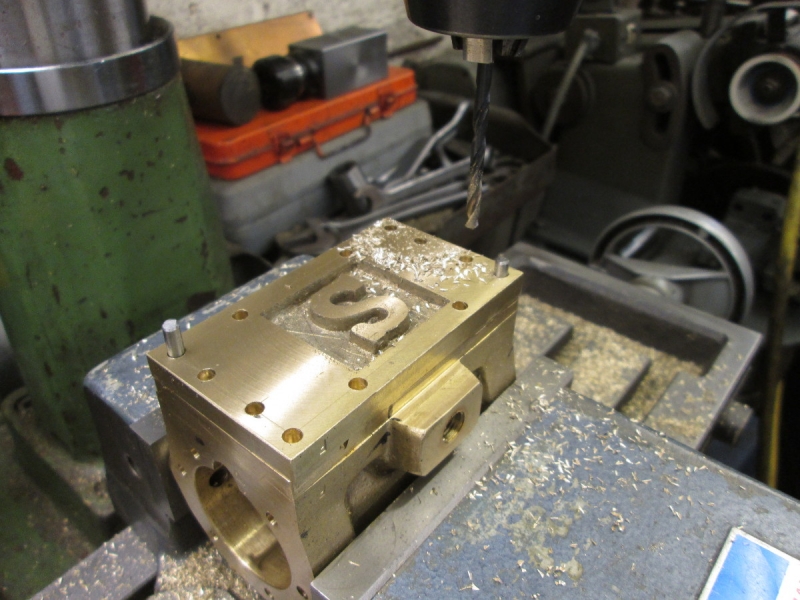
Transferring the hole pattern to the cylinder and support. Easy to do once it was all properly lined up because it can be clamped by a 3/8" cap screw. Once again check and re-check the pattern alignment!
That's all fine but now I had the problem of doing the back lid transfer. I thought about it a lot because it was so difficult to clamp with no hole in it.
I decided to go down the safe route and clamp the lid and support with a 1/4" cap bolt. I made a plate tapped 1/4" Whitworth and drilled a 1/4" hole in the lid, I'll bother about filling the hole later....

I had to turn the cap of the bolt down as it was a touch short but here we are set up firmly under the drill ready for drilling the hole pattern. It was knocking off time so I'll do that tomorrow.
Stanley Challenger Graham
Stanley's View
scg1936 at talktalk.net
"Beware of certitude" (Jimmy Reid)
The floggings will continue until morale improves!
Stanley's View
scg1936 at talktalk.net
"Beware of certitude" (Jimmy Reid)
The floggings will continue until morale improves!
-
Stanley
- Global Moderator
- Posts: 90439
- Joined: 23 Jan 2012, 12:01
- Location: Barnoldswick. Nearer to Heaven than Gloria.
Re: SHED MATTERS 2
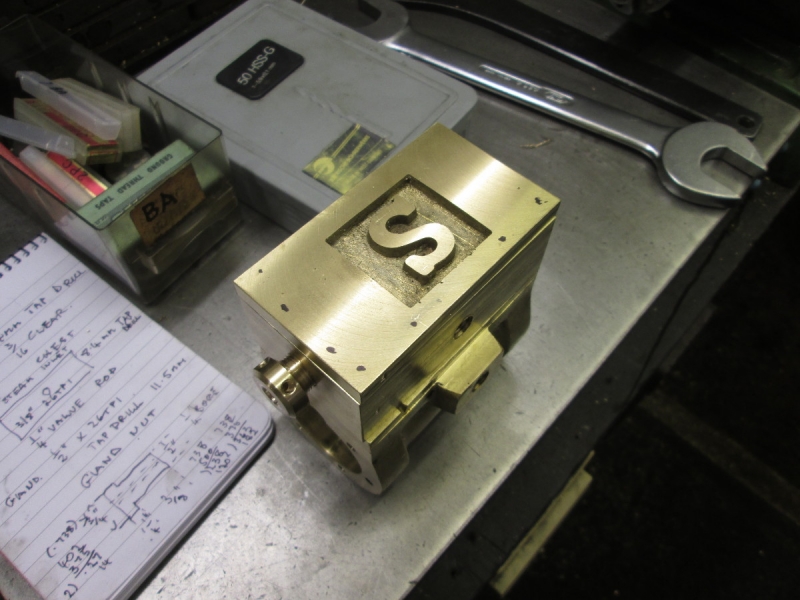
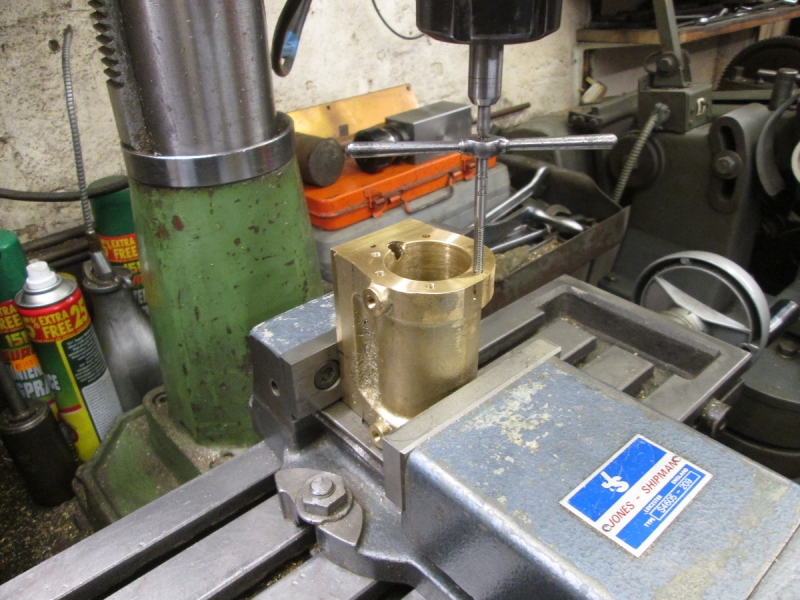
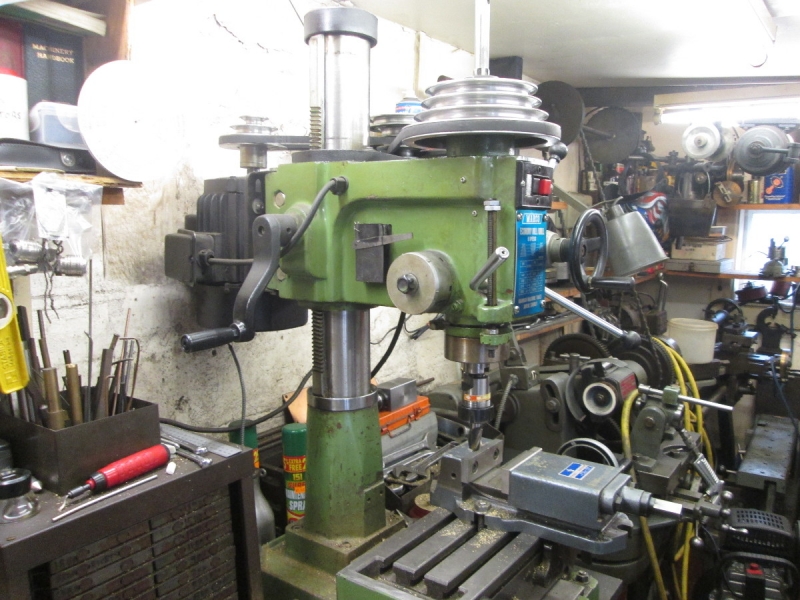
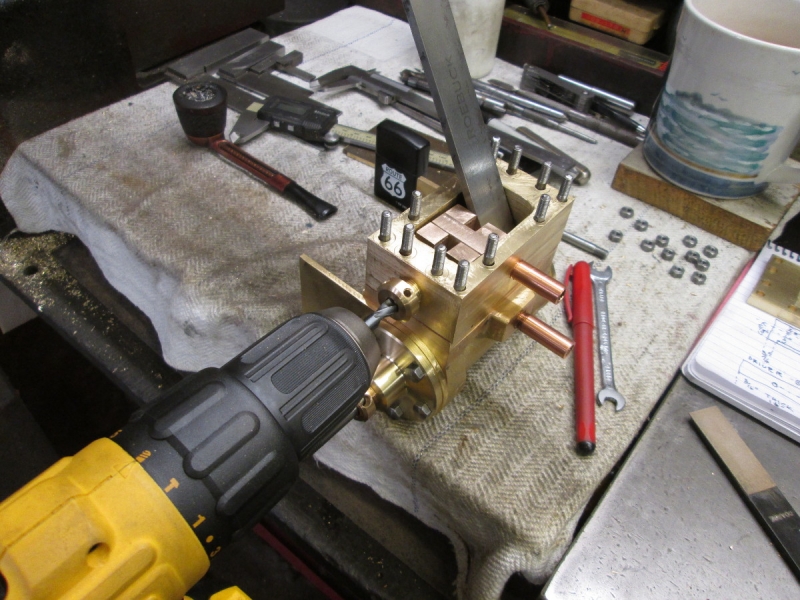
Straight into the next set of tapping holes using my high-tech depth gauge.
Decision time, do I start tapping the holes I have already drilled or prepare the valve chest and lid for drilling? I decided on the latter. That being the case I need to address the small matter of the steam inlet and the valve rod gland as it's best if they are done first. Remember that my stud holes have to miss these.....
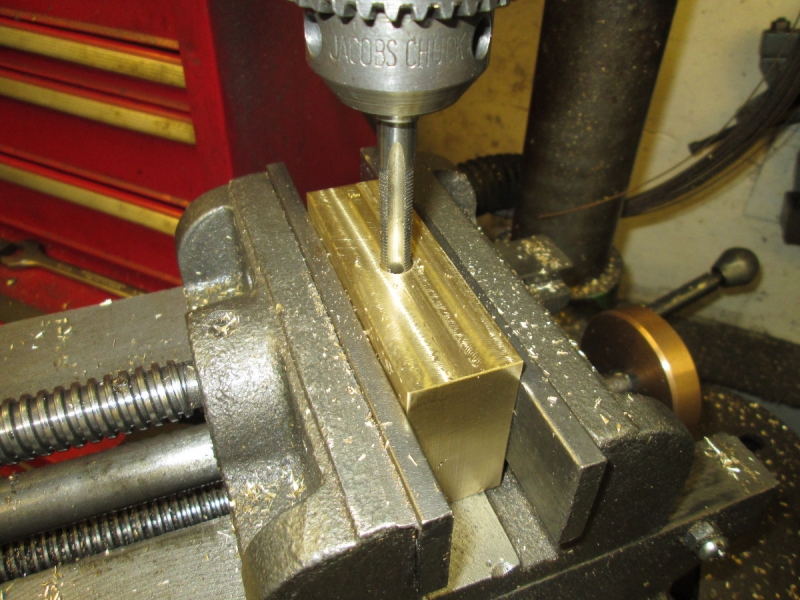
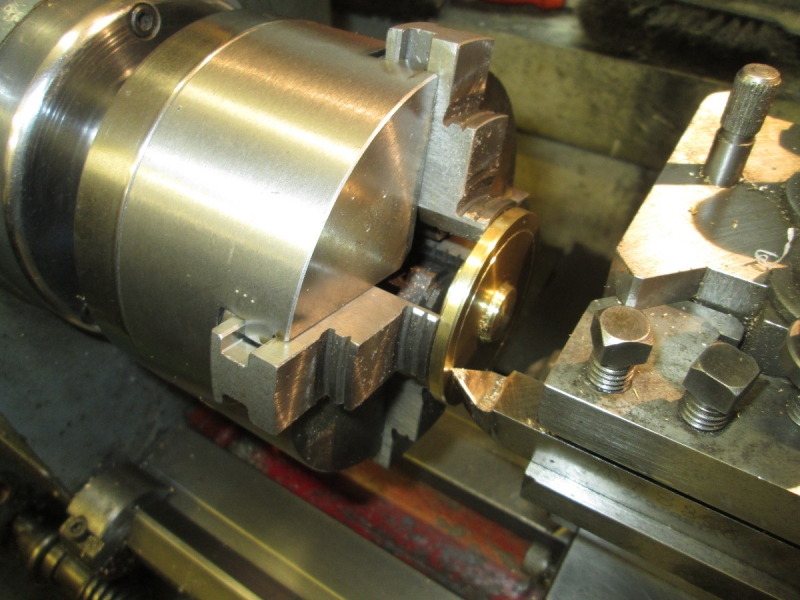
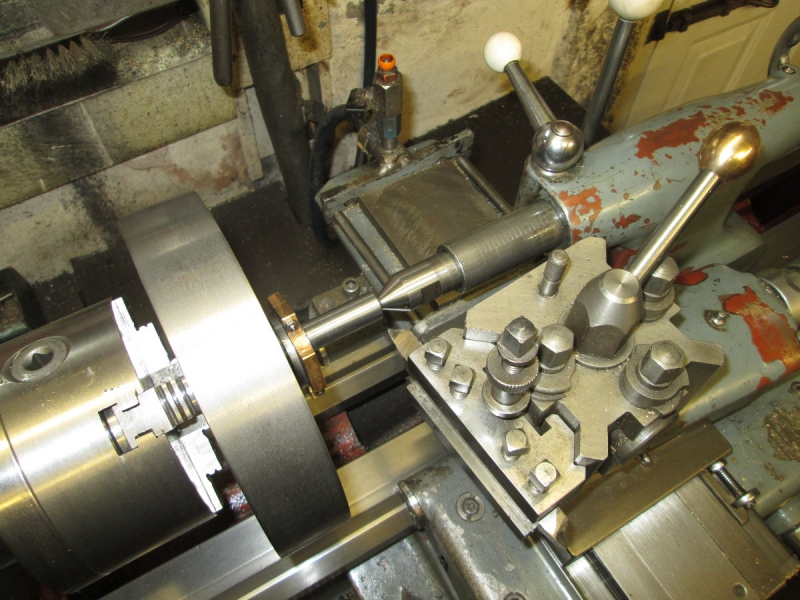
The steam inlet first, 3/8" X 26tpi same as the exhaust. I'll make the stub pipe as well.
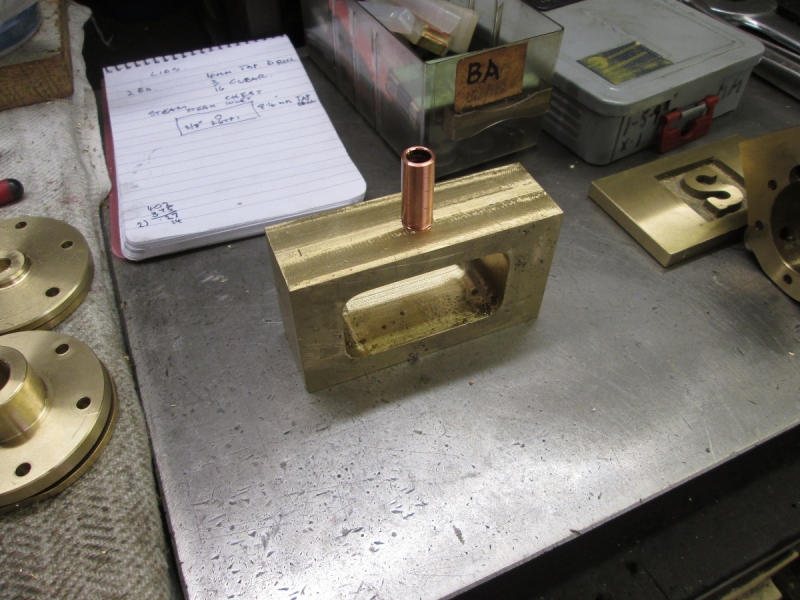
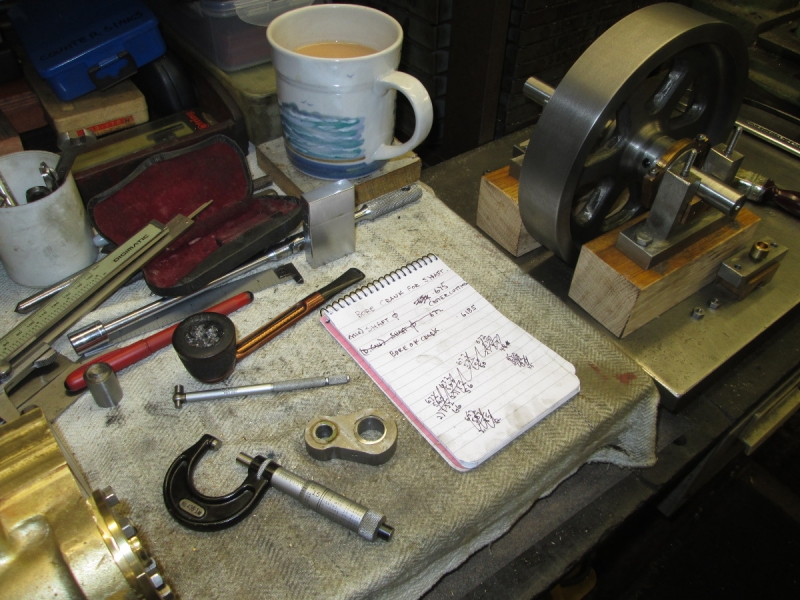
That looks nice.... By the way, I have been considering buying a small notebook for my fag packet drawings, I've run out of old small pads. This morning I found this as I was on my dog walk.... God moves in a mysterious way.

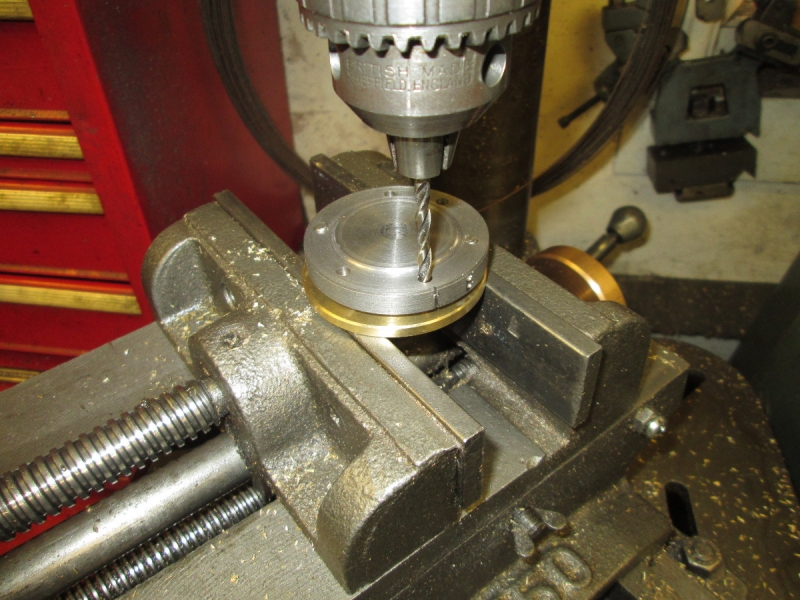
Next job was to make absolutely sure I had my castings the right way round and mark up for the valve rod gland.
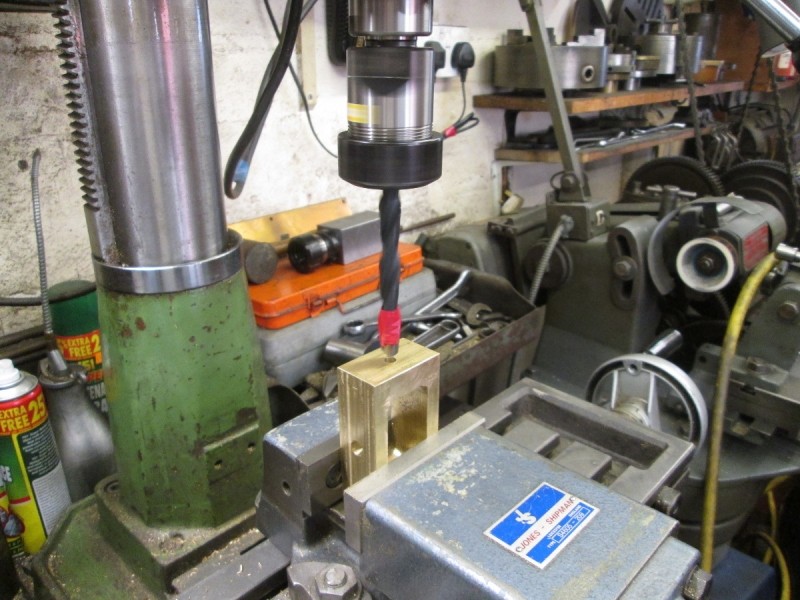
Not enough height under the pillar drill for the tapping drill so into the VM and deploy the depth gauge again. Then I tapped it 1/2" X 26tpi on the same setting.
I need the gland nut now. I sorted out a piece of bronze bar and found my 1/2" die. I am ready to make it tomorrow. Now for some housework......
Oh, By the way, when I finished drilling the holes for the lids I put a witness mark on the lid and the support so I get them the right way round. Being a staggered PCD means that I can't get them wrong but it makes for faster working......
Stanley Challenger Graham
Stanley's View
scg1936 at talktalk.net
"Beware of certitude" (Jimmy Reid)
The floggings will continue until morale improves!
Stanley's View
scg1936 at talktalk.net
"Beware of certitude" (Jimmy Reid)
The floggings will continue until morale improves!
-
Stanley
- Global Moderator
- Posts: 90439
- Joined: 23 Jan 2012, 12:01
- Location: Barnoldswick. Nearer to Heaven than Gloria.
Re: SHED MATTERS 2

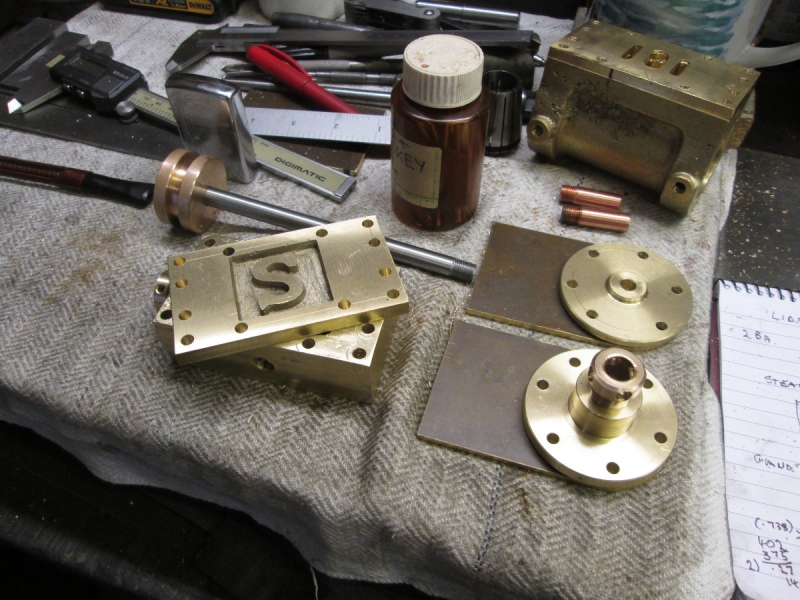
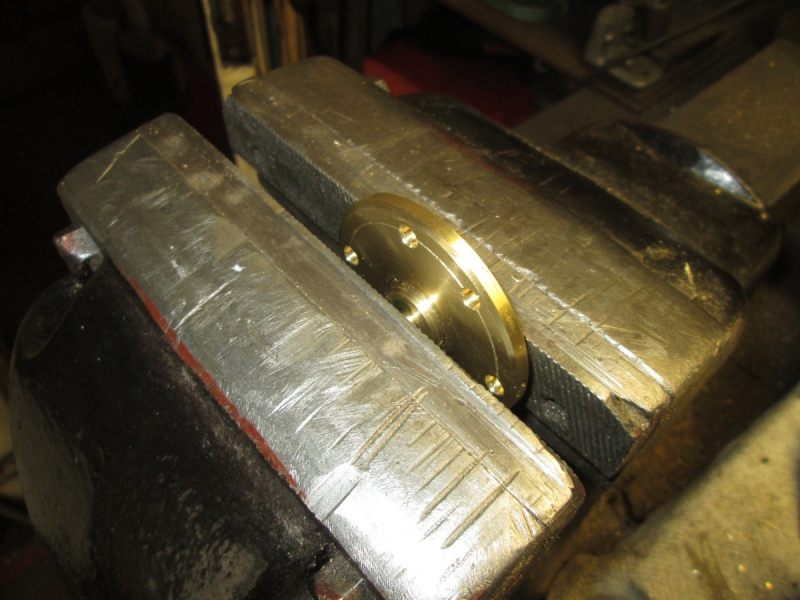
I started the day by making the valve rod gland nut. Here's the collet block being used again. Time well spent making it!

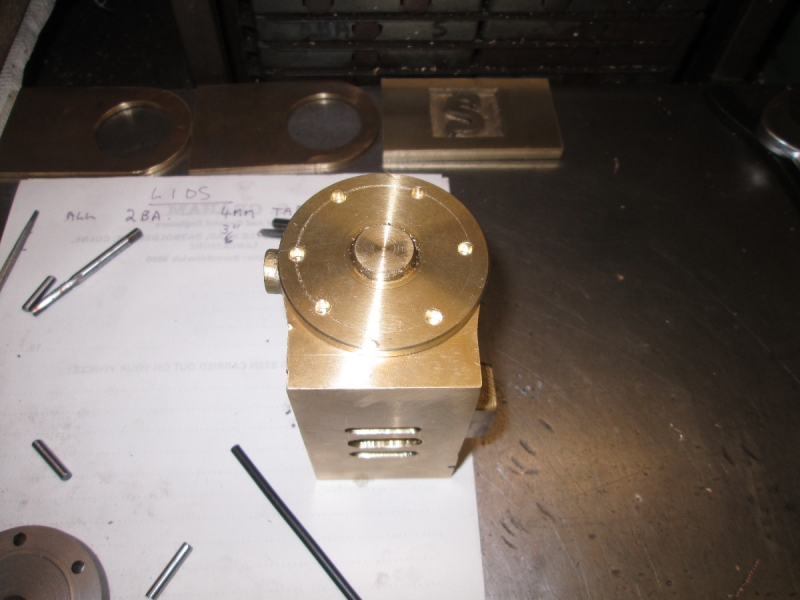
Another little stage completed, we now have a gland and nut!
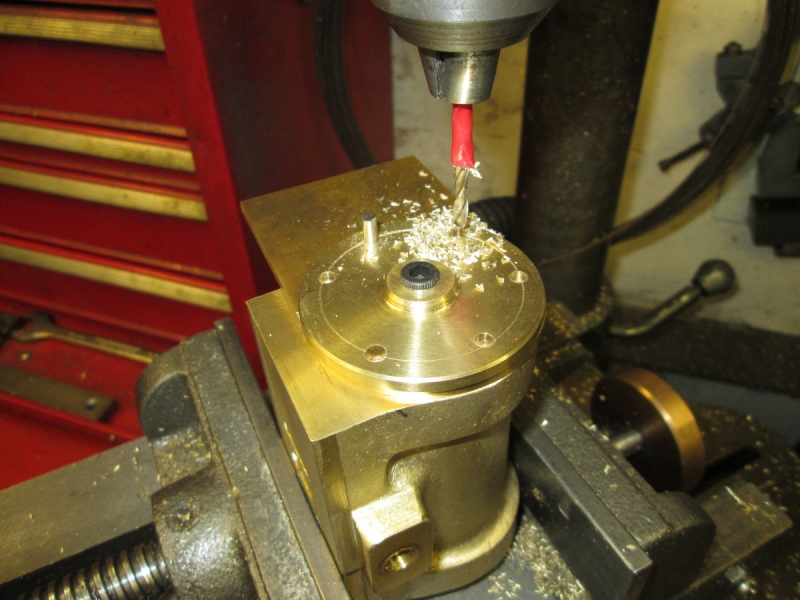
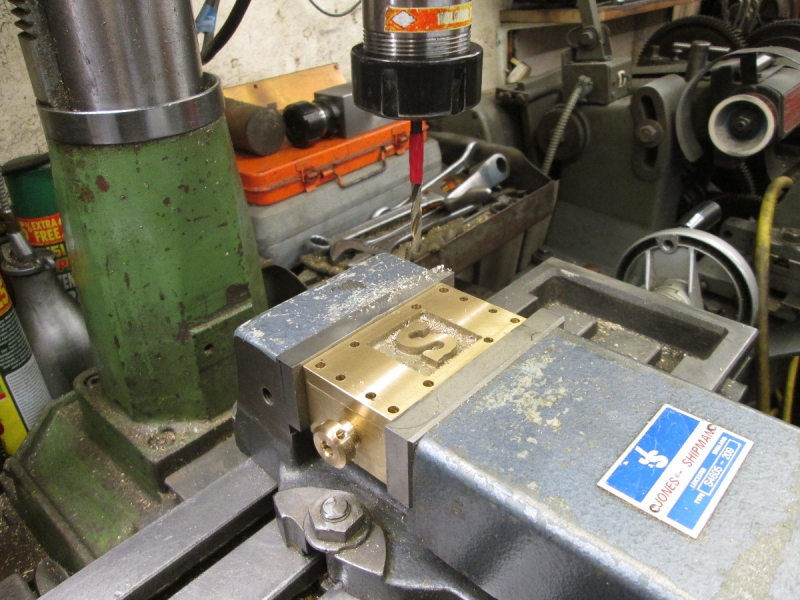
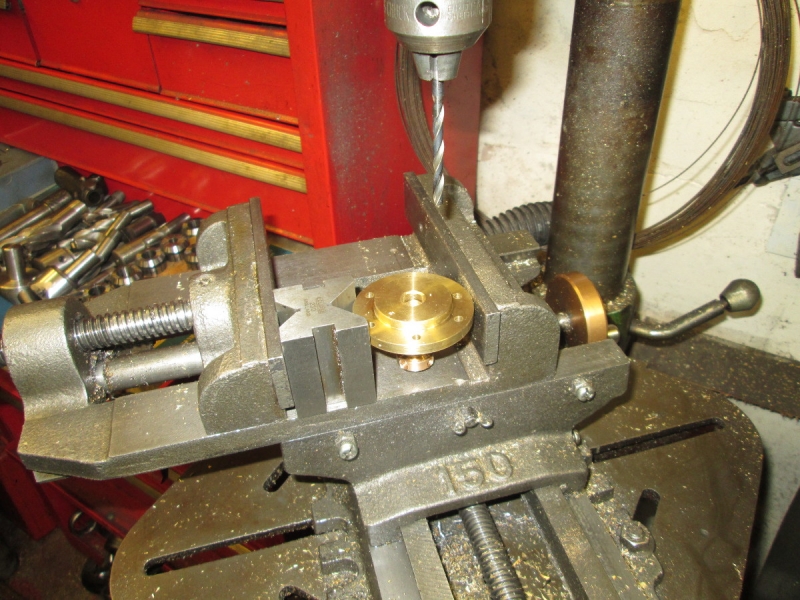
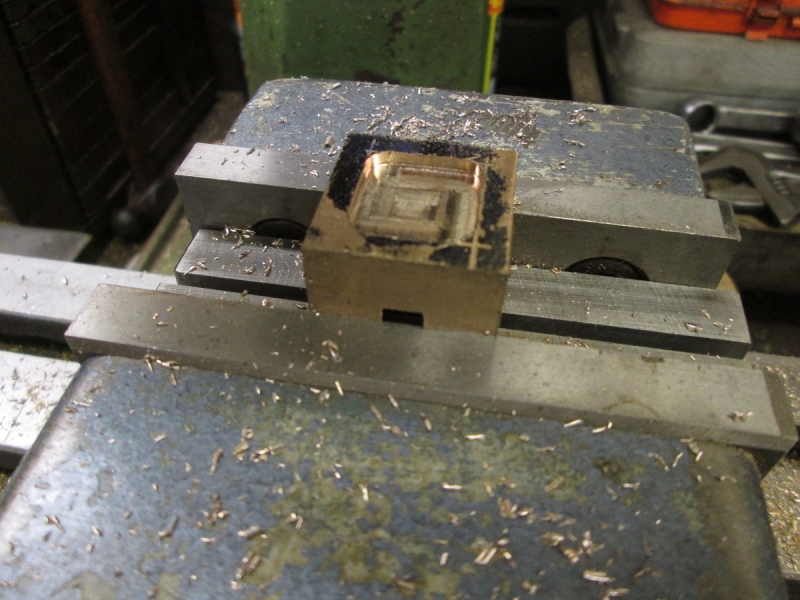
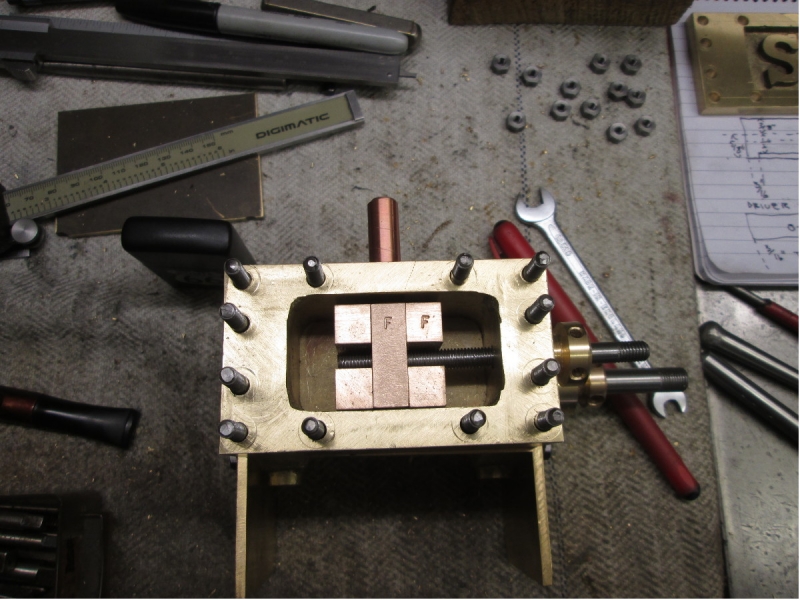
The next job is more tapping holes! This time in the valve face. First job was to make sure of the location so as to miss the steam inlet and the valve rod gland. I just dotted the positions with a sharpie and then laid them out properly in the right positions. Then some punch marks!
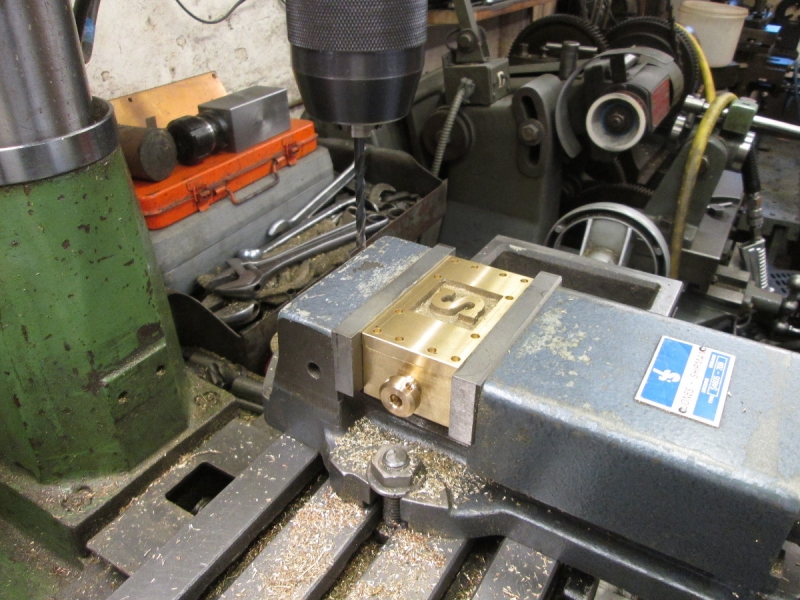
I'm going to be doing a lot of drilling and tapping so I set the keyless chuck up in the VM, put the speed up and set the depth gauge so that my hole finished up 1/4" shy of breaking through and marking the vise. It will be no trouble to complete these holes when I drill the valve chest for clearance. It's the lid that's the template.
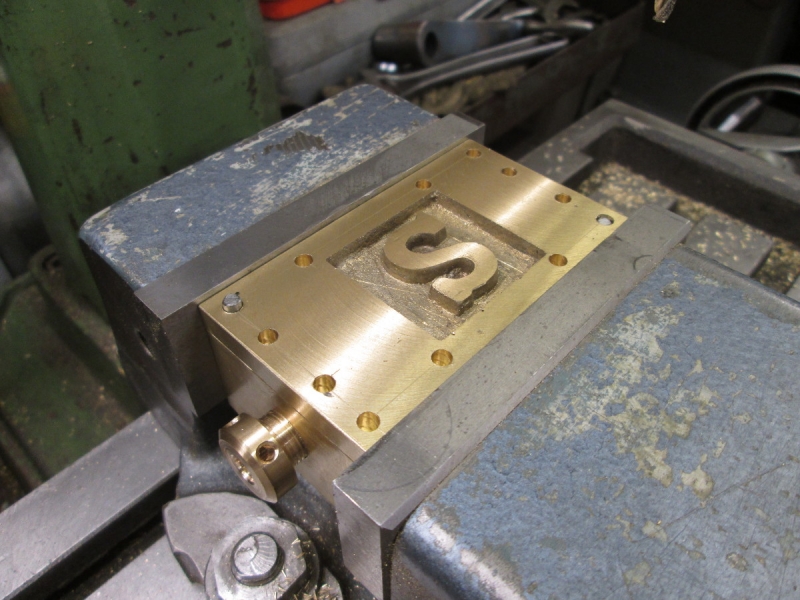
Belt and braces time, the lid and the chest can't be exactly the same size so to make sure that nothing shifts I drilled two corner holes first 1/2" deep and popped a dowel into them. I'll take them to full depth later when I have bored the rest.
Here we are a bit later. Remember that in the interests of accuracy all this drilling is tapping size. Clearance boring where appropriate comes later.
Now to use the lid as a template and drill the actual tapping holes in the valve face. Obviously the lid is loose but again I drilled the two opposite corners (with the depth gauge set to give the right depth on all the holes) and popped two tight fitting dowels in.
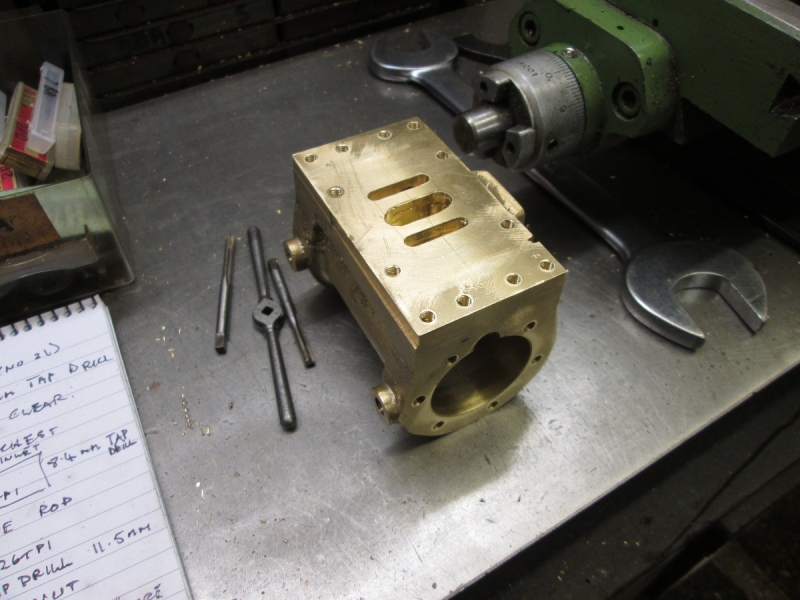
Knocking off time and we have more holes than a Swiss cheese but all in the right place and the right depth. I think the next job is to tap all the holes for the valve chest and the lids. Might as well get that out of the way!
Stanley Challenger Graham
Stanley's View
scg1936 at talktalk.net
"Beware of certitude" (Jimmy Reid)
The floggings will continue until morale improves!
Stanley's View
scg1936 at talktalk.net
"Beware of certitude" (Jimmy Reid)
The floggings will continue until morale improves!
-
Stanley
- Global Moderator
- Posts: 90439
- Joined: 23 Jan 2012, 12:01
- Location: Barnoldswick. Nearer to Heaven than Gloria.
Re: SHED MATTERS 2
I forgot to say, I'll be absent off parade tomorrow as I'll be having my trip on the Fellsman.....
Stanley Challenger Graham
Stanley's View
scg1936 at talktalk.net
"Beware of certitude" (Jimmy Reid)
The floggings will continue until morale improves!
Stanley's View
scg1936 at talktalk.net
"Beware of certitude" (Jimmy Reid)
The floggings will continue until morale improves!
-
Stanley
- Global Moderator
- Posts: 90439
- Joined: 23 Jan 2012, 12:01
- Location: Barnoldswick. Nearer to Heaven than Gloria.
Re: SHED MATTERS 2
We had a wonderful day in all respects. I am having an easy day today. Might pop into the shed later and do a bit of gentle tapping.....
Later.... I got in the shed at 9AM and started by having a chip chase. They tread all over the house!

You might remember me making a tap follower a while ago. I keep forgetting I have it and this is the first time I have used it. I used the point to locate the centre and then tapped each hole, second tap and bottoming.
I knocked off at the usual time.... I have all six holes in this end finished and checked. Easy peasy and of course accurate and in line. I shall carry on tomorrow....... Not earth shaking but a nice morning.
Later.... I got in the shed at 9AM and started by having a chip chase. They tread all over the house!
You might remember me making a tap follower a while ago. I keep forgetting I have it and this is the first time I have used it. I used the point to locate the centre and then tapped each hole, second tap and bottoming.
I knocked off at the usual time.... I have all six holes in this end finished and checked. Easy peasy and of course accurate and in line. I shall carry on tomorrow....... Not earth shaking but a nice morning.
Stanley Challenger Graham
Stanley's View
scg1936 at talktalk.net
"Beware of certitude" (Jimmy Reid)
The floggings will continue until morale improves!
Stanley's View
scg1936 at talktalk.net
"Beware of certitude" (Jimmy Reid)
The floggings will continue until morale improves!
-
Stanley
- Global Moderator
- Posts: 90439
- Joined: 23 Jan 2012, 12:01
- Location: Barnoldswick. Nearer to Heaven than Gloria.
Re: SHED MATTERS 2
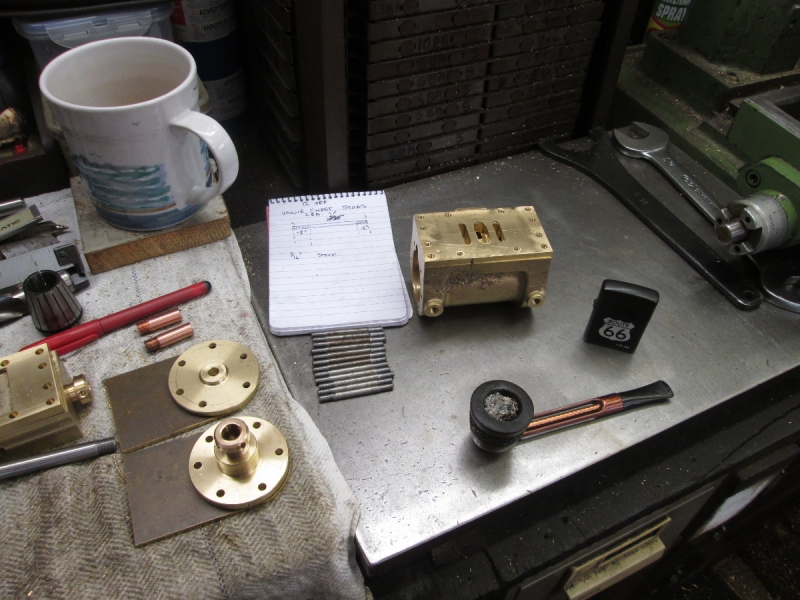
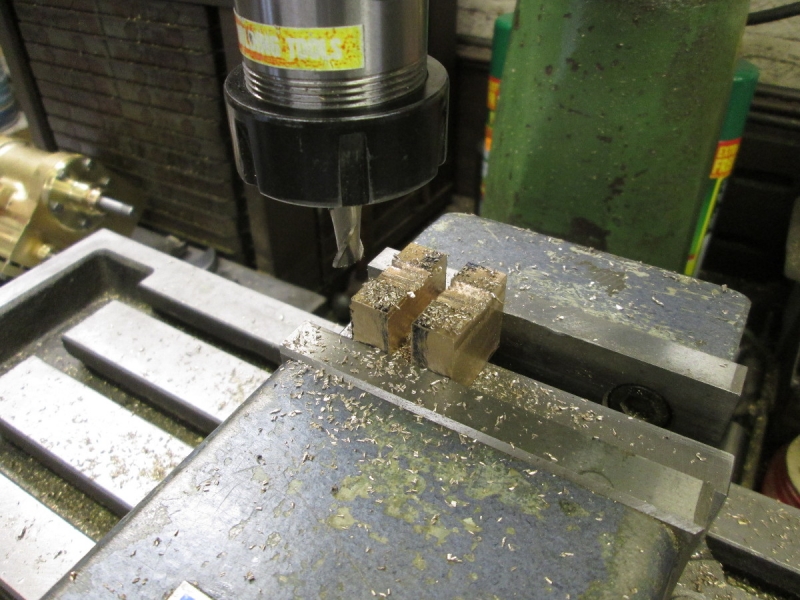
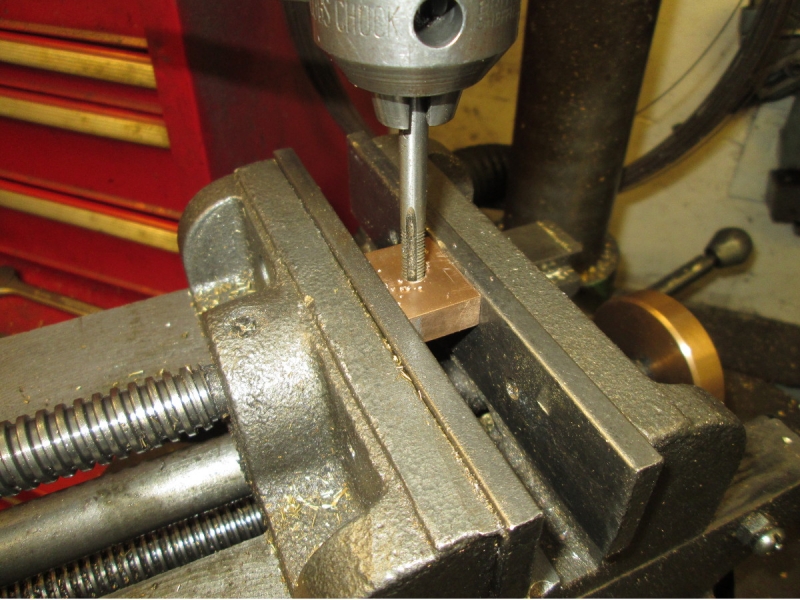
In the shed at 07:00 and straight back into tapping 2BA holes in the cylinder. All done with a second cut and finishing with a bottoming tap.
It took about 80 minutes repetition work to get to this stage. All the stud holes tapped.
Next job is to open all the holes in the valve chest, lid, cylinder covers and the supports to clearance size for the studs and set screws. Notice the depth stop to avoid drilling all the way through and marking the vise. I popped a dowel in two opposing corners just to make sure I didn't lose alignment.
I finished the holes in the valve chest with the DeWalt drill. No problems with alignment of course.
Same with the lids and supports but easier under the pillar drill.
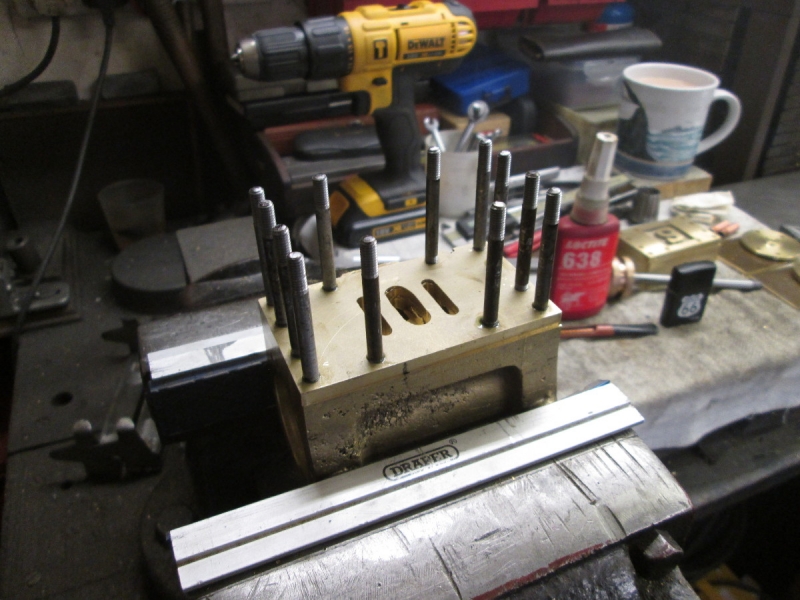
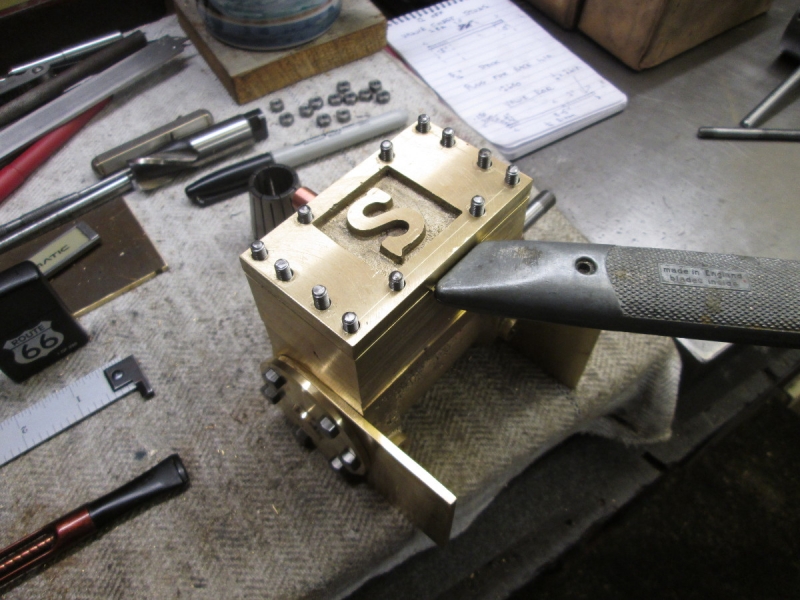
All done. Now for the studs for the valve chest!
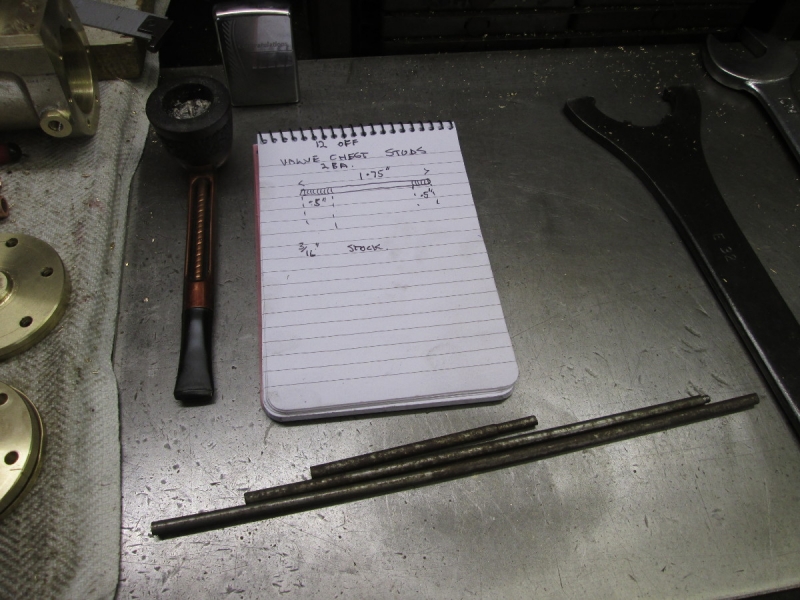
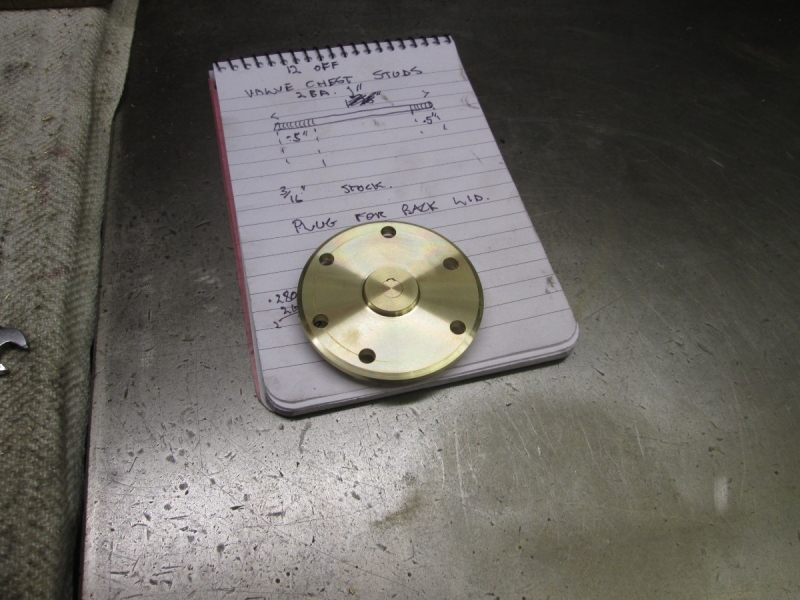
Some accurate measurements, a fag packet drawing and find some 3/16" stock. I've taken care to get all the stud holes in the valve face the same depth. (Hopefully!)
It was getting near knocking off time so I finished up by setting the lathe up ready for making 12 studs. That's the first job tomorrow.....
Stanley Challenger Graham
Stanley's View
scg1936 at talktalk.net
"Beware of certitude" (Jimmy Reid)
The floggings will continue until morale improves!
Stanley's View
scg1936 at talktalk.net
"Beware of certitude" (Jimmy Reid)
The floggings will continue until morale improves!
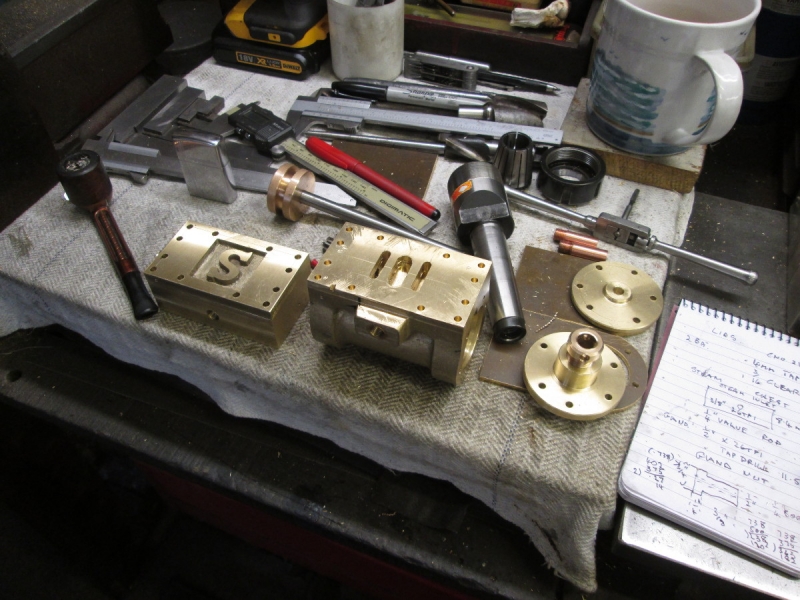
Re: SHED MATTERS 2
Hi Stanley nice to see you busy and making good use of the castings, you have lovely finish on the valve chest lid. I was just thinking Johnand I have not done any casting this year but I dont think its ever not rained long enough to get any done as we need it nice and dry outside. Hope you havd a good day out the other day. Cheers Mick.
-
Stanley
- Global Moderator
- Posts: 90439
- Joined: 23 Jan 2012, 12:01
- Location: Barnoldswick. Nearer to Heaven than Gloria.
Re: SHED MATTERS 2

We had a good day Mick. Sunshine all day in spite of a wet forecast!
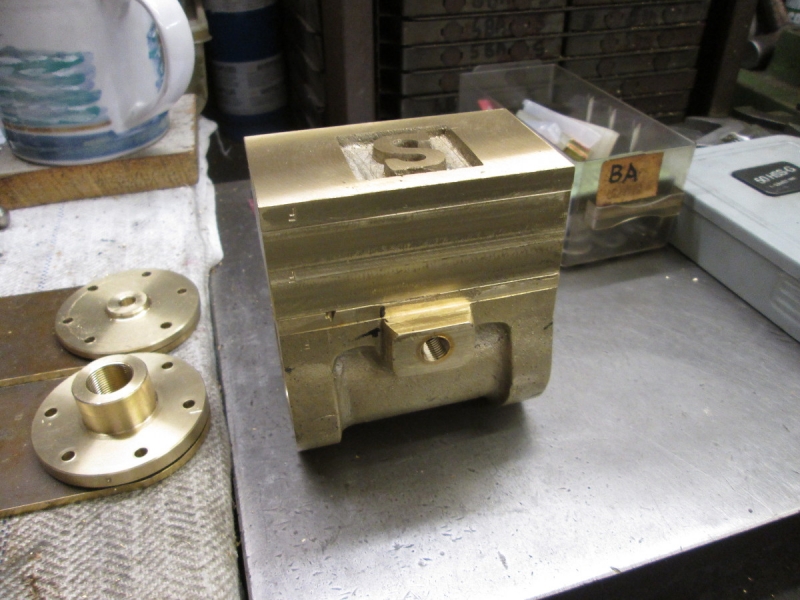
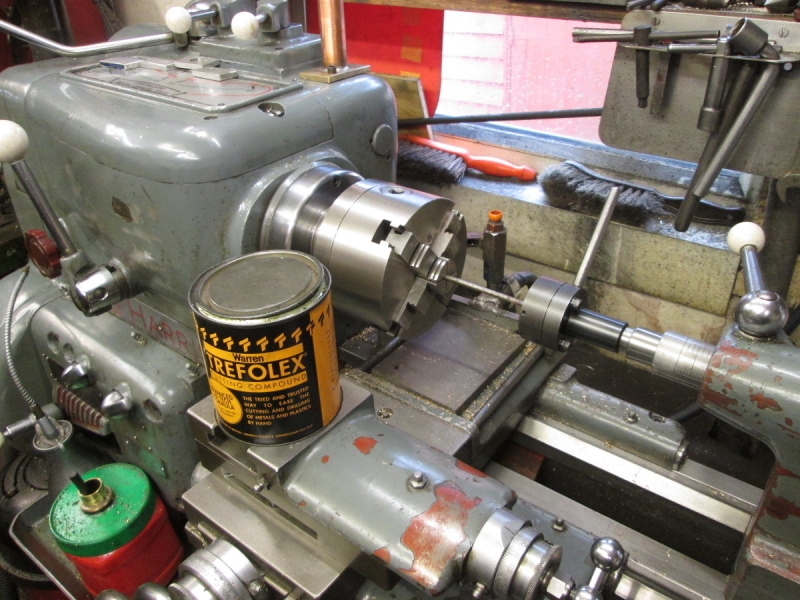
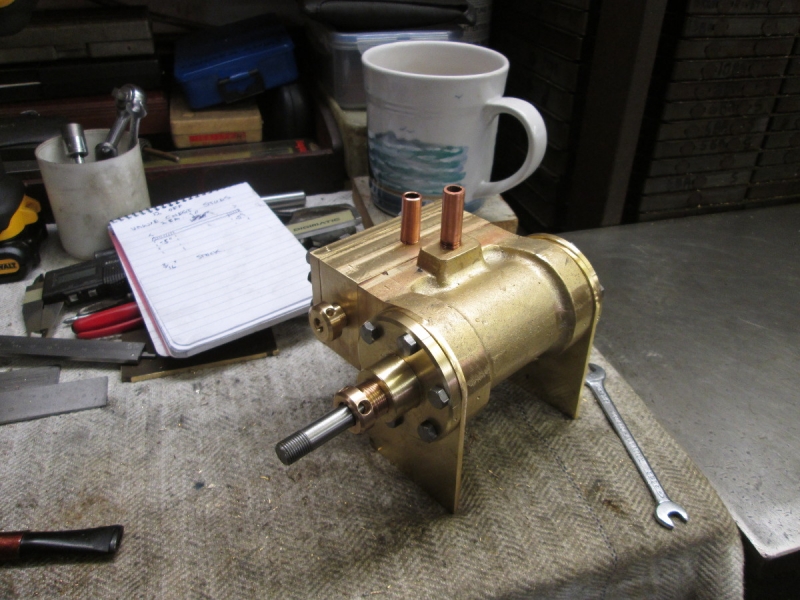
The cylinder is coming on well, note the new tin of Trefolex. I reckon it will last me until I am over 120 years old.....
Stanley Challenger Graham
Stanley's View
scg1936 at talktalk.net
"Beware of certitude" (Jimmy Reid)
The floggings will continue until morale improves!
Stanley's View
scg1936 at talktalk.net
"Beware of certitude" (Jimmy Reid)
The floggings will continue until morale improves!
-
Stanley
- Global Moderator
- Posts: 90439
- Joined: 23 Jan 2012, 12:01
- Location: Barnoldswick. Nearer to Heaven than Gloria.
Re: SHED MATTERS 2
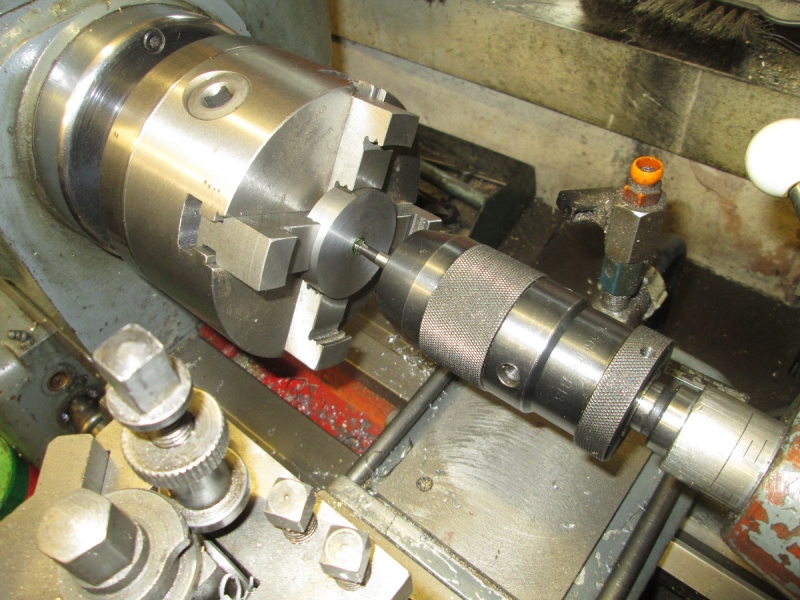
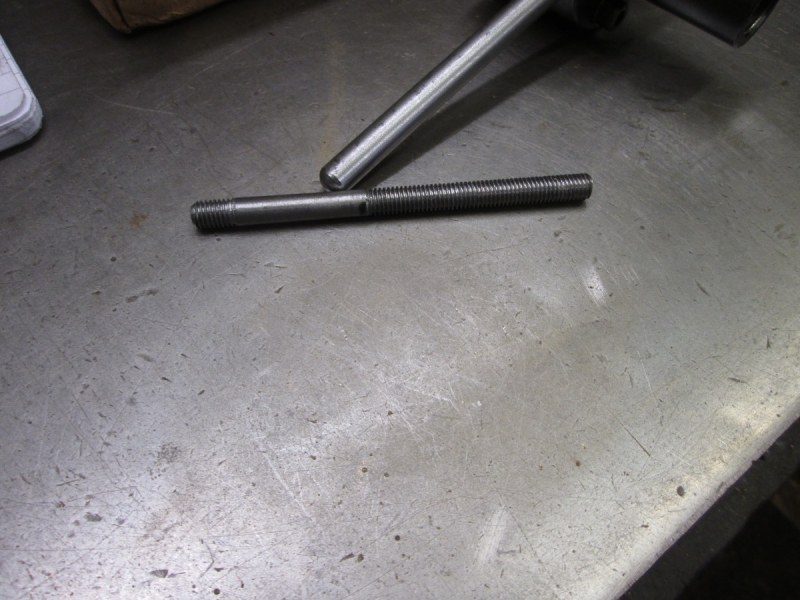
Friday is always a busy morning, shopping and other tasks have to be done but I got an hour in the shed making studs. Here we are at knocking off time. I had finished all my 3/16" stock that was ready so I had to prepare another length. It's had a hard life and is rusty so that included getting it clean. I have 8 studs done. The first one I made is a bit short but I may use it anyway. I tried that first one in the casting and was surprised to find I was a 1/4" out with my measurements so I'm making them all 2" long now. I'll soon knock the last ones off tomorrow......
Stanley Challenger Graham
Stanley's View
scg1936 at talktalk.net
"Beware of certitude" (Jimmy Reid)
The floggings will continue until morale improves!
Stanley's View
scg1936 at talktalk.net
"Beware of certitude" (Jimmy Reid)
The floggings will continue until morale improves!
-
Stanley
- Global Moderator
- Posts: 90439
- Joined: 23 Jan 2012, 12:01
- Location: Barnoldswick. Nearer to Heaven than Gloria.
Re: SHED MATTERS 2
Straight into stud making and after an hour I'd finished them and put all the tackle away.
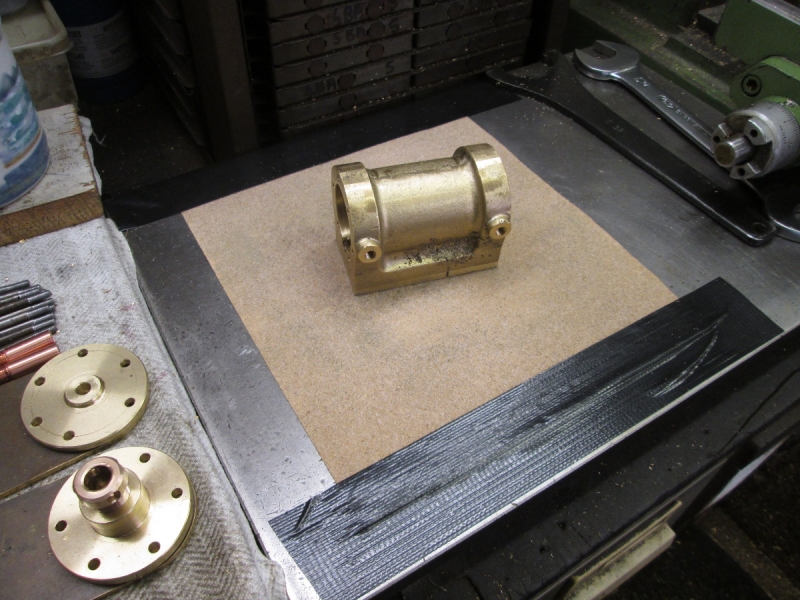
Before we fit the studs we need to get the final finish on the valve face. The first stage was to rub it down on a piece of sandpaper until I had an even finish across the face. The surface plate more or less guarantees that.
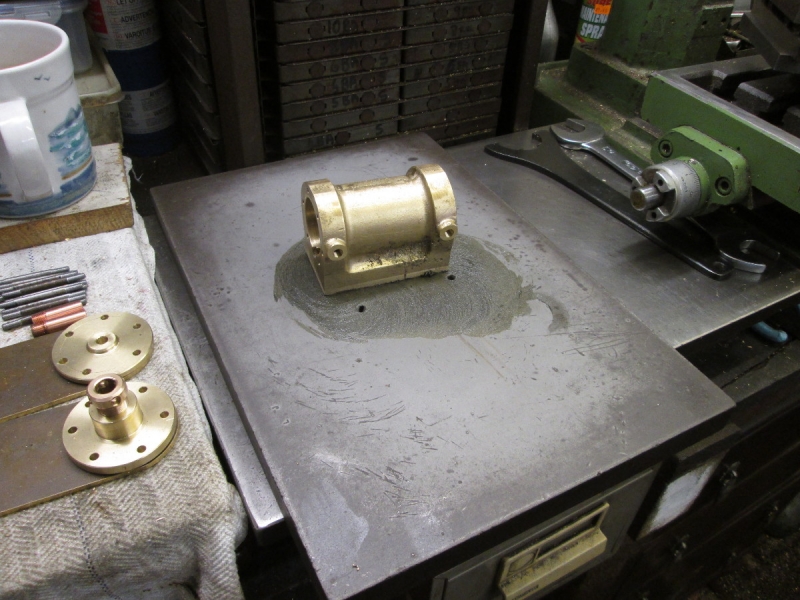
Then an old friend came out, Newton's old surface plate that he gave me when I gave him the small one I do so much work on. This came back into the fold when I got the 1927 lathe. This plate is actually a slide valve cover for one of the donkey engines that Brown's used to make. It was never used for some reason but Newton planed it flat and it's ideal for this job, putting the final finish on the valve face by hand with coarse valve grinding paste. I kept grinding and adding thin oil until it finished up as superfine grade.
Knocking off time and we have what I was after. A frosted finish on the valve face. Perfectly flat and it will hold oil. This is the best way to get a good seal between the valve and the face. One final job, stick the soles back on my slippers!
Stanley Challenger Graham
Stanley's View
scg1936 at talktalk.net
"Beware of certitude" (Jimmy Reid)
The floggings will continue until morale improves!
Stanley's View
scg1936 at talktalk.net
"Beware of certitude" (Jimmy Reid)
The floggings will continue until morale improves!
-
Stanley
- Global Moderator
- Posts: 90439
- Joined: 23 Jan 2012, 12:01
- Location: Barnoldswick. Nearer to Heaven than Gloria.
Re: SHED MATTERS 2
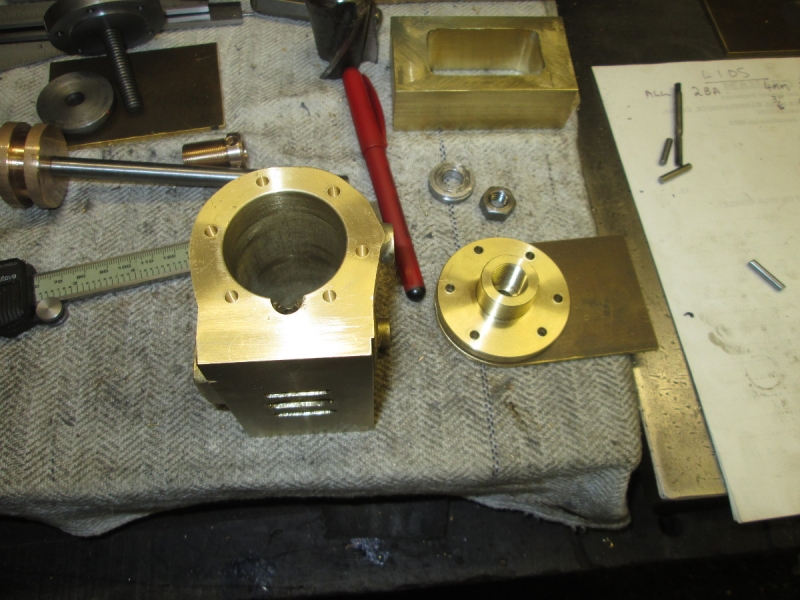
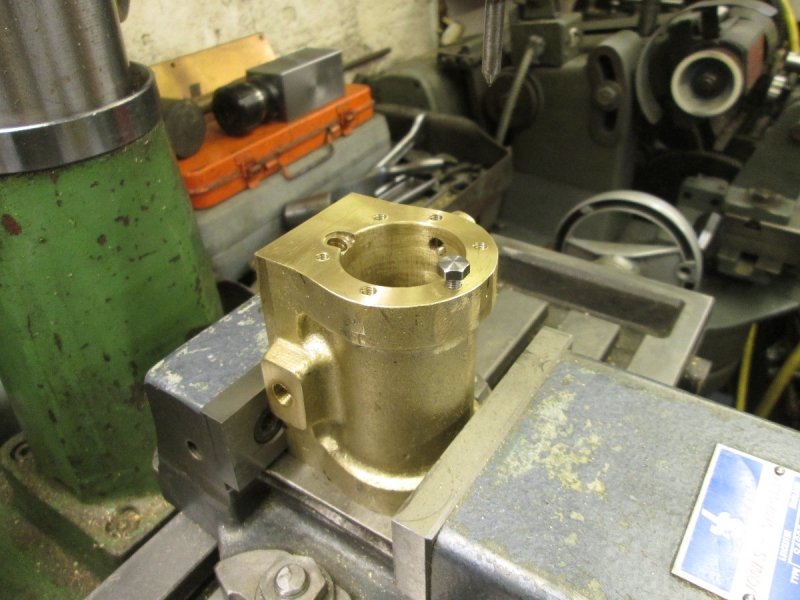
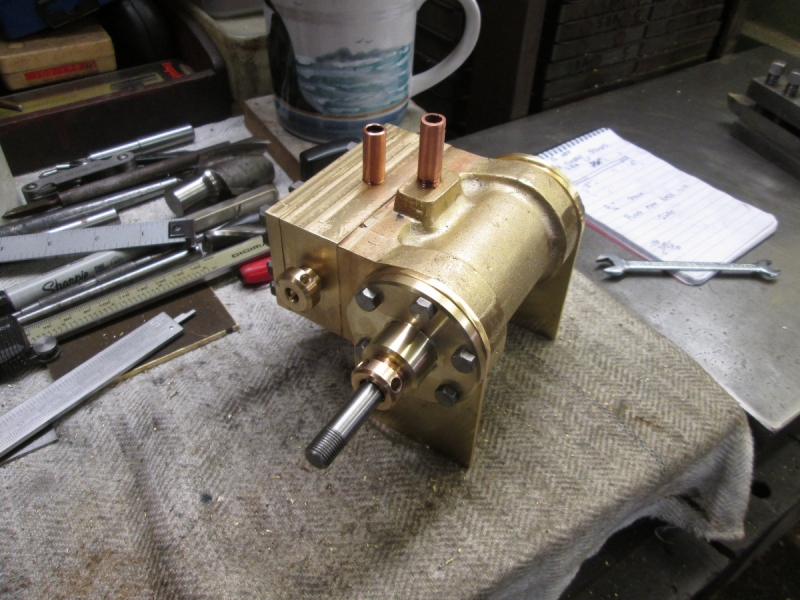
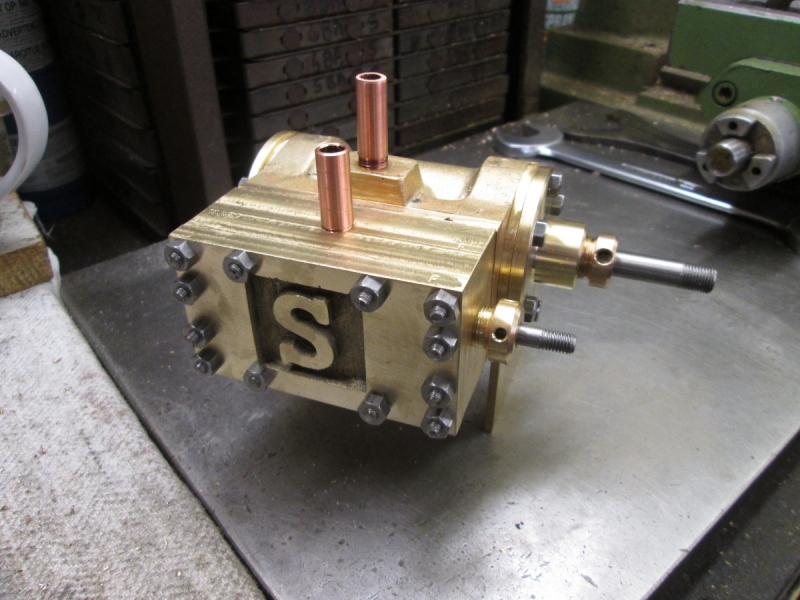
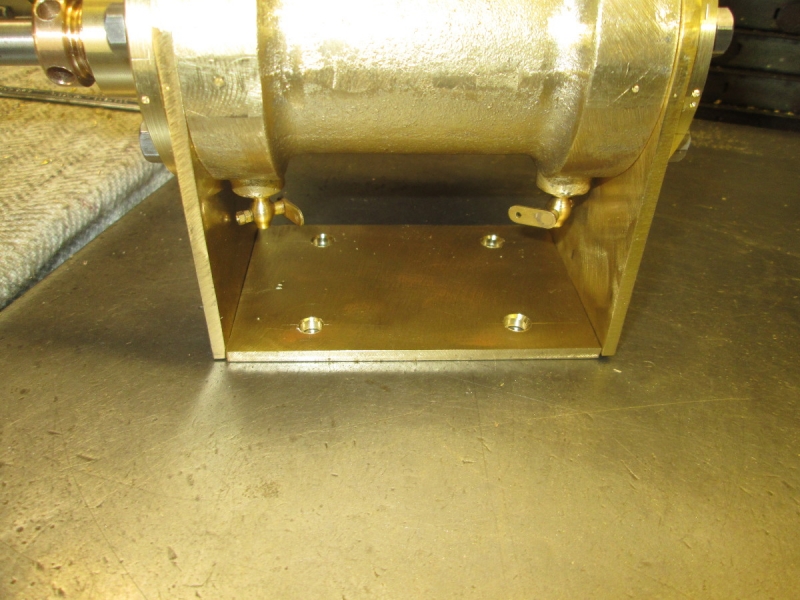
Not a full morning as it's free leccy day and I need to do housework. I started by taking my slippers out of the vice where we have had them under pressure all night. Then quietly away installing the studs in the valve face with a touch of Loctite shaft grade on each. This is a final fix, they will not come out again. 2BA is a nice size for this cylinder. These are substantial fastenings and will never ever give any problems!
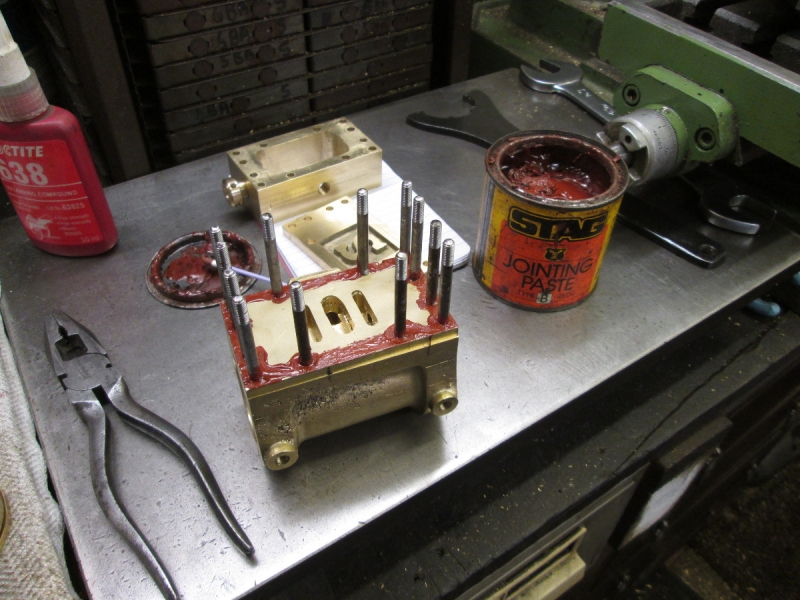
Next we need to install the chest on the studs. If like me you have done your job so far fitting everything closely normal clearance size for multiple studs like this is probably too tight. This can lead to thread damage. So what I did was open out the holes another 1/64" above 3/16" clearance size. Then I put my favourite jointing compound on the mating face. If you have made your parts accurately you don't need gaskets! I always remember Newton telling me that after an incident where a driver and his fireman were badly scalded on the footplate when a perfectly good gasket gave way they issued an order that all the joints had to be a ground fit and no gaskets, only Manganesite. That'll do me. Again, this is a final fit, the chest will not come off again.
I cleaned the excess Stag compound out of the inside of the valve chest after pressing the chest down hard. A cotton bud with meths is a good way to do it. Then I installed the lid and screwed the nuts down tight. There will probably be a bit more Stag in the chest but I can deal with that later. The excess that squeezed out on the outside was wiped off with meths again and then the chest can rest until tomorrow when I shall do a trial fit of the lids and supports. Exciting stuff, it's getting to look like a cylinder!
Stanley Challenger Graham
Stanley's View
scg1936 at talktalk.net
"Beware of certitude" (Jimmy Reid)
The floggings will continue until morale improves!
Stanley's View
scg1936 at talktalk.net
"Beware of certitude" (Jimmy Reid)
The floggings will continue until morale improves!
-
Stanley
- Global Moderator
- Posts: 90439
- Joined: 23 Jan 2012, 12:01
- Location: Barnoldswick. Nearer to Heaven than Gloria.
Re: SHED MATTERS 2
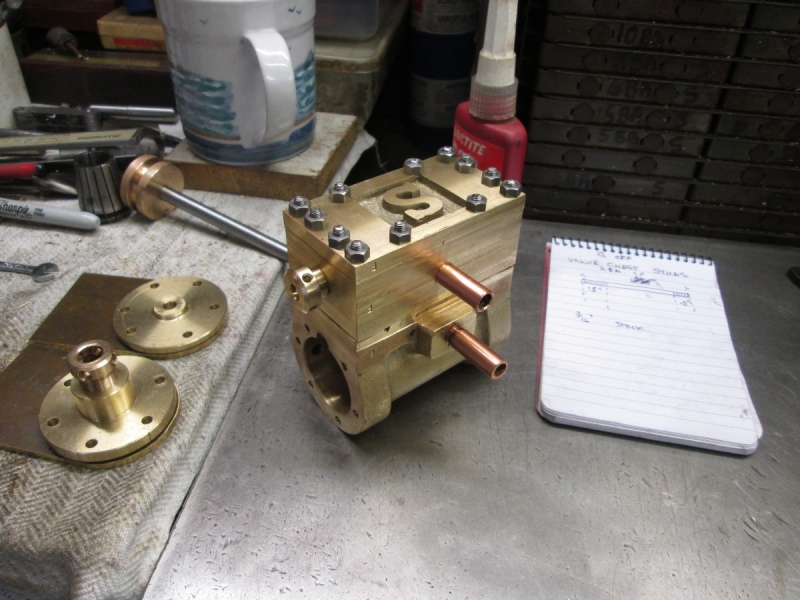
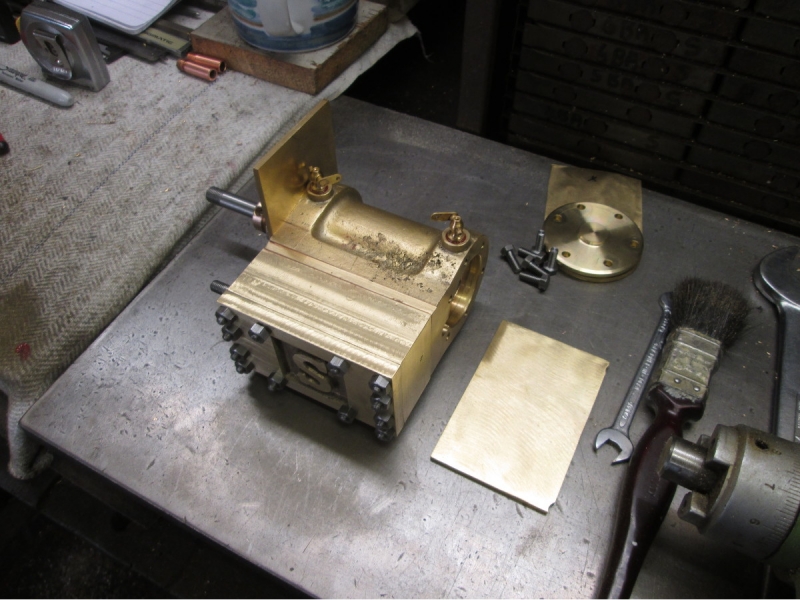
I started with a trial fit of the lids and supports this morning. Absolutely no problems and I could start and screw up all my set screws with my fingers. No adjustments needed. That's a good start, it says a lot about the accuracy of the work you've put in.
Once the cylinder was in one piece it became obvious that the next job was to bung up the 1/4" hole in the back cover I made to aid fitting the lids. You can't beat having treasure chests and I soon found a length of nominal 1/4" brass stock made slightly oversize. I always think when I get into this box about the age of the stock. It's all out of old sheds and some of it will be over 100 years old....
I turned a chunk up with a couple of thou nip, popped a bit of Loctite on and pressed it into place. Then popped it in the chuck and refaced the lid.
That looks a lot better, so much so that I took the front lid off and gave it the same treatment, thinned it down a bit and re-finished it.
Looking good, I'm quite pleased.
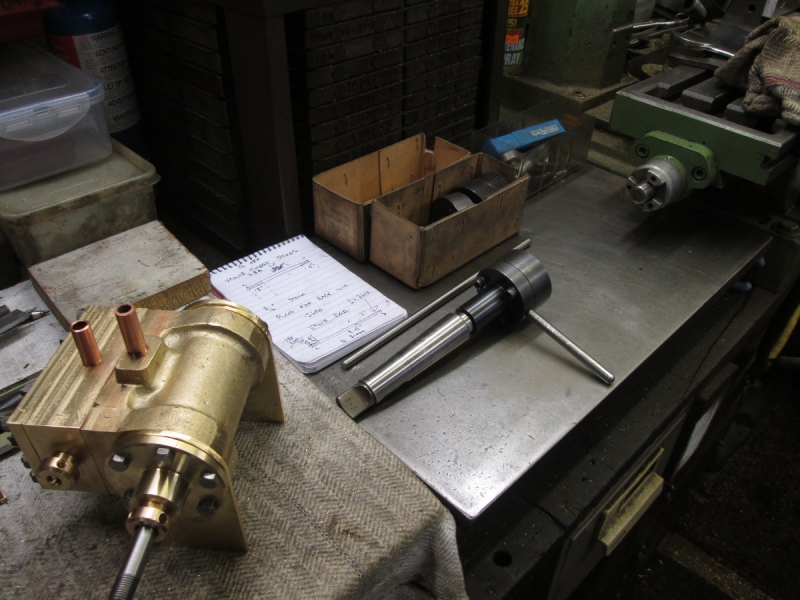
The next job is to attend to the valve. I found some 1/4" silver steel for the rod, did my measuring and got the threading tackle ready for tomorrow. Nice morning.....
Stanley Challenger Graham
Stanley's View
scg1936 at talktalk.net
"Beware of certitude" (Jimmy Reid)
The floggings will continue until morale improves!
Stanley's View
scg1936 at talktalk.net
"Beware of certitude" (Jimmy Reid)
The floggings will continue until morale improves!
-
Stanley
- Global Moderator
- Posts: 90439
- Joined: 23 Jan 2012, 12:01
- Location: Barnoldswick. Nearer to Heaven than Gloria.
Re: SHED MATTERS 2
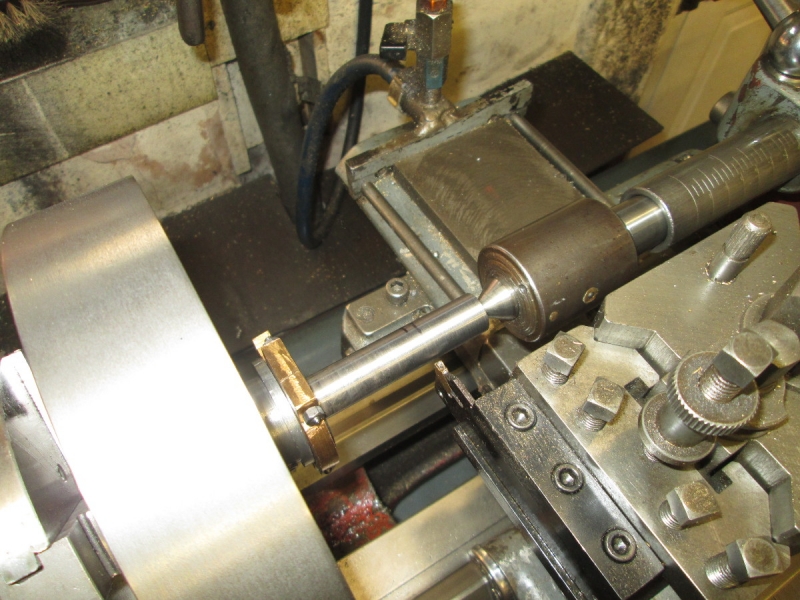
First job was to knock off a valve rod. I think I may have given it a bit too much thread for the valve adjustment but we'll see.
Now I have a rod it's time to make decisions about the valve. The lid is so close fitting I had to start it with a sharp knife. A good sign!
The first thing I looked for was to see if any jointing paste had been squeezed onto the valve face when I tightened the lid. There was none so that's a good thing. Then some measuring up and do a fag packet drawing of the valve. No surprises. A common thing is to find that despite your best efforts you haven't got quite enough room in the chest for a valve with a generous overlap at the sides. This one is OK.
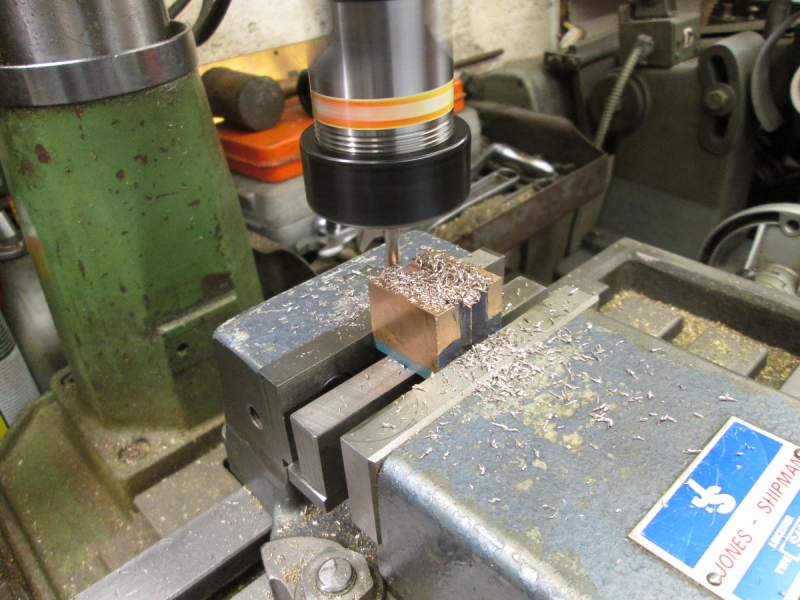
The next job was to get the VM ready for milling the valve. Slow it down and adjust the height so I have the least distance between the cutter and the work. This mill works better and is more accurate if the quill isn't extended.
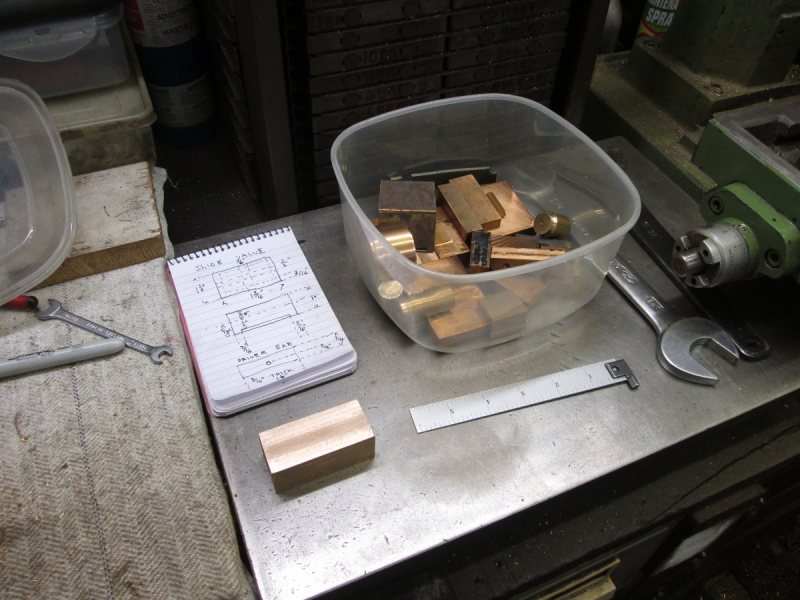
Then into the brass ends box and find some stock. I found a piece that's perfect!

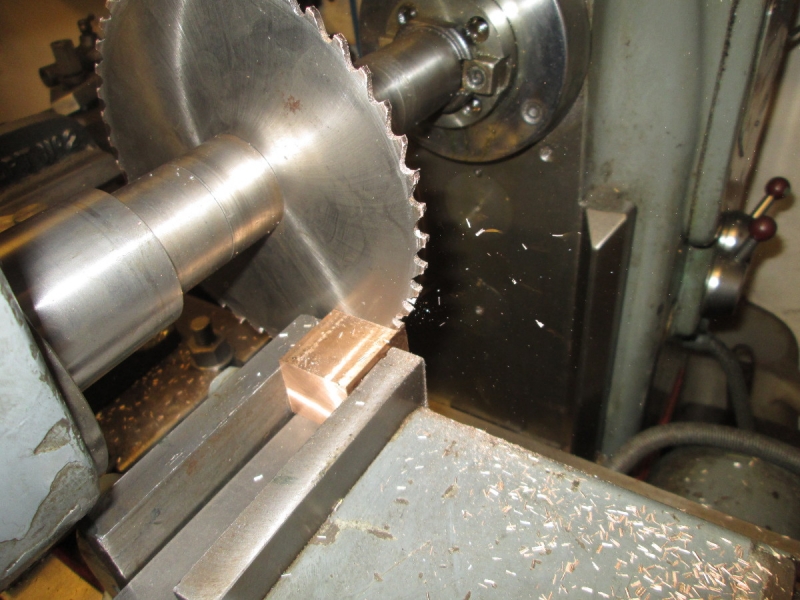
Into the HM then to saw the stock off square. I can make both the valve and the driver out of the same block.

Knocking off time. I have my sizes, a sharp cutter in a properly set up mill and I am ready to make the valve and driver but that's for tomorrow. I put some tackle away to de-clutter the bench.....
Stanley Challenger Graham
Stanley's View
scg1936 at talktalk.net
"Beware of certitude" (Jimmy Reid)
The floggings will continue until morale improves!
Stanley's View
scg1936 at talktalk.net
"Beware of certitude" (Jimmy Reid)
The floggings will continue until morale improves!
-
Stanley
- Global Moderator
- Posts: 90439
- Joined: 23 Jan 2012, 12:01
- Location: Barnoldswick. Nearer to Heaven than Gloria.
Re: SHED MATTERS 2
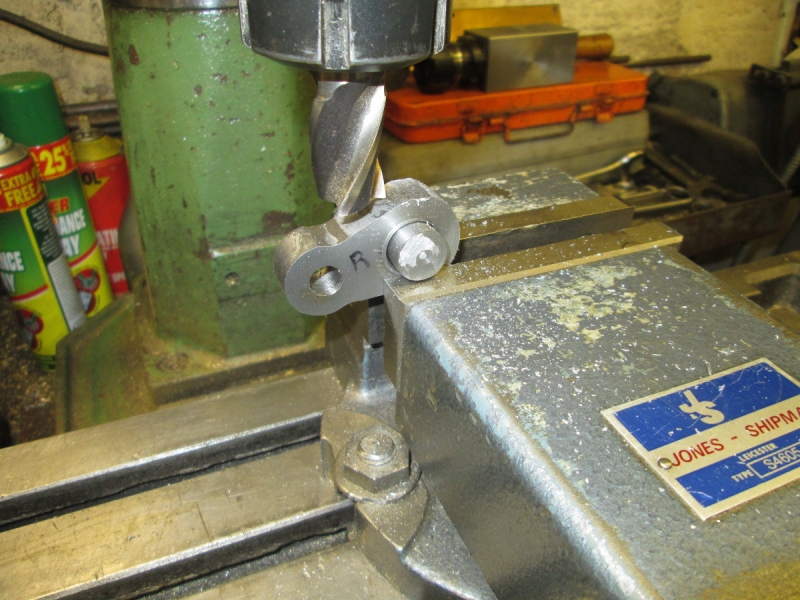
Today we make a valve and driver.... Once again we take lumps of metal and make them smaller! I did two cuts on the HM, one for the valve and another a slice for the driver.
After I milled the valve to the correct length I marked it up and started cutting. The first cut is a 1/4" slot down the middle to accept the valve rod.
A quick check to make sure it was a good fit, loose enough to float but close enough to ensure location on centre.
Next cut was the clearance pocket in the base of the valve for the exhaust. Good to do this first because the valve body is strong enough to take the pressure of the vise. This valve isn't so bad, it's a good size but on smaller valves you have to be careful you don't cause any distortion.
The next cut was the biggest, a 3/8" slot across the valve to accept the driver. Quietly away and a full depth cut to within less than an eighth inch of the exhaust pocket in the base.
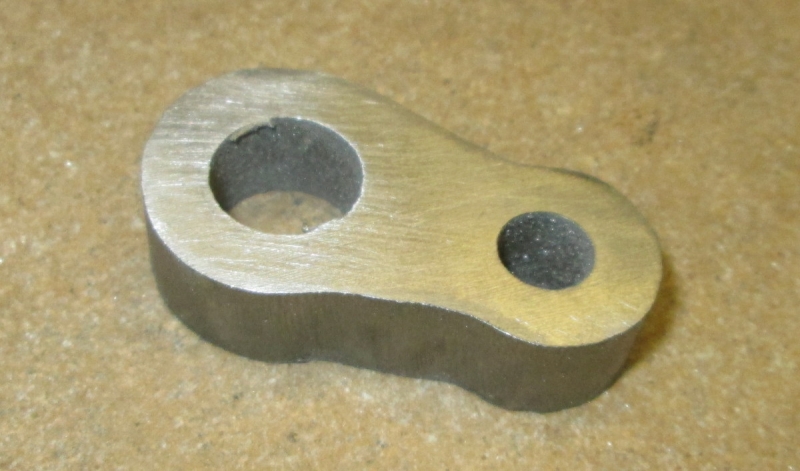
Next job was to clean up and deburr the slots in the valve and then fit the driver. It's a very close fit and I didn't rush, I did it entirely by rubbing the faces of the driver down on emery paper. By closing time I had a nice close fit but free enough to float. Next job is to reduce the height of the driver and drill and tap it for the valve rod but that's for tomorrow. I've enjoyed the morning and I think I have finished up with a good valve with no mistakes. That'll do me.....
Stanley Challenger Graham
Stanley's View
scg1936 at talktalk.net
"Beware of certitude" (Jimmy Reid)
The floggings will continue until morale improves!
Stanley's View
scg1936 at talktalk.net
"Beware of certitude" (Jimmy Reid)
The floggings will continue until morale improves!
-
Stanley
- Global Moderator
- Posts: 90439
- Joined: 23 Jan 2012, 12:01
- Location: Barnoldswick. Nearer to Heaven than Gloria.
Re: SHED MATTERS 2
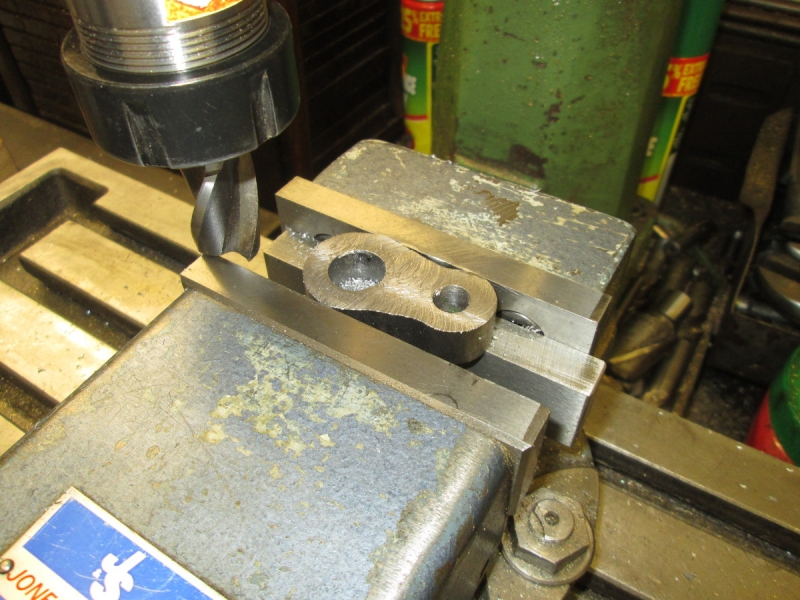
First job was to check the valve as it was on the valve face. I was right, it needed to be reduced until it was the same depth as the slot milled for it in the valve. Obvious really but it never does any harm to re-check! All the edges broken and it's a nice fit.
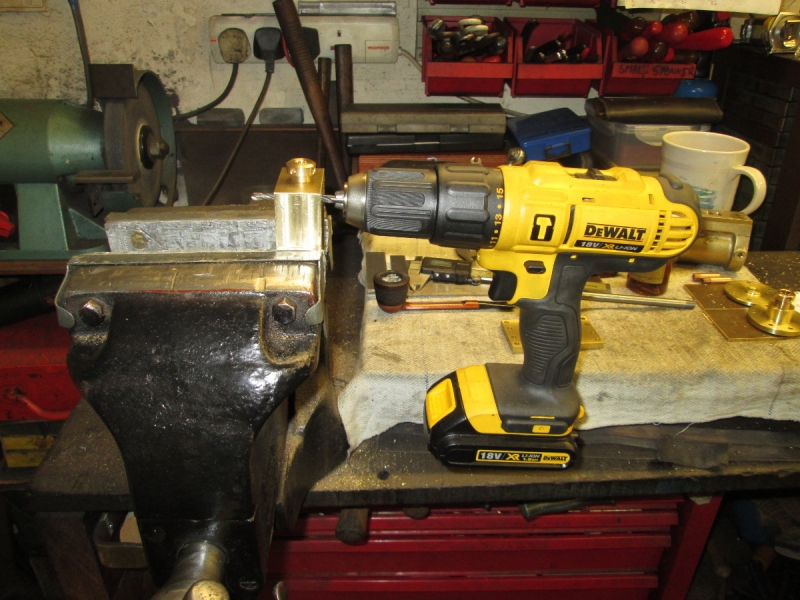
You could spend a long time doing careful measurements to decide the exact height of the tapped hole in the driver bar. I took the easy way out, I put a 1/4" drill in the DeWalt (What a good buy that was!), blocked the valve with a parallel to have it firm and poked the drill in making sure everything was in line and marked the driver bar. It's got to be correct!
I drilled and tapped the driver 1/4BSF. In case you think I've made a mistake, that's exactly the same size as 1/4 X 26tpi and I have a better BSF tap. Just to make sure I ran the 1/4BSF die down the valve rod as well.
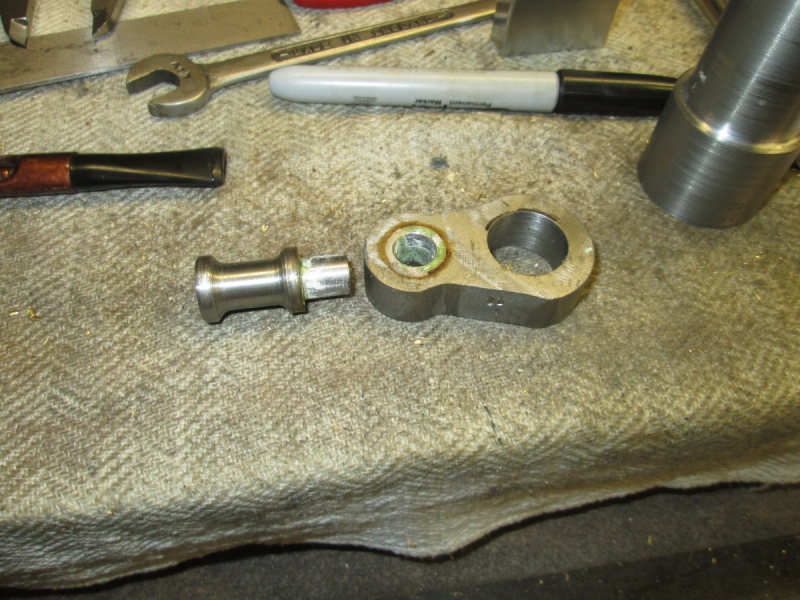
The valve and driver installed in the chest. Lovely fit, just the right amount of float in it and you'll notice I have put witness marks on the valve and driver. One bonus is that while there is a bit too much thread on the driver end I think we can get away with it. It's just the right length.....
I popped the lid back on finger tight and allowed myself a gloat over what is beginning to look like a cylinder!
You always have to think ahead, it can save a lot of trouble later on. It struck me that installing the drain valves would be a pain once the supports were fitted and the cylinder bolted down so I put a drop of Stag compound on them and popped them in. Just enough room to fit them even when the supports are on but better fitted now.
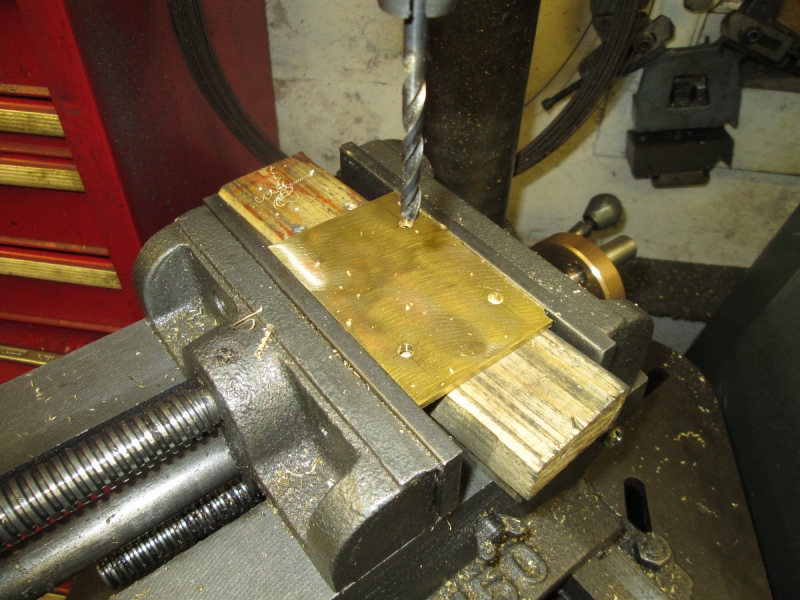
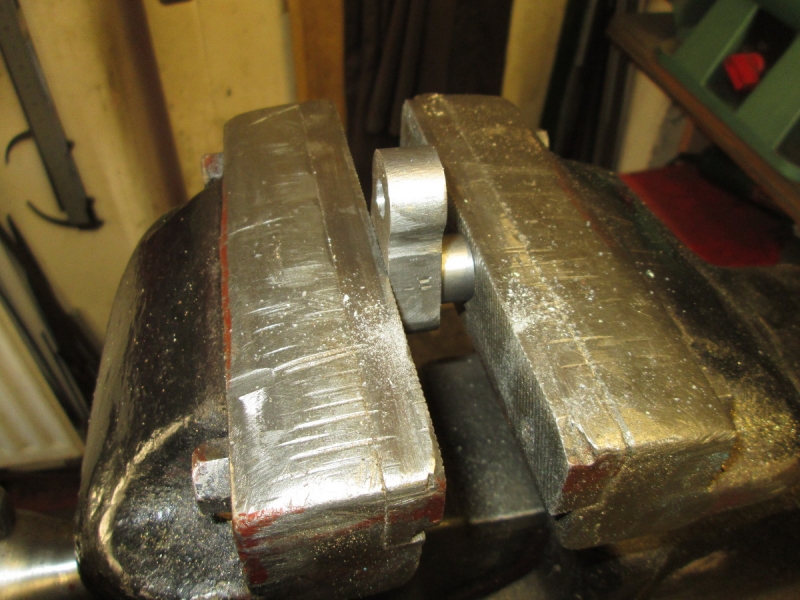
I've missed a pic here. I did some careful measuring and filed the longer of the supports down to the same size as the other, 30thou to come of it. Then I cleaned the base of the support up, marked it and drilled it clearance for 4 2BA set screws which is what it will be fastened down with. All the holes chamfered.
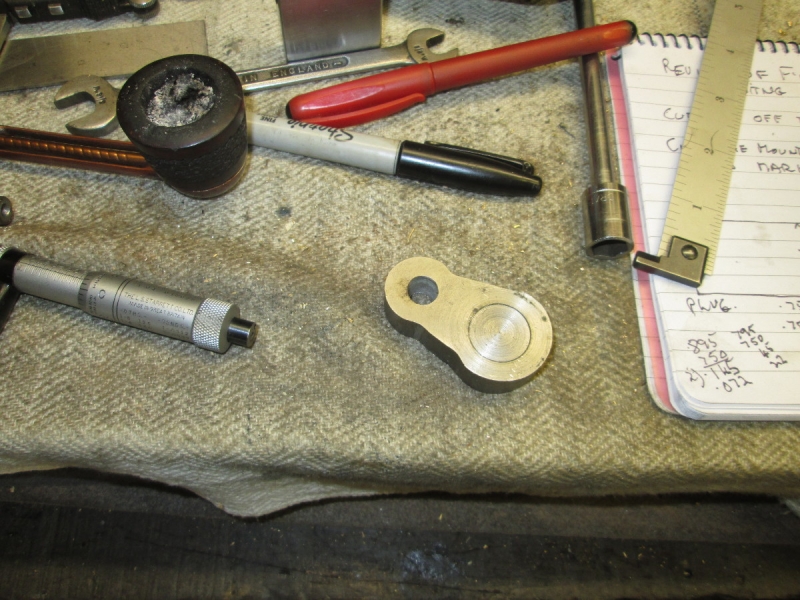
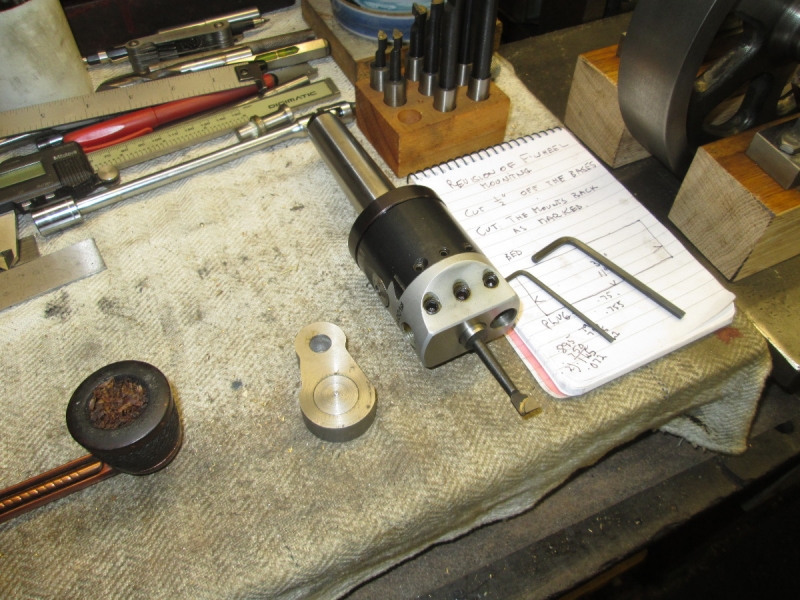
Here it is ready for fastening to the supports. Notice that it has a witness mark as well. I need to do some thinking now about how I am going to mount the cylinder and the arrangement of the beds for the flywheel and pedestals. I haven't made my mind up yet about the arrangement and length of the con rod.
I was treading bronze chips all over the house so I had a clean up to finish off a nice morning. I have lots of thinking to do apropos the beds and then there is the small matter of the articles I have to write. Machine work and fitting might be thin on the ground for a while.
Stanley Challenger Graham
Stanley's View
scg1936 at talktalk.net
"Beware of certitude" (Jimmy Reid)
The floggings will continue until morale improves!
Stanley's View
scg1936 at talktalk.net
"Beware of certitude" (Jimmy Reid)
The floggings will continue until morale improves!
-
Stanley
- Global Moderator
- Posts: 90439
- Joined: 23 Jan 2012, 12:01
- Location: Barnoldswick. Nearer to Heaven than Gloria.
Re: SHED MATTERS 2
Sorry lads, today has been article writing for the paper......
Stanley Challenger Graham
Stanley's View
scg1936 at talktalk.net
"Beware of certitude" (Jimmy Reid)
The floggings will continue until morale improves!
Stanley's View
scg1936 at talktalk.net
"Beware of certitude" (Jimmy Reid)
The floggings will continue until morale improves!
-
Stanley
- Global Moderator
- Posts: 90439
- Joined: 23 Jan 2012, 12:01
- Location: Barnoldswick. Nearer to Heaven than Gloria.
Re: SHED MATTERS 2
Three articles written yesterday, today could be the same. Decisions later.....
Stanley Challenger Graham
Stanley's View
scg1936 at talktalk.net
"Beware of certitude" (Jimmy Reid)
The floggings will continue until morale improves!
Stanley's View
scg1936 at talktalk.net
"Beware of certitude" (Jimmy Reid)
The floggings will continue until morale improves!
-
Stanley
- Global Moderator
- Posts: 90439
- Joined: 23 Jan 2012, 12:01
- Location: Barnoldswick. Nearer to Heaven than Gloria.
Re: SHED MATTERS 2
I wrote two more articles, that's the paper off my back for a week or two!
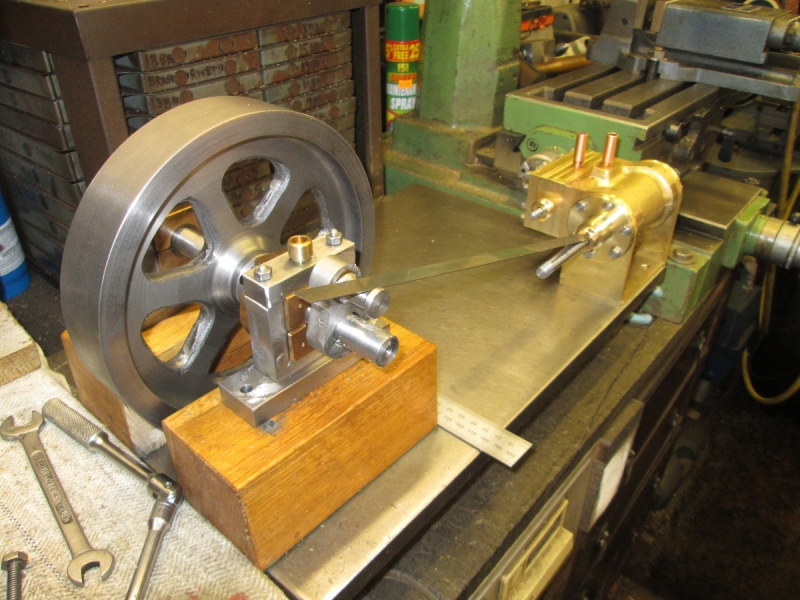
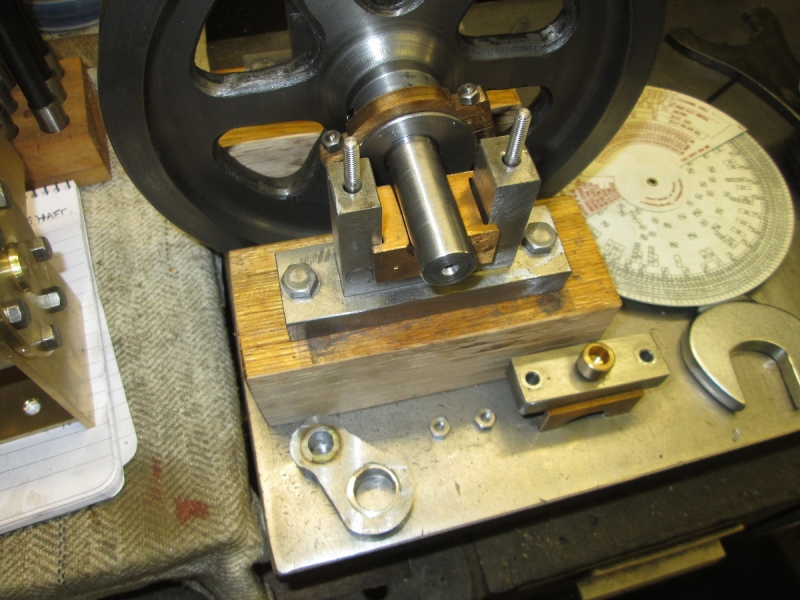
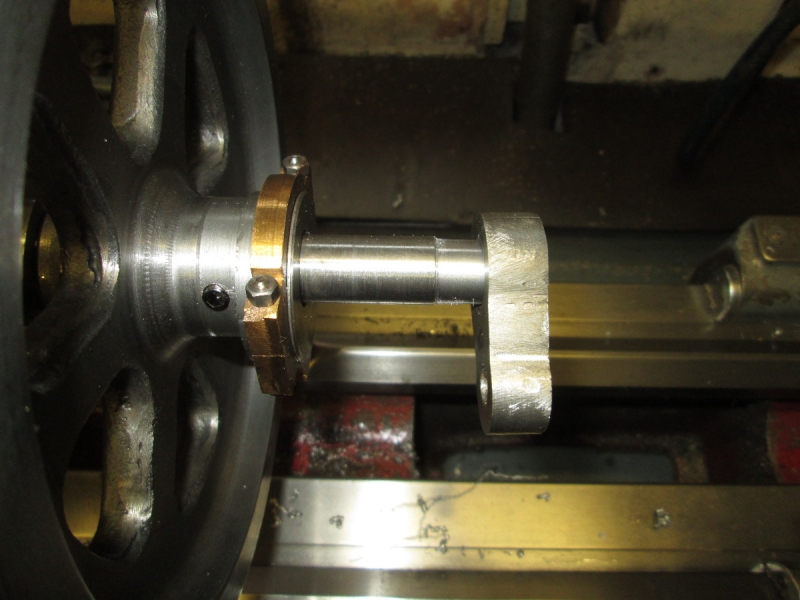
Today's job is to make some measurements and decisions about the relationship between the cylinder and the flywheel. It's suck it and see, I work better like this! I've decided that the stroke will be 2.25", I could squeeze more out of it but just by chance, the cranks I made for the shaft are 1.125" centres, just right for the stroke. I can plug the crank and re-bore it to make it fit, pity to discard good work. I shall do a lot more finishing on it as well.... I've decided to make the con rod 2.5 X the stroke just like the old engine makers, it always looks right. So this gives me 5.75" centres from cross head to crank pin. The factor that can't be altered is the height of the raising blocks for the flywheel and shaft, we have to have clearance for the wheel. So this gives me the height that the cylinder has to be raised to.
So I made decisions about the spacing of the supports for the bearings and tapped fresh 1/4" Whitworth holes for the holding down bolts. These blocks may be part of the finished engine but I'll decide that later. At the moment I need them properly oriented.
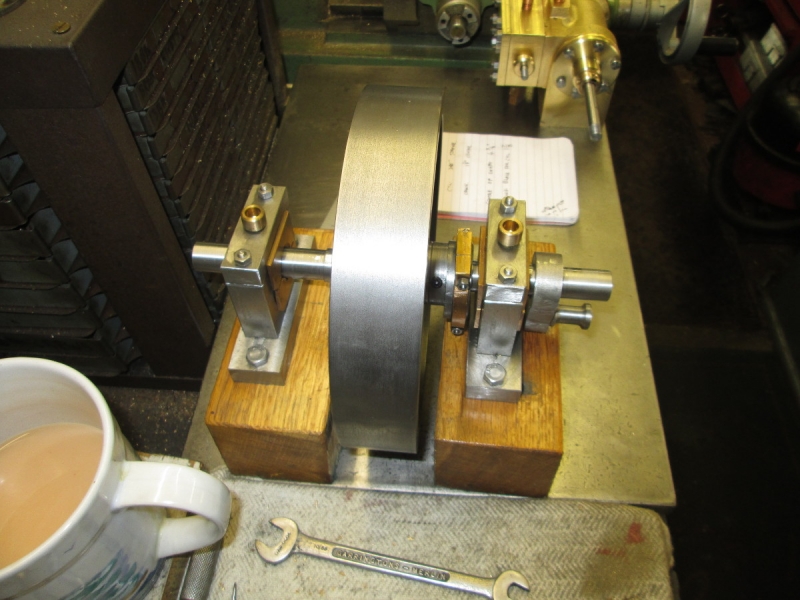
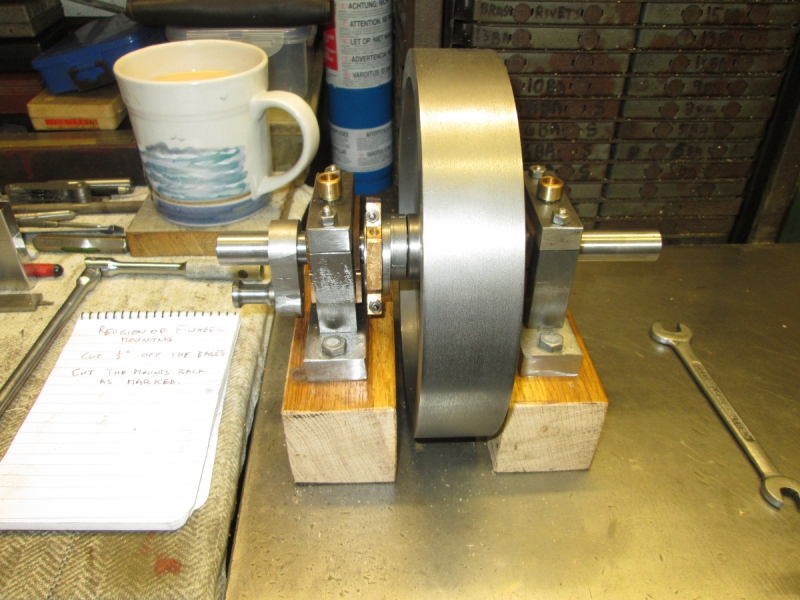
It was time to start housework on free leccy morning but just as I was going out of the shed I realised that I needed to adjust the other raising block as well. The shaft that carries the crank needs shortening of course. Doesn't look like much but very instructive and food for thought. I'm toying with the idea of making the bed solely out of wood just for a bit of a change.... Not sure about that and I might change my mind later. I shall let the Design Committee mull over the matter overnight!
Today's job is to make some measurements and decisions about the relationship between the cylinder and the flywheel. It's suck it and see, I work better like this! I've decided that the stroke will be 2.25", I could squeeze more out of it but just by chance, the cranks I made for the shaft are 1.125" centres, just right for the stroke. I can plug the crank and re-bore it to make it fit, pity to discard good work. I shall do a lot more finishing on it as well.... I've decided to make the con rod 2.5 X the stroke just like the old engine makers, it always looks right. So this gives me 5.75" centres from cross head to crank pin. The factor that can't be altered is the height of the raising blocks for the flywheel and shaft, we have to have clearance for the wheel. So this gives me the height that the cylinder has to be raised to.
So I made decisions about the spacing of the supports for the bearings and tapped fresh 1/4" Whitworth holes for the holding down bolts. These blocks may be part of the finished engine but I'll decide that later. At the moment I need them properly oriented.
It was time to start housework on free leccy morning but just as I was going out of the shed I realised that I needed to adjust the other raising block as well. The shaft that carries the crank needs shortening of course. Doesn't look like much but very instructive and food for thought. I'm toying with the idea of making the bed solely out of wood just for a bit of a change.... Not sure about that and I might change my mind later. I shall let the Design Committee mull over the matter overnight!
Stanley Challenger Graham
Stanley's View
scg1936 at talktalk.net
"Beware of certitude" (Jimmy Reid)
The floggings will continue until morale improves!
Stanley's View
scg1936 at talktalk.net
"Beware of certitude" (Jimmy Reid)
The floggings will continue until morale improves!
-
Stanley
- Global Moderator
- Posts: 90439
- Joined: 23 Jan 2012, 12:01
- Location: Barnoldswick. Nearer to Heaven than Gloria.
Re: SHED MATTERS 2
Still stumbling towards a design.... I have to report that the Design Committee were about as much use as a sick headache so I still have no clear idea of where I'm going. My way of dealing with this is to keep plugging on and see what happens. One thing had been annoying me, the two redundant holes in one of the blocks so I plugged them with a couple of hard dowels. Old shuttle pegs actually, rock hard Persimmon.
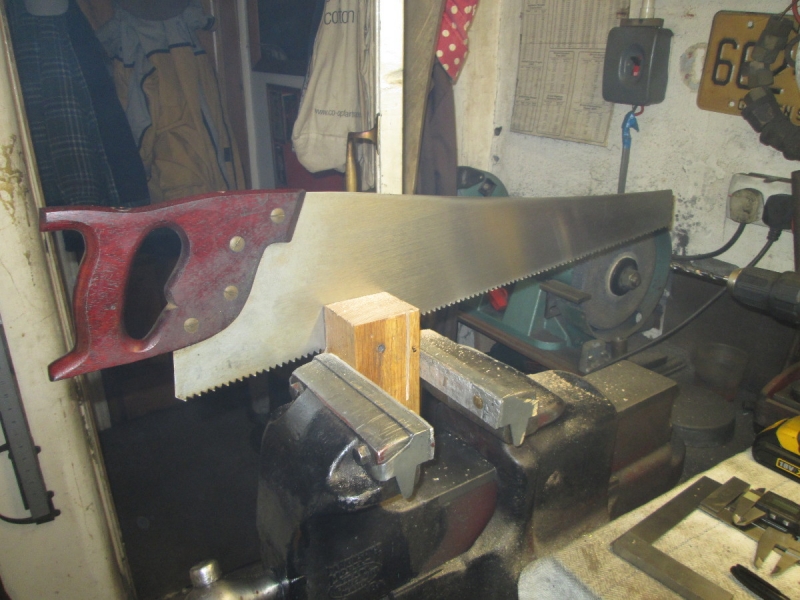
Next stage was to reduce the mounts to the smallest possible size. The blocks are too thick to go under the cut off saw so I reduced the thickness the old fashioned way, The Spear and Jackson 'Spearior' rip saw and breeches arse steam. Then under the saw for a more tidy reduction.
That's a bit better, They are the right size now.... The crank end of the flywheel shaft is going to have to be reduced by an inch.
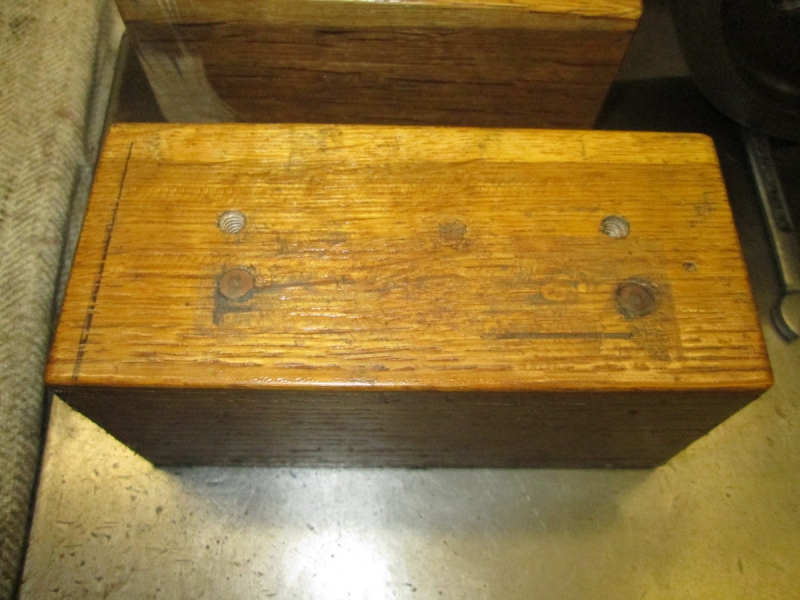
I tripped over this lump of Keruing in the treasure chest and after trimming it under the saw it's just about right for the cylinder end of the bed. This is the right relationship and I have something to work on but I'm not there yet.... Not to worry, it will happen!
Stanley Challenger Graham
Stanley's View
scg1936 at talktalk.net
"Beware of certitude" (Jimmy Reid)
The floggings will continue until morale improves!
Stanley's View
scg1936 at talktalk.net
"Beware of certitude" (Jimmy Reid)
The floggings will continue until morale improves!
-
Stanley
- Global Moderator
- Posts: 90439
- Joined: 23 Jan 2012, 12:01
- Location: Barnoldswick. Nearer to Heaven than Gloria.
Re: SHED MATTERS 2
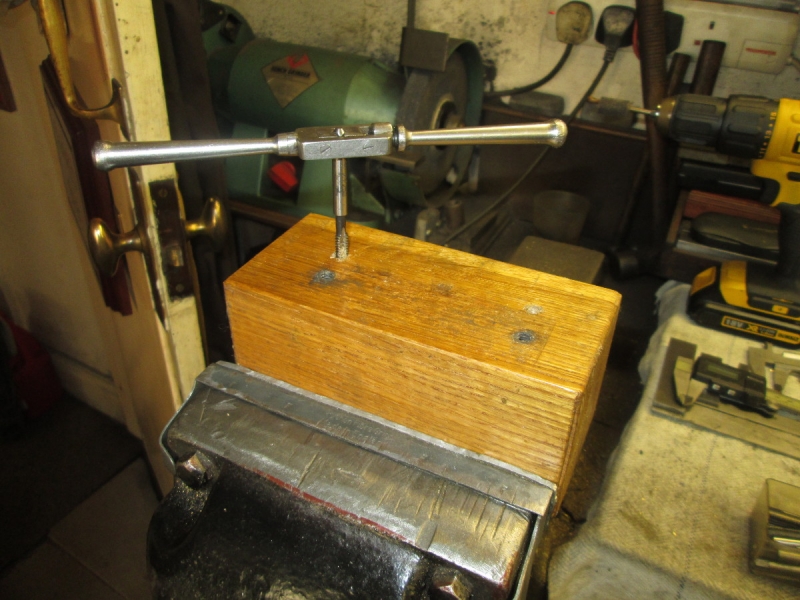
The good thing I have to report is that the bed design has come together in my head and I know now how I want to do it. It's going to be a wooden one. But I want to leave the design alone and let it sit in my head, there may be refinements! So I decided to keep things simple. I had to do some cooking this morning, nobody to do it for me! So it was 9AM before I got into the shed. I'm going to sort the crank out. In case you're wondering, I don't like wasted effort and a lot of work has gone into this one! I have to plug the hole for the shaft and rebore it for the smaller shaft and while the crank pin was OK, it isn't fitted to the full depth of the crank so I shall press it out, make a new one and refit it.
I had this scrap shaft end that had a hole in the end. I need a dolly with a cavity to press the pin into. The first job was to cut it to length. Thank God for Mick and John and Mrs McMaster.
Then into the vice and shove it out. It was Loctited in but I didn't heat it, just forced it out.
Then I cleaned the inside of the bores with my home made flapper. The old crank pin can go in the scrap box.
A bit of careful turning of a scrap end and I had a plug with almost 2thou of interference. It was just right, a heavy interference fit that needs no Loctite, it will never move!
Knocking off time. The bore is plugged and I centre punched it while I still had the turning marks on it. The next job is to do a good job of finishing as I left it a bit rough when I originally made it.
Stanley Challenger Graham
Stanley's View
scg1936 at talktalk.net
"Beware of certitude" (Jimmy Reid)
The floggings will continue until morale improves!
Stanley's View
scg1936 at talktalk.net
"Beware of certitude" (Jimmy Reid)
The floggings will continue until morale improves!
-
Stanley
- Global Moderator
- Posts: 90439
- Joined: 23 Jan 2012, 12:01
- Location: Barnoldswick. Nearer to Heaven than Gloria.
Re: SHED MATTERS 2
It's been an interesting if at times chastening morning. A learning curve and several mistakes but it's all turned out OK in the end!
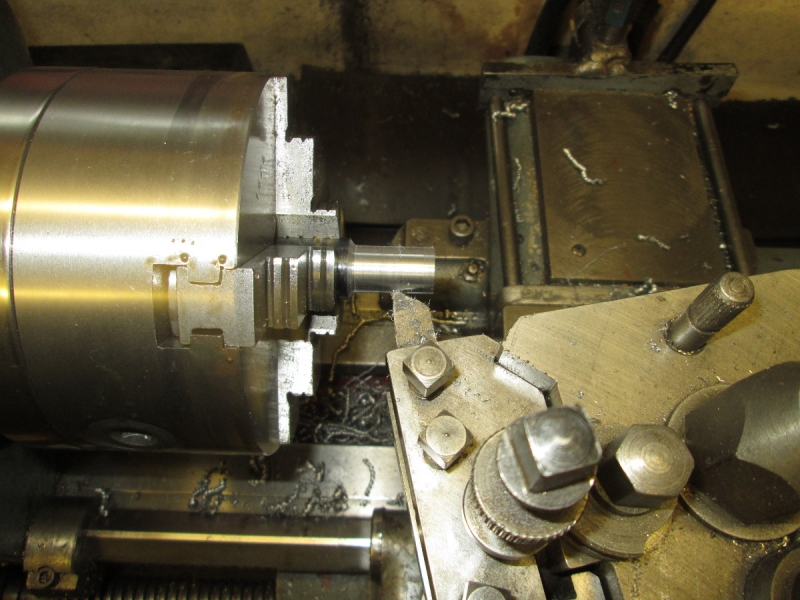
I wanted to bore out the plugged hole in the crank for the diameter of the modified flywheel shaft. I could have gone down several routes but decided it was about time I used the boring head that I bought a while ago and have never used. In fact I have never used a boring head in the VM. This was going to be interesting!
First thing to do was get the crank mounted in the mill and centred under the quill. Then I popped a chuck in to drill the plug out to 1/2". This was where I made my first mistake. I had to raise the quill to get the chuck in and I forgot that when I loosened the clamp on the quill it would almost certainly move a bit. I know! But we have all done it.
Then I mounted the boring head and at this point made my next mistake, I mounted the smallest cutter. With hindsight I should have fitted the biggest one that would enter the drilled hole.
After I had made a few successful passes through the bore (It was cutting well with a good finish) I realised that I was having trouble getting an accurate measurement of where I was at. I decided the best thing to do was part the end of the shaft off that is going to be redundant and use it as a gauge. No problem, I chopped it off, refinished the end of the shaft and put a new centre in it.

Here is the result, ready for the crank!
I carried on boring but gradually realised I was getting into trouble for two reasons. First I hadn't got the bore truly on centre which is no great problem but what was really disturbing was the realisation that I should have bored the old hole in the crank out larger because I was getting very close to one side of my plug. Even worse, my bore wasn't parallel. I don't know why but suspect it is connected with the cutter being small. So I decided to cut my losses, take the crank out of the mill and ream the hole out until I have it parallel. I did that successfully and measured the bore at slightly less than what I was aiming for. So I polished the bore with a flapper wheel and resolved to come at the problem from the opposite direction tomorrow. I shall skim the shaft down to fit the bore. This will give me a bonus in that it will give me a shoulder to mount the crank up to. Always look on the bright side!!
I don't regret anything about this morning, I have learned a lot and at my age that's quite an achievement.
I wanted to bore out the plugged hole in the crank for the diameter of the modified flywheel shaft. I could have gone down several routes but decided it was about time I used the boring head that I bought a while ago and have never used. In fact I have never used a boring head in the VM. This was going to be interesting!
First thing to do was get the crank mounted in the mill and centred under the quill. Then I popped a chuck in to drill the plug out to 1/2". This was where I made my first mistake. I had to raise the quill to get the chuck in and I forgot that when I loosened the clamp on the quill it would almost certainly move a bit. I know! But we have all done it.
Then I mounted the boring head and at this point made my next mistake, I mounted the smallest cutter. With hindsight I should have fitted the biggest one that would enter the drilled hole.
After I had made a few successful passes through the bore (It was cutting well with a good finish) I realised that I was having trouble getting an accurate measurement of where I was at. I decided the best thing to do was part the end of the shaft off that is going to be redundant and use it as a gauge. No problem, I chopped it off, refinished the end of the shaft and put a new centre in it.
Here is the result, ready for the crank!
I carried on boring but gradually realised I was getting into trouble for two reasons. First I hadn't got the bore truly on centre which is no great problem but what was really disturbing was the realisation that I should have bored the old hole in the crank out larger because I was getting very close to one side of my plug. Even worse, my bore wasn't parallel. I don't know why but suspect it is connected with the cutter being small. So I decided to cut my losses, take the crank out of the mill and ream the hole out until I have it parallel. I did that successfully and measured the bore at slightly less than what I was aiming for. So I polished the bore with a flapper wheel and resolved to come at the problem from the opposite direction tomorrow. I shall skim the shaft down to fit the bore. This will give me a bonus in that it will give me a shoulder to mount the crank up to. Always look on the bright side!!
I don't regret anything about this morning, I have learned a lot and at my age that's quite an achievement.
Stanley Challenger Graham
Stanley's View
scg1936 at talktalk.net
"Beware of certitude" (Jimmy Reid)
The floggings will continue until morale improves!
Stanley's View
scg1936 at talktalk.net
"Beware of certitude" (Jimmy Reid)
The floggings will continue until morale improves!
-
Stanley
- Global Moderator
- Posts: 90439
- Joined: 23 Jan 2012, 12:01
- Location: Barnoldswick. Nearer to Heaven than Gloria.
Re: SHED MATTERS 2
The job this morning is to get some finish into the crank before I make and install the crank pin but first I need some careful measurements so I can reduce the end of the shaft to be a light interference fit in the crank. It will be Loctited when it eventually goes on.
All ready for some careful turning. I have honed the HS tool to the best of my ability. Notice that the top slide is at a slight angle. 5.75dgrees, an old turner's trick. One thou advance on the cross slide is one tenth of a thou on the cut. We are working to tenths this morning! One thing to note if you are aiming for this sort of accuracy, use the power feed all the time for the cut. All lathes have a certain amount of play in the way the saddle sits on the ways and usually you'll find that if you advance the saddle manually it will cut slightly deeper so use the same method all the time.
Not long later and we have a light interference fit of the crank on the shaft. Just right!
Next I made a plug that's an exact fit in the bore of the crank.
I needed it so I could do my favourite trick and get a nice accurate radius on the big end of the crank.
Next I made sure the faces of the crank were parallel. Not a very good finish.....
Then into the vice and get the milling marks out with a big flat file.
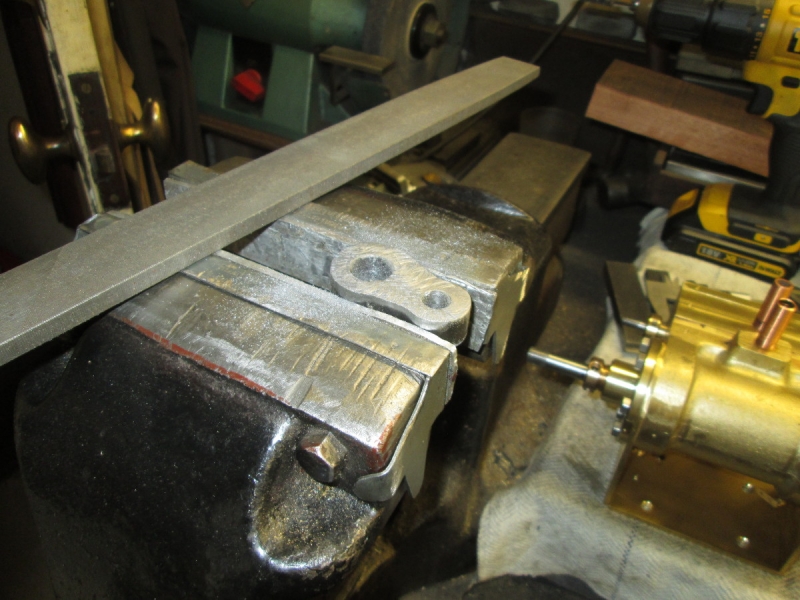
Next was a good rub down of the faces on sandpaper on the surface plate. We're getting there!
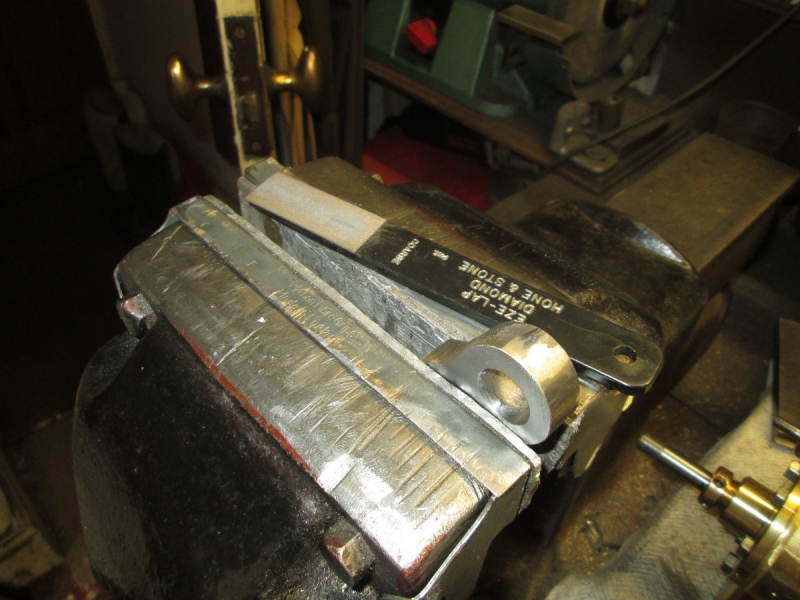
Then into the vice and the start of the hand work with diamond hones to get a really nice finish. You can't rush this bit! This is where I'll be starting tomorrow......
Stanley Challenger Graham
Stanley's View
scg1936 at talktalk.net
"Beware of certitude" (Jimmy Reid)
The floggings will continue until morale improves!
Stanley's View
scg1936 at talktalk.net
"Beware of certitude" (Jimmy Reid)
The floggings will continue until morale improves!