Shed Matters 3
-
Stanley

- Global Moderator

- Posts: 90699
- Joined: 23 Jan 2012, 12:01
- Location: Barnoldswick. Nearer to Heaven than Gloria.
Re: Shed Matters 3
Yup Kev, I've seen his post. No sweat, I'll wait until he gives the all clear.
Stanley Challenger Graham
Stanley's View
scg1936 at talktalk.net
"Beware of certitude" (Jimmy Reid)
The floggings will continue until morale improves!
Stanley's View
scg1936 at talktalk.net
"Beware of certitude" (Jimmy Reid)
The floggings will continue until morale improves!
-
PanBiker

- Site Administrator

- Posts: 16538
- Joined: 23 Jan 2012, 13:07
- Location: Barnoldswick - In the West Riding of Yorkshire, always was, always will be.
Re: Shed Matters 3
Stuck on this one for the moment struggling with file ownership on about 50,000 files!
Ian
-
Stanley
- Global Moderator
- Posts: 90699
- Joined: 23 Jan 2012, 12:01
- Location: Barnoldswick. Nearer to Heaven than Gloria.
Re: Shed Matters 3
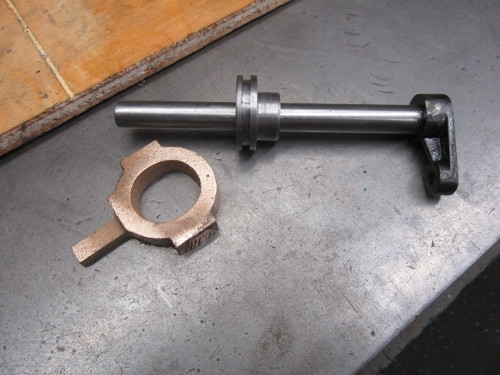
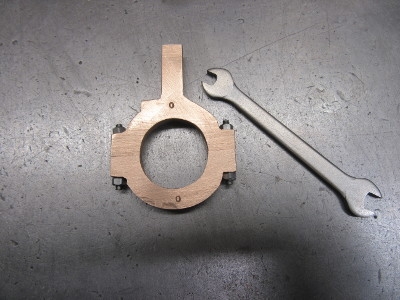
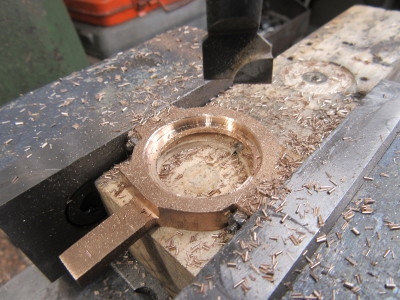
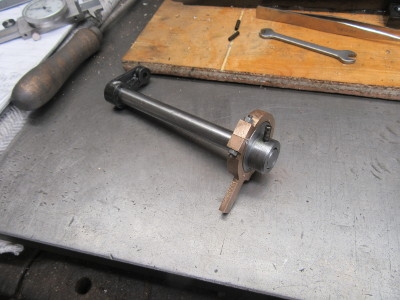
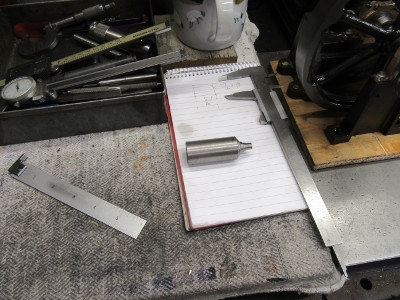
This was what we missed yesterday, I got the eccentric body made and this morning addressed the eccentric strap.
I set into the strap, I wanted proper relationships and sizes.
Next job was to saw the strap in two. Or was it? I managed to stop my self in time. I have to drill for the holding bolts while the strap is in one piece.
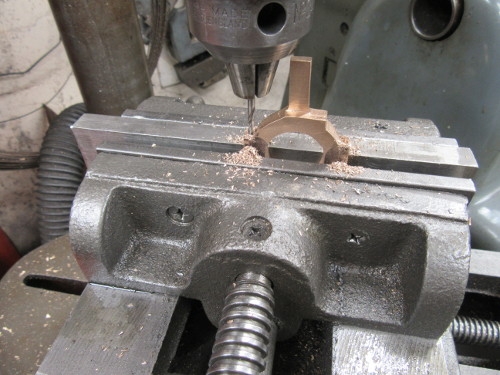
That's better, now you're shaping!.
That's enough on the strap for this morning. Notice the witness marks.
One last thing to do. My cutter needed a complete refurb, gulleting and backing off and then of course sharpening. So I did that before I finished. A nice morning.
Stanley Challenger Graham
Stanley's View
scg1936 at talktalk.net
"Beware of certitude" (Jimmy Reid)
The floggings will continue until morale improves!
Stanley's View
scg1936 at talktalk.net
"Beware of certitude" (Jimmy Reid)
The floggings will continue until morale improves!
-
Stanley
- Global Moderator
- Posts: 90699
- Joined: 23 Jan 2012, 12:01
- Location: Barnoldswick. Nearer to Heaven than Gloria.
Re: Shed Matters 3
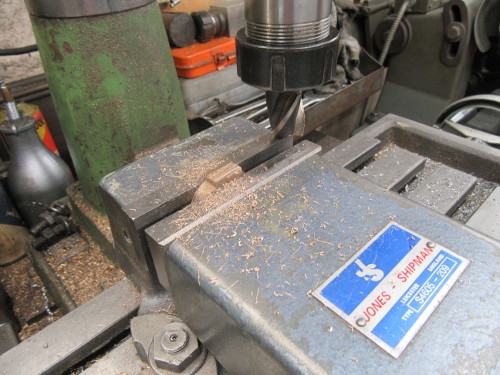
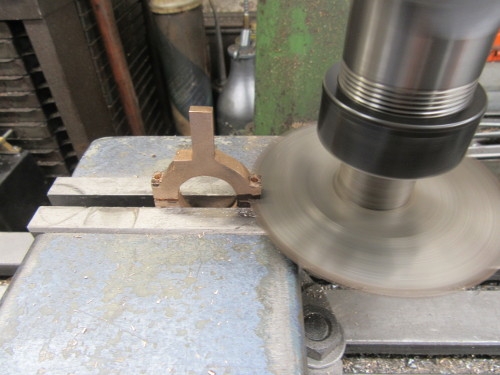
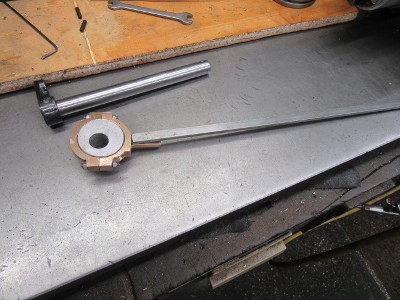
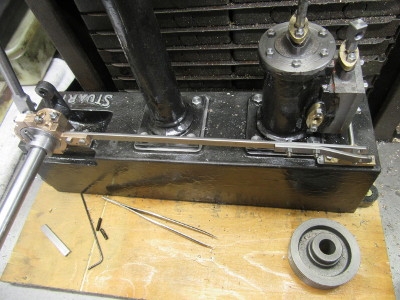
The first job was to fit the 7BA studs and nuts that anchor the two halves of the strap together. Daft as it sounds this took almost half an hour, all the holes had to be cleaned up.
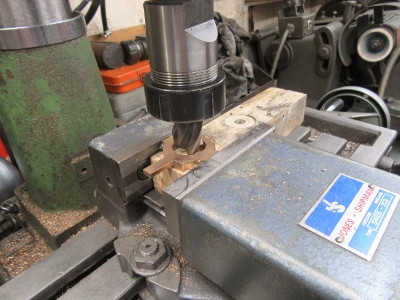
The job is to bore the strap out to fit the eccentric but leave a 1/16" wide ridge round the centre of the strap to fit in the groove in the eccentric. The first thing of course was some very careful measurements and decisions about the strap. I did a rough set up under the mill with the normal cutter in.
There's a pic missing here because the next job was to take the cutter out of the mill, install the boring head and get set up accurately. Then start to do some careful cutting.
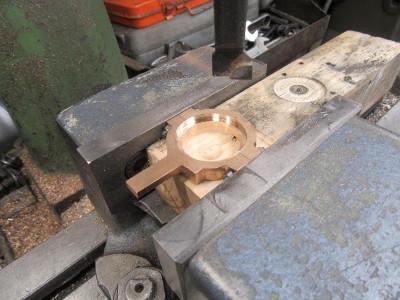
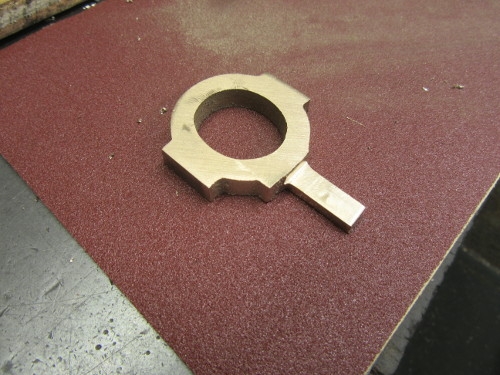
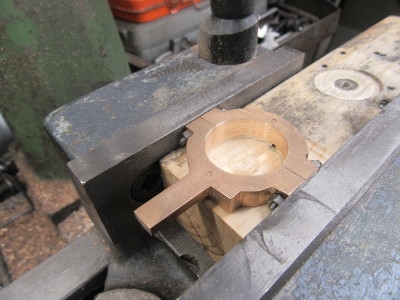
Eventually I got to this stage.
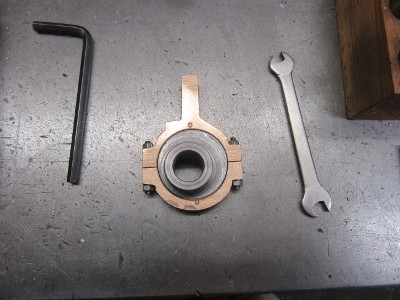
The strap fits but at the moment is tight, this is exactly how it should be and eventually I'll do the final fitting on it. The fact is it fits! Then I replaced the cutter on the mill and put the boring head away. I shall do a bit more cleaning and tidying tomorrow before going forward.
Stanley Challenger Graham
Stanley's View
scg1936 at talktalk.net
"Beware of certitude" (Jimmy Reid)
The floggings will continue until morale improves!
Stanley's View
scg1936 at talktalk.net
"Beware of certitude" (Jimmy Reid)
The floggings will continue until morale improves!
-
Stanley
- Global Moderator
- Posts: 90699
- Joined: 23 Jan 2012, 12:01
- Location: Barnoldswick. Nearer to Heaven than Gloria.
Re: Shed Matters 3
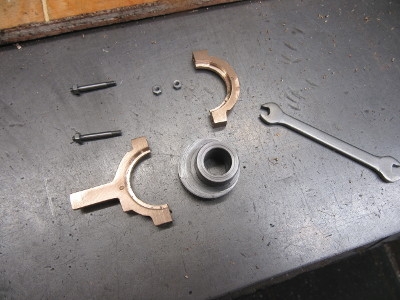
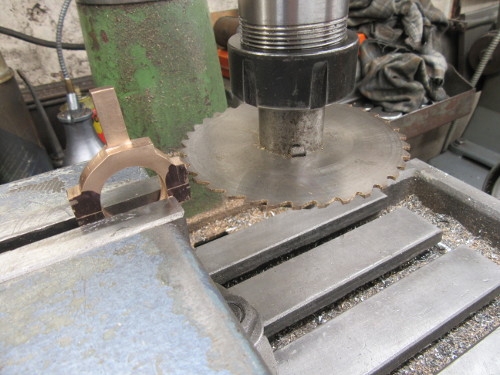
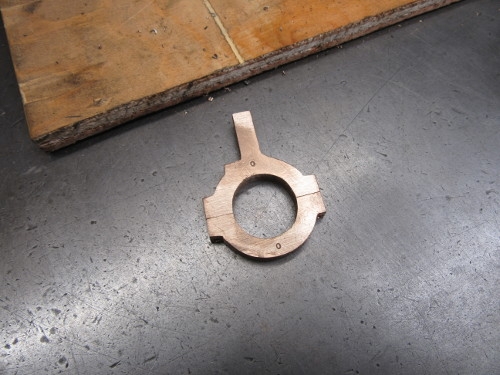
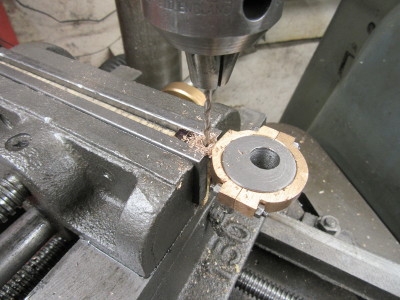
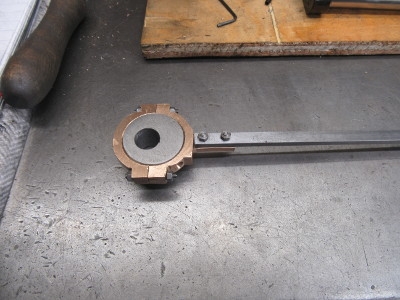
I changed my mind and decided to do more work on the eccentric and strap and improve it. Nowt to it!
On the way I drilled the oil hole in the strap and then decided to install the 1/8" set screw that bites onto the crankshaft.
It took almost two hours to get to this stage but no rush. The strap isn't dead tight but is free and when we get to later in the fitting process it will take its final polish. The temptation is to take it to bits and polish/abrade more off it but if you do that once it runs in you'll have a sloppy fit. Slow progress but a good morning.
Stanley Challenger Graham
Stanley's View
scg1936 at talktalk.net
"Beware of certitude" (Jimmy Reid)
The floggings will continue until morale improves!
Stanley's View
scg1936 at talktalk.net
"Beware of certitude" (Jimmy Reid)
The floggings will continue until morale improves!
-
Stanley
- Global Moderator
- Posts: 90699
- Joined: 23 Jan 2012, 12:01
- Location: Barnoldswick. Nearer to Heaven than Gloria.
Re: Shed Matters 3
Not in character I know but it occurred to me that a day off from the shed might be a good idea. So that's why there is no work on Margaret's engine today. No problem, it's just that I fancied a day off! 
Normal service tomorrow....
Normal service tomorrow....
Stanley Challenger Graham
Stanley's View
scg1936 at talktalk.net
"Beware of certitude" (Jimmy Reid)
The floggings will continue until morale improves!
Stanley's View
scg1936 at talktalk.net
"Beware of certitude" (Jimmy Reid)
The floggings will continue until morale improves!
-
Stanley
- Global Moderator
- Posts: 90699
- Joined: 23 Jan 2012, 12:01
- Location: Barnoldswick. Nearer to Heaven than Gloria.
Re: Shed Matters 3
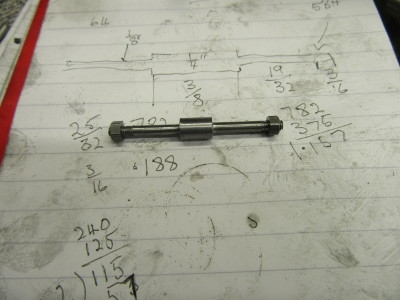
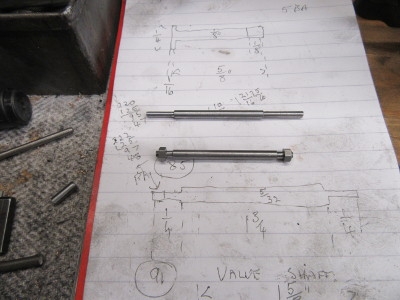
Today's task is to make the valve rod that connects the eccentric to the valve gear. Nowt to it, I grabbed the stock and started measuring and marking.
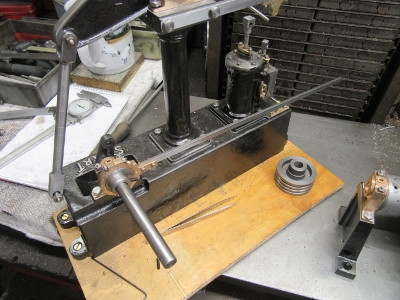
Well understood and I soon had the rod made and offered up to mark for cutting to length and drilling for the clevis pin. But then I looked again. Bugger, I'd grabbed the wrong stock, this is parallel motion stock, it's too thick! So I had to start again.

That's better, now I can make the jaw on the end of it.
Lots of measuring and bending and rounding of ends followed by fitting the jaw and finally drilling for the clevis pin.
Knocking off time. We have an eccentric rod and all it needs now is a bit of finishing. It's good progress and a nice morning.
Stanley Challenger Graham
Stanley's View
scg1936 at talktalk.net
"Beware of certitude" (Jimmy Reid)
The floggings will continue until morale improves!
Stanley's View
scg1936 at talktalk.net
"Beware of certitude" (Jimmy Reid)
The floggings will continue until morale improves!
-
Stanley
- Global Moderator
- Posts: 90699
- Joined: 23 Jan 2012, 12:01
- Location: Barnoldswick. Nearer to Heaven than Gloria.
Re: Shed Matters 3
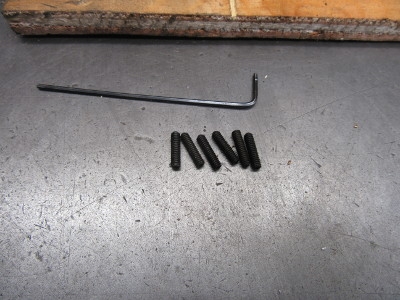
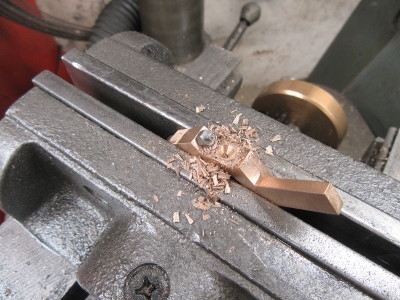
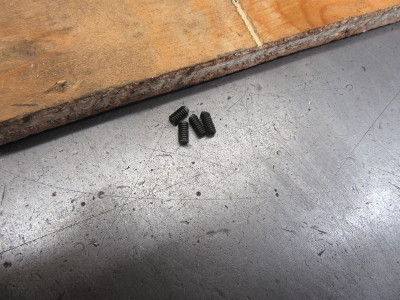
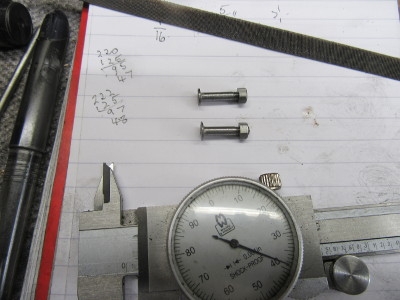
This morning I addressed one of the smaller matters, cutting the hardened Unbrako set screws down in length so that they look good when used.

These screws are hardened and I usually grind them down but that's a hit and miss operation so this morning I got these ex-army music wire cutters out to play. Just the ticket, they cut the screws perfectly with no damage to the cutters. Mind you I had to squeeze the jaws together with the vise!

Then I ground the ends to a finish that will ensure they fit the threads. I did this by hand on this diamond hone which means they are more accurate than if done on the grind stone.
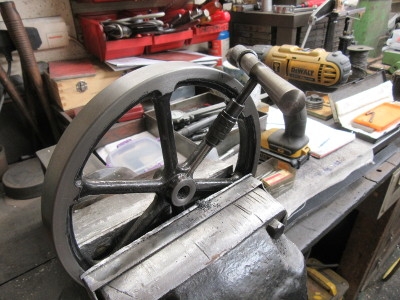
The flywheel needed a set screw as well so I drilled it freehand as it has to be on an angle. Then here I am threading it. That brought me to Co-op time. I shall finish this stage tomorrow, we need three more setscrews for the cranks in the valve gear.
Stanley Challenger Graham
Stanley's View
scg1936 at talktalk.net
"Beware of certitude" (Jimmy Reid)
The floggings will continue until morale improves!
Stanley's View
scg1936 at talktalk.net
"Beware of certitude" (Jimmy Reid)
The floggings will continue until morale improves!
-
Stanley
- Global Moderator
- Posts: 90699
- Joined: 23 Jan 2012, 12:01
- Location: Barnoldswick. Nearer to Heaven than Gloria.
Re: Shed Matters 3
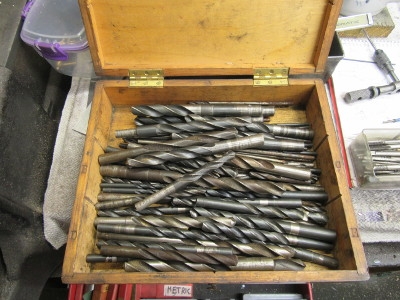
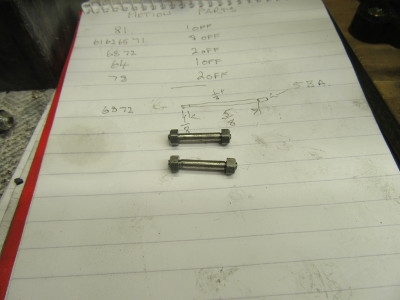
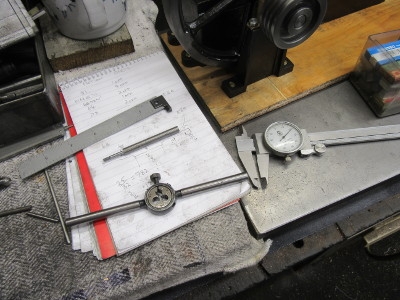
I spent quite a long time this morning sorting through my drills in order to find a No. 37 drill. This is just one box! After looking all through I found I hadn't got one.
Then I cleaned up the threads on all the set screws I shall need for the cranks in the valve gear and put them with the other parts I have ready.
Then I started assembling the crankshaft. and finished up with everything fitted except the collar I shall fit to stabilise the position of the crankshaft. That will be my first job tomorrow. Nice morning and I have enjoyed my time even though it's not all direct work on the engine. Oh, and I put a new battery in my digital caliper.
Stanley Challenger Graham
Stanley's View
scg1936 at talktalk.net
"Beware of certitude" (Jimmy Reid)
The floggings will continue until morale improves!
Stanley's View
scg1936 at talktalk.net
"Beware of certitude" (Jimmy Reid)
The floggings will continue until morale improves!
Re: Shed Matters 3
Batteries predominantly fail on a really cold day. It will be all those chemicals slowing down at low temperature. Today I noticed that the workshop clock has stopped.
You do not have the required permissions to view the files attached to this post.
-
Stanley
- Global Moderator
- Posts: 90699
- Joined: 23 Jan 2012, 12:01
- Location: Barnoldswick. Nearer to Heaven than Gloria.
Re: Shed Matters 3
Never seen a clock face like that before Bob! I like it.
Stanley Challenger Graham
Stanley's View
scg1936 at talktalk.net
"Beware of certitude" (Jimmy Reid)
The floggings will continue until morale improves!
Stanley's View
scg1936 at talktalk.net
"Beware of certitude" (Jimmy Reid)
The floggings will continue until morale improves!

Re: Shed Matters 3
Batteries predominantly fail on a really cold day. It will be all those chemicals slowing down at low temperature.
Tell me about it. Mrs P's outside twinkly lights all started failing one after another. Too late to get more batteries so in true scrooge tradition stripped out the three batteries from the units, connected groups of four up in series to give round 4.5 volts and lashed then to the control box. All is now sweetness and twinkly lights.
Tell me about it. Mrs P's outside twinkly lights all started failing one after another. Too late to get more batteries so in true scrooge tradition stripped out the three batteries from the units, connected groups of four up in series to give round 4.5 volts and lashed then to the control box. All is now sweetness and twinkly lights.
-
Stanley
- Global Moderator
- Posts: 90699
- Joined: 23 Jan 2012, 12:01
- Location: Barnoldswick. Nearer to Heaven than Gloria.
Re: Shed Matters 3
Can't blame the calliper battery failure on temperature. The shed is heated and the battery is at least 3 years old....
I had a spare 357 about my person....
I had a spare 357 about my person....
Stanley Challenger Graham
Stanley's View
scg1936 at talktalk.net
"Beware of certitude" (Jimmy Reid)
The floggings will continue until morale improves!
Stanley's View
scg1936 at talktalk.net
"Beware of certitude" (Jimmy Reid)
The floggings will continue until morale improves!
-
Stanley
- Global Moderator
- Posts: 90699
- Joined: 23 Jan 2012, 12:01
- Location: Barnoldswick. Nearer to Heaven than Gloria.
Re: Shed Matters 3
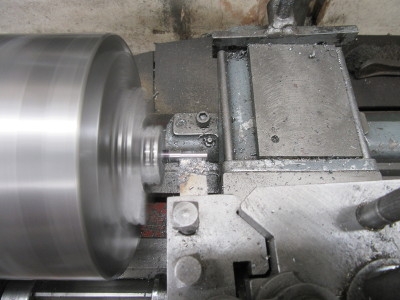
The main task today is to make the spacer collar for the crankshaft which, in the final fit, together with the pulley outboard of the crankshaft bearing, will locate the position of the crank and its shaft. I found a piece of scrap. made a fag packet drawing and got on with it.
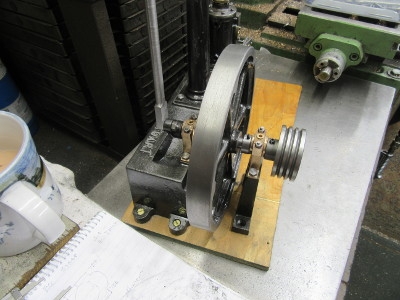
At closing time I had made the collar and fitted it. I had also cleaned the excess black paint off the flywheel rim which I had forgotten about earlier. None of this is final fitting, that will come when I am mounting the engine on it's final finished base. At the moment my attitude is to finish making the parts and then do the base and the final fit.
An hour and a half on my feet. Now for a walk!
Stanley Challenger Graham
Stanley's View
scg1936 at talktalk.net
"Beware of certitude" (Jimmy Reid)
The floggings will continue until morale improves!
Stanley's View
scg1936 at talktalk.net
"Beware of certitude" (Jimmy Reid)
The floggings will continue until morale improves!
-
Stanley
- Global Moderator
- Posts: 90699
- Joined: 23 Jan 2012, 12:01
- Location: Barnoldswick. Nearer to Heaven than Gloria.
Re: Shed Matters 3
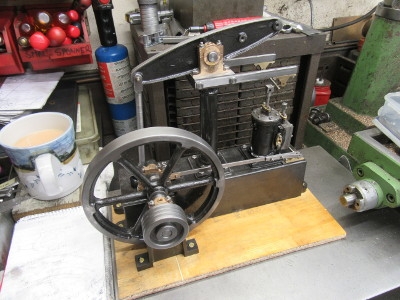
I had a good think this morning and decided I was on the right track yesterday, I am going to tighten everything up on the temporary baseboard and then make all the small parts needed for the final fitting. So I went through it as it stands, tightened everything up and screwed the outrigger down to the board. Then I spent quite a long time sorting out what had to be made.
Then quietly away eating into the list. I finished up half way through one part but that's all right!
So at least I know exactly where I am starting tomorrow!
A bitty morning but good progress.
Stanley Challenger Graham
Stanley's View
scg1936 at talktalk.net
"Beware of certitude" (Jimmy Reid)
The floggings will continue until morale improves!
Stanley's View
scg1936 at talktalk.net
"Beware of certitude" (Jimmy Reid)
The floggings will continue until morale improves!
-
Stanley
- Global Moderator
- Posts: 90699
- Joined: 23 Jan 2012, 12:01
- Location: Barnoldswick. Nearer to Heaven than Gloria.
Re: Shed Matters 3
This morning was more fiddling work finishing yesterday's shaft and making more small pieces.
There were a couple of other small shafts but I forgot to snap them!
This was knocking off time but not before I had spent time identifying other parts to make tomorrow that involve the lathe. (I'm not counting all the links) I also had to solve a mystery, this is the third engine I have made from these drawings and yet today I found a mistake in one part. It took a bit of sorting but I have it cracked now and can make the part tomorrow. I can't understand why I can't remember this from the others....
A good morning and the pile of bits is growing. It strikes me that as soon as I get a chance I must make the base board, we are close to needing it!
Stanley Challenger Graham
Stanley's View
scg1936 at talktalk.net
"Beware of certitude" (Jimmy Reid)
The floggings will continue until morale improves!
Stanley's View
scg1936 at talktalk.net
"Beware of certitude" (Jimmy Reid)
The floggings will continue until morale improves!
-
Stanley
- Global Moderator
- Posts: 90699
- Joined: 23 Jan 2012, 12:01
- Location: Barnoldswick. Nearer to Heaven than Gloria.
Re: Shed Matters 3
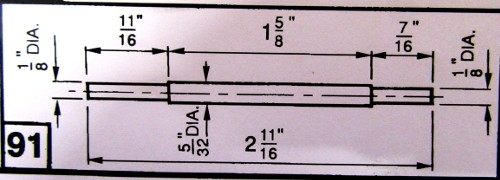
Here's the puzzle I had. Spot the mistake?
Stanley Challenger Graham
Stanley's View
scg1936 at talktalk.net
"Beware of certitude" (Jimmy Reid)
The floggings will continue until morale improves!
Stanley's View
scg1936 at talktalk.net
"Beware of certitude" (Jimmy Reid)
The floggings will continue until morale improves!
Re: Shed Matters 3
So did you make it 2 3/4” Stanley?
-
Stanley
- Global Moderator
- Posts: 90699
- Joined: 23 Jan 2012, 12:01
- Location: Barnoldswick. Nearer to Heaven than Gloria.
Re: Shed Matters 3
I'm making it this morning and will add an extra 1/8" to each end. When I come to fit it I'll just cut the surplus off....
Stanley Challenger Graham
Stanley's View
scg1936 at talktalk.net
"Beware of certitude" (Jimmy Reid)
The floggings will continue until morale improves!
Stanley's View
scg1936 at talktalk.net
"Beware of certitude" (Jimmy Reid)
The floggings will continue until morale improves!
-
Stanley
- Global Moderator
- Posts: 90699
- Joined: 23 Jan 2012, 12:01
- Location: Barnoldswick. Nearer to Heaven than Gloria.
Re: Shed Matters 3
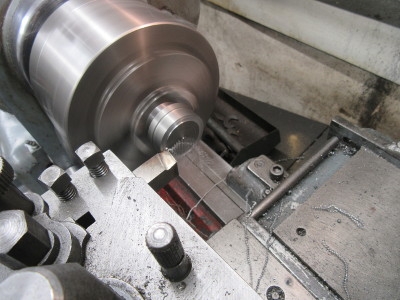
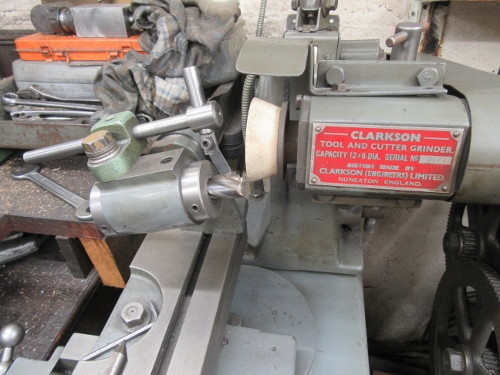
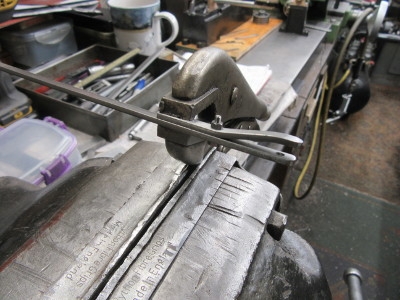
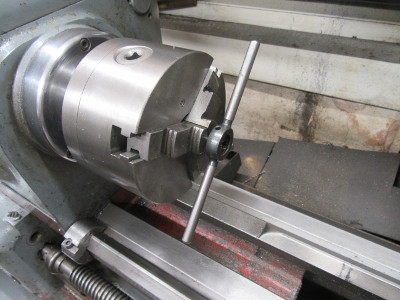
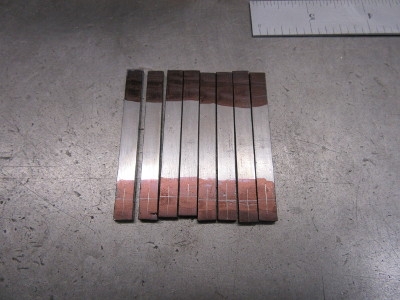
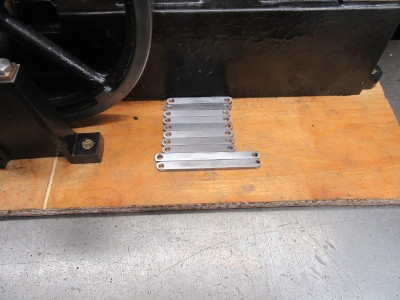
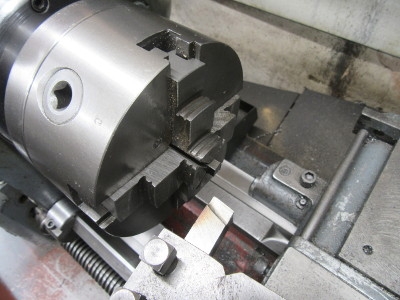
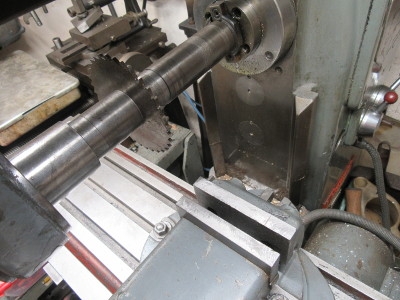
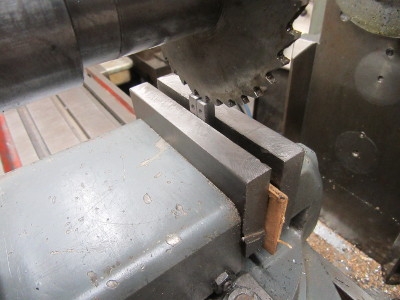
If you're thinking this is a big lump considering what we are doing but I wasn't totally satisfied about my cutter and so here, after re-sharpening it I am testing that it's cutting on centre. This is the best way of doing it.

These two pics are all you need to understand what I've been doing in the shed. First I made the two shafts (to the right size!) and then I cut the Blanks for the ten links I have to make next for the valve gear and the parallel motion. So once again, I know where I am starting tomorrow morning! It's fiddly repetitious work but necessary.....
Stanley Challenger Graham
Stanley's View
scg1936 at talktalk.net
"Beware of certitude" (Jimmy Reid)
The floggings will continue until morale improves!
Stanley's View
scg1936 at talktalk.net
"Beware of certitude" (Jimmy Reid)
The floggings will continue until morale improves!
-
Stanley
- Global Moderator
- Posts: 90699
- Joined: 23 Jan 2012, 12:01
- Location: Barnoldswick. Nearer to Heaven than Gloria.
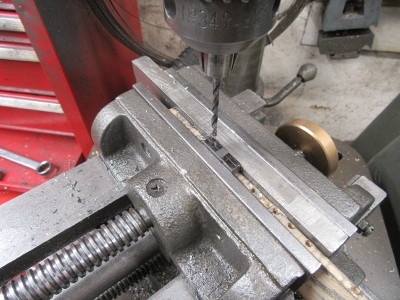
Re: Shed Matters 3
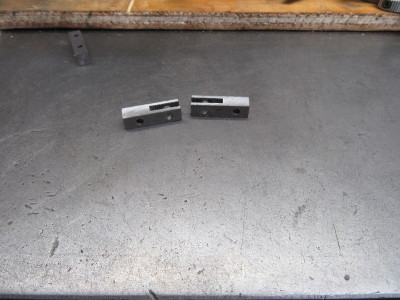
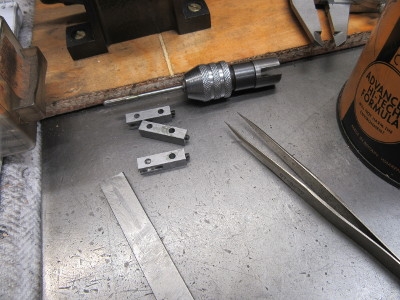
That's right, the blanks need an 1/8" hole in each end at very specific locations so the first thing to do is mark them. I could clamp them together and drill all of them at once but what happens then is almost certainly the drill drifting a bit. I am going to do them all individually, that way I can be sure they are accurate.
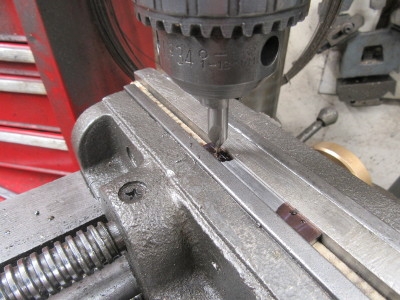
This centre drill has a 1/8" pilot drill so I am using it for the holes I need. Being rigid means it's more accurate! Quietly away for an hour and a half, drilling, checking marking the mating holes and more drilling. Then finishing on emery paper.
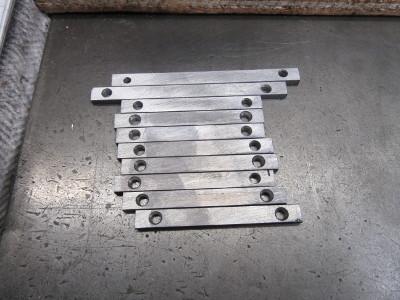
Here we are at knocking off time. They are ready to have some shape put in them now. I'll decide tomorrow how pretty I intend to make them.
Stanley Challenger Graham
Stanley's View
scg1936 at talktalk.net
"Beware of certitude" (Jimmy Reid)
The floggings will continue until morale improves!
Stanley's View
scg1936 at talktalk.net
"Beware of certitude" (Jimmy Reid)
The floggings will continue until morale improves!
-
Stanley
- Global Moderator
- Posts: 90699
- Joined: 23 Jan 2012, 12:01
- Location: Barnoldswick. Nearer to Heaven than Gloria.
Re: Shed Matters 3
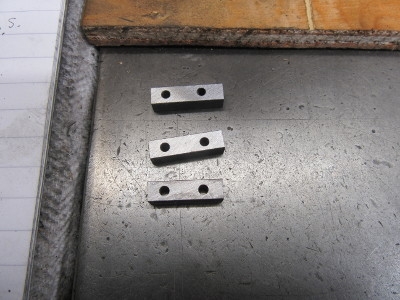
Only one picture this morning to show the results of just short of an hour's work in a cold shed despite the central heating. It's a very cold morning. All the links are ready for any final prettification or what is most likely, fitting. I am not the best man in the world at prettification.
The next job is to make the cranks for the valve gearing. That's for tomorrow, I'm glad to be back in the warmth of the kitchen!
Stanley Challenger Graham
Stanley's View
scg1936 at talktalk.net
"Beware of certitude" (Jimmy Reid)
The floggings will continue until morale improves!
Stanley's View
scg1936 at talktalk.net
"Beware of certitude" (Jimmy Reid)
The floggings will continue until morale improves!
-
Stanley
- Global Moderator
- Posts: 90699
- Joined: 23 Jan 2012, 12:01
- Location: Barnoldswick. Nearer to Heaven than Gloria.
Re: Shed Matters 3

Today is the cranks in the valve gearing. First job was to do a fag packet drawing and then find the 1/4" stock. For some reason that was more difficult than it should have been and took over 20 minutes! In addition I had to give a bit of thought to where and how I fit the set screws that fasten the crank to the operating shaft. The wall thickness of a 1/8" hole in 1/4" stock is too small to give a good hold to the threads of the set screw so I am gong to try installing them differently, from the end of the crank. I think I can get to them to tighten them!
The next thing was to cut the stock to length, change the 3 jaw chuck for the 4 jaw SC and face the ends of the cranks in the lathe.

Then measure and mark the positions for the 1/8" holes.
Then some careful drilling of the six holes. By the way, they need drilling before you cut the clevis in two of them otherwise you risk squeezing the jaws in.
The holes drilled we have to think about the 1/8" slot we need in two of them.
I finished my hour and a half in the shed by getting the horizontal mill ready to mill the clevis gaps by fitting a sharp 1/8" cutter. That will be the first job tomorrow morning. A morning of quiet steady progress.
Stanley Challenger Graham
Stanley's View
scg1936 at talktalk.net
"Beware of certitude" (Jimmy Reid)
The floggings will continue until morale improves!
Stanley's View
scg1936 at talktalk.net
"Beware of certitude" (Jimmy Reid)
The floggings will continue until morale improves!
-
Stanley
- Global Moderator
- Posts: 90699
- Joined: 23 Jan 2012, 12:01
- Location: Barnoldswick. Nearer to Heaven than Gloria.
Re: Shed Matters 3
It took me 25 minutes to get the mill set up and the vise positioned so that a straight plunge cut of .4" to give me my two clevis gaps. Worth taking the time
Because two minutes cutting gives you a nice accurate result like this.
Then some careful drilling and tapping and I have my set screws fitted. Tomorrow I'll round the ends and make them pretty! A nice quiet hour and a half with no cock-ups.
Stanley Challenger Graham
Stanley's View
scg1936 at talktalk.net
"Beware of certitude" (Jimmy Reid)
The floggings will continue until morale improves!
Stanley's View
scg1936 at talktalk.net
"Beware of certitude" (Jimmy Reid)
The floggings will continue until morale improves!