Shed Matters 3
-
Stanley

- Global Moderator

- Posts: 90301
- Joined: 23 Jan 2012, 12:01
- Location: Barnoldswick. Nearer to Heaven than Gloria.
Re: SHED MATTERS 2
They still make an RF31 which in the 12 speed version is the same as mine but mine has a longer column, more lift China.
Stanley Challenger Graham
Stanley's View
scg1936 at talktalk.net
"Beware of certitude" (Jimmy Reid)
The floggings will continue until morale improves!
Stanley's View
scg1936 at talktalk.net
"Beware of certitude" (Jimmy Reid)
The floggings will continue until morale improves!
-
Stanley
- Global Moderator
- Posts: 90301
- Joined: 23 Jan 2012, 12:01
- Location: Barnoldswick. Nearer to Heaven than Gloria.
Re: SHED MATTERS 2

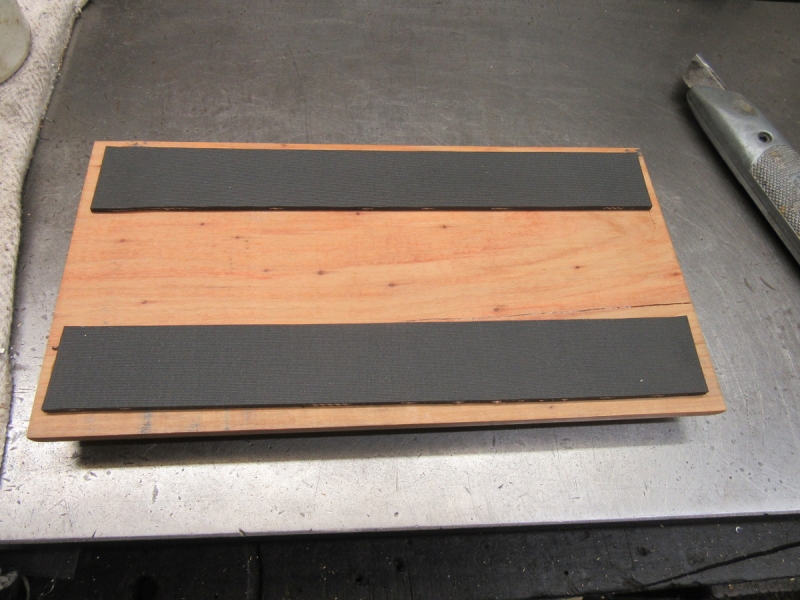
The shed isn't what you'd call a hive of industry this morning. This close warm weather is sapping my energy. But I have made one small step forward. I want to fit the bases that Mick made for me to the two engines and the steam hammer. I want something on the bases to protect the surfaces they are sat on. So I have glued these strips of rubber sheet to them with bog standard impact adhesive. I'll let them dry thoroughly and set today and fit them tomorrow.....
Stanley Challenger Graham
Stanley's View
scg1936 at talktalk.net
"Beware of certitude" (Jimmy Reid)
The floggings will continue until morale improves!
Stanley's View
scg1936 at talktalk.net
"Beware of certitude" (Jimmy Reid)
The floggings will continue until morale improves!
-
Stanley
- Global Moderator
- Posts: 90301
- Joined: 23 Jan 2012, 12:01
- Location: Barnoldswick. Nearer to Heaven than Gloria.
Re: SHED MATTERS 2
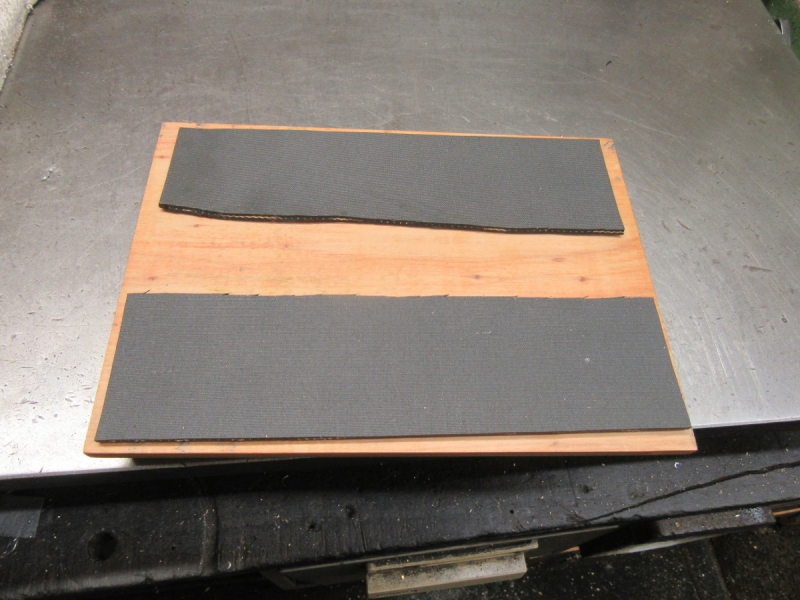
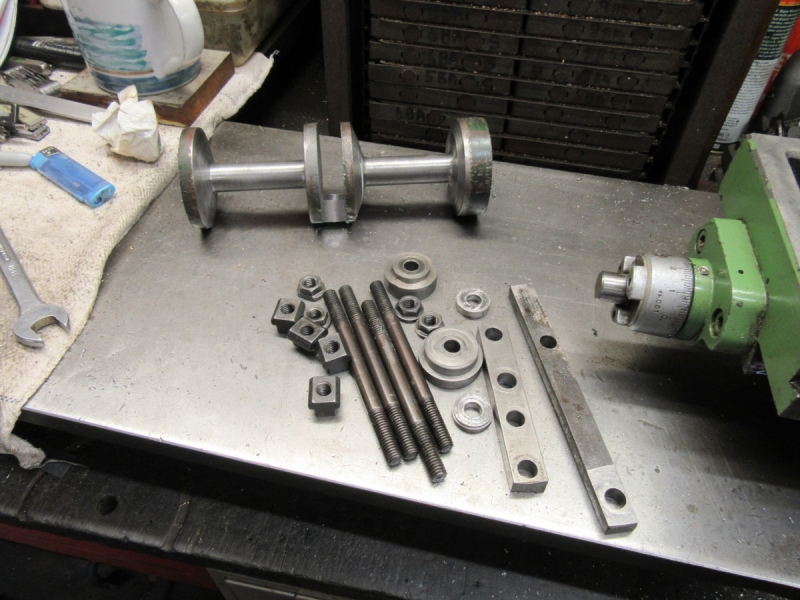
It's been a busy morning. Washing and vacuuming and then a bit of shed. Then I addressed the engine bases that Mick made for me. Lovely quality and I think you'll agree that they are a big improvement. Biggest job was getting the big compound on to its base! It's too bloody heavy!
Call me a wimp but that's it, I've done enough for this morning and am definitely not in the mood for crankshaft designing!
Stanley Challenger Graham
Stanley's View
scg1936 at talktalk.net
"Beware of certitude" (Jimmy Reid)
The floggings will continue until morale improves!
Stanley's View
scg1936 at talktalk.net
"Beware of certitude" (Jimmy Reid)
The floggings will continue until morale improves!


-
Stanley
- Global Moderator
- Posts: 90301
- Joined: 23 Jan 2012, 12:01
- Location: Barnoldswick. Nearer to Heaven than Gloria.
Re: SHED MATTERS 2
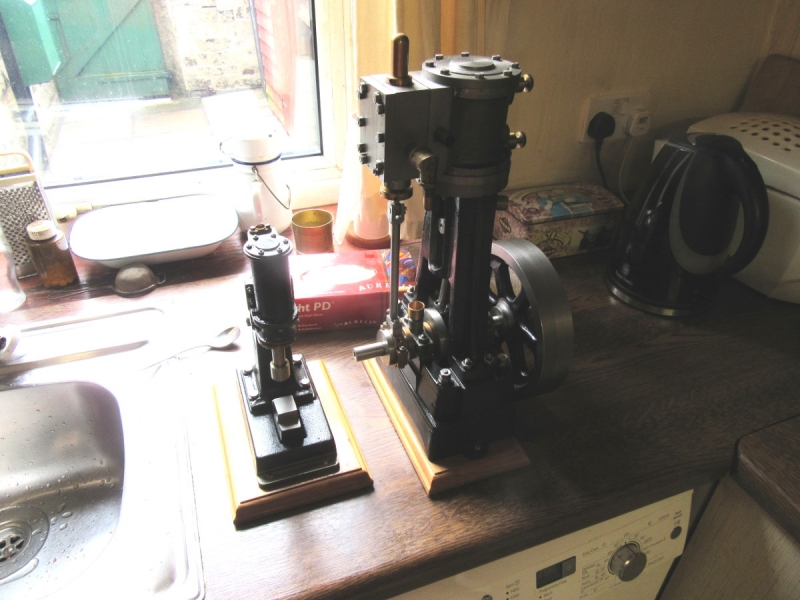
Thanks Kev. I didn't actually lift it, I tipped it on its side and then back on to the base.
Stanley Challenger Graham
Stanley's View
scg1936 at talktalk.net
"Beware of certitude" (Jimmy Reid)
The floggings will continue until morale improves!
Stanley's View
scg1936 at talktalk.net
"Beware of certitude" (Jimmy Reid)
The floggings will continue until morale improves!
-
Stanley
- Global Moderator
- Posts: 90301
- Joined: 23 Jan 2012, 12:01
- Location: Barnoldswick. Nearer to Heaven than Gloria.
Re: SHED MATTERS 2
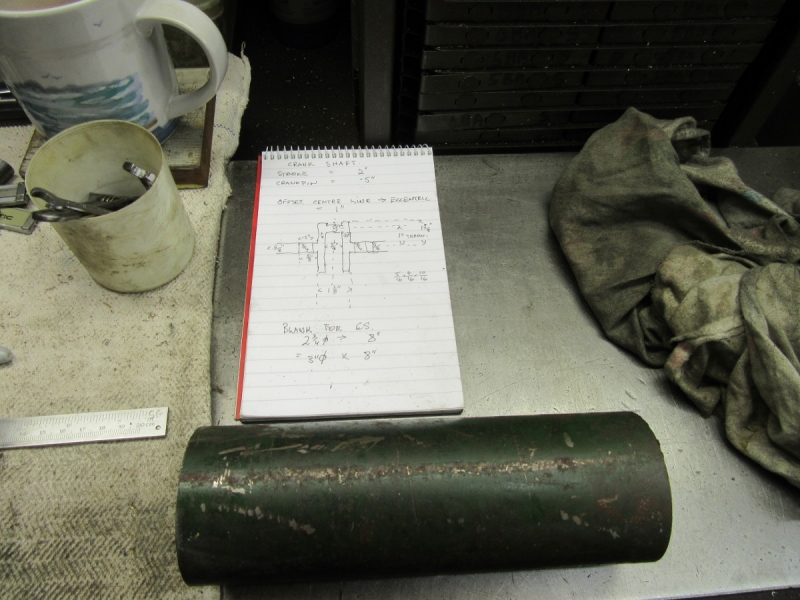
It's been a nice morning..... I was in the shed just after 7AM and set to to design my crankshaft. Lots of things to consider, a very enjoyable exercise. Then a fag packet drawing and a search for a piece of steel I can get a 2.75" bar out of. I found an old piece of mill shafting that is nominally 2.75" but I can get away with it. Then I measured a piece just over 8" long and asked Mrs McMaster to chop it off for me. Nice to have her back on the team.
While the shafting was under the saw I swapped the 3 jaw out for the 9" 4 jaw independent. There's a good reason for choosing this chuck.... I had to swap the jaws round and set it somewhere near the diameter of the shaft, this took about 15 minutes and just as I got it set up Mrs McMaster finished sawing the shaft. The new secondhand blade is doing a good job.
We have a drawing and a piece of stock. Let crankshaft making commence! Bit of bleeding obvious here for anyone who hasn't watched me do this before. You'll find all sorts of complicated ways of making crankshafts involving building them up pinning welding etc. Newton taught me to do them the old fashioned way, chop them out of the solid so that's what we are going to do. You choose your own way, all I can say is that this way has never failed me.
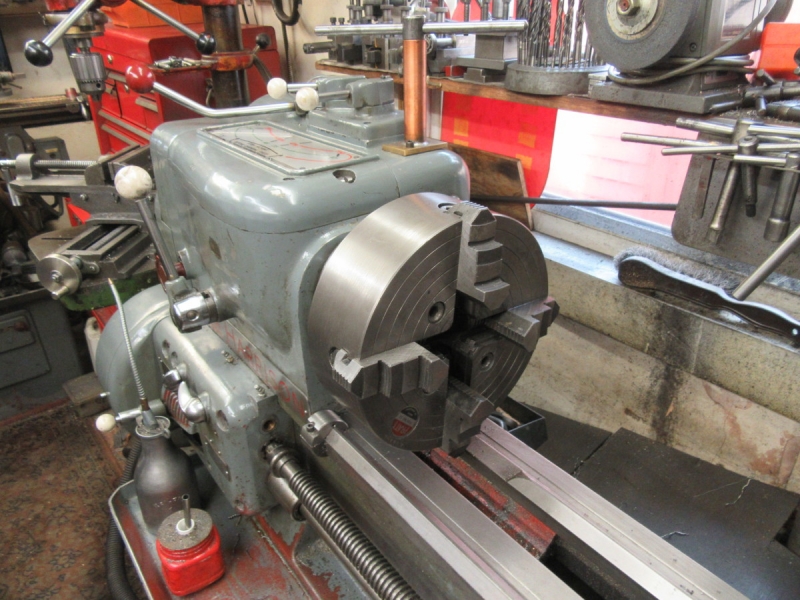
The first thing we need because I have so little metal to play with for the crank itself is get two accurate centres, one at each end. So a set up in the big 4 jaw, dial it in and pop a centre in. Then reverse it and do the same at the other end.
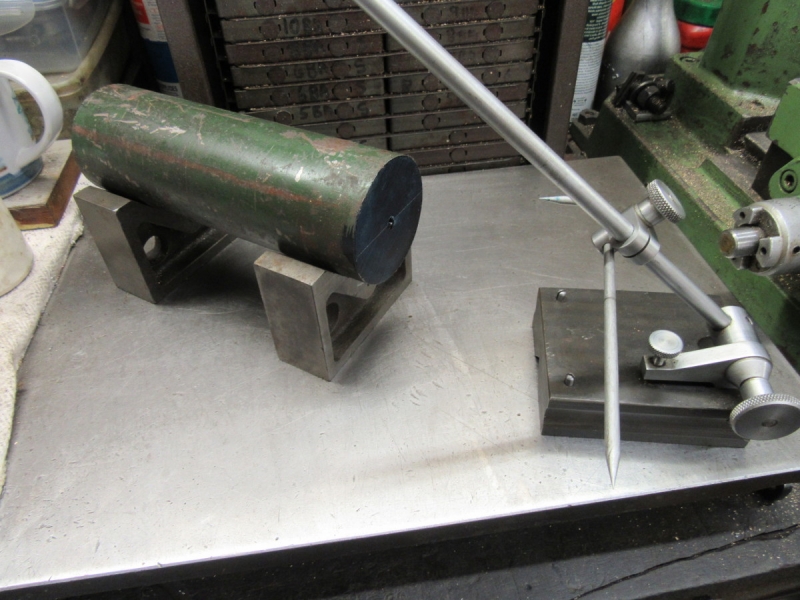
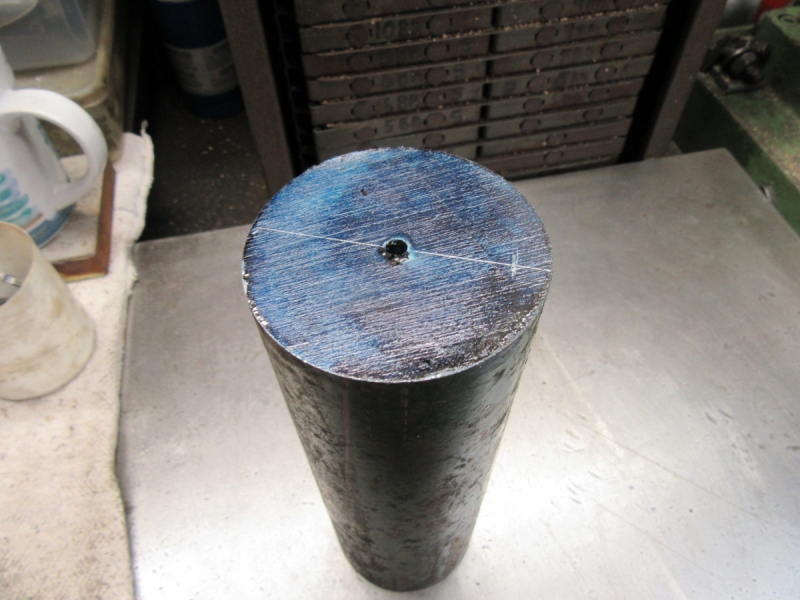
Then blue the ends, set up on two vee blocks on the surface plate, strike a line through the centre at both ends and measure 1" out for the throw. Put a good pop mark in each end and then drill the centre holes for the crank pin axis by hand.
Here's why we are using this chuck. I have a morse taper adapter 5-3 which, while morse 5 is not the right taper for the mandrel I know that it is exactly the same size as the bore in the chuck and if pressed in is dead central. I have an old centre that's a bit short and just the right length. Popped into the adapter it's within a gnat's whisker of central so I can mount the stock on that, grab it using the chuck jaws and know I have a solid accurate set up. It works just as well when I am turning eccentric for the crank of course.
We are ready for making some muck!
Stanley Challenger Graham
Stanley's View
scg1936 at talktalk.net
"Beware of certitude" (Jimmy Reid)
The floggings will continue until morale improves!
Stanley's View
scg1936 at talktalk.net
"Beware of certitude" (Jimmy Reid)
The floggings will continue until morale improves!
-
Stanley
- Global Moderator
- Posts: 90301
- Joined: 23 Jan 2012, 12:01
- Location: Barnoldswick. Nearer to Heaven than Gloria.
Re: SHED MATTERS 2

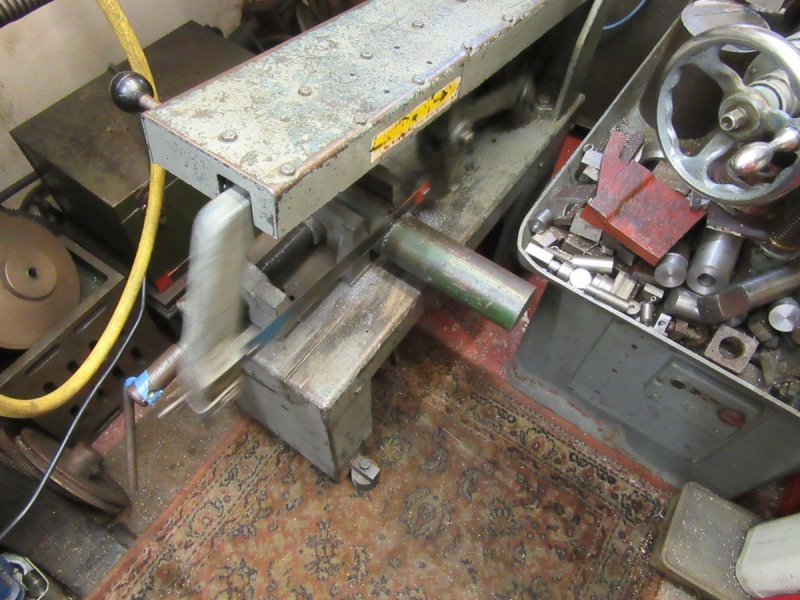
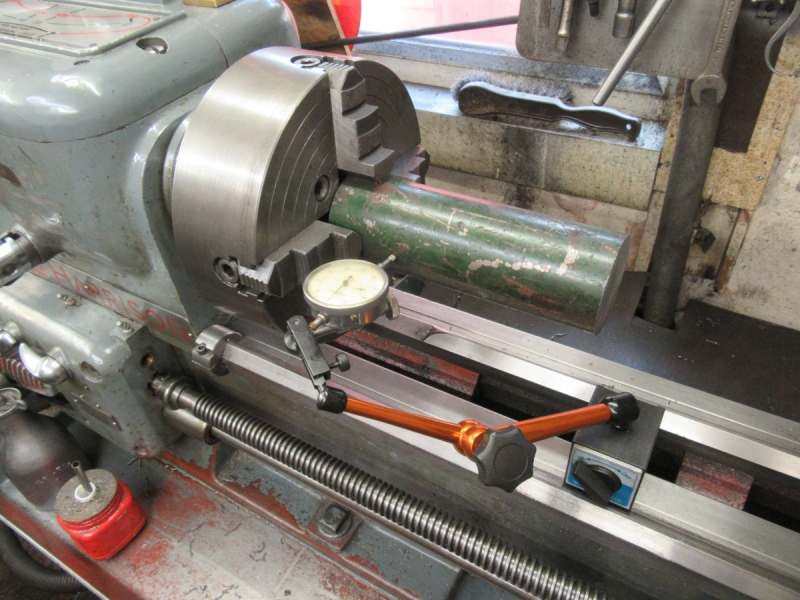
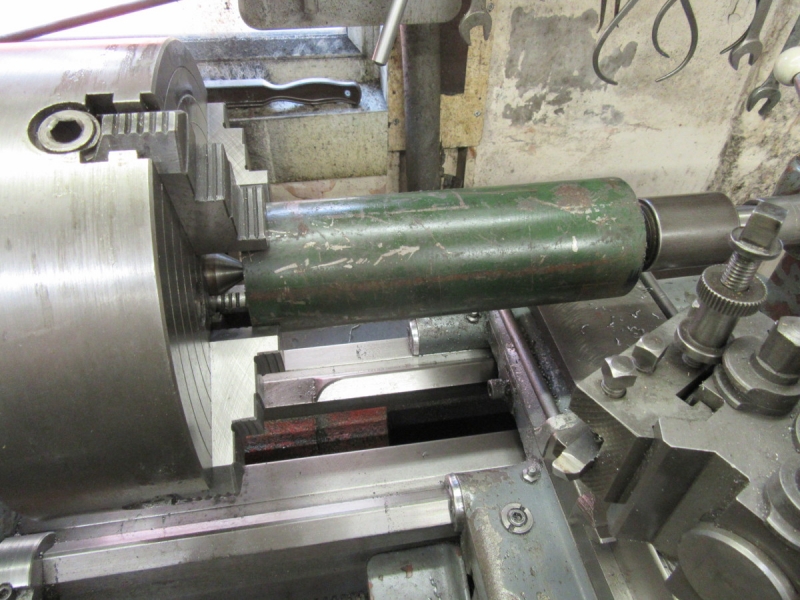
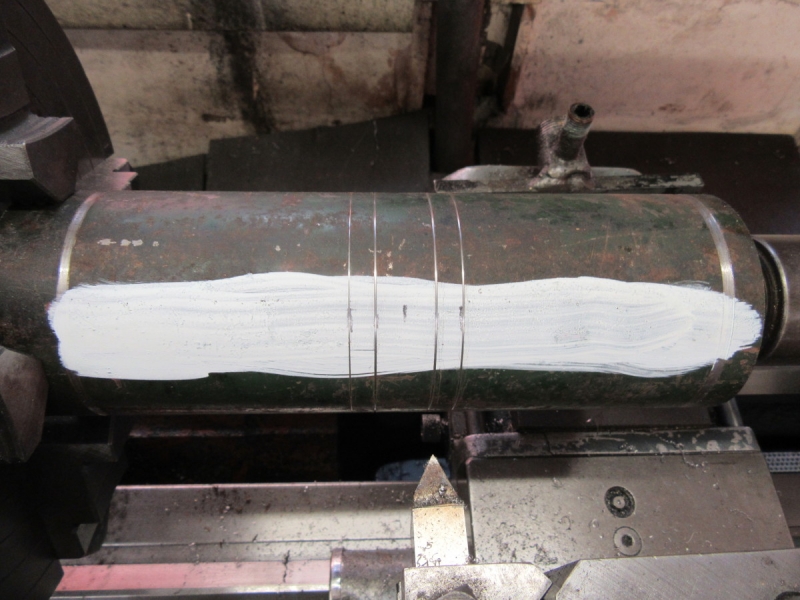
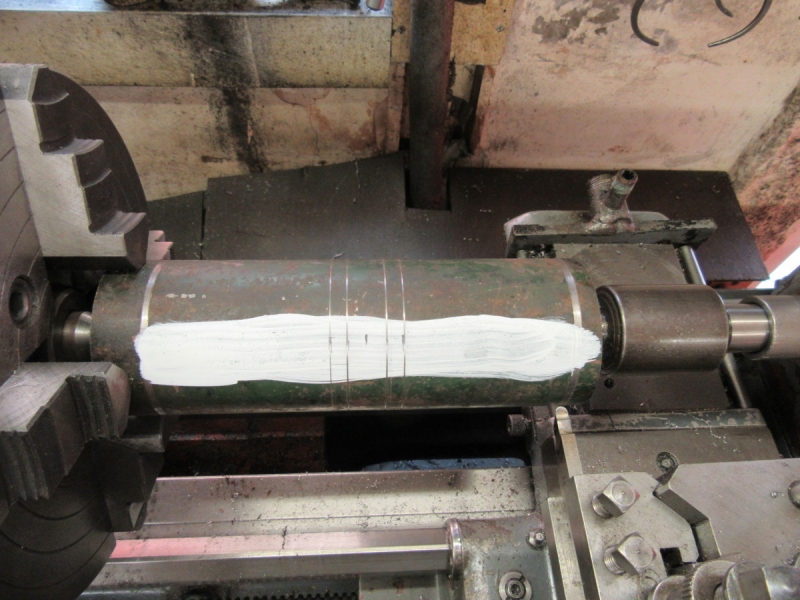
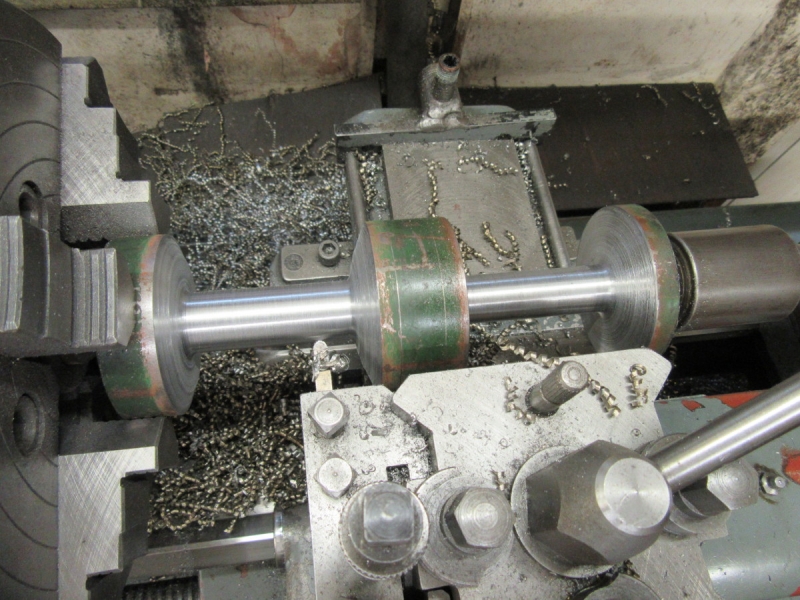
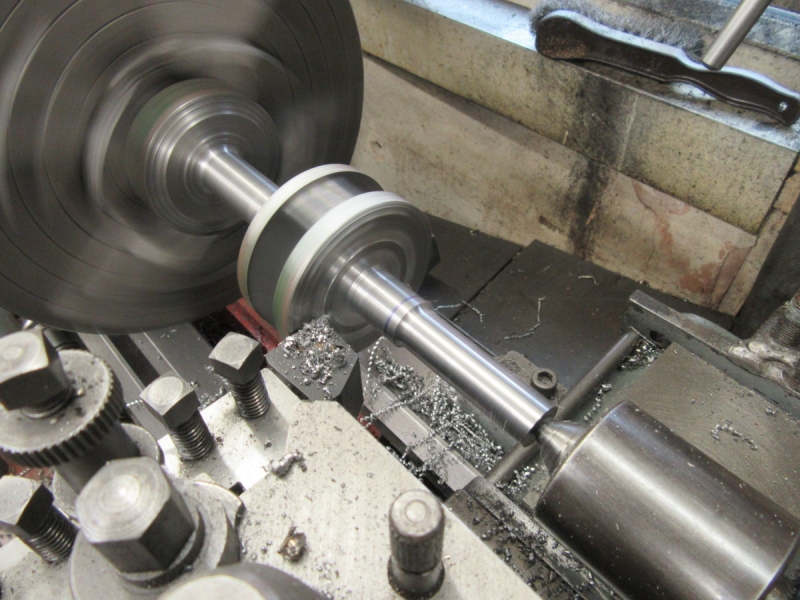
I started this morning by marking each end of the working area. I used the parting tool for this because I wanted to be quite certain that, at the chuck end, there was plenty of room to get the parting tool in. At the same time this enabled me to identify any slight deviation from centre at the chuck end. There was a touch so I corrected it by adjusting the jaws. Then I wiped the piece down with brake fluid and put a band of white layout fluid on it because it takes pencil marks.
First find the centre then mark out the cuts for the web of the crank and mark them permanently with a sharp pointed tool. Check them carefully!
Then I fitted the cutter I am going to use. I found out a long time ago that the one that works for me best is what Newton used to call 'a widow's tooth', very sharp, good rake on it and rounded nicely at the sides. Then checked it for height. Last check of the chuck and the centre and I think we're ready.
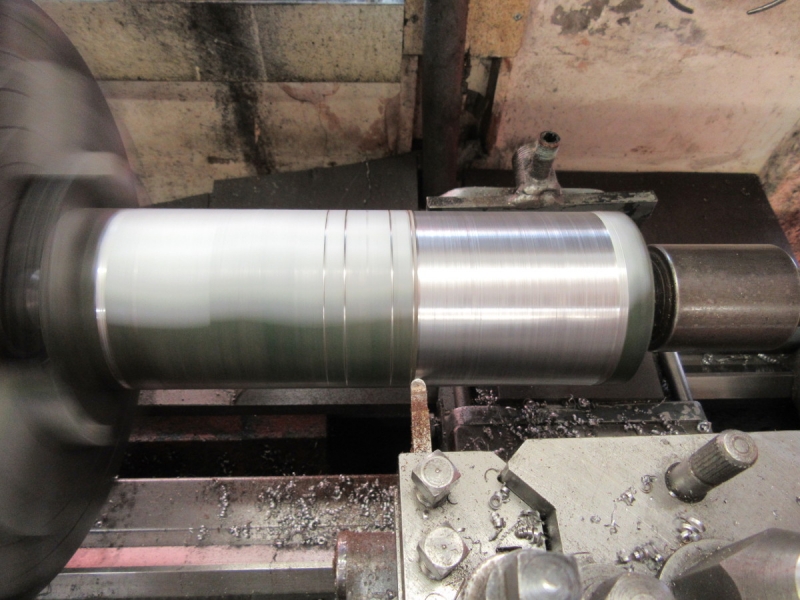
300rpm, 10Thou cut and adjust the feed rate to get a straw-coloured chip and away we go. Then it's a question of patience, nobody's pushing me and we have plenty of time. As the diameter lessens I leave everything as it is but increase the depth of cut.
Getting close to knocking off time. No heroic cuts but notice I'm making blue swarf with a high speed steel cutter. That's a good way of telling you when you are getting close to the limit. I didn't use any oil because I don't want the smoke! Keep a close eye on the temperature of the workpiece and its affect on the tailstock centre. It can build up a lot of pressure because of expansion. Then I had a quick clean up and got the main of the swarf out of the shed, including the floor.
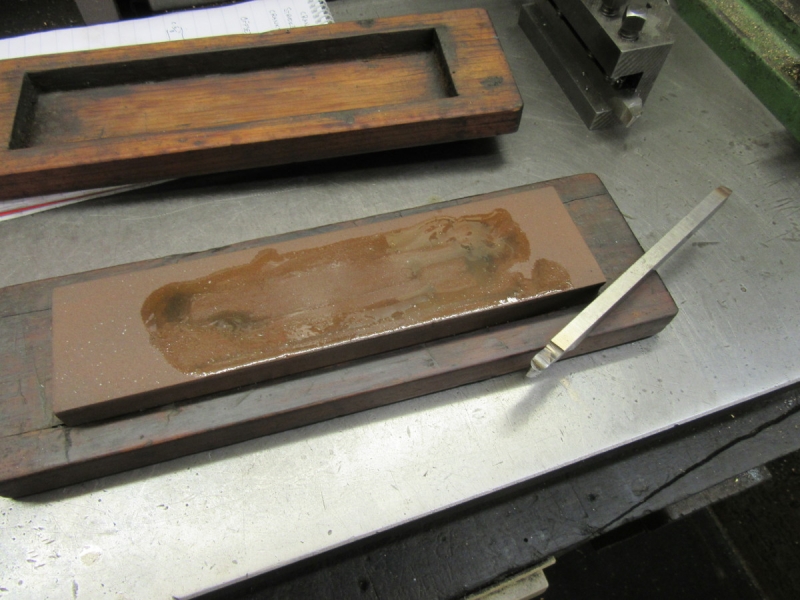
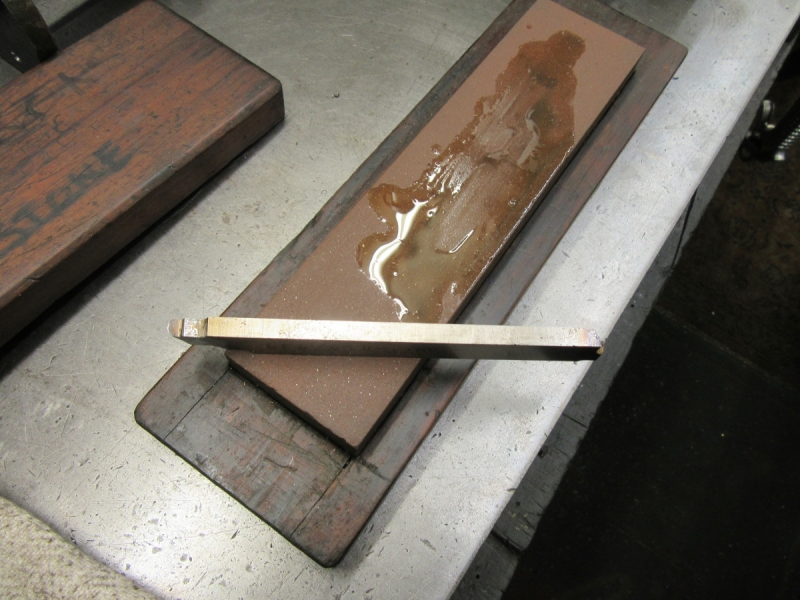
The last thing I did was to get the fine India Stone out and hone the cutter to the best edge I can. Replace it in the tool holder and do a final check on the centre height.
No heroic turning but good progress. The main thing is don't push too hard, you've got plenty of time! That'll do until tomorrow! Remember, the aim is to get it right the first time!
Stanley Challenger Graham
Stanley's View
scg1936 at talktalk.net
"Beware of certitude" (Jimmy Reid)
The floggings will continue until morale improves!
Stanley's View
scg1936 at talktalk.net
"Beware of certitude" (Jimmy Reid)
The floggings will continue until morale improves!
-
Stanley
- Global Moderator
- Posts: 90301
- Joined: 23 Jan 2012, 12:01
- Location: Barnoldswick. Nearer to Heaven than Gloria.
Re: SHED MATTERS 2
No swarf this morning.... too much shopping and domestic work to be attended to.... I shall be in there tomorrow.
Stanley Challenger Graham
Stanley's View
scg1936 at talktalk.net
"Beware of certitude" (Jimmy Reid)
The floggings will continue until morale improves!
Stanley's View
scg1936 at talktalk.net
"Beware of certitude" (Jimmy Reid)
The floggings will continue until morale improves!
-
Stanley
- Global Moderator
- Posts: 90301
- Joined: 23 Jan 2012, 12:01
- Location: Barnoldswick. Nearer to Heaven than Gloria.
Re: SHED MATTERS 2

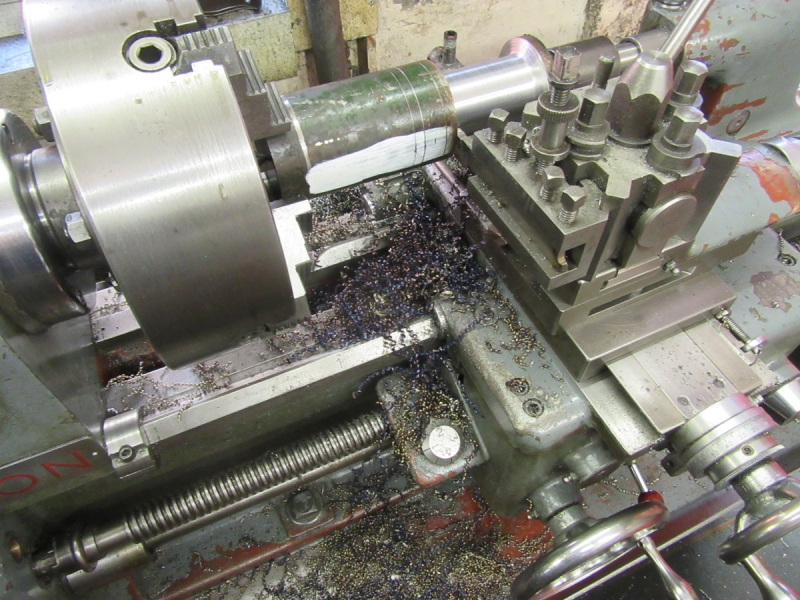
Straight into muck-shifting after checking the centre and fitting a temporary deflector to keep the swarf on the lathe! 30thou a side and away we go....
One end roughed down to just above .750" which is going to be the diameter of the bearing journals. Don't be tempted into cleaning anything else up, that comes later! Then a complete re-sharpen and hone of the tool, it was showing signs of stress. I've been working it hard.
Off we go again, 20thou a side. Cutting better. No room for the deflector.....
Knocking off time, good progress, no cock ups and I have cleared the main of the swarf off Mrs Harrison. I am quite satisfied.
Stanley Challenger Graham
Stanley's View
scg1936 at talktalk.net
"Beware of certitude" (Jimmy Reid)
The floggings will continue until morale improves!
Stanley's View
scg1936 at talktalk.net
"Beware of certitude" (Jimmy Reid)
The floggings will continue until morale improves!
-
Stanley
- Global Moderator
- Posts: 90301
- Joined: 23 Jan 2012, 12:01
- Location: Barnoldswick. Nearer to Heaven than Gloria.
Re: SHED MATTERS 2
Not a lot to report. Cooking and washing had to be done but I got an hour in the shed muck-shifting. No need to resharpen the cutter, I didn't hammer it yesterday. Quietly away, same ground rules as before, 300rpm, pick a relatively slow feed and take a cut that produces a light straw colour. That's the only thing that matters.
An hour later..... I'm getting very close to my target but it's time to stop. No cleaning up, I shall do that tomorrow when I take the workpiece out to go on to the next stage. What's left won't take long because as I get onto the smaller diameter I am taking 40 thou a side. As I say, no trees torn up but we are getting there. A good morning.....
Stanley Challenger Graham
Stanley's View
scg1936 at talktalk.net
"Beware of certitude" (Jimmy Reid)
The floggings will continue until morale improves!
Stanley's View
scg1936 at talktalk.net
"Beware of certitude" (Jimmy Reid)
The floggings will continue until morale improves!

Re: SHED MATTERS 2
Hi Stanley,
Just wondering... As you are reaping loads of material off that lump of line shaft, does it warp?
I've seen many references to steel bar moving as it is turned due to released stresses. Is this material subject to these stresses (set up, I believe, by the drawing process), or is it more like hot-rolled?
I assume it's also quite old, so maybe it has aged, like castings do?
BR
Mick (in Barnsley)
-
Stanley
- Global Moderator
- Posts: 90301
- Joined: 23 Jan 2012, 12:01
- Location: Barnoldswick. Nearer to Heaven than Gloria.
Re: SHED MATTERS 2
Morning Mick, nice to hear from you. I have little doubt that there will be some movement as with all metals but it's quite possibly over 100 years old, as you say it's old mill shafting (hence the green paint). But I am doing it slowly and in stages so by the time some have come out I'll be doing finishing cuts. Certainly nothing to worry about.
And as Johnny used to say, we aren't driving 300 looms!
And as Johnny used to say, we aren't driving 300 looms!
Stanley Challenger Graham
Stanley's View
scg1936 at talktalk.net
"Beware of certitude" (Jimmy Reid)
The floggings will continue until morale improves!
Stanley's View
scg1936 at talktalk.net
"Beware of certitude" (Jimmy Reid)
The floggings will continue until morale improves!
-
Stanley
- Global Moderator
- Posts: 90301
- Joined: 23 Jan 2012, 12:01
- Location: Barnoldswick. Nearer to Heaven than Gloria.
Re: SHED MATTERS 2
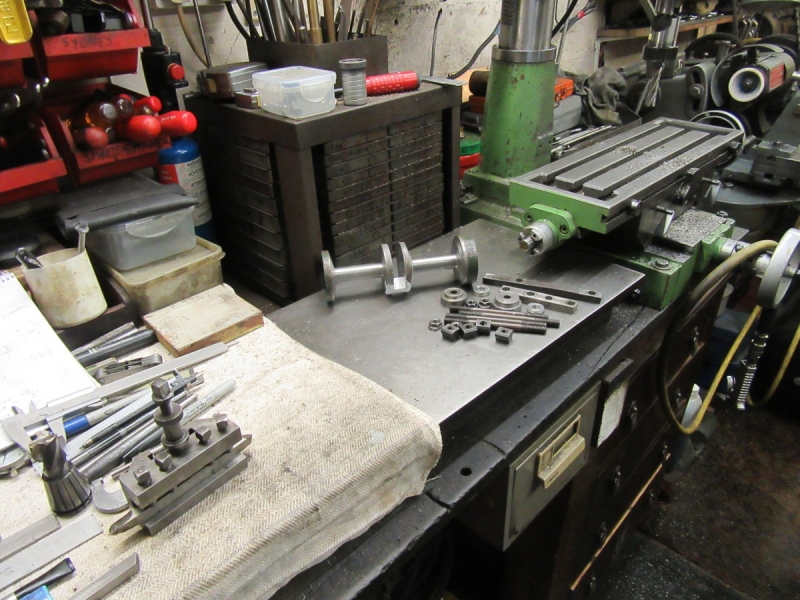
It only took two 30thou cuts to get the section I was working on to the roughing size. Then take it out of Mrs Harrison and before I did anything else I had a good clean up including vacuuming the carpet. I work best in a clean environment!
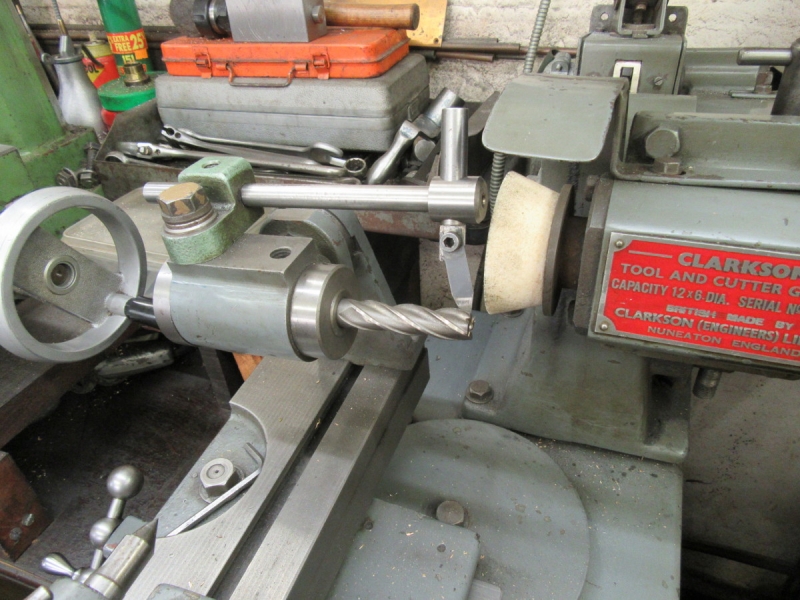
The next phase in the job requires a long sharp 5/8" end mill so a quick trip to the T&C grinder and a careful resharpen.
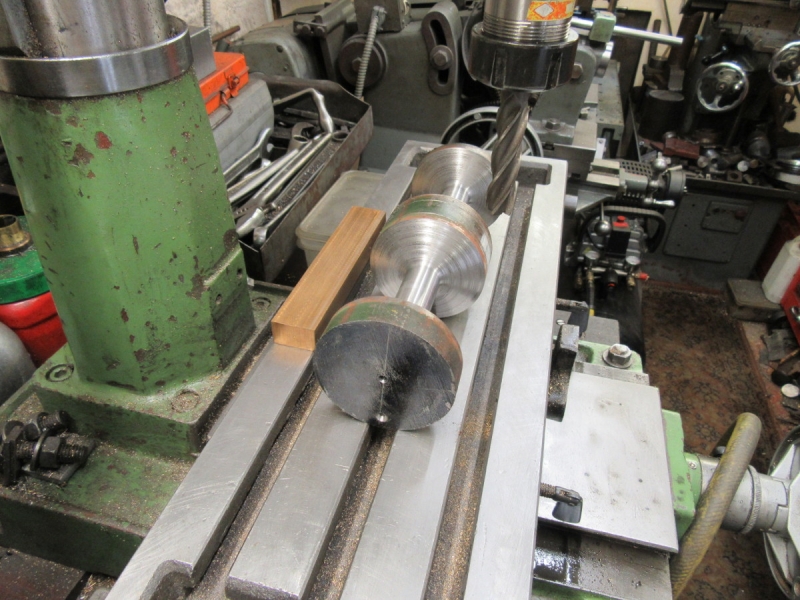
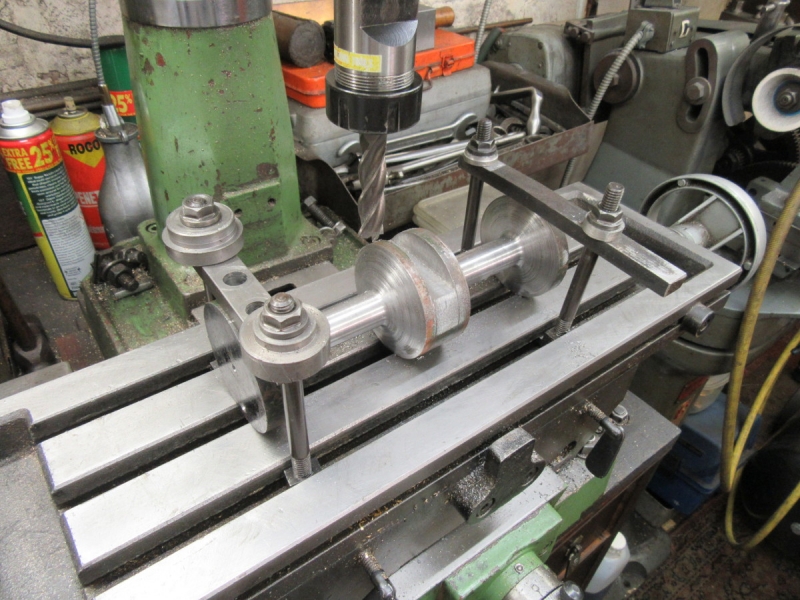
You get a clue here what we are about. Anyone who has chopped a crankshaft out of the solid will tell you that the worst bit is the eccentric turning of the crank pin which involves the misery of interrupted cuts. I did my first one that way but then Newton put me right. Get the shaft under the mill and cut most of the excess metal out of the stock. It makes a hell of a difference! In case you're wondering about the lump of brass lay on the bed, that's exactly 5/8" thick and will be used to let me know when I have taken enough out.
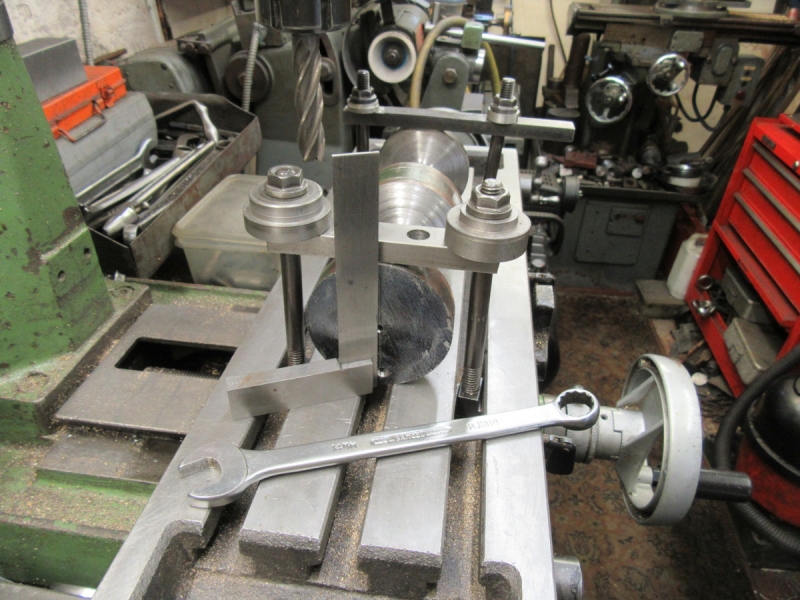
Here's the setup. Remember we have a line cast across the end of the stock that we used to get the offset centre hole for the crankpin turning. This makes it easy to get the stock in the right orientation.
Once I got set up I took a light cut to make sure I was hitting the centre of the stock. Once I was sure, I locked the X axis of the bed. Notice that you don't have to bother about getting it square, the tee slot in the bed does that for you.
Ready for a start, a nice clean shed. In case you're wondering, I had just lit my pipe!
Knocking off time. This is the patience bit again. Work within the limits of your setup and machine. I know the VM's limits so to be absolutely sure, light cuts and patience is the order of the day. You have to have a long cutter to clear the stock when you get to the bottom of the cut and this of course is exactly what you don't want in a lightly built mill. So for those who laugh at my light cuts, laugh away! I shall finish up with as good a cut as you can get on the best milling machine there is, it's just that it will take me a bit longer. We know what I'll be doing tomorrow......
Stanley Challenger Graham
Stanley's View
scg1936 at talktalk.net
"Beware of certitude" (Jimmy Reid)
The floggings will continue until morale improves!
Stanley's View
scg1936 at talktalk.net
"Beware of certitude" (Jimmy Reid)
The floggings will continue until morale improves!
-
Stanley
- Global Moderator
- Posts: 90301
- Joined: 23 Jan 2012, 12:01
- Location: Barnoldswick. Nearer to Heaven than Gloria.
Re: SHED MATTERS 2
Ready for a start, everything set up yesterday. Straight into patient small cuts. Plenty of time to think when you are doing a repetitive job like this. I stopped and resharpened the cutter twice, improving it a bit each time.
I have always said that the reason why the old lads were so good at sharpening their high carbon steel tools was because they had to treadle their lathes, no electric motors then! That meant that they soon learned what grind gave the easiest cut and the least effort. As I keep saying, this is an El Cheapo mill, in fact to be more accurate it isn't a mill at all, simply a very heavily built and accurate drilling machine. This cut I am doing is about the worst you could think of, a long cutter, full width of cut and a piece of steel of uncertain origin and vintage. If I had a proper mill with flood cooling I could do this job in a few cuts. But that would take all the sense of achievement out of doing it. It dawned on me this morning as I adjusted the grind on my cutter that working on something like this is the same as the old lads on their treadle lathes, you soon find out if the cutter is sharp and ground correctly! So this is probably the best training I could have on the use of the T&C grinder and the correct angles for the edges on milling cutters.
When I sharpened the cutter yesterday I gave the edge 5 degrees and didn't bother about the back rake but this morning I gave it 15 degrees, gashed the centre out and used 6 degrees for the edge, what Clarkson's advise. It cut better. That's the way you learn.
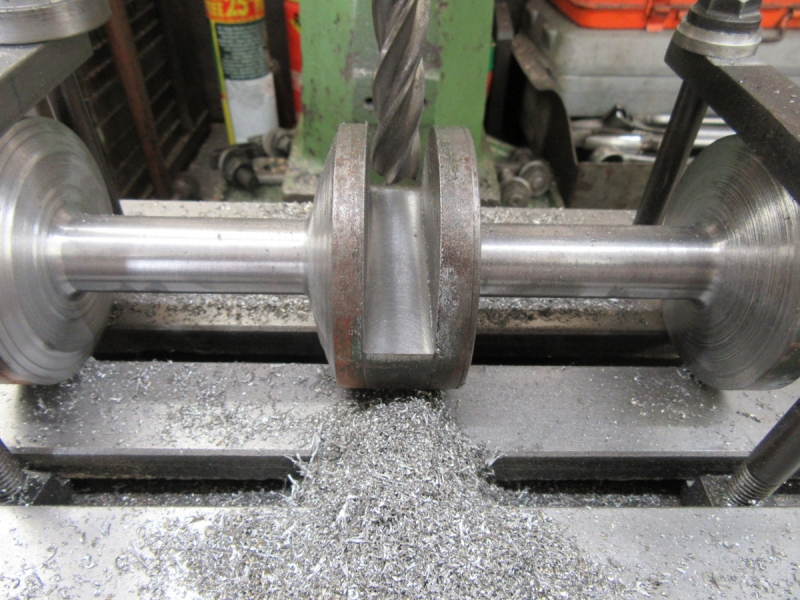
This is knocking off time. We're getting there, I only have 3/4" to go and the width is diminishing because I have passed the centre. Notice what a good finish there is on the cut surface. Bit of an achievement I reckon. Another thing that struck me was that first thing this morning the workpiece was getting hot and when old shafting gets hot it gets sticky to cut in my experience. When I finished this morning it was warm but not hot.
So, patience pays! (Mind you I'll admit that you have to be a bit of a masochist to do this.....)
Stanley Challenger Graham
Stanley's View
scg1936 at talktalk.net
"Beware of certitude" (Jimmy Reid)
The floggings will continue until morale improves!
Stanley's View
scg1936 at talktalk.net
"Beware of certitude" (Jimmy Reid)
The floggings will continue until morale improves!
-
Stanley
- Global Moderator
- Posts: 90301
- Joined: 23 Jan 2012, 12:01
- Location: Barnoldswick. Nearer to Heaven than Gloria.
Re: SHED MATTERS 2
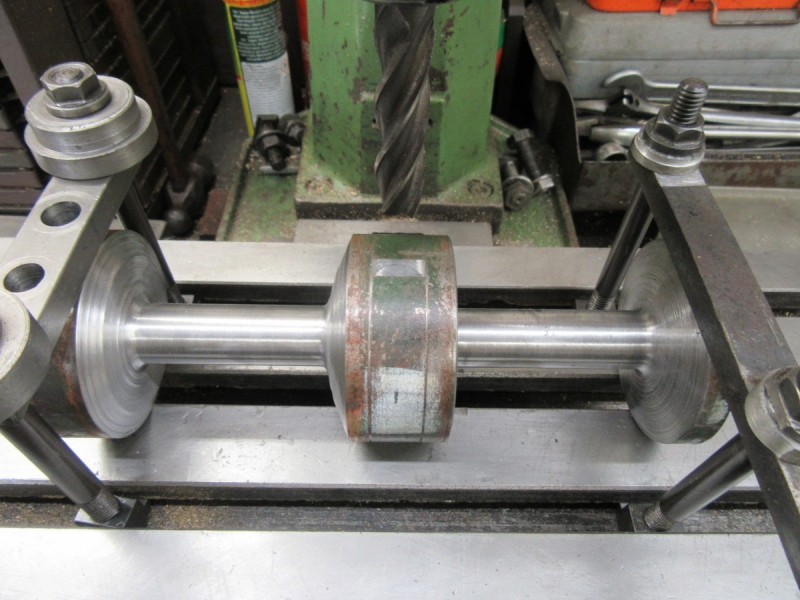
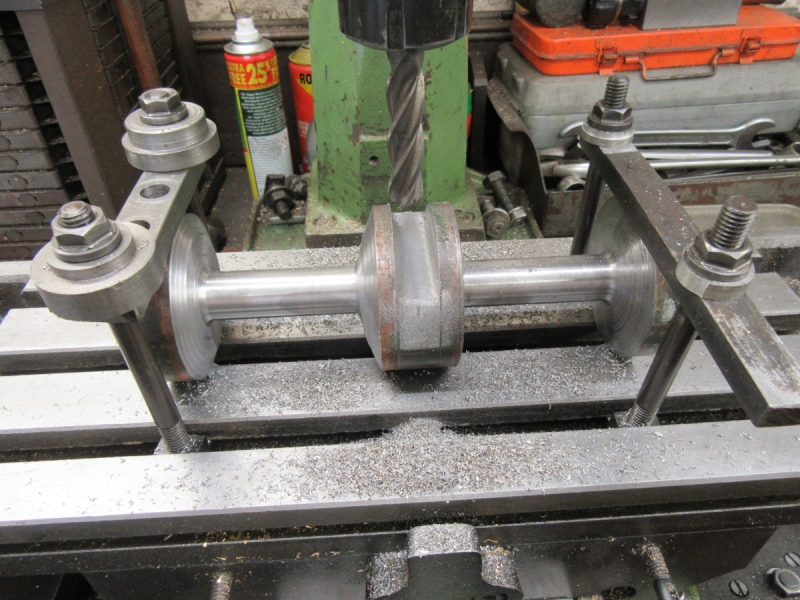
You know what I am doing.... In case you're wondering, the brass bar is 5/8" thick and is my tell-tale. As soon as I get down to that I stop.
It took about an hour to get the last 3/4" out of the shaft. A very welcome sight!
Remember how much metal has been removed. Time to move on to the next stage.
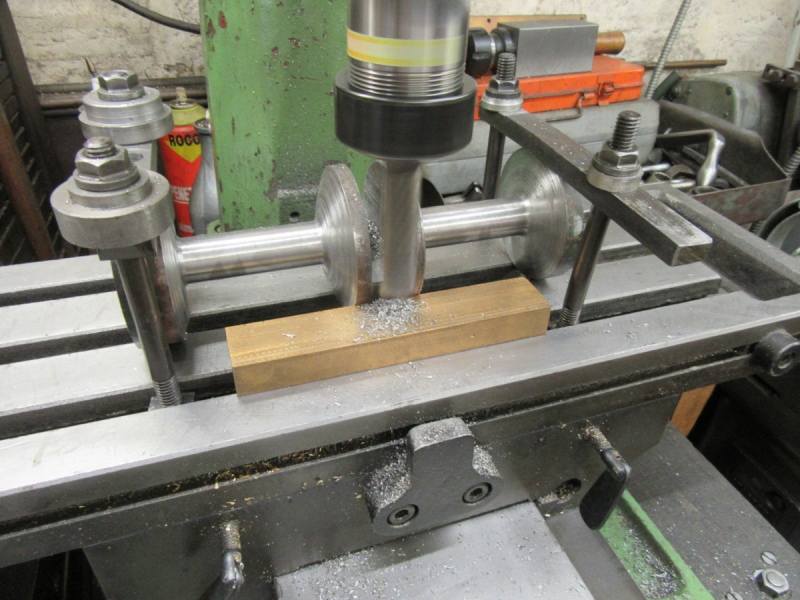
I have two more cuts to do. Better safe than sorry so I maintained standards and gave the cutter a careful regrind. Notice in the background that the mill has been cleaned!
I did some careful measuring and marked the next two cuts on the stock. Then a new set up in the mill. The blocks are there to do a rough check on the alignment. You needn't be too critical, just as near as possible by eye because the measurement includes some spare for turning of the pin.
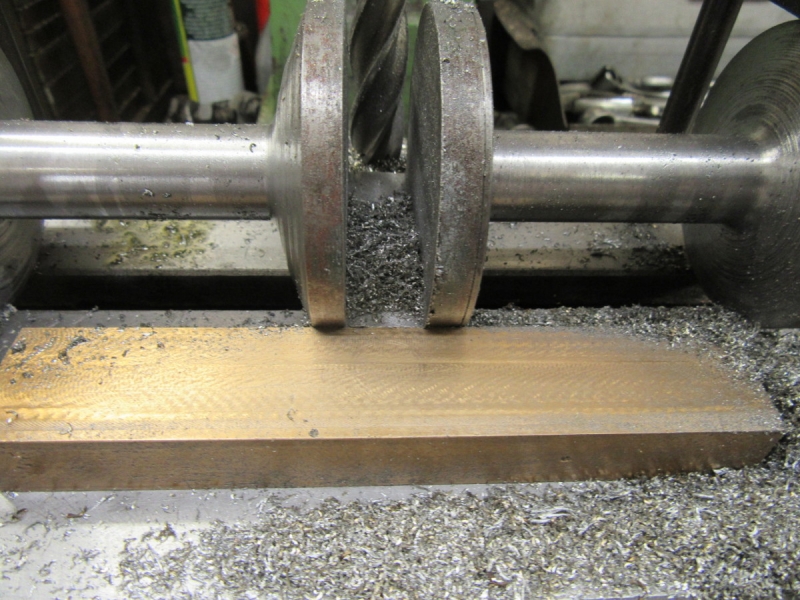
The first cut done and then I reversed the stock and set it up again to cut the other side.
I did ten minutes overtime! But here we are at knocking off time. I will clean the mill up and put stuff away tomorrow. I think you can see from the stock what we have been looking for. If you think I've been obsessive about cutting all that metal out wait until tomorrow when you see the setup for actually making the finished crank pin. Believe me the last three sessions have been worth while! (About eight hours actual milling time.....)
Stanley Challenger Graham
Stanley's View
scg1936 at talktalk.net
"Beware of certitude" (Jimmy Reid)
The floggings will continue until morale improves!
Stanley's View
scg1936 at talktalk.net
"Beware of certitude" (Jimmy Reid)
The floggings will continue until morale improves!
-
Stanley
- Global Moderator
- Posts: 90301
- Joined: 23 Jan 2012, 12:01
- Location: Barnoldswick. Nearer to Heaven than Gloria.
Re: SHED MATTERS 2
Not sure if I will be in the shed this morning Lads. Jack got savaged by a big dog yesterday and has spent the night under observation at the vets...... I am a bit shaky.....
Stanley Challenger Graham
Stanley's View
scg1936 at talktalk.net
"Beware of certitude" (Jimmy Reid)
The floggings will continue until morale improves!
Stanley's View
scg1936 at talktalk.net
"Beware of certitude" (Jimmy Reid)
The floggings will continue until morale improves!
-
Stanley
- Global Moderator
- Posts: 90301
- Joined: 23 Jan 2012, 12:01
- Location: Barnoldswick. Nearer to Heaven than Gloria.
Re: SHED MATTERS 2
Sorry lads but at the moment I am a full time nurse to Jack. Normal service will be resumed as soon as he mends......
Stanley Challenger Graham
Stanley's View
scg1936 at talktalk.net
"Beware of certitude" (Jimmy Reid)
The floggings will continue until morale improves!
Stanley's View
scg1936 at talktalk.net
"Beware of certitude" (Jimmy Reid)
The floggings will continue until morale improves!
-
Stanley
- Global Moderator
- Posts: 90301
- Joined: 23 Jan 2012, 12:01
- Location: Barnoldswick. Nearer to Heaven than Gloria.
Re: SHED MATTERS 2
He's doing well but I am still on nursing duties 24X7......
Stanley Challenger Graham
Stanley's View
scg1936 at talktalk.net
"Beware of certitude" (Jimmy Reid)
The floggings will continue until morale improves!
Stanley's View
scg1936 at talktalk.net
"Beware of certitude" (Jimmy Reid)
The floggings will continue until morale improves!
-
Stanley
- Global Moderator
- Posts: 90301
- Joined: 23 Jan 2012, 12:01
- Location: Barnoldswick. Nearer to Heaven than Gloria.
Re: SHED MATTERS 2
We're doing well and the shed is starting to pull again...... Patience Lads!
Stanley Challenger Graham
Stanley's View
scg1936 at talktalk.net
"Beware of certitude" (Jimmy Reid)
The floggings will continue until morale improves!
Stanley's View
scg1936 at talktalk.net
"Beware of certitude" (Jimmy Reid)
The floggings will continue until morale improves!
-
Stanley
- Global Moderator
- Posts: 90301
- Joined: 23 Jan 2012, 12:01
- Location: Barnoldswick. Nearer to Heaven than Gloria.
Re: SHED MATTERS 2
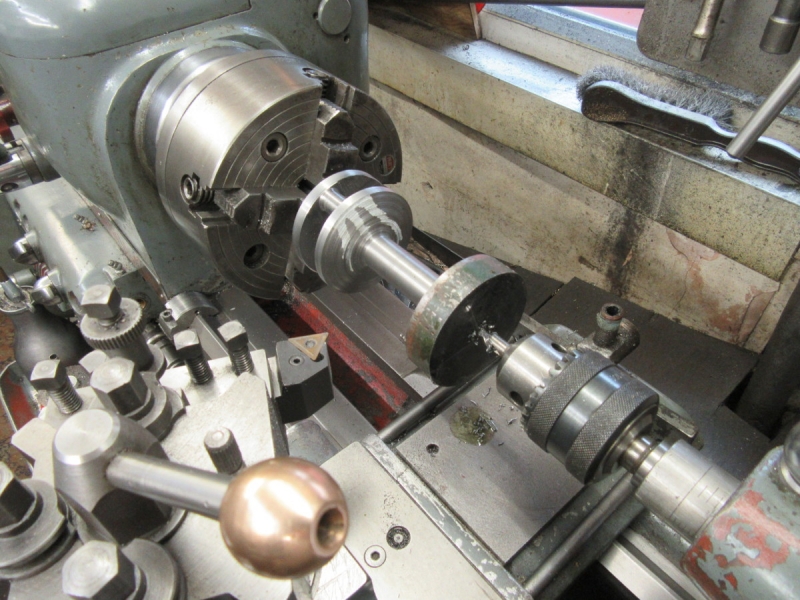
The good news is that guilt won! The first thing I did was put all the tackle away and have a good chip chase. Then I put the normal cutter back in the mill and addressed the main event, turning the crank pin.
The first job was to regrind this cutter to flatten out the curve on the nose and then hone it on the India stone.
Then very carefully adjust the height so that it is turning dead on centre.
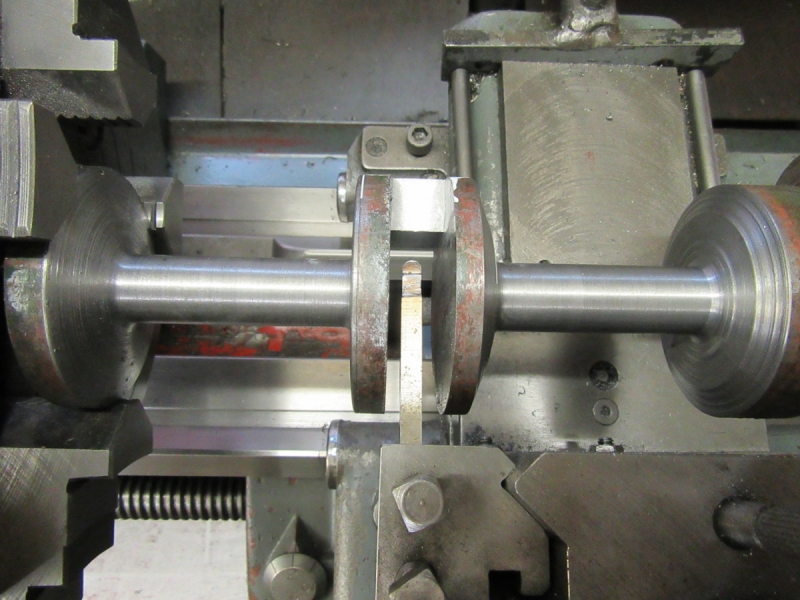
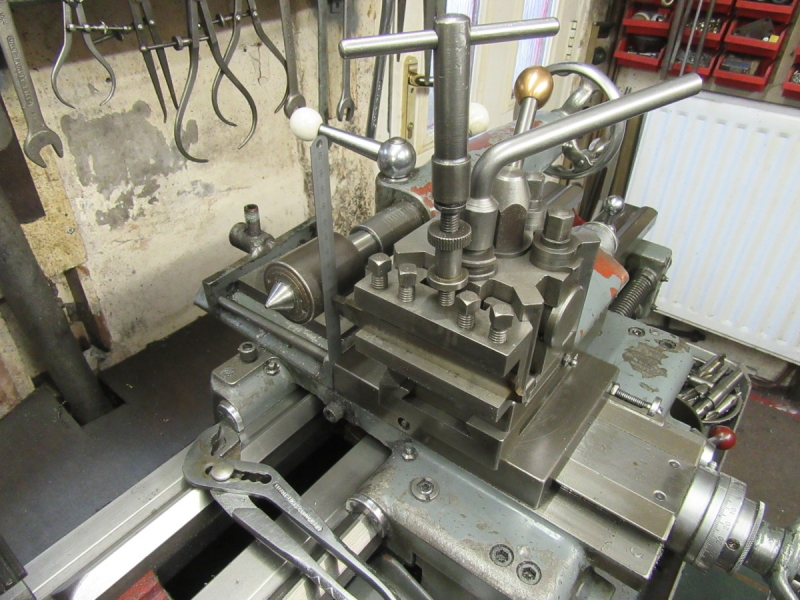
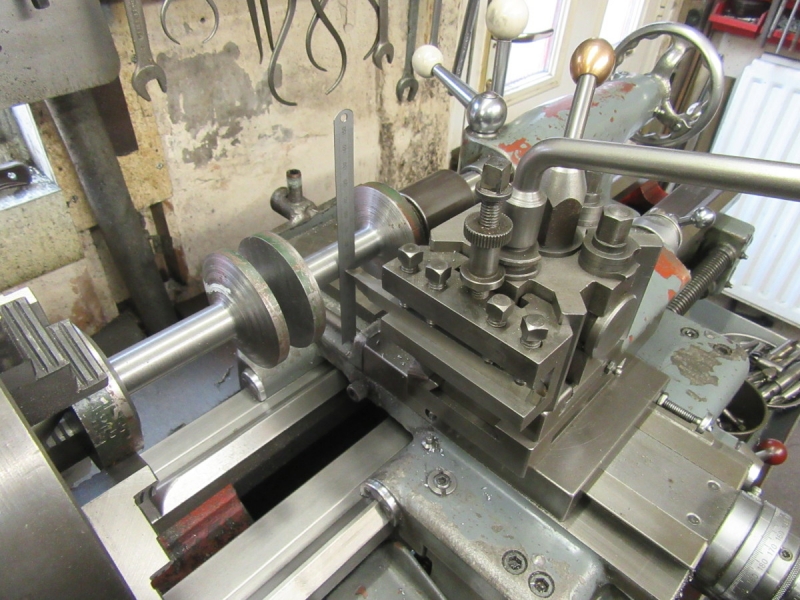
Next was to set up the shaft between centres and adjust the cutter. Notice the amount of stick out you have to have in order to be able to reach the pin whilst avoiding the eccentric path of the workpiece fouling the toolholder. Imagine taking out all the metal we milled out with this setup on a continuous interrupted cut. All right, milling it out was a pain but nothing compared to the alternative!
Notice that the 4 jaw has become a 3 jaw. Two reasons for this. First, only three jaws are needed to grip the shaft. Second, the jaw won't go fully home because it fouls on the centre. One small point, don't put too much pressure on the tailstock centre, recognise that there isn't a lot of meat in the shaft. we are ready!
Some time later..... we have a round crank pin. It's come in just a shade over the target of 1/2". If you want the technicalities, 48rpm and 10 thou cut each time, hand feed all the time and at each end of the cut allow the tool to relieve the spring, which is unavoidable. Don't expect a full clean up at the ends. I've just remembered, the reason for this pic is that I needed a bit more stick out as the shaft was on the verge of fouling the toolpost.
This was the actual end of the cutting to size.
Next we need a setup to clean up the side of the cut. The aim is to clean up the inside side of of the cut. Another careful setup and and slow but careful turning. The aim is to clean up the end of the cut on the actual pin.
Knocking off time, I have a clean cut and a tidy junction between the pin and the shaft. Don't expect a perfect finish, you won't get it with this amount of stick out and an interrupted cut, be satisfied with what you get. Tomorrow I shall change the tool and do the other side and then put some finish on the journal.
One thing that I noted, it was time to knock off, my legs were letting me know in no uncertain fashion that I have done enough.
Stanley Challenger Graham
Stanley's View
scg1936 at talktalk.net
"Beware of certitude" (Jimmy Reid)
The floggings will continue until morale improves!
Stanley's View
scg1936 at talktalk.net
"Beware of certitude" (Jimmy Reid)
The floggings will continue until morale improves!
-
Stanley
- Global Moderator
- Posts: 90301
- Joined: 23 Jan 2012, 12:01
- Location: Barnoldswick. Nearer to Heaven than Gloria.
Re: SHED MATTERS 2
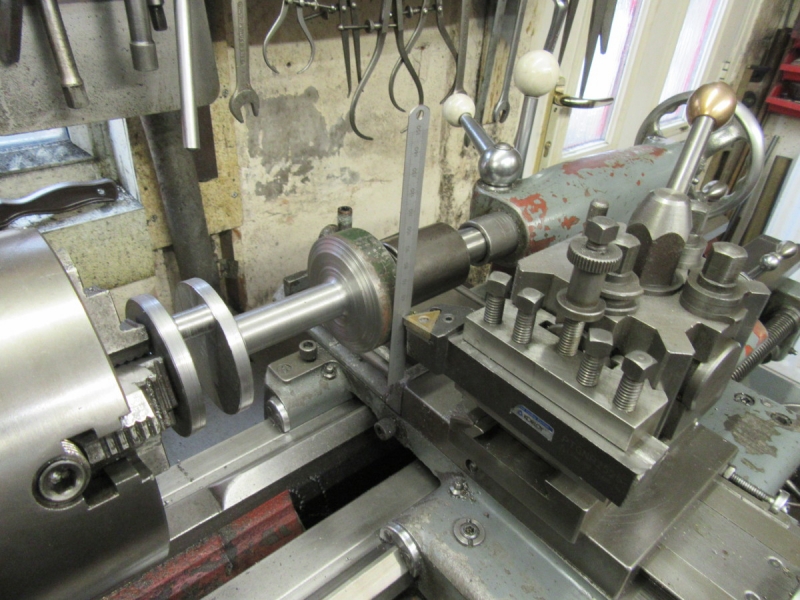
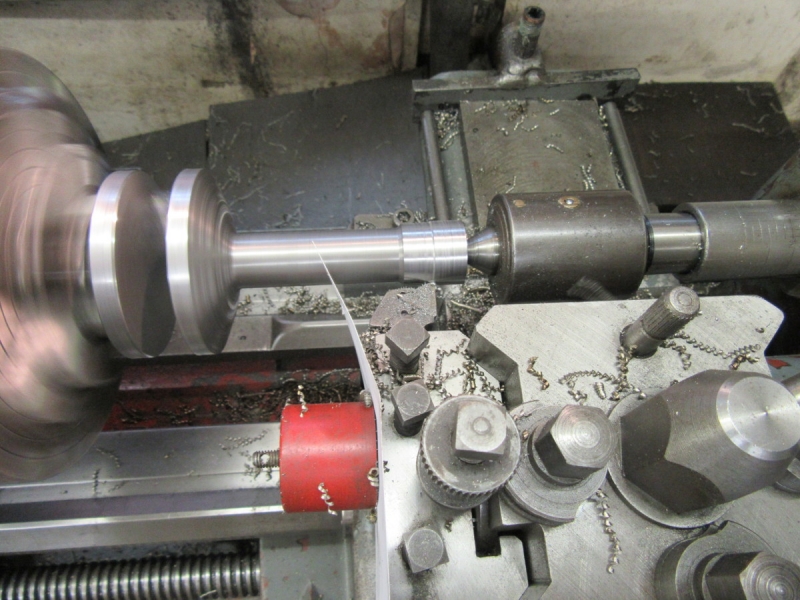
The first job today is a repeat of yesterday but for the opposite face. I'm reaching the point where I have resharpened my favourite HS cutter so many times and modified it for different jobs that I have reached the stage where I need a fresh start, a new piece of steel and a fresh grind. But I didn't feel like interrupting this morning so I took a piece of HSS and gave it a very unconventional grind but one which suited the special job I'm doing. I set it up and made my cut down the face on auto feed and then finished it off by hand.
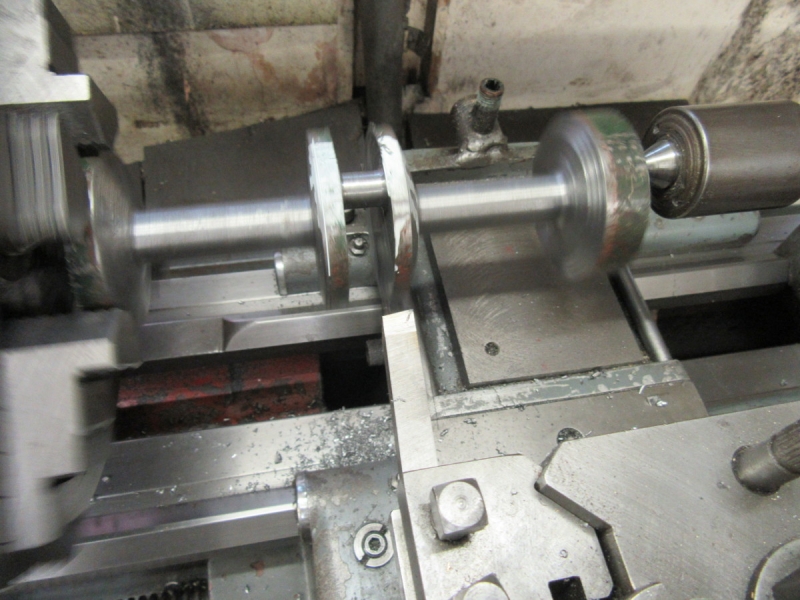

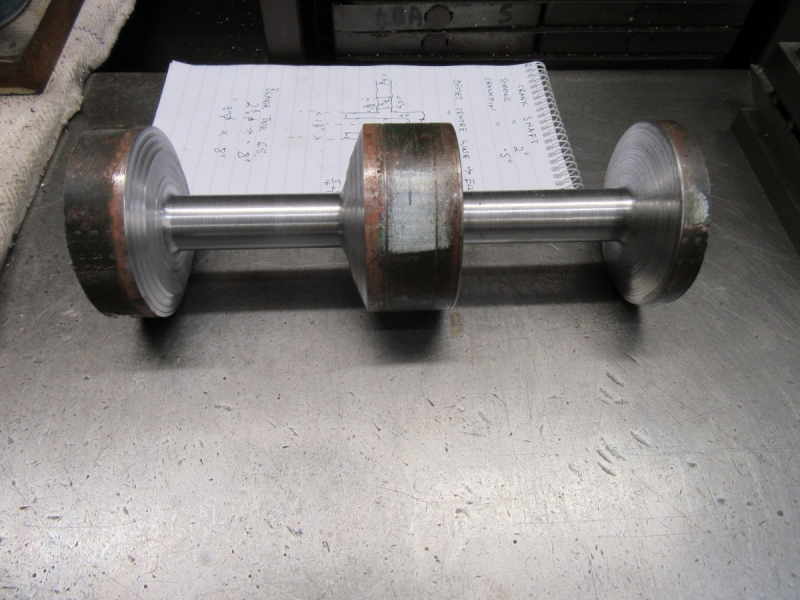
No drama and here we are at the end of the eccentric cutting. It's beginning to look like a crankshaft!
I honed my favourite HS cutter and made sure I was on centre.
I'd started off using the centre but then realised that I could do a better job if I ditched the centre and set it up normally, dialling it in. More accurate!
Here we are at knocking off time. I had found that my favourite cutter was beyond its sell by date so I ditched it and popped Newton's 'widows tooth in. Much better and we are into muck shifting again. I'll continue tomorrow.....
I know I'm slow but shortly this lump of old shafting will be a thing of beauty.......
Stanley Challenger Graham
Stanley's View
scg1936 at talktalk.net
"Beware of certitude" (Jimmy Reid)
The floggings will continue until morale improves!
Stanley's View
scg1936 at talktalk.net
"Beware of certitude" (Jimmy Reid)
The floggings will continue until morale improves!
-
Stanley
- Global Moderator
- Posts: 90301
- Joined: 23 Jan 2012, 12:01
- Location: Barnoldswick. Nearer to Heaven than Gloria.
Re: SHED MATTERS 2
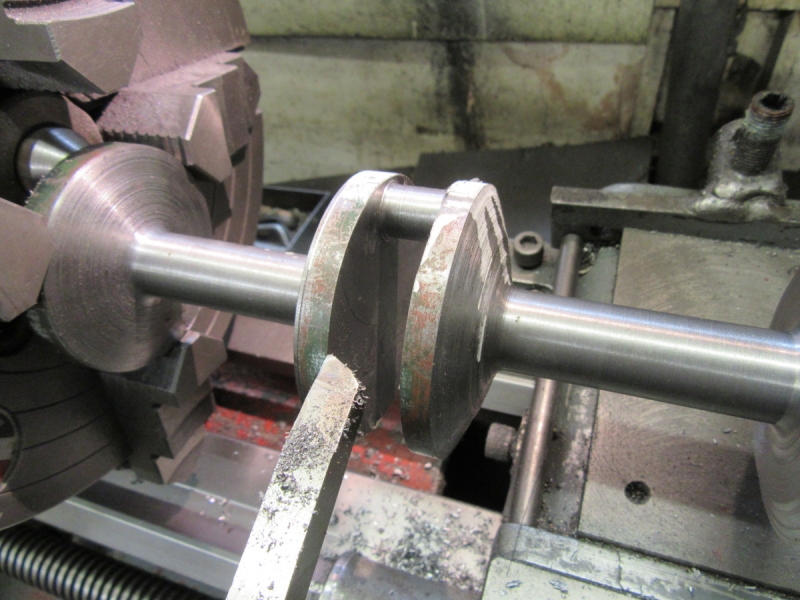
Back into muck-shifting. Notice that I have made another change of tool. Old shafting like this is a moveable feast and I don't know why but this piece is difficult, not free-cutting at all no matter what I do. The worst symptom is chatter.
I had a rethink and went over to a ceramic tip. This is the heaviest tipped cutter I have and it will be as rigid as possible. It was a good move despite being negative rake and after experimenting with speeds and cuts I got reasonable results.

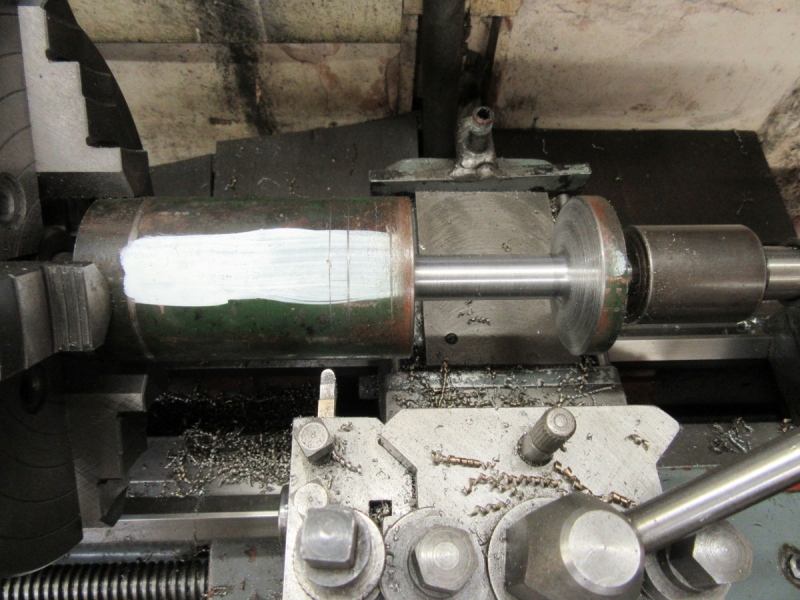
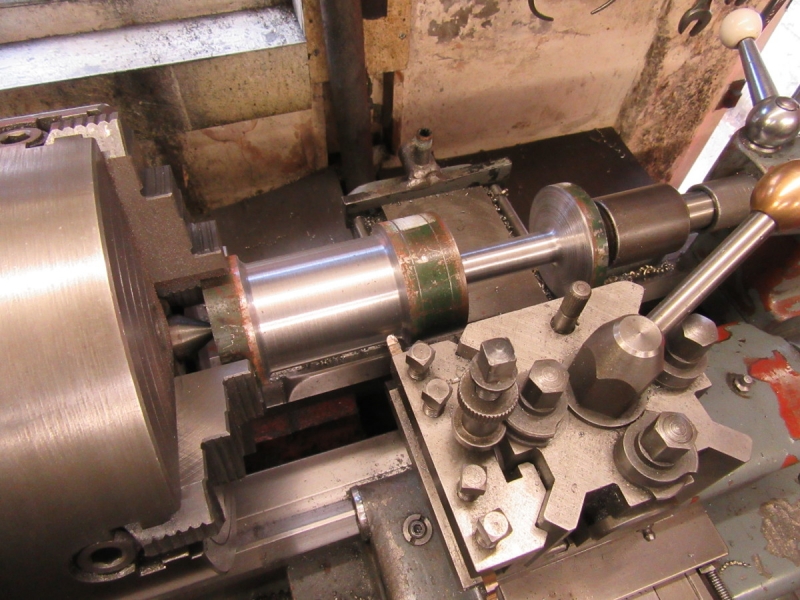
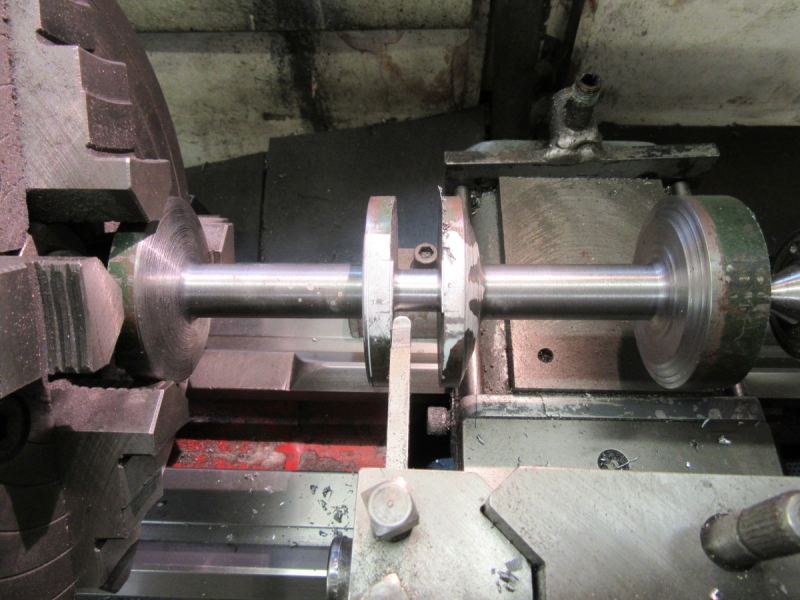
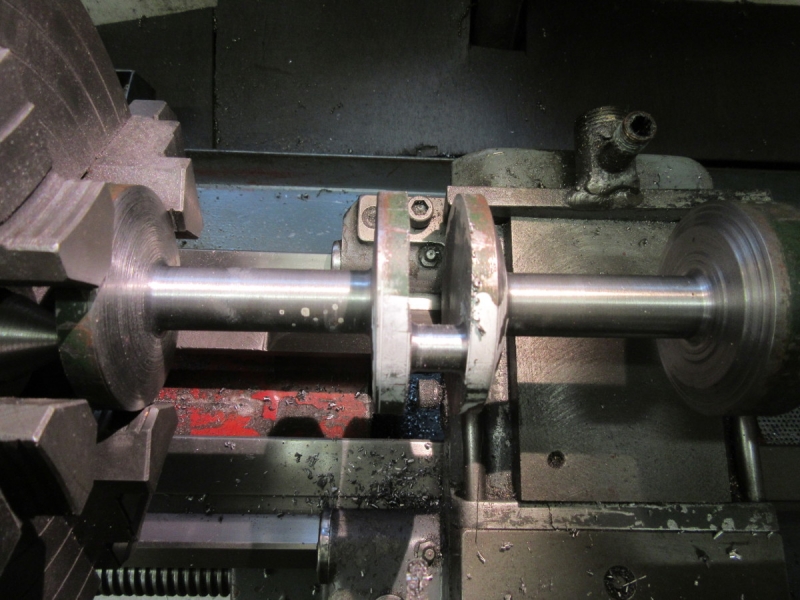
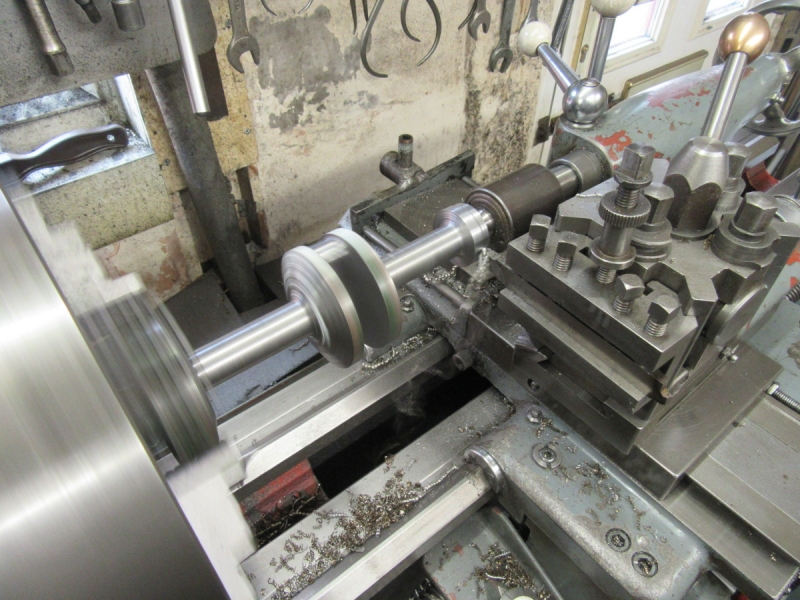
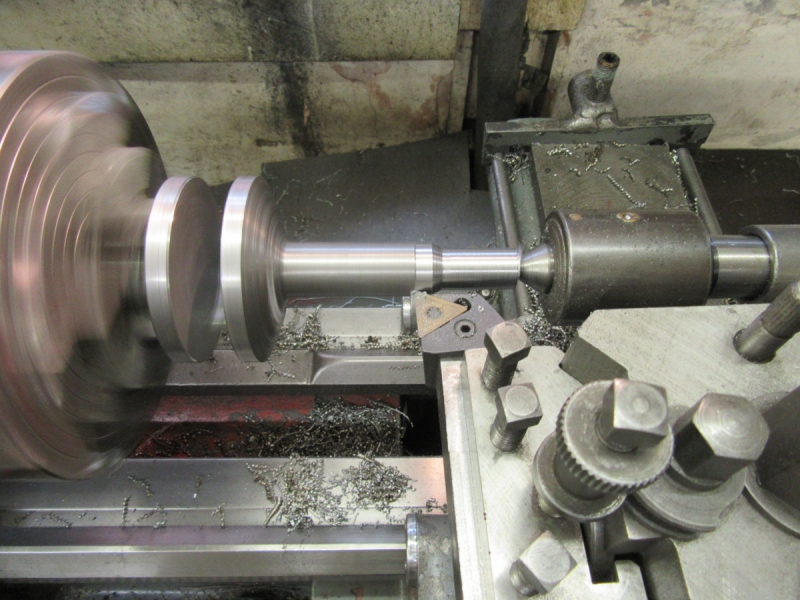
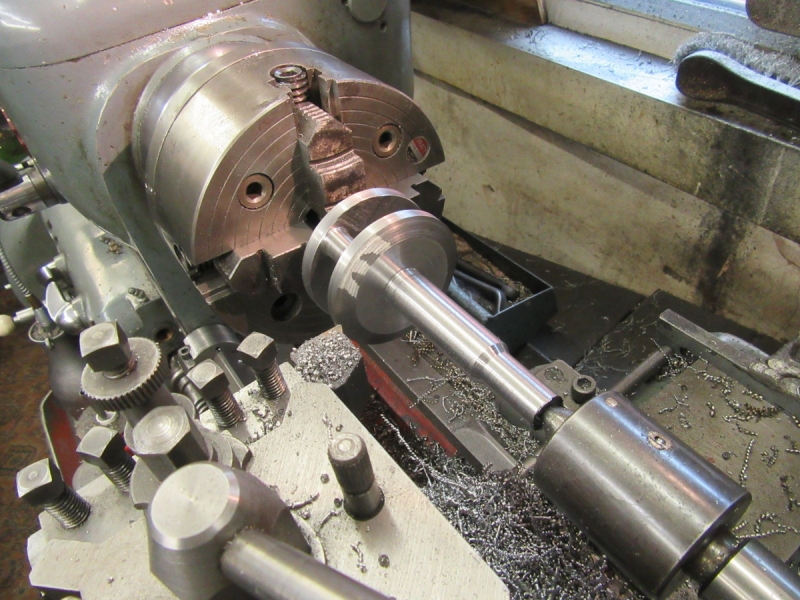
After some careful work here's where we are. This end of the shaft is finished, the journal is 3/4" and the rest of the shaft is 5/8". I have broken the edges on this side of the crank and on both inside edges. No polishing, this is tool finish. It's too long but I will wait until I have settled on the design overall and then cut it to the length I need. Last job was to finish the exterior of the crank discs.
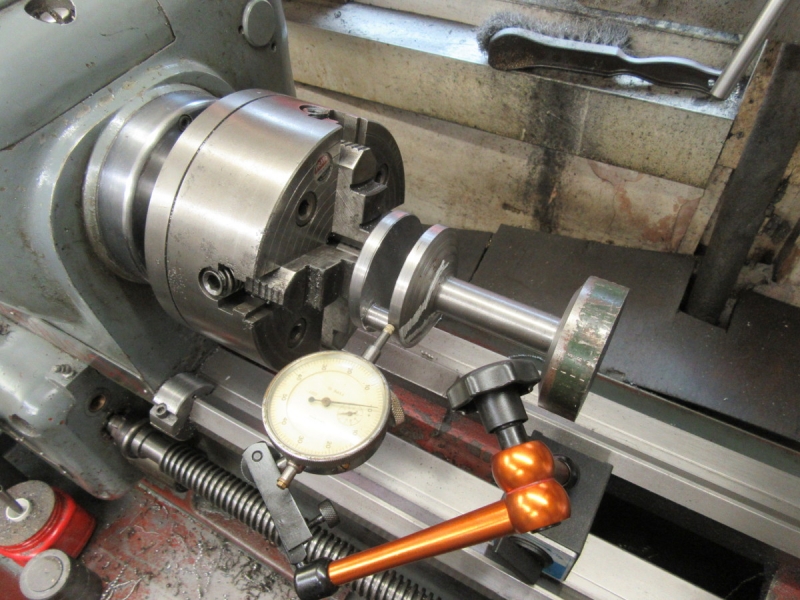
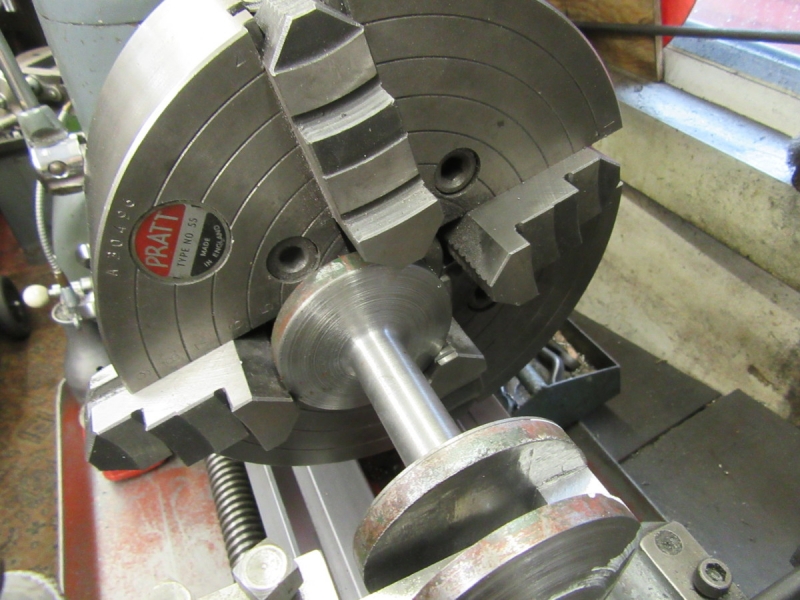
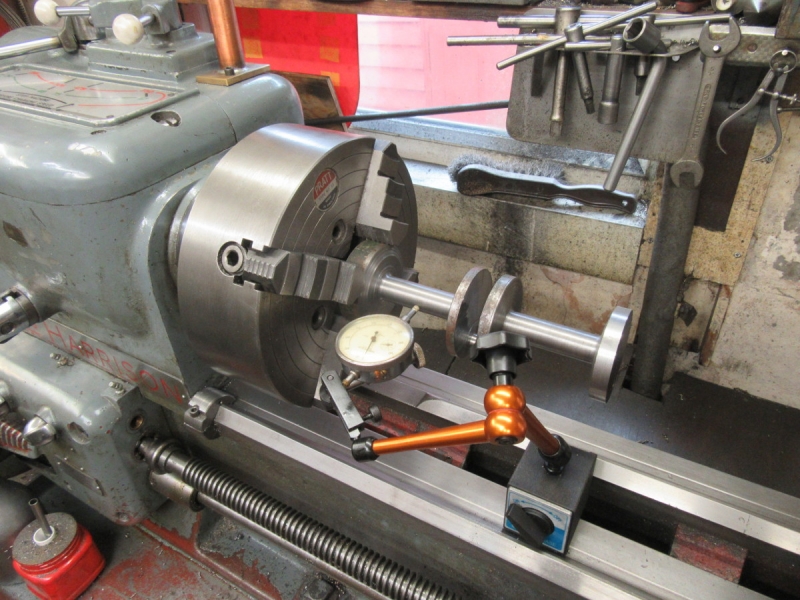
I took the big 4 jaw off and replaced it with the smaller one and dialled the shaft in to within a thou on the diameter.
The outboard end of the shaft when reversed was slightly out of truth so I carefully re-cut the centre and set it up. This means that this end now looks slightly out of truth but is actually a perfect match for the other end.
Never miss having a check! I made sure that the cutter was dead on centre.
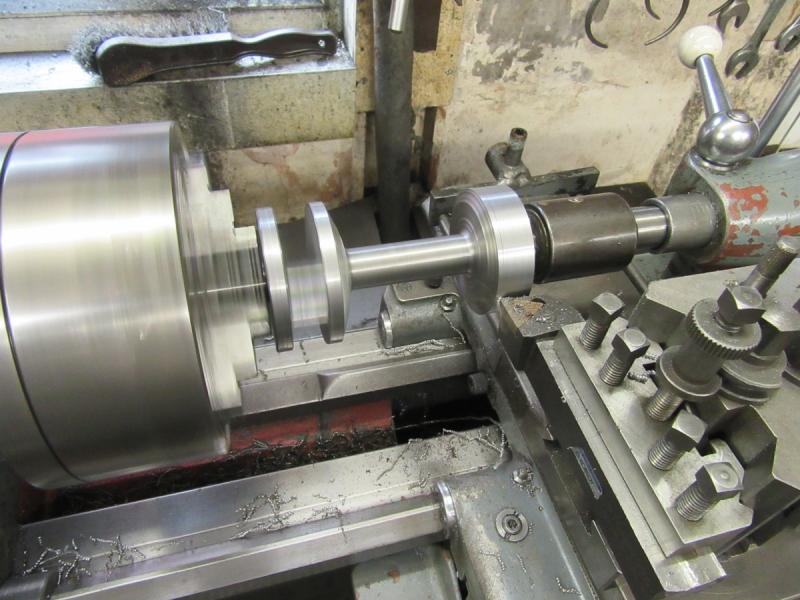
I took a few cuts and adjusted the speed, feed and depth of cut until I was getting a good cut without chatter. We are ready for the final stages tomorrow and in good order. I know I'm old and slow but we are making a good job. What more could a bloke want!
Stanley Challenger Graham
Stanley's View
scg1936 at talktalk.net
"Beware of certitude" (Jimmy Reid)
The floggings will continue until morale improves!
Stanley's View
scg1936 at talktalk.net
"Beware of certitude" (Jimmy Reid)
The floggings will continue until morale improves!
-
Stanley
- Global Moderator
- Posts: 90301
- Joined: 23 Jan 2012, 12:01
- Location: Barnoldswick. Nearer to Heaven than Gloria.
Re: SHED MATTERS 2
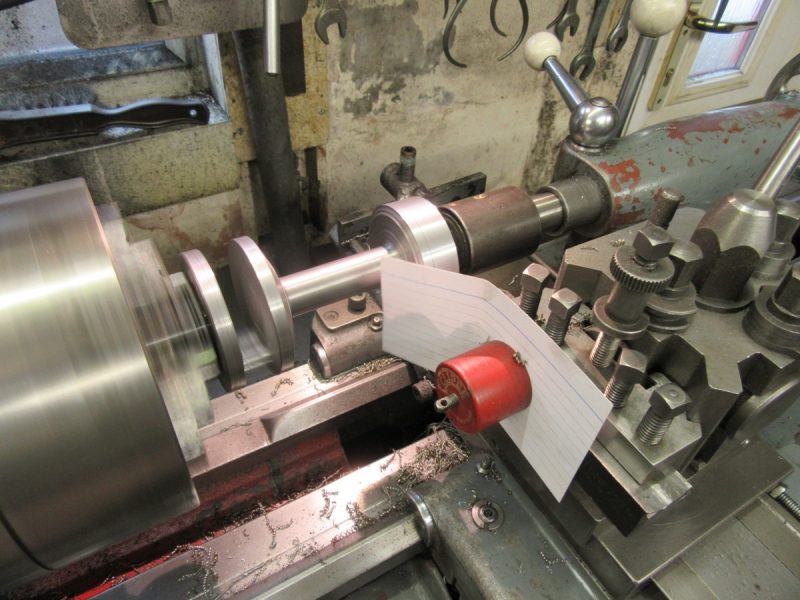
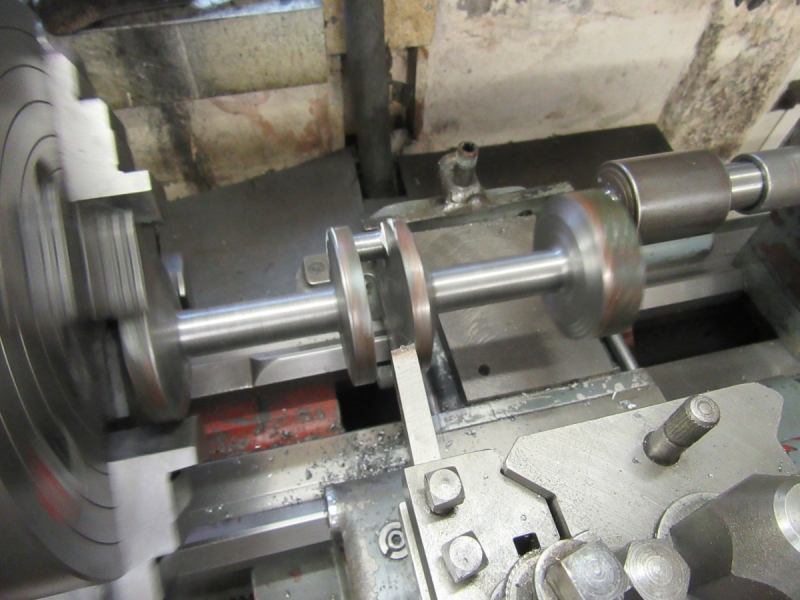
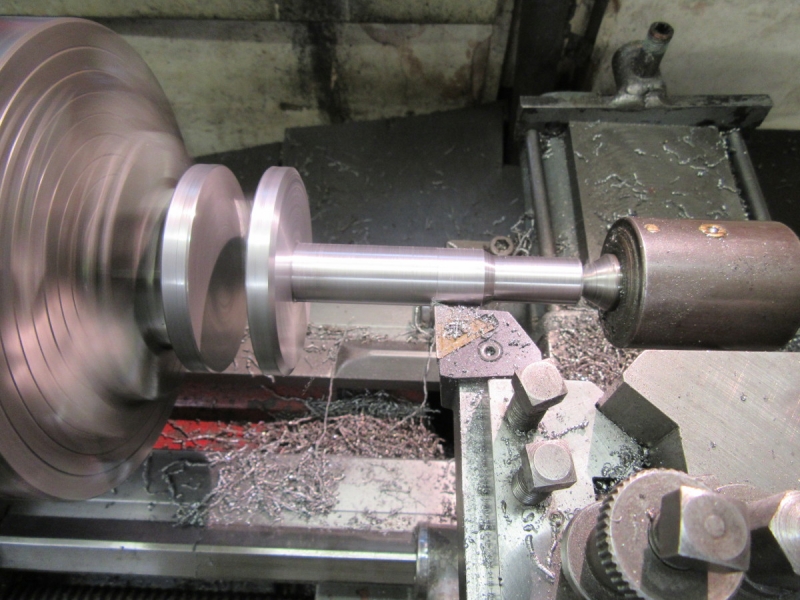
I changed the tip round to give me a clean start and after sweeping the floor (I hate paddling around in chips!) I got stuck in and immediately got into trouble, I had more chatter than yesterday. I tightened the gib on the cross slide, made sure the tailstock was tight, oiled the live centre, in short everything I could think of but no real improvement. I am fairly certain that this is a result of the uncertain nature of this 100 year old lump of shaft probably made worse by some play in the bearings in the live centre, it was old when I got it and has had a lot of work. I think I might invest in a new one. But today is today....
I tried a different approach, I swapped to a left hand tool, rotated the tip to a new corner, checked the height and got going again. I immediately doubled the cut and could put the speed up 100rpm to 340rpm. Better but not perfect.
A bit later, we have progress. I carried on with this cut and took the end of the shaft down to finished size, .625", 5/8".
Then back to the right hand tool and now we are down to a small diameter it's cutting well and leaving a reasonable finish. I need this tool of course to clean up the face of the crank disc.
Knocking off time. I've started to reduce the crank disc and all is going well. With a bit of luck, we will have a thing of beauty by tomorrow. When Brown and Pickles were making big three throw pumps that used to make the crankshaft out of a billet of 70 ton steel and Jim Fort once told me it took eight working days to chop a shaft out..... All right, there were three throws but essentially the same job and you can't rush the job! That's my story and I'm sticking to it!
Stanley Challenger Graham
Stanley's View
scg1936 at talktalk.net
"Beware of certitude" (Jimmy Reid)
The floggings will continue until morale improves!
Stanley's View
scg1936 at talktalk.net
"Beware of certitude" (Jimmy Reid)
The floggings will continue until morale improves!
-
Stanley
- Global Moderator
- Posts: 90301
- Joined: 23 Jan 2012, 12:01
- Location: Barnoldswick. Nearer to Heaven than Gloria.
Re: SHED MATTERS 2

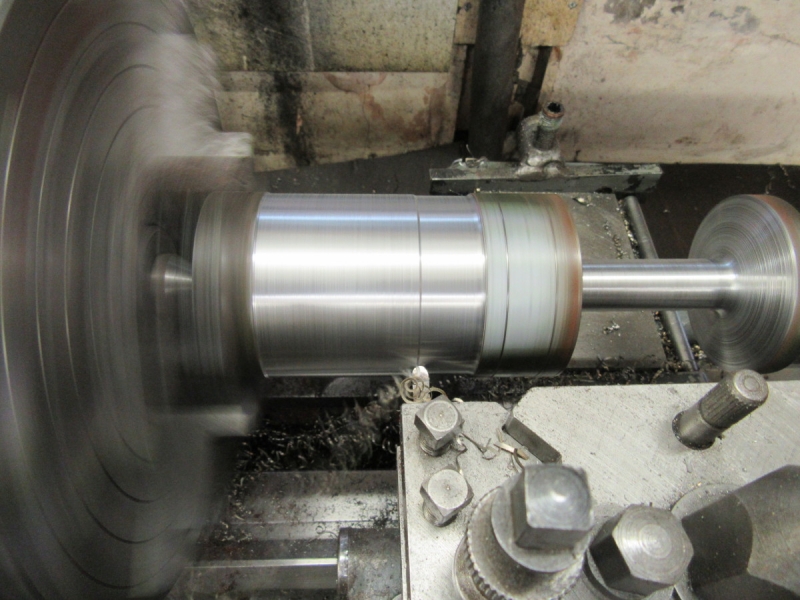
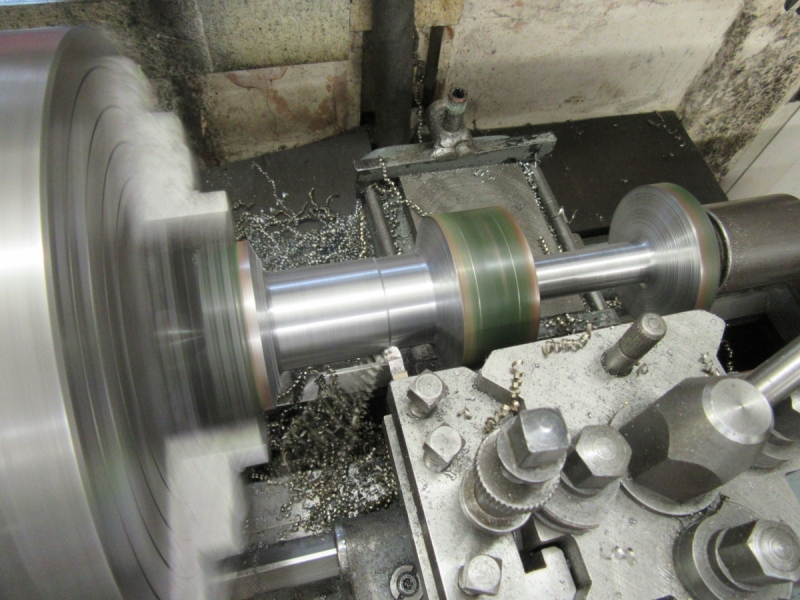
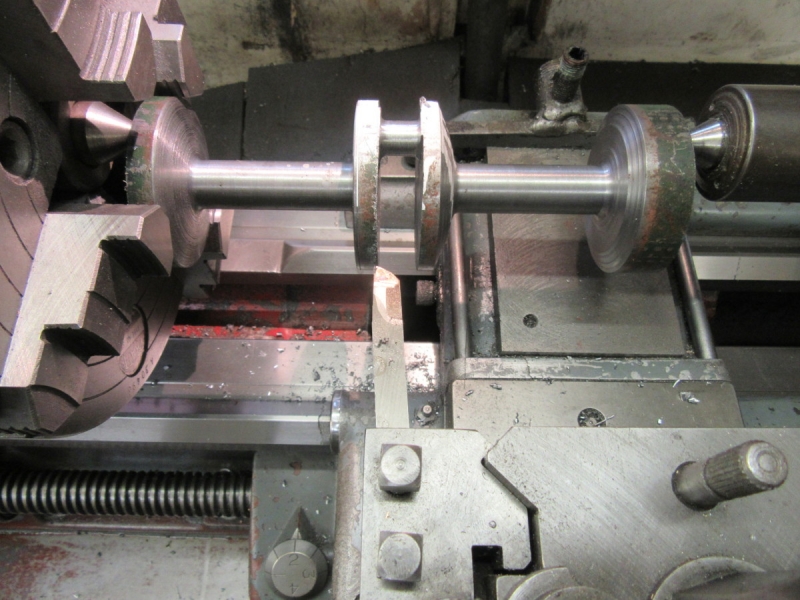
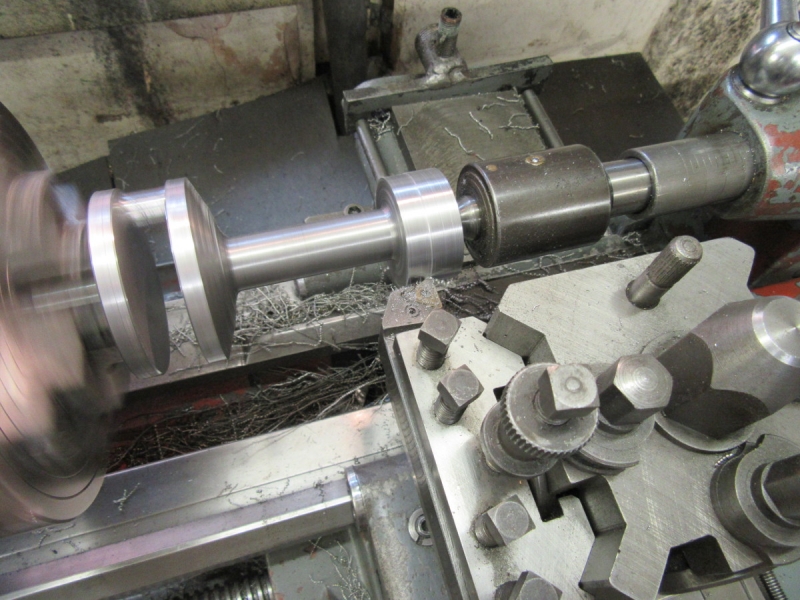
Straight into reducing the crank web and chamfering the edge.
Next job was to reduce the major diameter to 3/4".
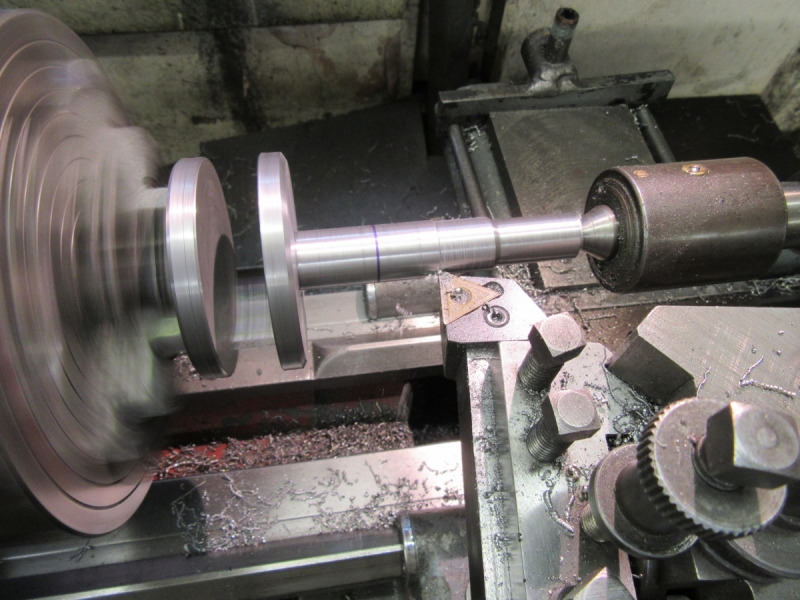
Then reduce the end of the shaft to 5/8". I put a chamfer on the end of the shaft to get rid of the sharp edges.
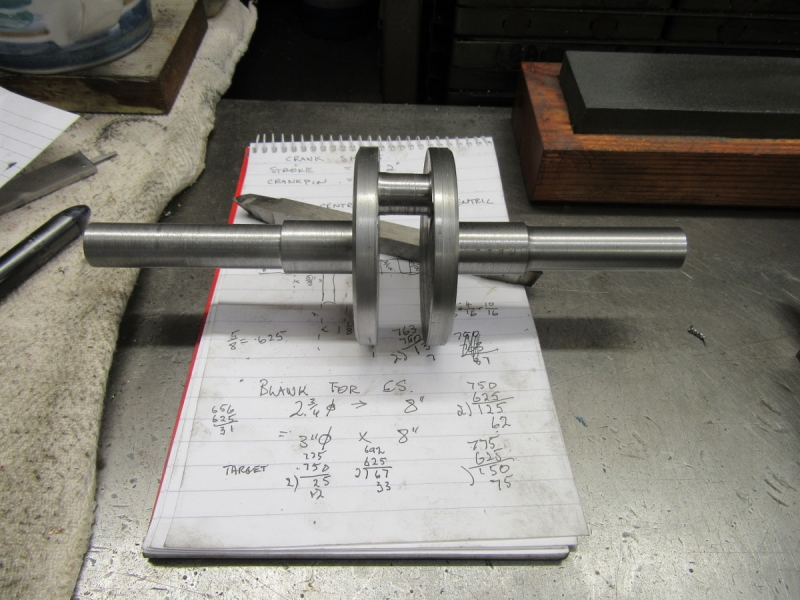
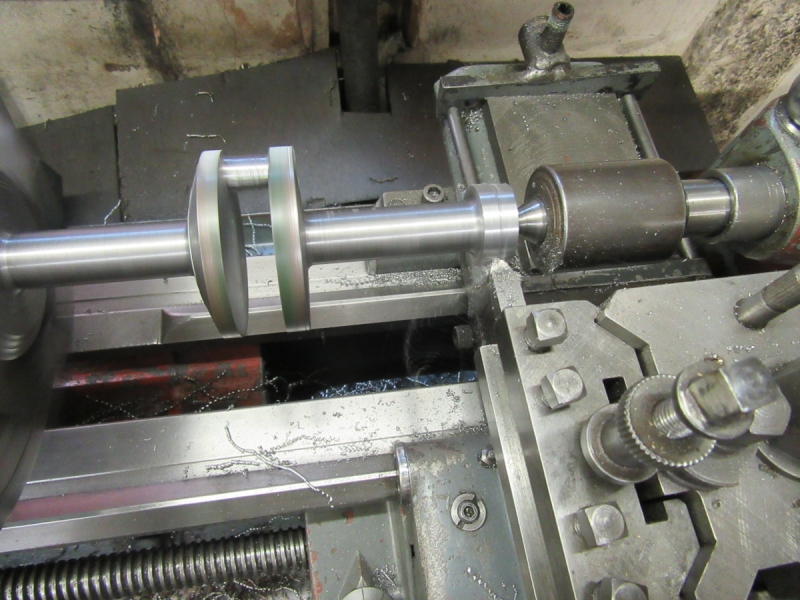
This is what we have been looking for. We have an accurate crankshaft turned to size. It's tool finish, prettyfication comes later as does cutting the ends of the shafts to length. The main thing is that it is chopped out of the solid and experience has taught that this is the best format for any crankshaft, whatever the size or application. Those who argue for built up shafts are looking for an easier way which is seductive but I shall stick to my time consuming method despite all the patience you need. What can make the process easier is to start with a billet that is forged to the rough shape but that isn't available to me. That's the way all high performance commercial shafts are made. I rest my case!

I knocked off an hour early because I have to concentrate on other matters but not before I had a good clean up of Mrs Harrison and the floor. I have plenty to be going on with and want to have a straight edge tomorrow.
Stanley Challenger Graham
Stanley's View
scg1936 at talktalk.net
"Beware of certitude" (Jimmy Reid)
The floggings will continue until morale improves!
Stanley's View
scg1936 at talktalk.net
"Beware of certitude" (Jimmy Reid)
The floggings will continue until morale improves!
Re: SHED MATTERS 2
Hi Stanley,
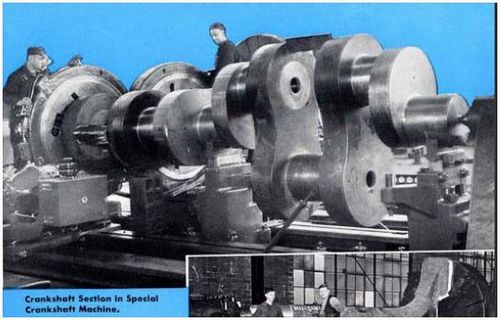
I've been following your crankshaft construction with interest. In your latest post you said high performance commercial crankshafts were forged in one piece.
That got me to thinking about a series of articles I read some time ago about Doxford's ship engines of Sunderland. It seems they built their cranks up from parts. I think they used shrink fitting, possibly with liquid nitrogen. Here is a link to a picture of one of their built up shafts.
http://www.dieselduck.info/historical/0 ... 0Works.jpg
There are other pictures somewhere on line showing a shaft actually being built from bits with the partially completed shaft being lowered by crane into the "new" bits
They may have had trouble though, as one article I read was by a field engineer of theirs who had to re-twist a moved throw in a ship! If I recall right, he used some serious (100 ton or more) hydraulic jacks and gallons of liquid nitrogen to move the offending throw. It sounded like a REAl bit of engineering. Your original statement stands up well in this context!
Regards
Mick