Shed Matters 3

User avatar
Stanley
Global Moderator
Global Moderator
Posts: 90300
Joined: 23 Jan 2012, 12:01
Location: Barnoldswick. Nearer to Heaven than Gloria.

Re: Shed Matters 3

Post by Stanley »

Image

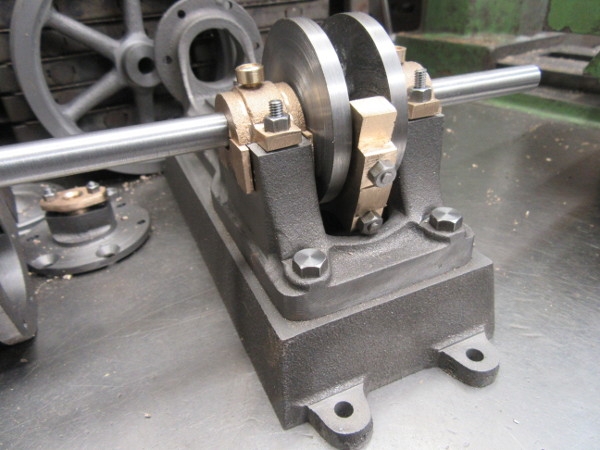
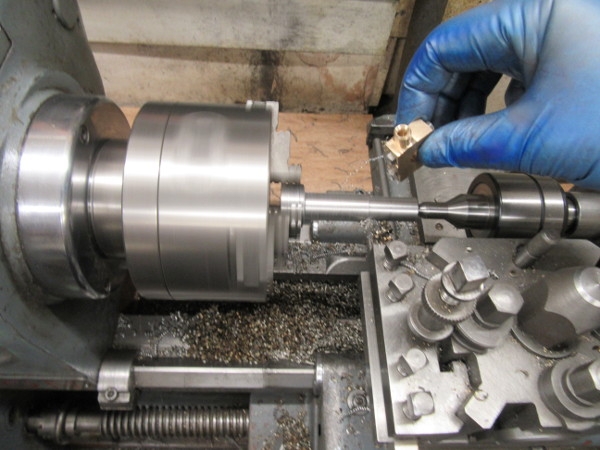
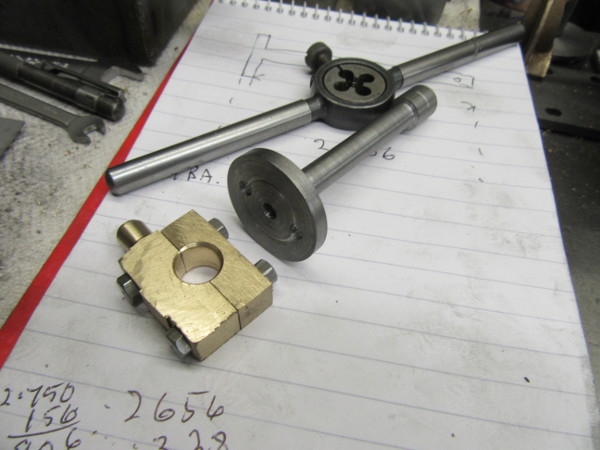
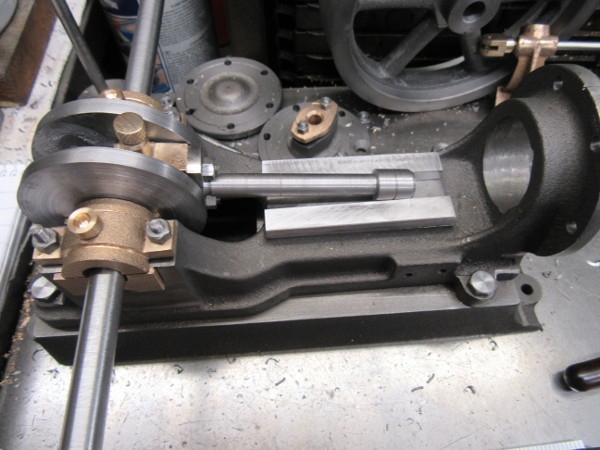
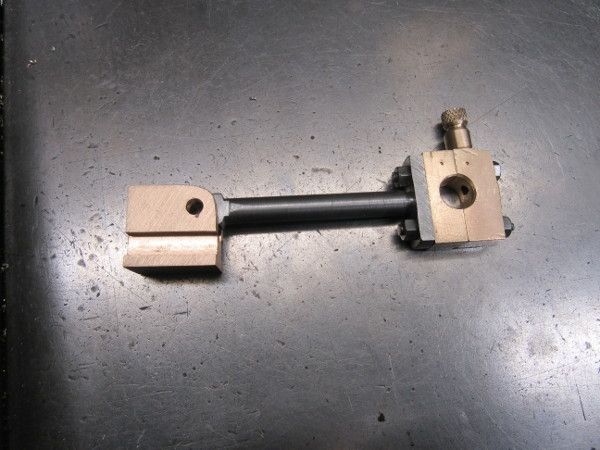
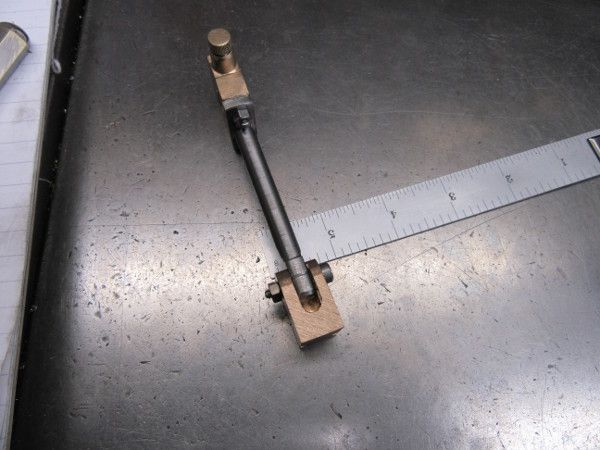
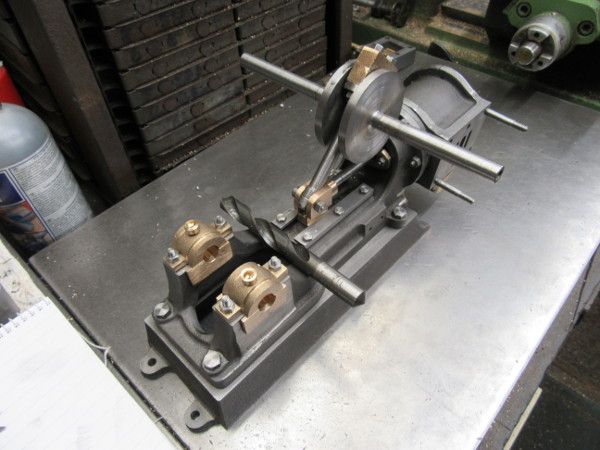
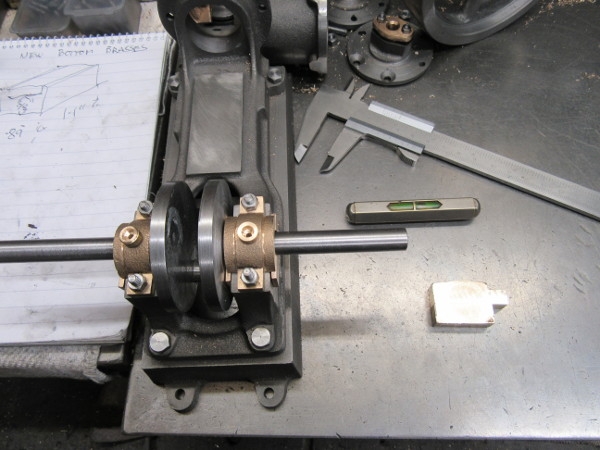
This morning I had a choice where to go. I decided to get the castings ready for the bearing on the end of the connecting rod. Very strange because the castings in the kit bear very little relationship to the actual bearing. Only one thing to do, do my best. This is where I eventually finished up
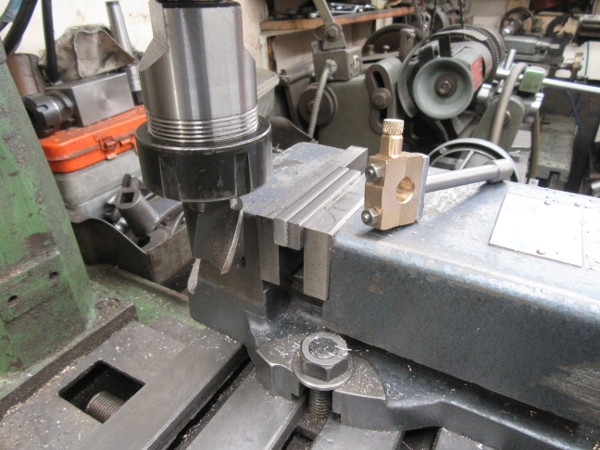
There was one other matter. I had great difficulty sharpening the 3/8" cutter I used to cut the channel in the bottom brasses. It eventually dawned on me that it was a carbide cutter so I got out what I fondly imagined was my green grit cup wheel and found it wasn't. So I tried it on HSS and it's simply a finer grade of grit and makes a better job of the cutters! Remember I bought a new 60grit cup wheel the other day...... Ah well, I shall not be spending another £35 on a green grit wheel, I only have two carbide cutters, I shall do what I did this morning, sharpen them by hand on the green grit wheel on the grinder.
Stanley Challenger Graham
Stanley's View
scg1936 at talktalk.net

"Beware of certitude" (Jimmy Reid)
The floggings will continue until morale improves!
BobH
Regular User
Posts: 133
Joined: 15 Nov 2019, 18:09
Location: Rochdale

Re: Shed Matters 3

Post by BobH »

Ah yes, upside down lathe means the swarf just falls out! Or perhaps it is just ipad photography striking again.

I did get some time later to connect the stator coils together. They go in a plastic insert which slides into the housing. You will see that this is a 12 pole machine. The magnets fit in the rotor, but that will be next week.
8802A703-2B7B-4B26-A029-D3CAC4A327AF.jpeg
The sleeve is about 3 1/2inch diameter so not too fiddly.
You do not have the required permissions to view the files attached to this post.
User avatar
Stanley
Global Moderator
Global Moderator
Posts: 90300
Joined: 23 Jan 2012, 12:01
Location: Barnoldswick. Nearer to Heaven than Gloria.

Re: Shed Matters 3

Post by Stanley »

That looks fiddly to me Bob....
Thinking about my crank bearing.... I can't see why they have made it so complicated. I shall make it like I would for one of my scratch-built engines. as long as I get the centres and therefore the overall length right it will run fine.... :biggrin2:
Stanley Challenger Graham
Stanley's View
scg1936 at talktalk.net

"Beware of certitude" (Jimmy Reid)
The floggings will continue until morale improves!
User avatar
Stanley
Global Moderator
Global Moderator
Posts: 90300
Joined: 23 Jan 2012, 12:01
Location: Barnoldswick. Nearer to Heaven than Gloria.

Re: Shed Matters 3

Post by Stanley »

I've had nice hour and a half in the shed and the brass castings are now drilled for the connecting bolts and bored for the crank pin. Here's the bearing mounted on the pin.

Image

Tomorrow I'll look at the connecting rod, I think that's next for shaving. (Although I might go for the crosshead and slide.... :biggrin2: )
Stanley Challenger Graham
Stanley's View
scg1936 at talktalk.net

"Beware of certitude" (Jimmy Reid)
The floggings will continue until morale improves!
BobH
Regular User
Posts: 133
Joined: 15 Nov 2019, 18:09
Location: Rochdale

Re: Shed Matters 3

Post by BobH »

Today I put the coils in place and am now waiting for the glue to set before sticking down any stray wires.
D45EB30A-151B-47AA-B455-8D6FD81D788A.jpeg
You do not have the required permissions to view the files attached to this post.
User avatar
Stanley
Global Moderator
Global Moderator
Posts: 90300
Joined: 23 Jan 2012, 12:01
Location: Barnoldswick. Nearer to Heaven than Gloria.

Re: Shed Matters 3

Post by Stanley »

It still looks fiddly but I have to admit it looks like a winding!
Stanley Challenger Graham
Stanley's View
scg1936 at talktalk.net

"Beware of certitude" (Jimmy Reid)
The floggings will continue until morale improves!
User avatar
Stanley
Global Moderator
Global Moderator
Posts: 90300
Joined: 23 Jan 2012, 12:01
Location: Barnoldswick. Nearer to Heaven than Gloria.

Re: Shed Matters 3

Post by Stanley »

Image

Two for the price of one. I started the morning by making the head of the bearing round and drilling for the clever little oil passage that lets oil get past the mounting bolt. I didn't bother making a lubricator, it isn't going to drive 300 looms! The two jaw brass finisher's chuck came out, you can't have too many chucks!.
Then I had a good measure up (I have modified the crank bearing slightly.) And got set up to chop the con rod out of the solid 1.25" stock provided. I have the large end to size and the small end is almost there but I have been cutting quite heavily (look at the colour of the chips.) considering I was using HSS and not carbide and the stock has got too hot to measure it accurately so it can wait until tomorrow. A nice 2 hours, I enjoyed that. Steady accurate progress....
Stanley Challenger Graham
Stanley's View
scg1936 at talktalk.net

"Beware of certitude" (Jimmy Reid)
The floggings will continue until morale improves!
User avatar
Stanley
Global Moderator
Global Moderator
Posts: 90300
Joined: 23 Jan 2012, 12:01
Location: Barnoldswick. Nearer to Heaven than Gloria.

Re: Shed Matters 3

Post by Stanley »

Image

A nice quiet two hours. I started by threading the lubricating hole in the crank bearing 1BA. I shall make a fancy plug for it with a knurled top.
But first I went back to the con rod and finished turning that to the exact sizes given in the drawings. The only variation is that I haven't given it a taper. I didn't feel like it! You'll note it is marked for the crosshead pin hole, I shall drill that when I've finished fitting the rod to the bearing. That's the next job tomorrow, make the plug for the oil hole, fit the rod to the bearing and drill for the crosshead pin. Oh, and then round the small end and cut to fit the crosshead. I might leave that until I have made the crosshead.....
Stanley Challenger Graham
Stanley's View
scg1936 at talktalk.net

"Beware of certitude" (Jimmy Reid)
The floggings will continue until morale improves!
BobH
Regular User
Posts: 133
Joined: 15 Nov 2019, 18:09
Location: Rochdale

Re: Shed Matters 3

Post by BobH »

Nice steady progress Stanley. Today I set the mill up to put slots in the rotor to mount the magnets. This generator is like the big machines that I knew at work. The magnetic field rotates whilst the windings are static. The neodymium magnets take a bit of handling. They are very powerful and the material is brittle. They will slide themselves across the bench to the nearest bit of steel and are easily cracked if allowed to smack into it.
E404A4CF-DB91-4A07-BA30-56D470C57EB6.jpeg
You do not have the required permissions to view the files attached to this post.
User avatar
Whyperion
Senior Member
Posts: 3073
Joined: 23 Jan 2012, 22:13
Location: Stockport, after some time in Burnley , After leaving Barnoldswick , except when I am in London

Re: Shed Matters 3

Post by Whyperion »

Bob - can the magnets not be encased in plastic resin to protect their structural integrity, or does this diminish their magnetic field in airspace ?
User avatar
Stanley
Global Moderator
Global Moderator
Posts: 90300
Joined: 23 Jan 2012, 12:01
Location: Barnoldswick. Nearer to Heaven than Gloria.

Re: Shed Matters 3

Post by Stanley »

That looks like a very natty mill Bob. It's got all the things mine hasn't! (Variable speed motor and digital indexing....)
Stanley Challenger Graham
Stanley's View
scg1936 at talktalk.net

"Beware of certitude" (Jimmy Reid)
The floggings will continue until morale improves!
User avatar
Stanley
Global Moderator
Global Moderator
Posts: 90300
Joined: 23 Jan 2012, 12:01
Location: Barnoldswick. Nearer to Heaven than Gloria.

Re: Shed Matters 3

Post by Stanley »

Image

This pic gives this morning's story. First I made the little cap for the crank bearing lubricator threaded 1BA and with a knurled cap. (David does like his knurled caps....).
Once that was done I found some 4BA studding in the treasure chest and made the connection of the brass bearing with the con rod. The 1" bolts supplied aren't quite big enough because I've put a bit more meat in it than their design.
When that was done I had to put the assembly in the mill and cut the foot of the con rod down to the width of the bearing. You can see above that that's been done. Then I started on the guide bars for the crosshead slide, and if you look carefully you'll see that I have squared one end o0f both bars. Tomorrow I'll cut the other end to length and square that. Then I can machine the bars and fit them.
Nice morning, quiet progress....
Stanley Challenger Graham
Stanley's View
scg1936 at talktalk.net

"Beware of certitude" (Jimmy Reid)
The floggings will continue until morale improves!
BobH
Regular User
Posts: 133
Joined: 15 Nov 2019, 18:09
Location: Rochdale

Re: Shed Matters 3

Post by BobH »

My mill is about 15 years old so quite new compared to many. It is of Chinese manufacture and was sold under a number of brand names with various small differences. Generically it is known as an X2. It has been highly modified. Initially it was supplied with a 2 speed gear drive which was extremely noisy. One of the gears stripped first time the cutter really dug in so it got a 2 speed belt drive. I changed the main shaft bearing at the same time. They were angular contact bearings but taper rollers run much better. I ran it like that for a few years before spending over £300 on a digital readout kit from Machine DRO. The kit needed brackets and swarf covers making but that wasn’t a problem with a good stock of aluminium angle. To get the vertical readout fitted I had to remove the spring that counterbalanced the weight of the head. That was replaced with a pneumatic strut behind the column. The column itself now has some 1/4inch plated under the column bottom swivel bolt. It limits the amount of tilt, which I don’t use but it adds rigidity.
So it started as a small hobby machine but can now do good work so long as I don’t take heavy cuts.
User avatar
Stanley
Global Moderator
Global Moderator
Posts: 90300
Joined: 23 Jan 2012, 12:01
Location: Barnoldswick. Nearer to Heaven than Gloria.

Re: Shed Matters 3

Post by Stanley »

Like my El Cheapo mill Bob but I never fitted DRO or a different motor....

Image

This morning has been a milling morning, making the guide bars for the crosshead slide. A very fiddly job because there are measurements like 21/64"! So slow careful work and we gradually get there....
Stanley Challenger Graham
Stanley's View
scg1936 at talktalk.net

"Beware of certitude" (Jimmy Reid)
The floggings will continue until morale improves!
User avatar
Stanley
Global Moderator
Global Moderator
Posts: 90300
Joined: 23 Jan 2012, 12:01
Location: Barnoldswick. Nearer to Heaven than Gloria.

Re: Shed Matters 3

Post by Stanley »

Image

This is where I finished at closing time. I have cut out the crosshead guide bars so that when bolted to the crosshead slide they give a slot for the crosshead to slide in. Not a lot for almost two hours I grant you but before I cut the slots under the vertical mill I did some other jobs.
It's the first day of the year so it seemed to be a good idea to clean the mill, Mrs Harrison and sweep the carpet as well. I drained the tank on the compressor and made a 3/4" centre so I can take a centre on the mill without changing the collet, I usually have 3/4" shank cutters in the mill.
Next I sharpened the 3/4" cutter that's in the mill at the moment, changed the collet in the T&C grinder and sharpened a 1/4" slot drill. Then I found a brand new 1/4" milling cutter so I used that instead.
Finally I set the bars up, centred them under the cutter and carefully and cut what was in effect a 1/4" x 1/8" slot across the two bars. And that's where I finished up, ready to make the next moves on the crosshead, the guides and the con rod.
Stanley Challenger Graham
Stanley's View
scg1936 at talktalk.net

"Beware of certitude" (Jimmy Reid)
The floggings will continue until morale improves!
User avatar
Stanley
Global Moderator
Global Moderator
Posts: 90300
Joined: 23 Jan 2012, 12:01
Location: Barnoldswick. Nearer to Heaven than Gloria.

Re: Shed Matters 3

Post by Stanley »

Image

Here's the pic that sums up this morning. The nice looking block is my blank for the crosshead, the pieces in front are the lumps I had to cut off the gun metal block in the kit to get to the size I need.
Stuarts have been a bit naughty. The crosshead should have been a casting as it's a complicated little part but Stuarts just chucked a lump of gun metal in and it's not even the size they give in the parts list.
No point complaining. I shall just go quietly forward!
Stanley Challenger Graham
Stanley's View
scg1936 at talktalk.net

"Beware of certitude" (Jimmy Reid)
The floggings will continue until morale improves!
User avatar
Stanley
Global Moderator
Global Moderator
Posts: 90300
Joined: 23 Jan 2012, 12:01
Location: Barnoldswick. Nearer to Heaven than Gloria.

Re: Shed Matters 3

Post by Stanley »

Image

No, it's not a joke... Old age is so interesting. When I went in this morning I checked as always and found I had cut the stock yesterday the wrong width. :biggrin2:
So I want into my brass ends, found a piece of stock and crashed on. In the two hours I was in the shed this morning I have cut a new block, cut the channels down each side for the guide bars, drilled and tapped for the crosshead pin and cut the slot for the small end of the connecting rod. Not bad, I am satisfied.
Stanley Challenger Graham
Stanley's View
scg1936 at talktalk.net

"Beware of certitude" (Jimmy Reid)
The floggings will continue until morale improves!
User avatar
Stanley
Global Moderator
Global Moderator
Posts: 90300
Joined: 23 Jan 2012, 12:01
Location: Barnoldswick. Nearer to Heaven than Gloria.

Re: Shed Matters 3

Post by Stanley »

Image

Here is where I am at at knocking off time today. As you can see, quite a lot has been done and I'm pleased to say, with no cock ups. :biggrin2: I've put the curve in the con rod end and cut the small end of the con rod down to size for the clevis. I was baffled for a while by a seeming mismatch between the drawing of the crosshead and that of the con rod. All is clear now, the reason for the difference is that I have to make a crosshead pin, it's not simply a simple 4BA bolt as I was assuming. So this is a good place to stop because I need to be able to mount the con rod on the crank pin and the crosshead in order to get an accurate measurement for the connection between the piston rod and the crosshead. But that's for tomorrow.
Stanley Challenger Graham
Stanley's View
scg1936 at talktalk.net

"Beware of certitude" (Jimmy Reid)
The floggings will continue until morale improves!
User avatar
Stanley
Global Moderator
Global Moderator
Posts: 90300
Joined: 23 Jan 2012, 12:01
Location: Barnoldswick. Nearer to Heaven than Gloria.

Re: Shed Matters 3

Post by Stanley »

Image

Today I wanted to make the crosshead pin which is the tiny custom bolt you can see above fitted to the little end of the con rod. I started by sharpening a small cutter specifically for this job. I wanted a very sharp cutter that didn't have the cutting point honed into a small radius with a diamond hone which is how you get finish. I didn't want finish I wanted precise lengths and square corners.
I started with some hexagon rod, just the right size.... But as soon as I started cutting it I found it was brass, I hadn't realised because it's very old and was black. So a fresh start with 1/4" silver steel. It has a round head and I have cut a slot in it so I can use a screwdriver.
I came out of the shed early, didn't feel like starting a new task. I'm satisfied, one more small step with no mistakes.
Stanley Challenger Graham
Stanley's View
scg1936 at talktalk.net

"Beware of certitude" (Jimmy Reid)
The floggings will continue until morale improves!
User avatar
Stanley
Global Moderator
Global Moderator
Posts: 90300
Joined: 23 Jan 2012, 12:01
Location: Barnoldswick. Nearer to Heaven than Gloria.

Re: Shed Matters 3

Post by Stanley »

Image

I went in the shed early this morning and got an hour and a half in before my early doors weekend shop. My aim was to temporarily install the cylinder and drill and tap the crosshead for the piston rod. The image shows where I finished up at with the guides in place and the piston in place in the crosshead. No surprise, the positioning of the crosshead isn't quite right and adjustments will have to be made but that's for tomorrow.
Once more we have a quiet step forward.
Stanley Challenger Graham
Stanley's View
scg1936 at talktalk.net

"Beware of certitude" (Jimmy Reid)
The floggings will continue until morale improves!
User avatar
plaques
Donor
Posts: 8094
Joined: 23 May 2013, 22:09

Re: Shed Matters 3

Post by plaques »

Today's tip. Getting fed up with poor lighting when doing those odd fiddly jobs. I upgraded my 'Head Torch' to a 100 lumens model £6 from Argos. The best £6 worth this year, actually the only spend this year. All shed men should get one.
User avatar
Stanley
Global Moderator
Global Moderator
Posts: 90300
Joined: 23 Jan 2012, 12:01
Location: Barnoldswick. Nearer to Heaven than Gloria.

Re: Shed Matters 3

Post by Stanley »

Ken, they tell me they are good. However, With my LED lighting I think I have enough light. What would really help me would be a good head magnifier but at the moment I can't afford one...
Stanley Challenger Graham
Stanley's View
scg1936 at talktalk.net

"Beware of certitude" (Jimmy Reid)
The floggings will continue until morale improves!
User avatar
Stanley
Global Moderator
Global Moderator
Posts: 90300
Joined: 23 Jan 2012, 12:01
Location: Barnoldswick. Nearer to Heaven than Gloria.

Re: Shed Matters 3

Post by Stanley »

Image

I did almost two and a half hours in the shed this morning. Lots of little jobs and adjustments. Bottom line is that the piston is now running equidistant in the cylinder and clearing the registers on the lids at each end. The piston rod length has been adjusted and the crosshead is now running accurately on the slide. The crank bearing has been adjusted and now runs in a full circle and not fouling the bed, there is very little room at the end of the stroke. I've also modified the crosshead so that the bottom of the slide doesn't overrun the slide. All in all a lot of little jobs attended to and I am now ready to fit the crosshead guides.
Stanley Challenger Graham
Stanley's View
scg1936 at talktalk.net

"Beware of certitude" (Jimmy Reid)
The floggings will continue until morale improves!
User avatar
Stanley
Global Moderator
Global Moderator
Posts: 90300
Joined: 23 Jan 2012, 12:01
Location: Barnoldswick. Nearer to Heaven than Gloria.

Re: Shed Matters 3

Post by Stanley »

Image

Two for the price of one. I put the two jaw chuck on and did a bit of high risk turning to make the crosshead pretty by turning the end that accepts the piston rod round. This matters because it means the nose fits between the studs that adjust the gland.
Then I started on fitting the crosshead guides, I can measure accurately now. I ran into some trouble straight away. The set screws are supposed to be 5BA but after finding I was having a problem I realised that I was using the wrong tapping drill. I did some more measuring and found that I could get away with using 4BA bolts so that's what I am doing. As you can see I have one guide fitted and provided with witness marks. Tomorrow I shall carry on and fit the other. Slow but steady progress and no cock-ups.... :biggrin2:
Stanley Challenger Graham
Stanley's View
scg1936 at talktalk.net

"Beware of certitude" (Jimmy Reid)
The floggings will continue until morale improves!
User avatar
Stanley
Global Moderator
Global Moderator
Posts: 90300
Joined: 23 Jan 2012, 12:01
Location: Barnoldswick. Nearer to Heaven than Gloria.

Re: Shed Matters 3

Post by Stanley »

Image

Almost the entire shed stint this morning was spent in finishing installing the guide bars and then adjusting the crosshead and the aperture between the bars and the engine bed until the piston and crosshead move smoothly when the crankshaft is turned. Sounds simple but in practice it's surprisingly difficult but I got there. Where to go next? You might remember that I had a lot of trouble with the crankshaft bearings. They are nowhere near satisfactory so I had an inspection and what I'm going to do is make two bushes for the crankshaft and bore the bearings to fit. That will probably be 7/16". We shall see.

Image
Stanley Challenger Graham
Stanley's View
scg1936 at talktalk.net

"Beware of certitude" (Jimmy Reid)
The floggings will continue until morale improves!
Post Reply

Return to “Crafts”