Shed Matters 3
-
Stanley

- Global Moderator

- Posts: 90301
- Joined: 23 Jan 2012, 12:01
- Location: Barnoldswick. Nearer to Heaven than Gloria.
Re: Shed Matters 3
There were always exceptions Mick, usually because forgings of the required size couldn't be made. The throws on this one won't shift........
Stanley Challenger Graham
Stanley's View
scg1936 at talktalk.net
"Beware of certitude" (Jimmy Reid)
The floggings will continue until morale improves!
Stanley's View
scg1936 at talktalk.net
"Beware of certitude" (Jimmy Reid)
The floggings will continue until morale improves!
-
Stanley
- Global Moderator
- Posts: 90301
- Joined: 23 Jan 2012, 12:01
- Location: Barnoldswick. Nearer to Heaven than Gloria.
Re: Shed Matters 3
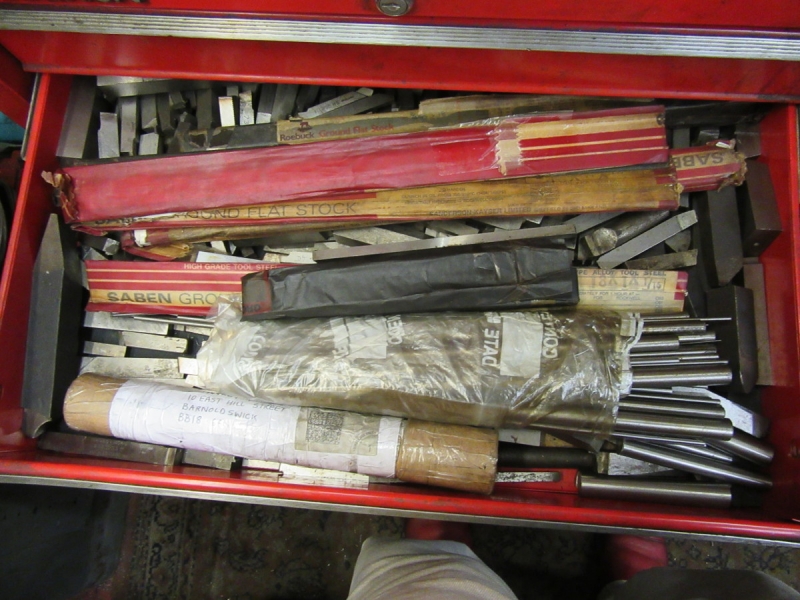
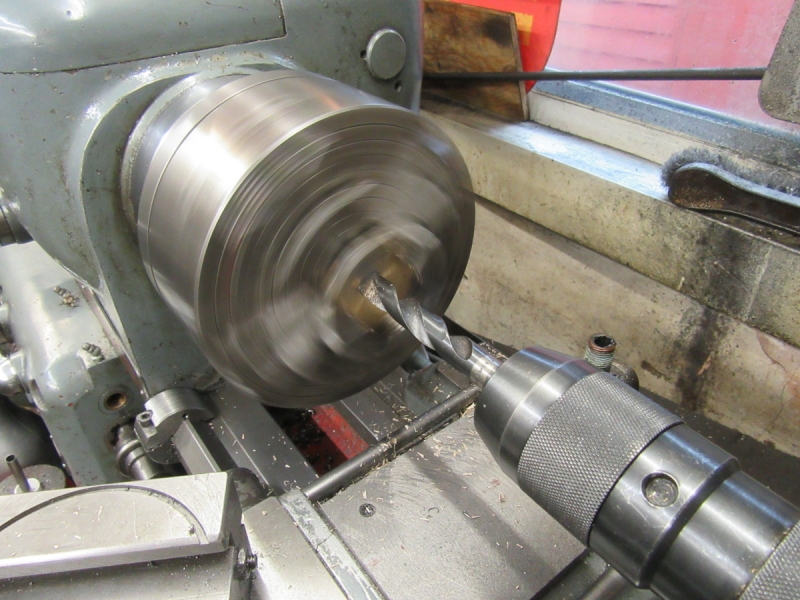
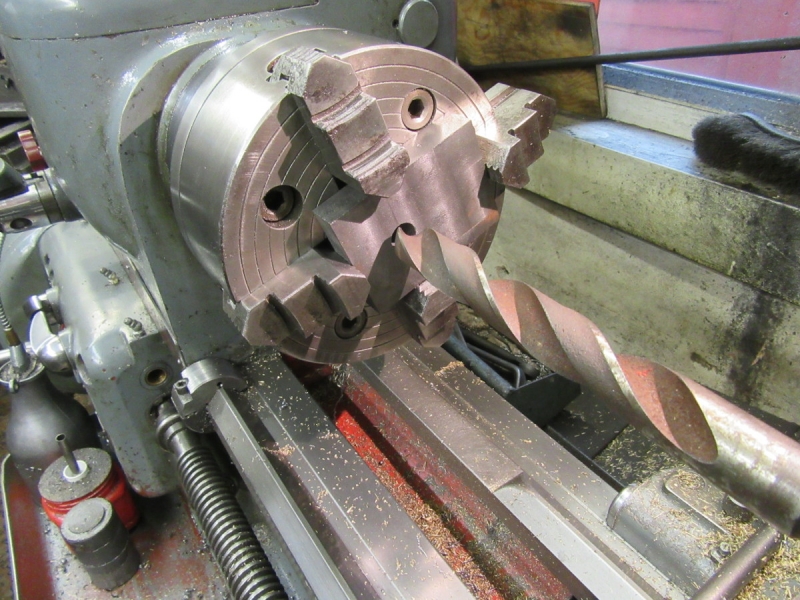
I got caught up in other matters yesterday but was in the shed before 8AM this morning. This morning's task was to have a fresh start on my favourite tool, a piece of HS Steel with a left hand grind on one end and a right hand on the other. What usually happens is that you continually re-sharpen to cutter you're using and occasionally modifying it for a special cut and eventually you end up with a dog's breakfast. So I went into my HSS drawer to see what I could find. Many years ago I was in Dixons at Worston, one of my favourite places, it's where I bought Mrs Harrison and the HM, and I saw a weft tin full of HS steel that had come out of a fire extinguisher factory. Nu Swift I think. I bought the lot for £25 and I will never run out!
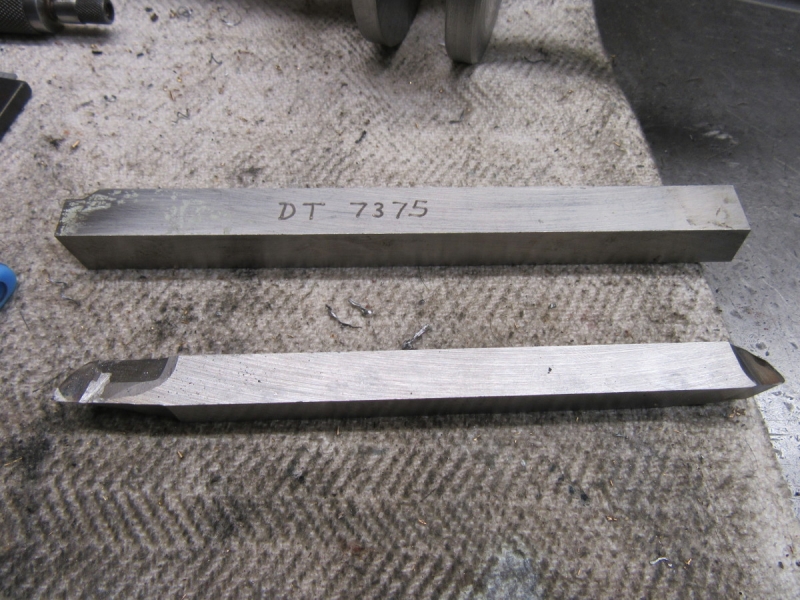
I've been using a 10mm length of cobalt steel and found a nice piece of 14mm cobalt which will be better and slightly more rigid.

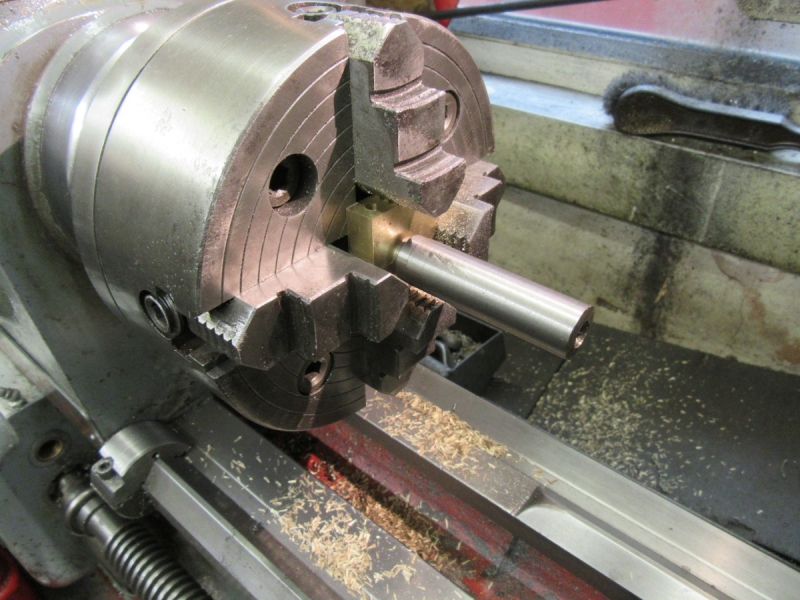
I found a handy lump of clean steel in the scrap box and dialled it in in the 4 Jaw.
I'd put a conventional text book grind on each end, one left hand a and one right hand. I made sure it was dead on centre and just put a long cut on.
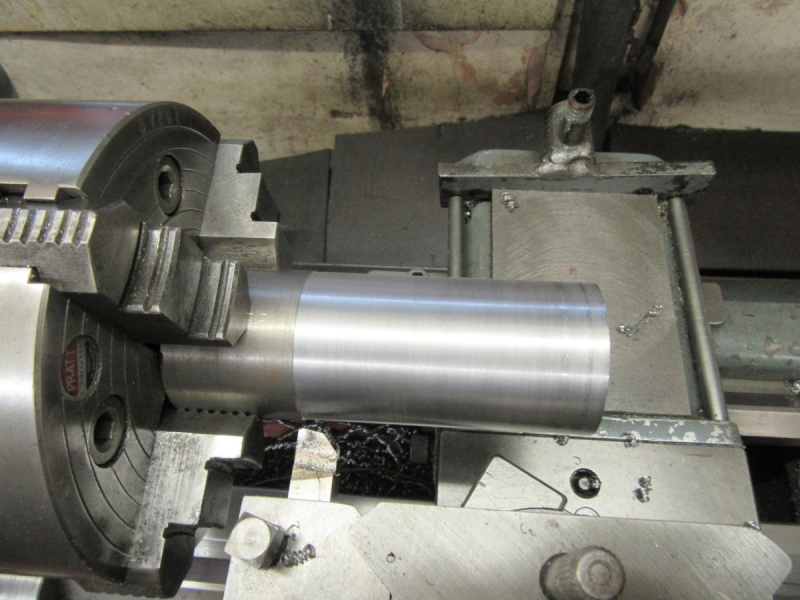
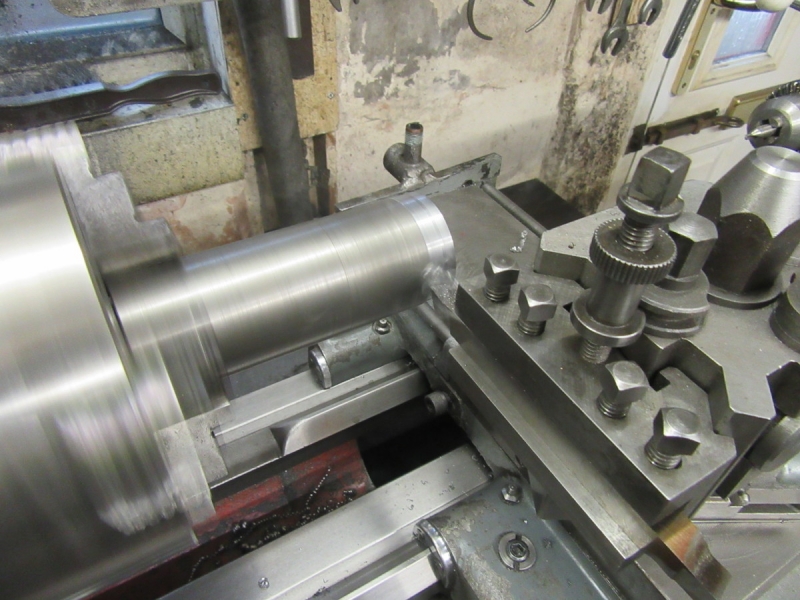
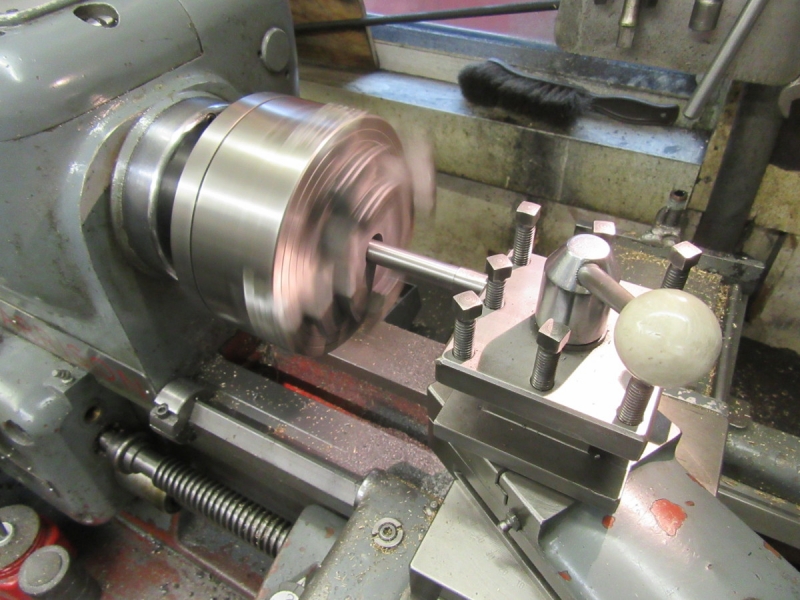
This was the result, not the slowest feed but a very acceptable tool finish.
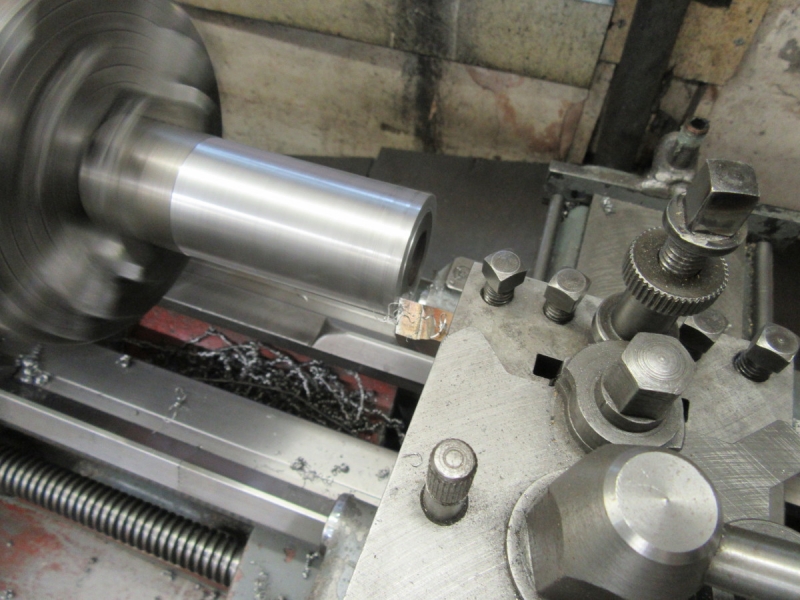
I swapped the tool round, still dead on centre because I made sure of that when I ground them. I made a cut across the face. A bit of chatter on starting because of the stick out but once it settled into the cut a perfectly acceptable finish..... That will do me for this morning........
Stanley Challenger Graham
Stanley's View
scg1936 at talktalk.net
"Beware of certitude" (Jimmy Reid)
The floggings will continue until morale improves!
Stanley's View
scg1936 at talktalk.net
"Beware of certitude" (Jimmy Reid)
The floggings will continue until morale improves!
-
Stanley
- Global Moderator
- Posts: 90301
- Joined: 23 Jan 2012, 12:01
- Location: Barnoldswick. Nearer to Heaven than Gloria.
Re: Shed Matters 3
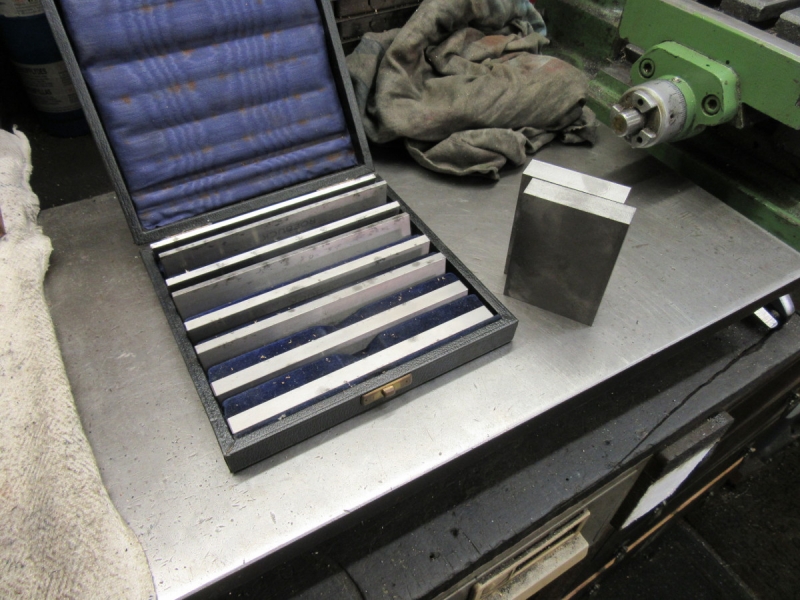
One thing I forgot to say is that the cutter will get better as I always use a very fine stone to hone the edge each time I use it.
Stanley Challenger Graham
Stanley's View
scg1936 at talktalk.net
"Beware of certitude" (Jimmy Reid)
The floggings will continue until morale improves!
Stanley's View
scg1936 at talktalk.net
"Beware of certitude" (Jimmy Reid)
The floggings will continue until morale improves!
-
Stanley
- Global Moderator
- Posts: 90301
- Joined: 23 Jan 2012, 12:01
- Location: Barnoldswick. Nearer to Heaven than Gloria.
Re: Shed Matters 3
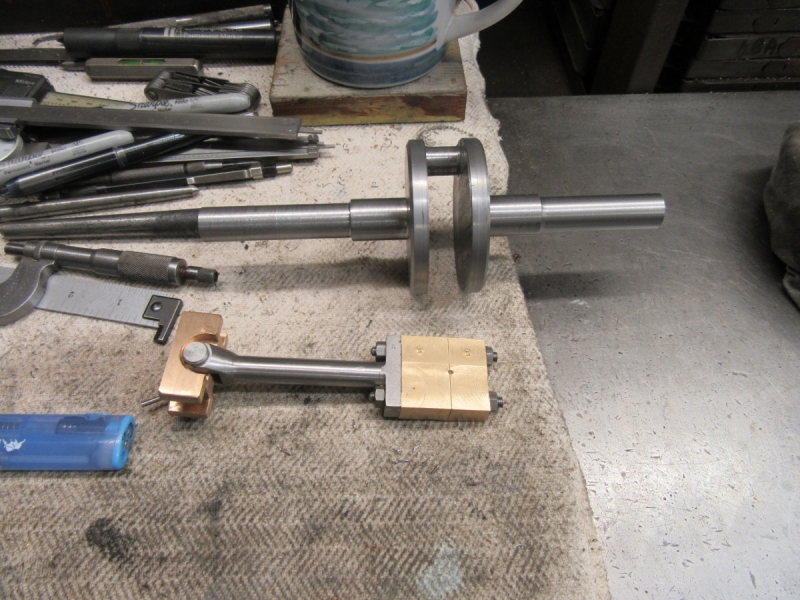
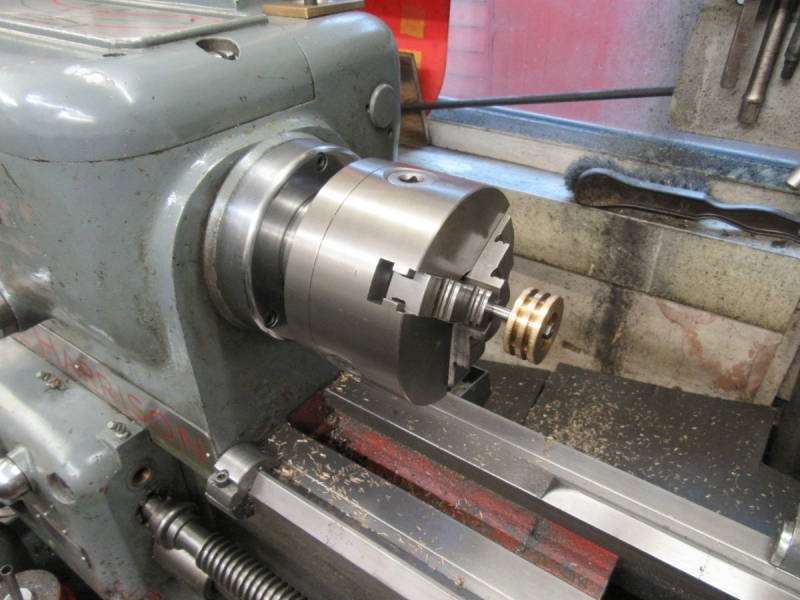
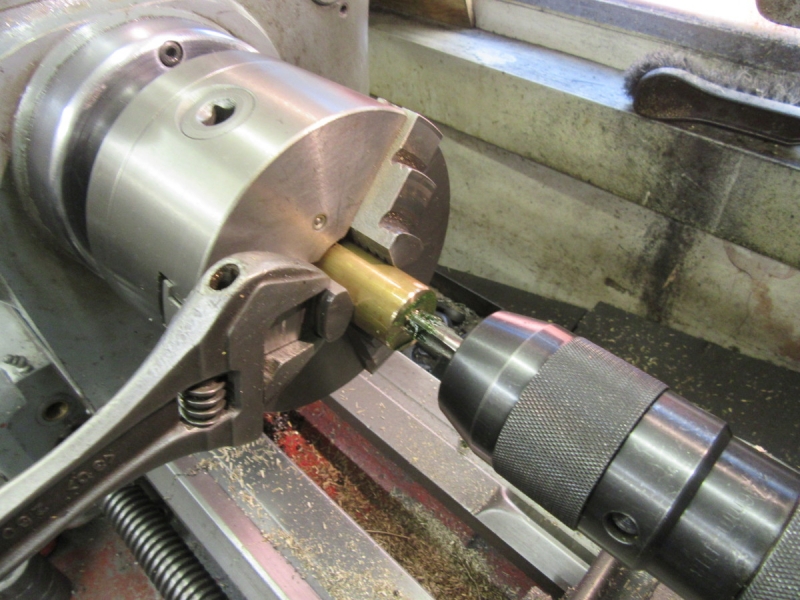
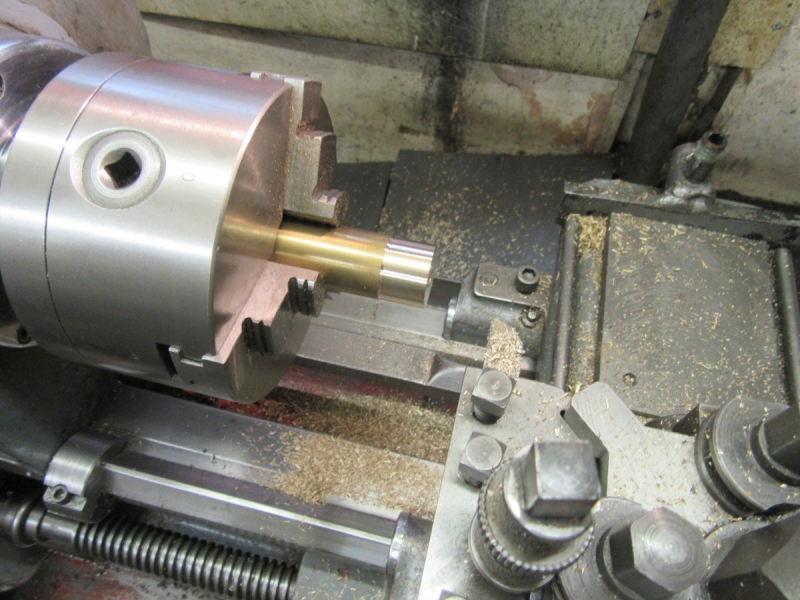
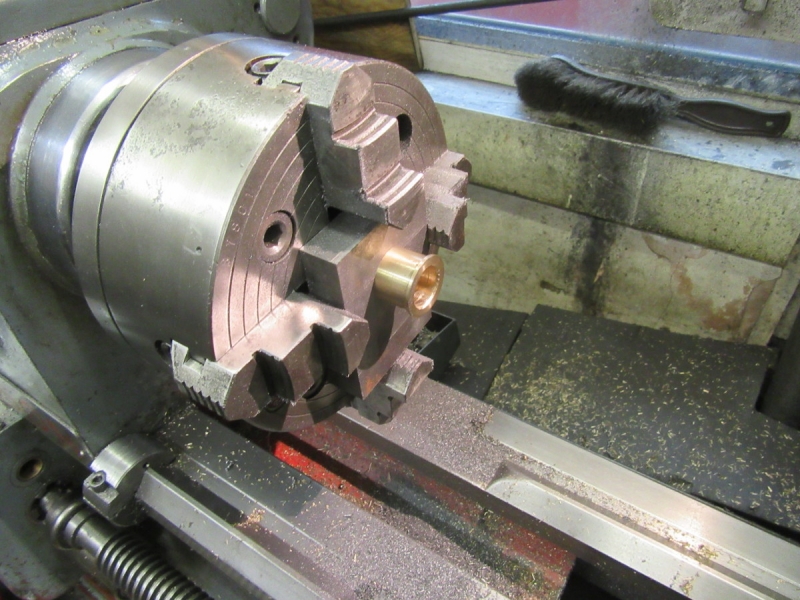
I have been a bit dilatory this morning and got less than an hour in the shed. But I spent it well! What I wanted to do was bore the brass crank bearing and fit it to the crankshaft.
There are lots of ways to measure the bore for the crankpin but the best by far is to make a plug gauge the size of the crank pin. So I popped a piece of scrap steel in the 4 Jaw, dialled it in and honed my cutter. I checked the centre height again and as I suspected it was slightly low so I adjusted that and cut my gauge to .518" that's a thou smaller than the crank pin, you always finish up slightly larger!
Knocking off time..... I have my plug gauge and tomorrow I'll set the brass up in the 4 jaw and bore it to the correct size. As I have already admitted, no trees torn up but what there is is good!
Stanley Challenger Graham
Stanley's View
scg1936 at talktalk.net
"Beware of certitude" (Jimmy Reid)
The floggings will continue until morale improves!
Stanley's View
scg1936 at talktalk.net
"Beware of certitude" (Jimmy Reid)
The floggings will continue until morale improves!
-
Stanley
- Global Moderator
- Posts: 90301
- Joined: 23 Jan 2012, 12:01
- Location: Barnoldswick. Nearer to Heaven than Gloria.
Re: Shed Matters 3

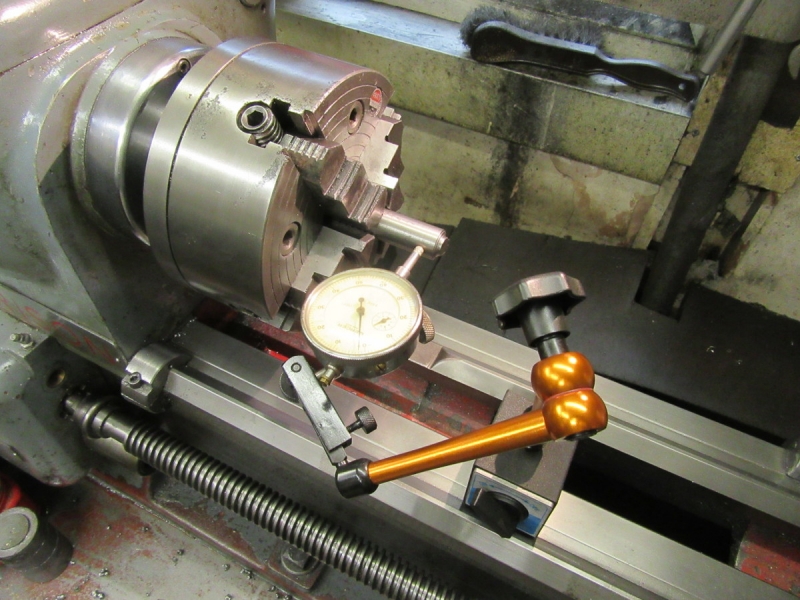
A bit of careful setting up in the 4 jaw, start with a centre drill and poke a 3/16" drill through.
The target is .519" so the next thing was to poke a 1/2" drill through, then set a small boring bar up and creep up on the target!
The plug gauge is .518" and is a perfect easy fit.
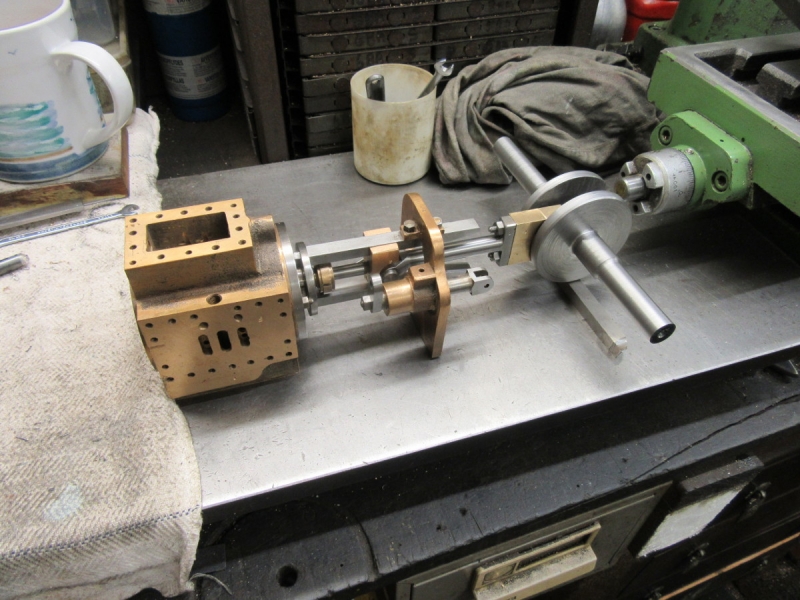
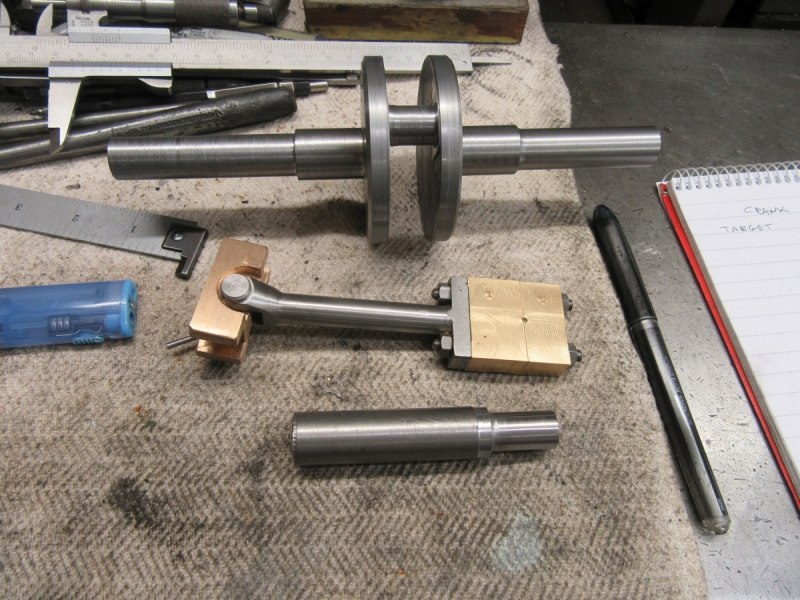
The bearing is as near a perfect fit as you could want so that's all right. Now I need to have a good look and do a bit of thinking so I fitted the piston and rod.....
I think the con rod is going to be OK for length but before I can reach a final conclusion I have to reduce the length of the piston rod, then I'll be able to get a definitive answer. I decided that I wanted to come to this with plenty of time to think so I knocked off.
Stanley Challenger Graham
Stanley's View
scg1936 at talktalk.net
"Beware of certitude" (Jimmy Reid)
The floggings will continue until morale improves!
Stanley's View
scg1936 at talktalk.net
"Beware of certitude" (Jimmy Reid)
The floggings will continue until morale improves!
-
Stanley
- Global Moderator
- Posts: 90301
- Joined: 23 Jan 2012, 12:01
- Location: Barnoldswick. Nearer to Heaven than Gloria.
Re: Shed Matters 3
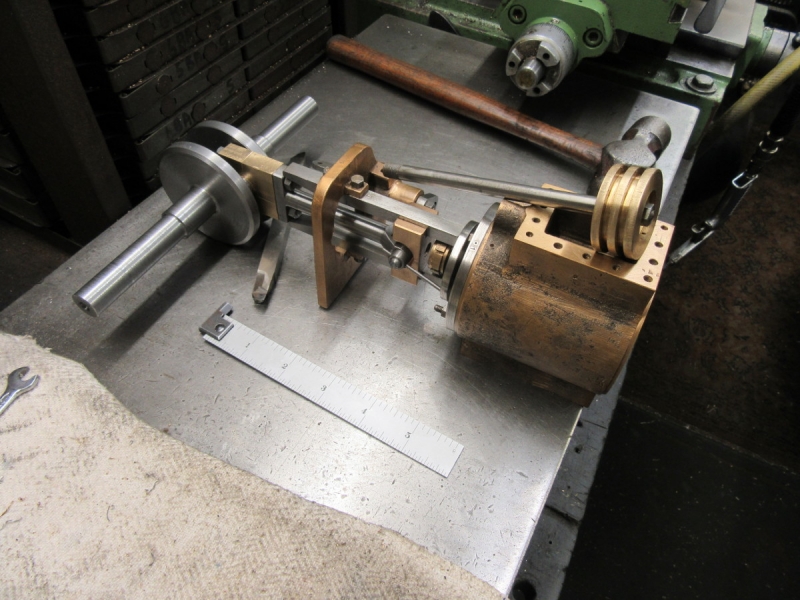
Not a lot of time this morning, I have to take Jack to the vet's. My first job was to slacken the fit of the piston in the bore, as usual, I have fitted it too close and that's making sizing the rod and fitting it very difficult. So the first job was to get it in Mrs Harrison and give the piston a light skim. And no, I haven't given up on the 4 jaw, it's simply that it won't close enough to grip the 5/16" rod so I put the Polish 3 jaw SC on and that solved it. I did a light skim and now it fits closely in the bore but is not tight. So that's that one out of the way!
Then I did some fitting and measuring, a lot easier now the piston slides freely, decided how much the piston rod needed to be shortened and then cut it off, cleaned the end up in the lathe and threaded it 5/16" 26tpi. Then a bit of fitting to make sure there was enough clearance for the crosshead pin in the end support. Then reassemble and pop the cylinder in the vice. Here it is at each end of the cylinder which is a bit more than the actual stroke because of the clearance. It's going to be OK. Off to the vet's now.....
Stanley Challenger Graham
Stanley's View
scg1936 at talktalk.net
"Beware of certitude" (Jimmy Reid)
The floggings will continue until morale improves!
Stanley's View
scg1936 at talktalk.net
"Beware of certitude" (Jimmy Reid)
The floggings will continue until morale improves!
-
Stanley
- Global Moderator
- Posts: 90301
- Joined: 23 Jan 2012, 12:01
- Location: Barnoldswick. Nearer to Heaven than Gloria.
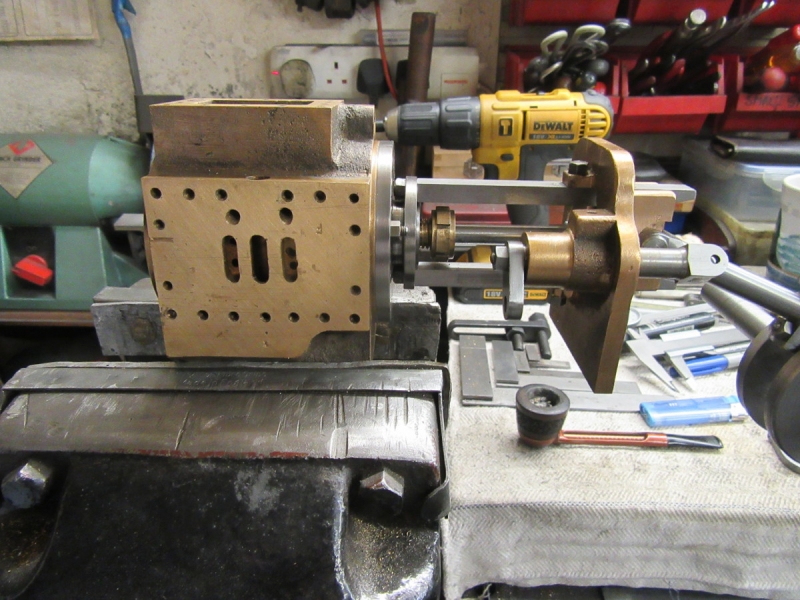
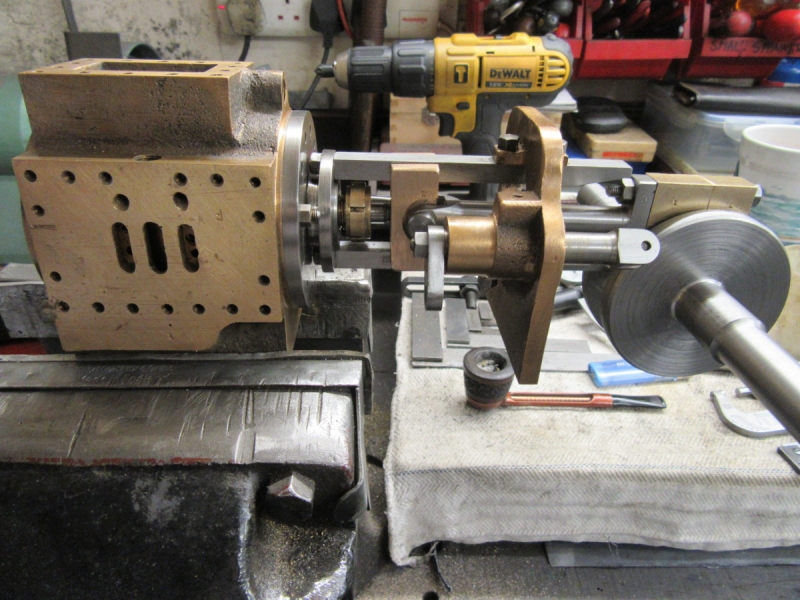
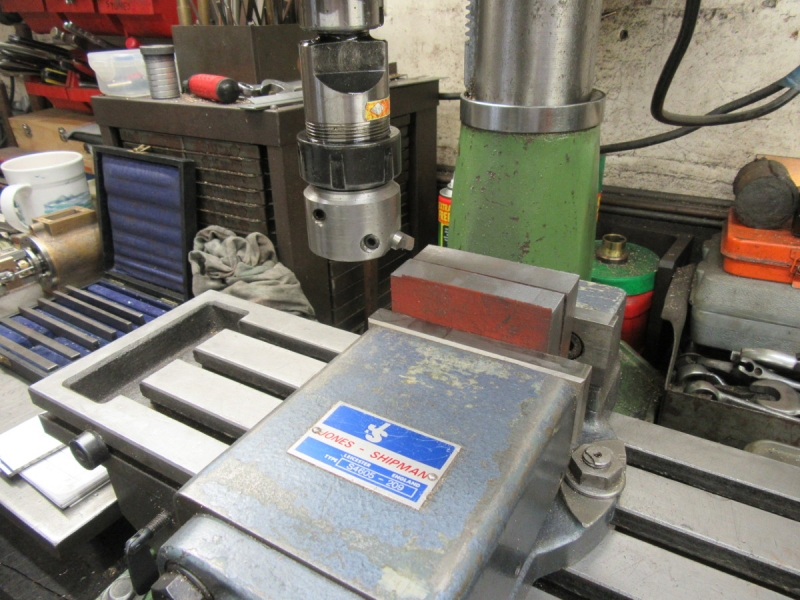
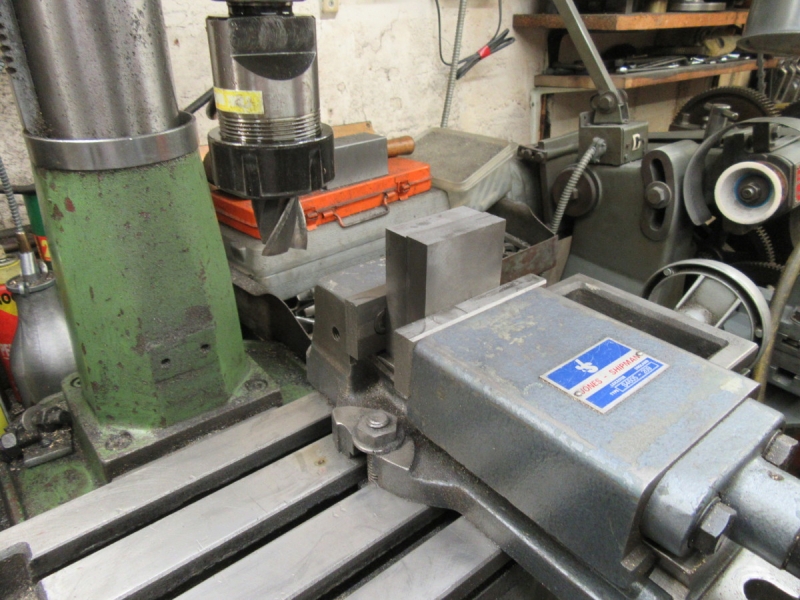
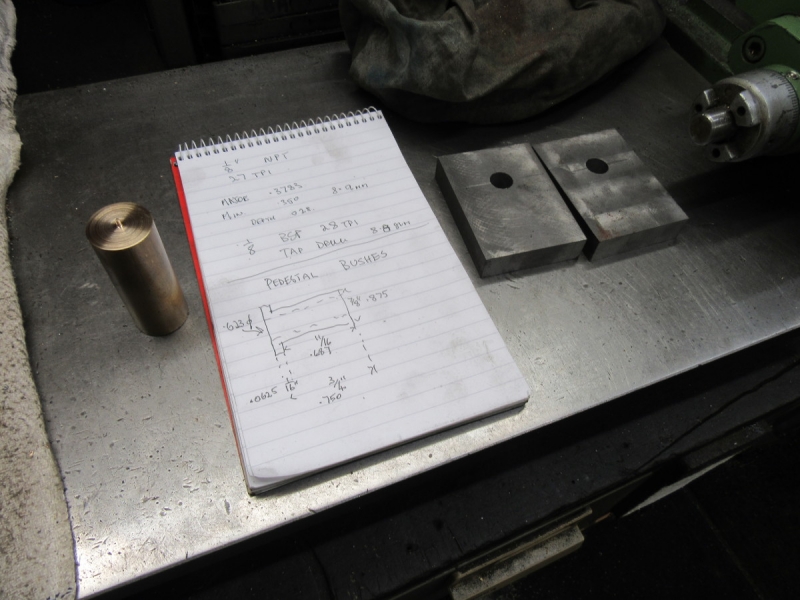
Re: Shed Matters 3
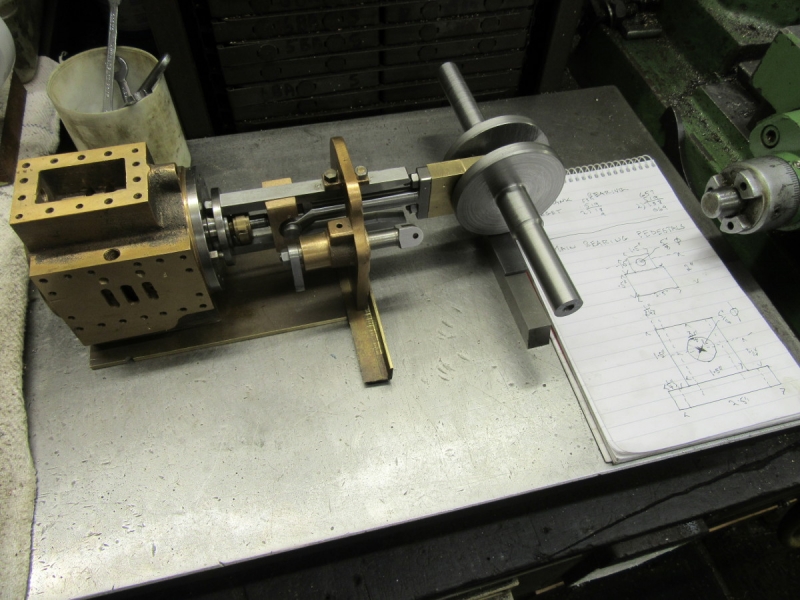
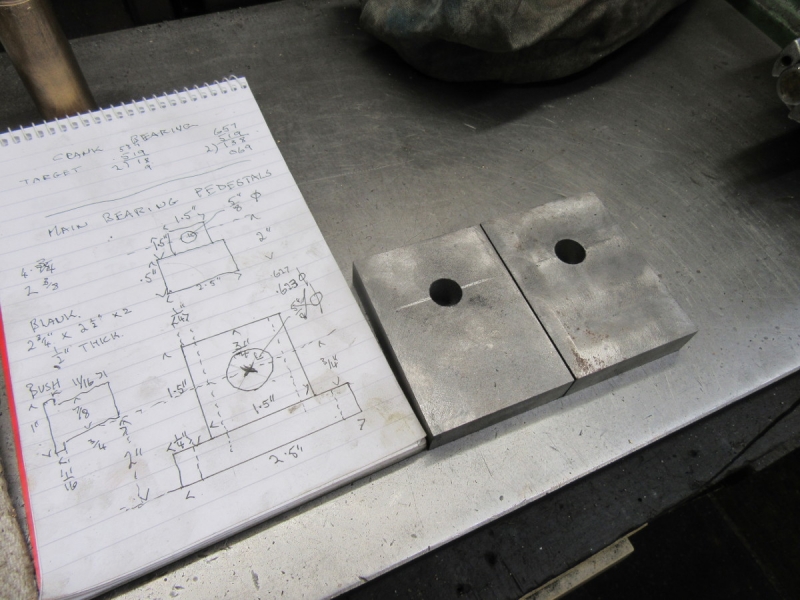
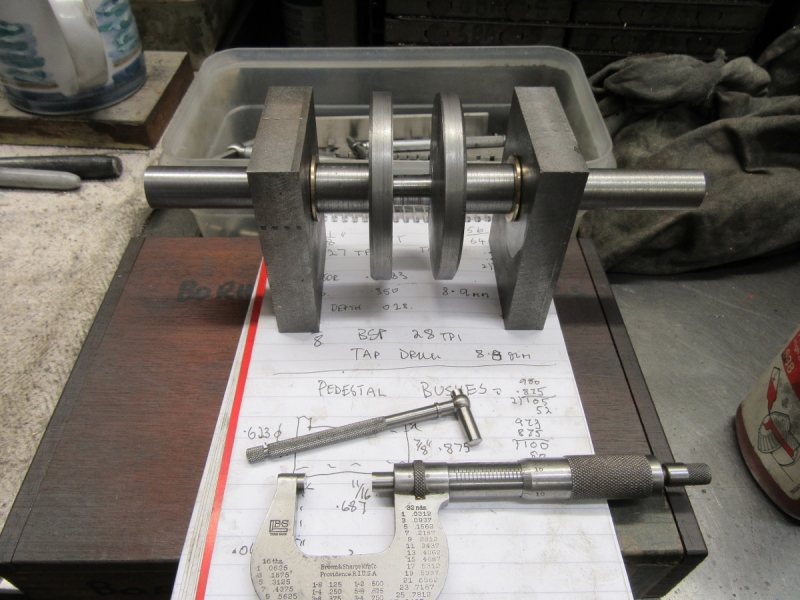
The aim this morning is to decide on the pedestal bearings so a set up was needed so I could get some measurements and do a drawing. The main thing is the height of the bearing, I took a stab at the other measurements.
I needed some stock that I could get 1/2" out of it. You might remember that this is part of an old CI cistern I got out of a scrap yard once. It's good material and although I can't quite get the measurements I had decided on out of it I can make do with a bit of modification.
There is no sound quite as soothing as the regular chunk chunk of Mrs McMaster doing her thing.

I've put this view in to show what the line of the valve rod is going to be. This decides the placement of the pedestal bearings, they are going on the 5/8" part of the shaft. When I get there I shall modify the length of the 3/4" section of the shaft next to the crank webs.
Here's where I finished up, I have marked a centre line on the stock and tomorrow I shall start by splitting it down the middle and then converting it into two square, finished blanks.
Stanley Challenger Graham
Stanley's View
scg1936 at talktalk.net
"Beware of certitude" (Jimmy Reid)
The floggings will continue until morale improves!
Stanley's View
scg1936 at talktalk.net
"Beware of certitude" (Jimmy Reid)
The floggings will continue until morale improves!
-
Stanley
- Global Moderator
- Posts: 90301
- Joined: 23 Jan 2012, 12:01
- Location: Barnoldswick. Nearer to Heaven than Gloria.
Re: Shed Matters 3
We were getting a bit too big for our boots lads so Ian has created a new thread for us. Should load quicker. Otherwise, normal service...
Stanley Challenger Graham
Stanley's View
scg1936 at talktalk.net
"Beware of certitude" (Jimmy Reid)
The floggings will continue until morale improves!
Stanley's View
scg1936 at talktalk.net
"Beware of certitude" (Jimmy Reid)
The floggings will continue until morale improves!
-
Stanley
- Global Moderator
- Posts: 90301
- Joined: 23 Jan 2012, 12:01
- Location: Barnoldswick. Nearer to Heaven than Gloria.
Re: Shed Matters 3
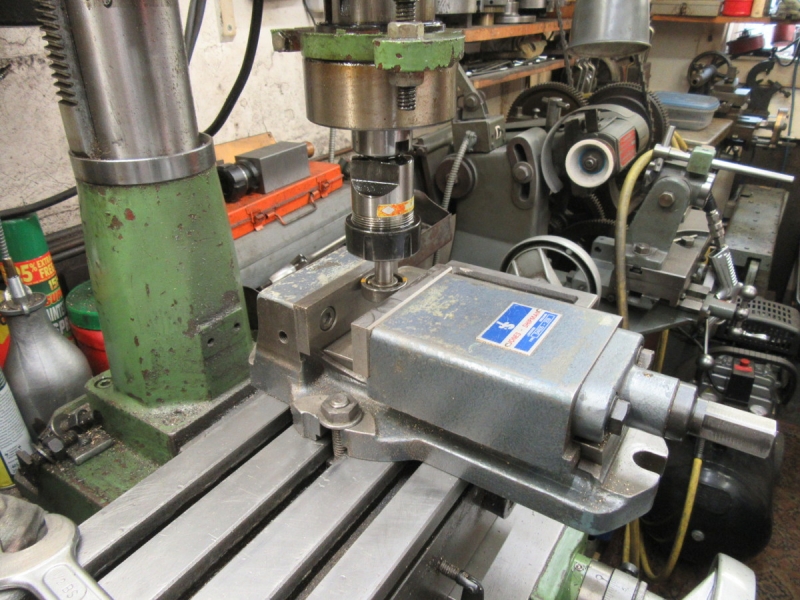
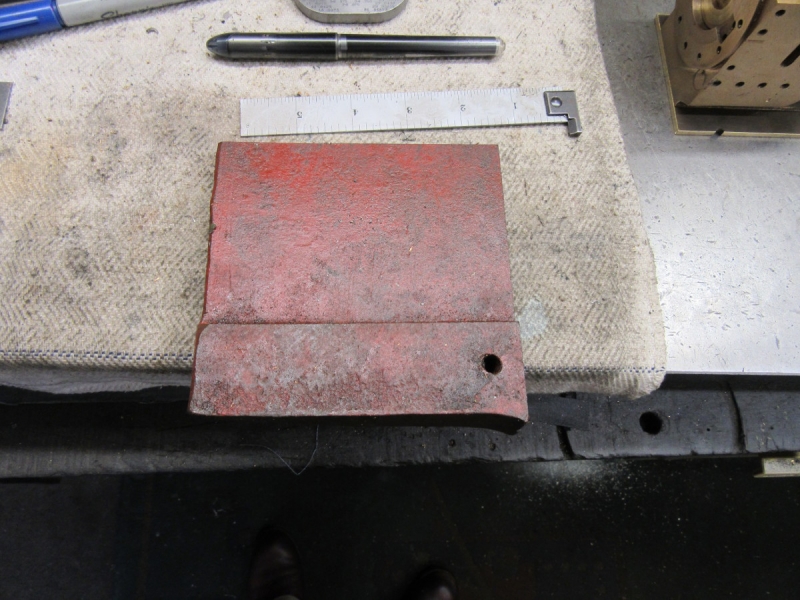
Mrs McMaster is chunking away in the background cutting my lump of CI in two while I get the vice trammed in on the VM using the John Mills ball bearing tool.
Newton was always a big fan of fly cutters, mainly because he could sharpen them easily. Look at the finish, you can see why. We have started making the CI blocks shiny and square!
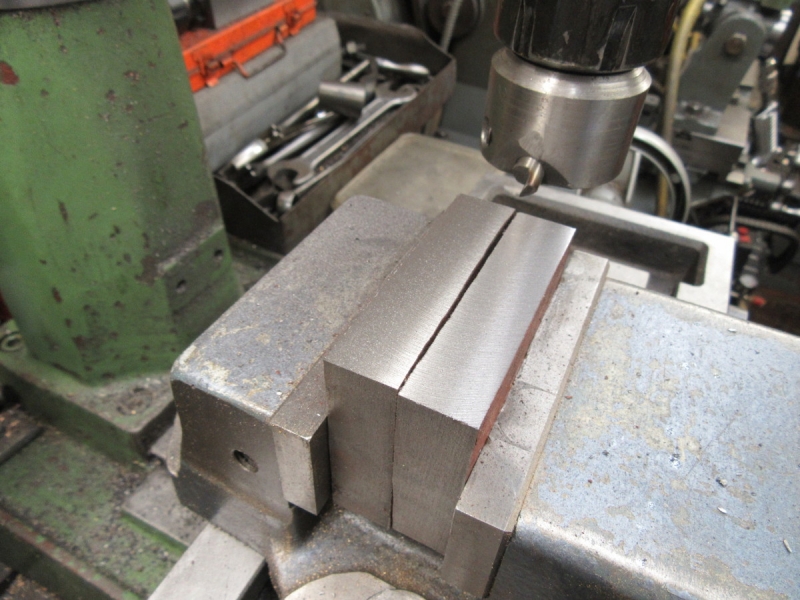
Two sides square with each other, a good start.
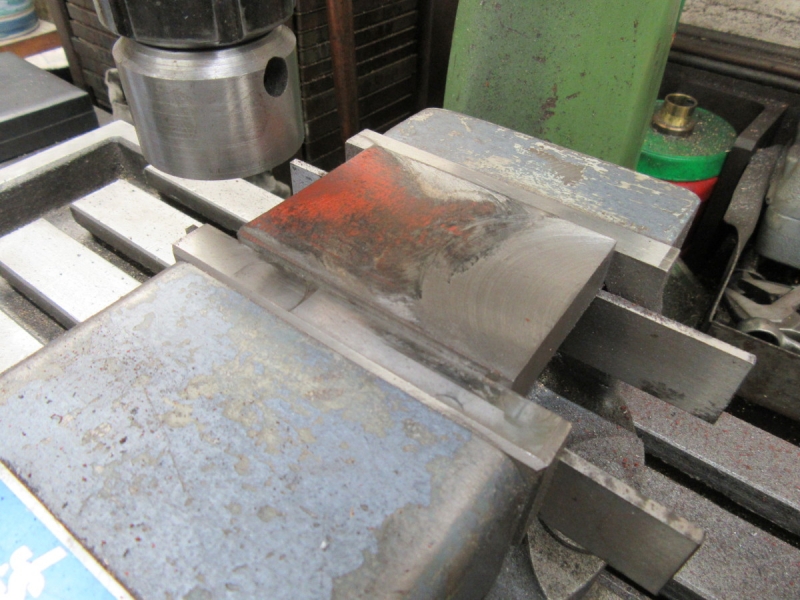
I flatted one broad side with a couple of cuts with no problem. So I turned it over to do the other side but I hit a problem, a hard shop in the casting. It wasn't too bad just a slight chill but it was enough to knock the edge off the cutter so I had to have a rethink. I put a normal end mill in and took a cut deep enough to get under the skin. That cured it so I did the rest of the broad sides that way.

Here we are at knocking off time. I have the two ends to square on the right hand block before I go forward!
Stanley Challenger Graham
Stanley's View
scg1936 at talktalk.net
"Beware of certitude" (Jimmy Reid)
The floggings will continue until morale improves!
Stanley's View
scg1936 at talktalk.net
"Beware of certitude" (Jimmy Reid)
The floggings will continue until morale improves!
-
Stanley
- Global Moderator
- Posts: 90301
- Joined: 23 Jan 2012, 12:01
- Location: Barnoldswick. Nearer to Heaven than Gloria.
Re: Shed Matters 3
For some reason that last image won't post...... Never mind, it was a boring pic anyway!
Stanley Challenger Graham
Stanley's View
scg1936 at talktalk.net
"Beware of certitude" (Jimmy Reid)
The floggings will continue until morale improves!
Stanley's View
scg1936 at talktalk.net
"Beware of certitude" (Jimmy Reid)
The floggings will continue until morale improves!
-
PanBiker

- Site Administrator

- Posts: 16449
- Joined: 23 Jan 2012, 13:07
- Location: Barnoldswick - In the West Riding of Yorkshire, always was, always will be.
Re: Shed Matters 3
That's weird, I tried replacing the string in your post Stanley and it bombs. Works fine in a new post? Nothing wrong with the image as such or the generated URL, how strange. Tried it in Practice posting as well, without problem. Brain fart?
Ian
-
Stanley
- Global Moderator
- Posts: 90301
- Joined: 23 Jan 2012, 12:01
- Location: Barnoldswick. Nearer to Heaven than Gloria.
Re: Shed Matters 3
We'll eventually find out Ian. Perhaps the new thread has a limit of 5 pics?
Stanley Challenger Graham
Stanley's View
scg1936 at talktalk.net
"Beware of certitude" (Jimmy Reid)
The floggings will continue until morale improves!
Stanley's View
scg1936 at talktalk.net
"Beware of certitude" (Jimmy Reid)
The floggings will continue until morale improves!
-
PanBiker
- Site Administrator
- Posts: 16449
- Joined: 23 Jan 2012, 13:07
- Location: Barnoldswick - In the West Riding of Yorkshire, always was, always will be.
Re: Shed Matters 3
There are no limits on the number of images in a post, only settings for image size. Post settings are global. Permissions can be tweaked but I copied the permission set from Shed 2 as well when I created the new thread so there should be nothing there. Soon see if you try another half dozen.
Fourth post in Shed 3 has 10 images in the single post and I have dropped 40 or more in some of my Favourite Walk posts.
Fourth post in Shed 3 has 10 images in the single post and I have dropped 40 or more in some of my Favourite Walk posts.
Ian

Interesting Steam Engine
Hi Stanley,
One of the YouTube machinists I follow is a Finn, Lauri Vuohensilta. He does crazy stuff with a hydraulic press but also some serious machining in his father's commercial workshop. His latest video was about a visit to a museum in his home town, Tampere, where there is a preserved mill engine. A former cotton mill is now a shopping centre and museum with the engine as an exhibit.
Sadly, it looks not to be in steam, but is beautifully preserved in a very nice engine house. It is a 1600 horsepower 4 cylinder twin-tandem similarly configured to how I understand Ellenroad was before the 1916 upgrade, as it has 1 x h.p, 1 x i.p and 2 x l.p cylinders. Translating back from the metric info he gave, it has a good size flywheel, about 27 foot in diameter weighing around 50 tons and used steam at about 180 p.s.i.
The engine is a product of the Sulzer company in Winterthur, Switzerland from 1899. I am very familiar with their diesel anigines, but hadn't realised they had also produced steam eninges.The valve gear was interesting, it reminded me of pictures I have seen of the Mons Mill engine, so I assume they are drop valves.
Were these valevs much used here? The Mons Mill engine was Belgian and the one in this video is Swiss but I have never seen a British made engine with these valves.
Here is a link to the video:-
https://www.youtube.com/watch?v=9JQf22SuApY
His english is a bit different, but fairly understandable. I find him very clear, but I worked in Helsinki for 6 years, so I'm very familiar with "Finglish".
BR
Mick
-
Stanley
- Global Moderator
- Posts: 90301
- Joined: 23 Jan 2012, 12:01
- Location: Barnoldswick. Nearer to Heaven than Gloria.
Re: Shed Matters 3
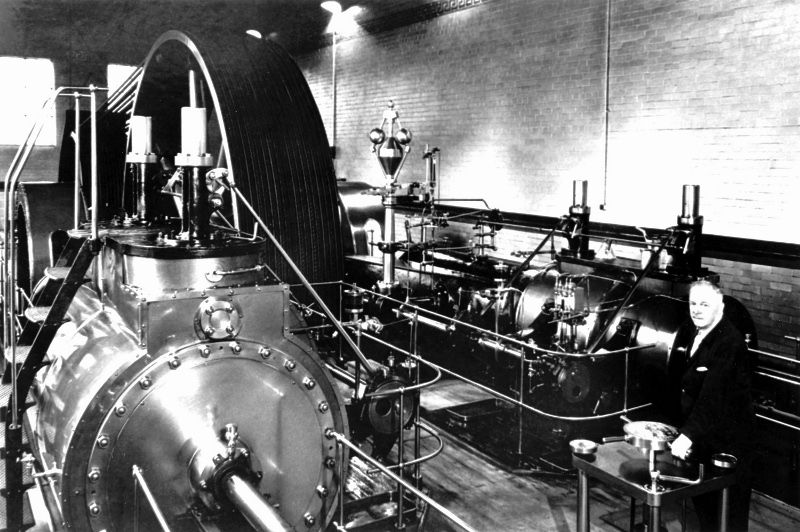
Morning Mick. You're right about drop valves being popular on continental engines and yes Carel Freres used them on their engines and Mons is theirs. Here's a pic of Sam Holden's engine at Barrowford, that was on superheat and had drop valves. It was a Cole Marchent and Morley from Bradford. This was the only one to use them round here. They became popular late on in the industry in Uniflow engines.
Stanley Challenger Graham
Stanley's View
scg1936 at talktalk.net
"Beware of certitude" (Jimmy Reid)
The floggings will continue until morale improves!
Stanley's View
scg1936 at talktalk.net
"Beware of certitude" (Jimmy Reid)
The floggings will continue until morale improves!
-
Stanley
- Global Moderator
- Posts: 90301
- Joined: 23 Jan 2012, 12:01
- Location: Barnoldswick. Nearer to Heaven than Gloria.
Re: Shed Matters 3
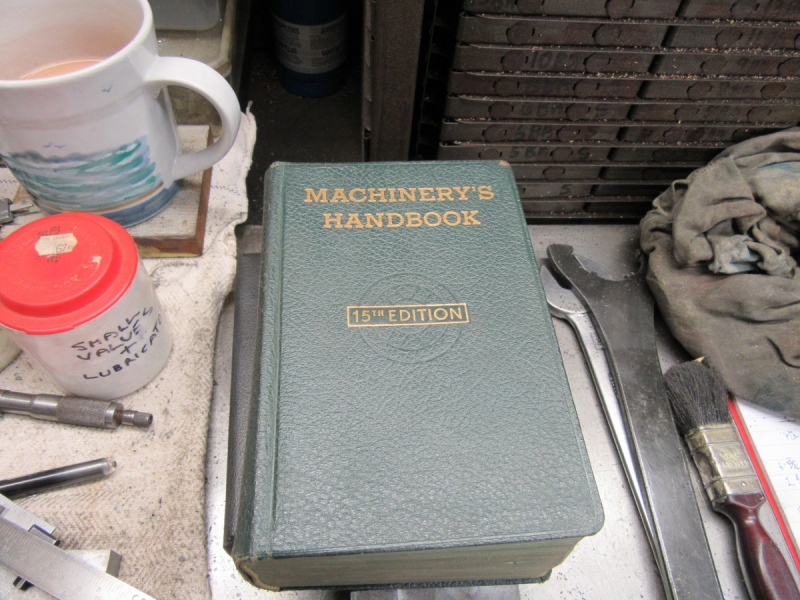
I got a shout from Colin at Lower Burnt Hill this morning. He needs an extension to fit on a sensor he wants to put in the new borehole. Nothing technical, he just wants some weight. He sent me a drawing (in Metric for God's sake!) The thread required is 1/8" NTP which is an American pipe thread. I know nothing about this so I got the Bible down from the shelf above the bench. If you haven't got one of these get on the web and find one. If you get the 13th to the 15th edition they have Imperial stuff in and all the old style stuff. They cover everything and I do mean everything!
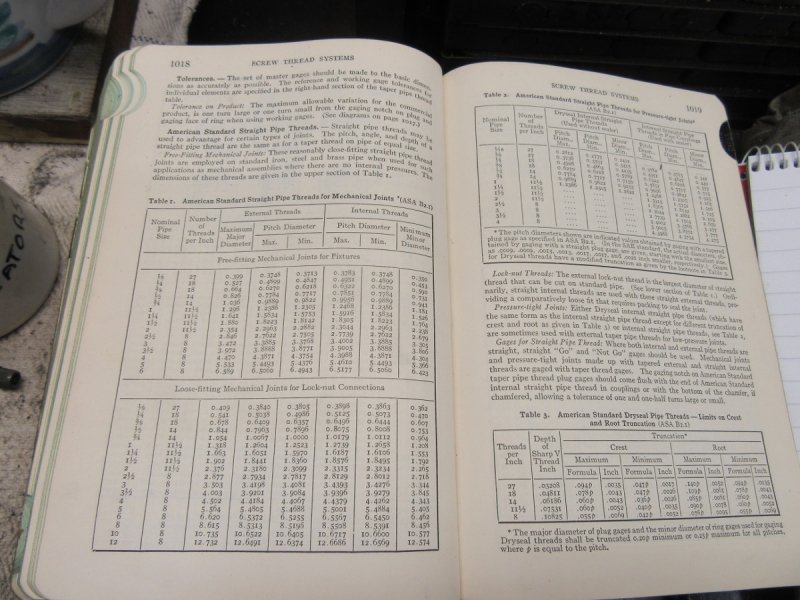
Here's the page, all the information anyone could want. Only problem is it is 27tpi which in our terms is a bastard size, even my thread gauge hasn't got it. I suppose that wherever the sensors are made the American market is their main customer so they use an American thread. I did a bit of furtling and I don't have the tap for it. No problem of course, I can thread it on Mrs Harrison and I have all the information I need but being a bodger at heart and having hit this problem before..... The Imperial equivalent is 28tpi and the same size and I know that the difference in 1/2" of engagement is bugger all. It will fit!
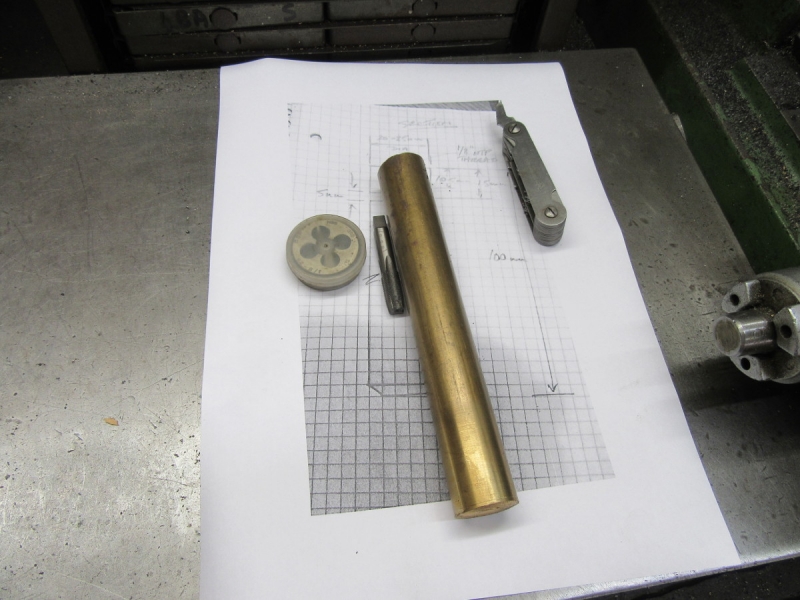
Usual route, find the tap and die for 1/8" BSP parallel, the tapping drill and a piece of 1" diameter bronze that will do nicely.
Into Mrs Harrison, square and chamfer the end, drill and tap plenty deep enough. When Col comes round tomorrow we'll try the sensor in this and I'll bet it will do. If not we can run the BSP die down the sensor thread and make it do.

Enough time to go back to the engine and square the ends of the pedestal block I had left over from yesterday.
Knocking off time. Two blocks squared up and not enough difference between them to cause any problems, but I might give them a skim to make them a perfect match. Nice morning, I love being able to help mates out of a problem.
Stanley Challenger Graham
Stanley's View
scg1936 at talktalk.net
"Beware of certitude" (Jimmy Reid)
The floggings will continue until morale improves!
Stanley's View
scg1936 at talktalk.net
"Beware of certitude" (Jimmy Reid)
The floggings will continue until morale improves!
-
PanBiker
- Site Administrator
- Posts: 16449
- Joined: 23 Jan 2012, 13:07
- Location: Barnoldswick - In the West Riding of Yorkshire, always was, always will be.
Re: Shed Matters 3
I think we ran into the same or similar problem with that thread on the soldering tip we towed with a while back. Noted today that you have dropped 6 images into your post and that they sit in the new gallery album. 

Ian
-
Stanley
- Global Moderator
- Posts: 90301
- Joined: 23 Jan 2012, 12:01
- Location: Barnoldswick. Nearer to Heaven than Gloria.
Re: Shed Matters 3
Same one Ian. I refuse to go out and buy a new set of taps and dies! I'm sure it will work.
Yes, no problem posting at all thanks, all seems to be AOK.
Yes, no problem posting at all thanks, all seems to be AOK.
Stanley Challenger Graham
Stanley's View
scg1936 at talktalk.net
"Beware of certitude" (Jimmy Reid)
The floggings will continue until morale improves!
Stanley's View
scg1936 at talktalk.net
"Beware of certitude" (Jimmy Reid)
The floggings will continue until morale improves!
-
Stanley
- Global Moderator
- Posts: 90301
- Joined: 23 Jan 2012, 12:01
- Location: Barnoldswick. Nearer to Heaven than Gloria.
Re: Shed Matters 3
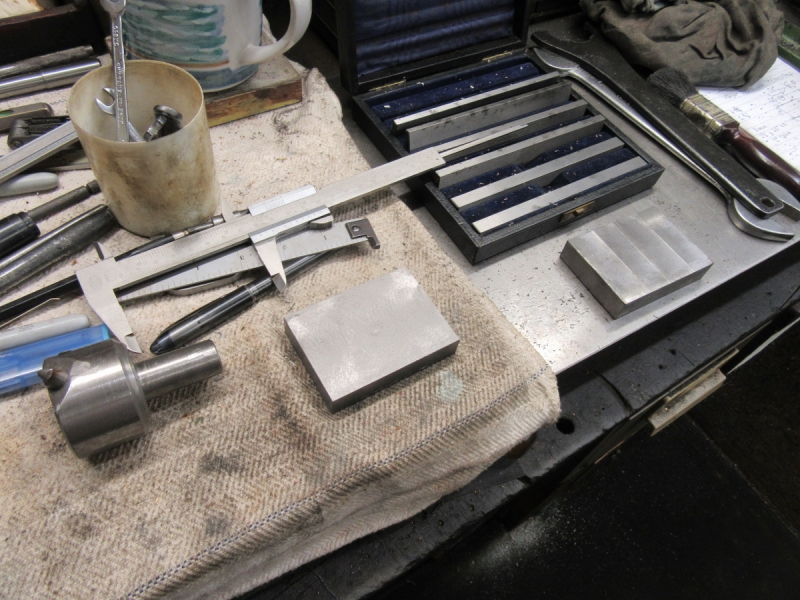
I decided we'd better have the pedestal blocks exactly the same height.
I marked the centre heights for the bearings and drilled them 1/2". They have to be over 3/4" to take the bushes for the 5/8" shaft but I'll open them up to that in the lathe. I shall need the 4jaw in for that but just as I was finishing the second hole Colin turned up. We soon recognised that the 27tpi spigot wasn't going to work so we carefully threaded it for 28tpi BSP (Parallel) and it fits perfectly. Then part off and finish the base and drill a 5/16" hole through which acts as a tommy bar hole if needed but mainly lets the water pressure get into the sensor via a hole in the end of the spigot. Then I fitted it with Loctite 638 and it's perfect, he is a happy man. I offloaded two big tools on him that I will never use, a very big Clyburn type adjustable spanner and a 36" Stillson wrench. He has uses for them and I don't so better if he has them. A good morning!
Stanley Challenger Graham
Stanley's View
scg1936 at talktalk.net
"Beware of certitude" (Jimmy Reid)
The floggings will continue until morale improves!
Stanley's View
scg1936 at talktalk.net
"Beware of certitude" (Jimmy Reid)
The floggings will continue until morale improves!
-
Stanley
- Global Moderator
- Posts: 90301
- Joined: 23 Jan 2012, 12:01
- Location: Barnoldswick. Nearer to Heaven than Gloria.
Re: Shed Matters 3
Sorry about yesterday lads, I was kidnapped for retail therapy.
This morning we need two bushes and some work on the crankshaft so the first thing was to do a fag packet drawing based on the actual sizes of the shaft.
I'm using the fag end of the 1" bar that I used for Colin's extension. I won't bore you with all the stages, straight turning, two off.
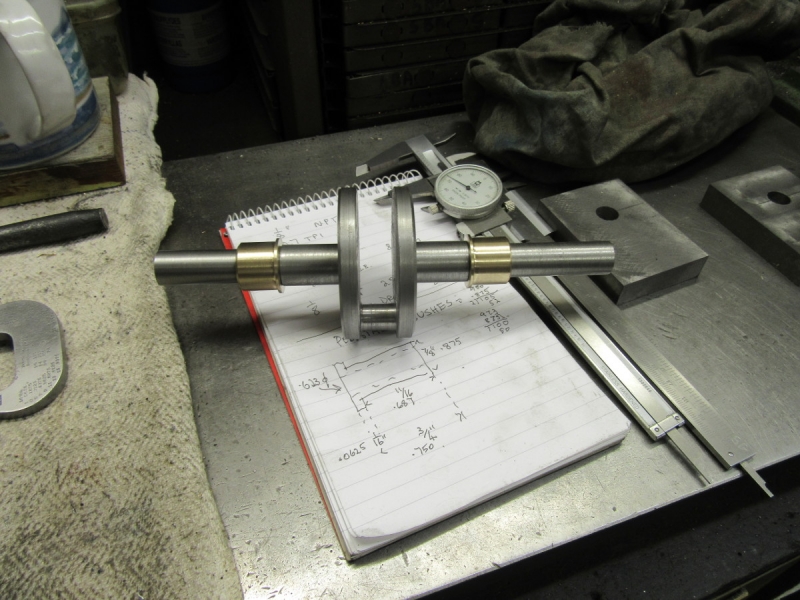
A bit later..... We have two bushes and now we need to adjust the crankshaft. I need to make the two thicker sections the same length. The eccentric will go on one of them and the other might as well match!

Both sides adjusted to the right size for the bush which is almost the same as the thinner part of the shaft that exists.They aren't exactly the same size, I have feet of clay!
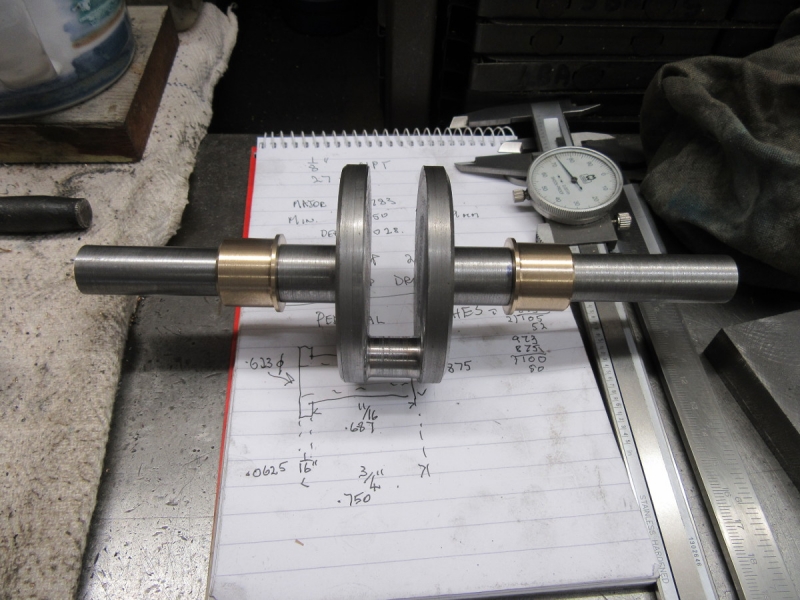
Here we are at knocking off time. Both bushes fitted in their correct positions. The next move is to put the 4 jaw back on Mrs Harrison and bore the standards for an interference fit of the bushes. By the way, I have marked both ends of the shaft and the matching bushes with witness marks.
This morning we need two bushes and some work on the crankshaft so the first thing was to do a fag packet drawing based on the actual sizes of the shaft.
I'm using the fag end of the 1" bar that I used for Colin's extension. I won't bore you with all the stages, straight turning, two off.
A bit later..... We have two bushes and now we need to adjust the crankshaft. I need to make the two thicker sections the same length. The eccentric will go on one of them and the other might as well match!
Both sides adjusted to the right size for the bush which is almost the same as the thinner part of the shaft that exists.They aren't exactly the same size, I have feet of clay!
Here we are at knocking off time. Both bushes fitted in their correct positions. The next move is to put the 4 jaw back on Mrs Harrison and bore the standards for an interference fit of the bushes. By the way, I have marked both ends of the shaft and the matching bushes with witness marks.
Stanley Challenger Graham
Stanley's View
scg1936 at talktalk.net
"Beware of certitude" (Jimmy Reid)
The floggings will continue until morale improves!
Stanley's View
scg1936 at talktalk.net
"Beware of certitude" (Jimmy Reid)
The floggings will continue until morale improves!
-
Stanley
- Global Moderator
- Posts: 90301
- Joined: 23 Jan 2012, 12:01
- Location: Barnoldswick. Nearer to Heaven than Gloria.
Re: Shed Matters 3
This morning I want to bore the pedestals and install the bronze bushes in them. The first thing was to put a witness mark on each which corresponds to the bush and the mark on the end of the shaft. Then I took the 3 jaw off and installed the small four jaw so I could grab the pedestals. I centred them with the tailstock centre and started on the first by boring it 1/6" less than is needed.
Then I bored to the size of the bush giving an interference fit. I got the first one dead right but on the second I went a shade oversize. No problem, I put some Loctite 638 on it, it will not move!
Knocking off time. Both bushes installed and a nice fit on the crankshaft. No trees torn up but another small step forward!
Stanley Challenger Graham
Stanley's View
scg1936 at talktalk.net
"Beware of certitude" (Jimmy Reid)
The floggings will continue until morale improves!
Stanley's View
scg1936 at talktalk.net
"Beware of certitude" (Jimmy Reid)
The floggings will continue until morale improves!
-
Stanley
- Global Moderator
- Posts: 90301
- Joined: 23 Jan 2012, 12:01
- Location: Barnoldswick. Nearer to Heaven than Gloria.
Re: Shed Matters 3
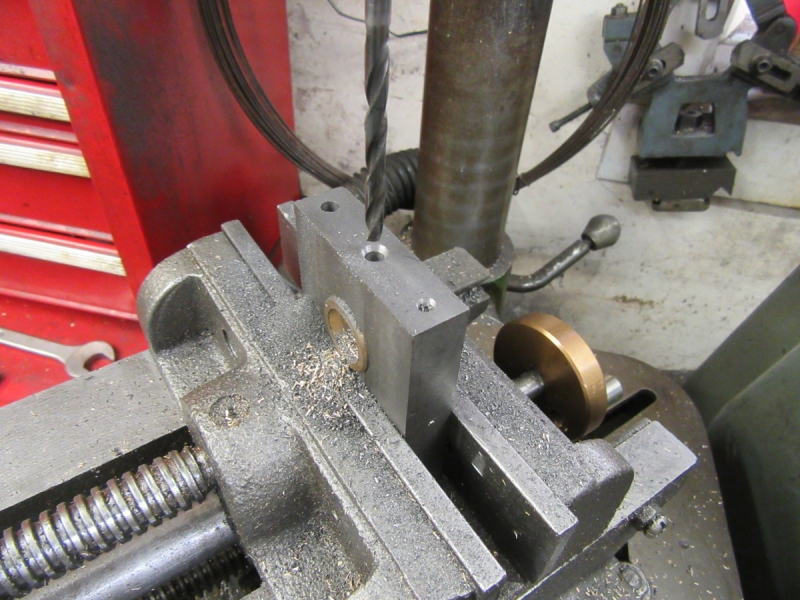
Today's main job is to drill for oil feed and for the 2BA holding down bolts. That's 3/16" clearance and after making a cup for the oil with the centre drill I drilled the oil hole 3/16" as well. Normally I do that 1/8" but what's the point?
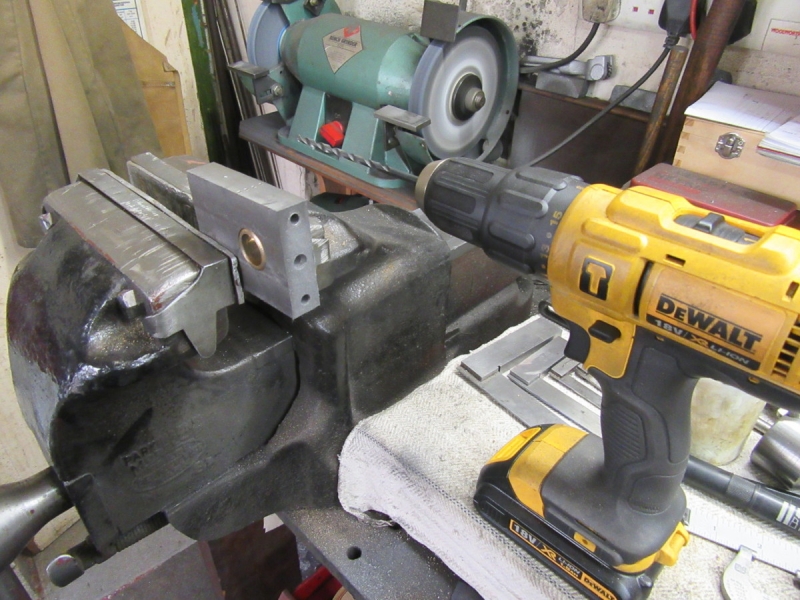
An ordinary jobber's drill isn't long enough to drill all the way through for the bolts so I finished them off with a 3/16" long series which is too long to go in the drill press but no matter because I have enough hole to give me a good guide so using the De Walt is fine. Once again I'll say it, this iron is lovely, nice soft grey iron. It's old so it's even possible it was charcoal iron. Certainly not remelted scrap like modern CI.

Then about half an hour putting just a little bit of finish on the pedestals and breaking all the edges. I didn't want too much, I don't do highly finished as you well know, I go for function! That's my excuse and I'm sticking to it!
Finally..... it won't surprise you to know that I gave Mrs Harrison a good clean. I hate a mucky shop when I have come to the end of one stage of the build. I work better on the next phase if things are reasonably clean. Newton used to laugh at me but I always told him he was a mucky little beggar.
Stanley Challenger Graham
Stanley's View
scg1936 at talktalk.net
"Beware of certitude" (Jimmy Reid)
The floggings will continue until morale improves!
Stanley's View
scg1936 at talktalk.net
"Beware of certitude" (Jimmy Reid)
The floggings will continue until morale improves!
-
Stanley
- Global Moderator
- Posts: 90301
- Joined: 23 Jan 2012, 12:01
- Location: Barnoldswick. Nearer to Heaven than Gloria.
Re: Shed Matters 3
Sorry lads but events overtook me this morning. Normal service will be resumed tomorrow.
Stanley Challenger Graham
Stanley's View
scg1936 at talktalk.net
"Beware of certitude" (Jimmy Reid)
The floggings will continue until morale improves!
Stanley's View
scg1936 at talktalk.net
"Beware of certitude" (Jimmy Reid)
The floggings will continue until morale improves!