I shall be AWOL today, I have other fish to fry but I am easy in my mind, I can see the way out of the local difficulty with the engine.....
Shed Matters 3
-
Stanley

- Global Moderator

- Posts: 90295
- Joined: 23 Jan 2012, 12:01
- Location: Barnoldswick. Nearer to Heaven than Gloria.
Re: Shed Matters 3
I shall be AWOL today, I have other fish to fry but I am easy in my mind, I can see the way out of the local difficulty with the engine.....
Stanley Challenger Graham
Stanley's View
scg1936 at talktalk.net
"Beware of certitude" (Jimmy Reid)
The floggings will continue until morale improves!
Stanley's View
scg1936 at talktalk.net
"Beware of certitude" (Jimmy Reid)
The floggings will continue until morale improves!
-
Stanley
- Global Moderator
- Posts: 90295
- Joined: 23 Jan 2012, 12:01
- Location: Barnoldswick. Nearer to Heaven than Gloria.
Re: Shed Matters 3
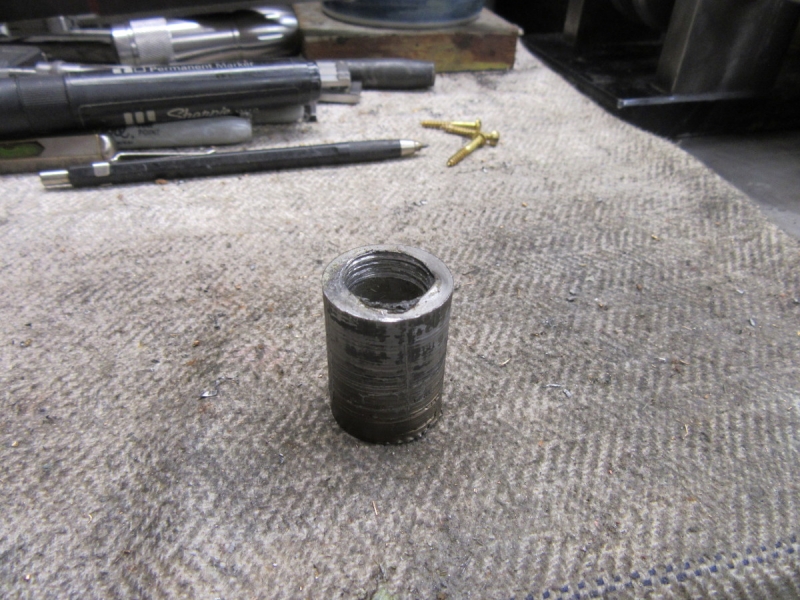
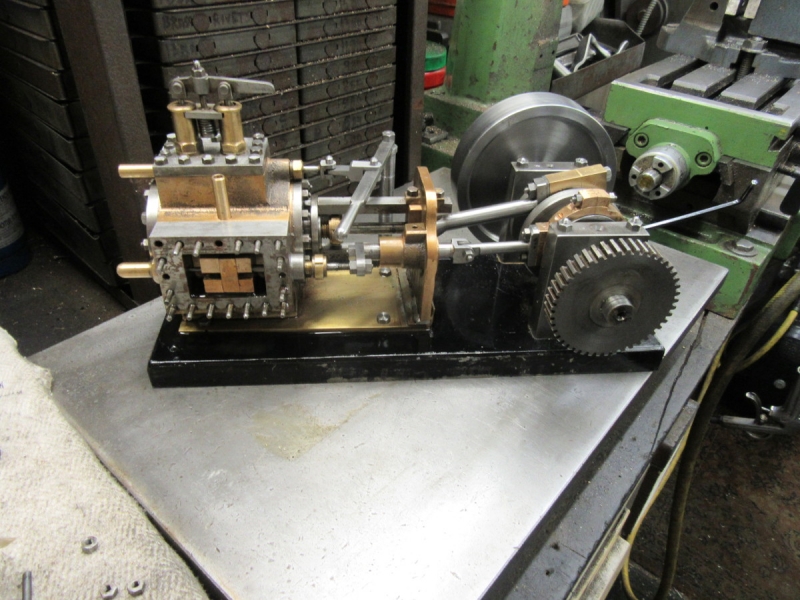
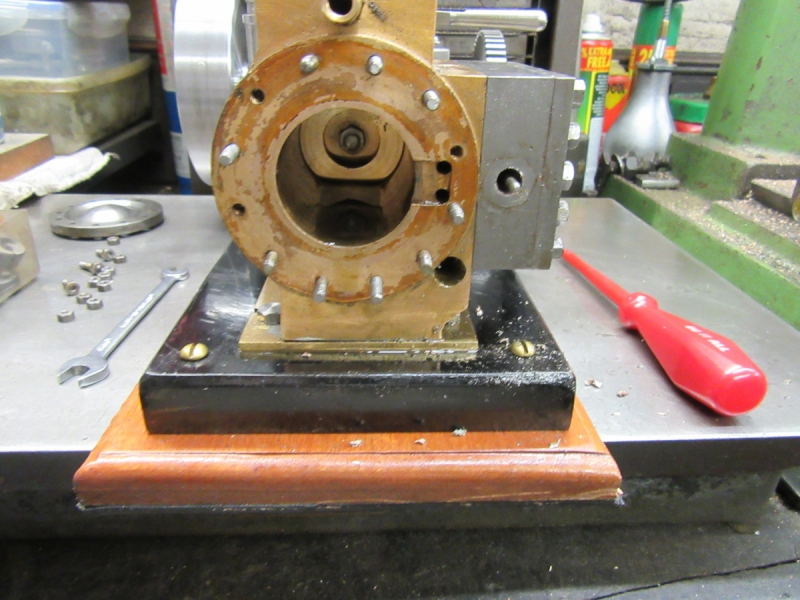
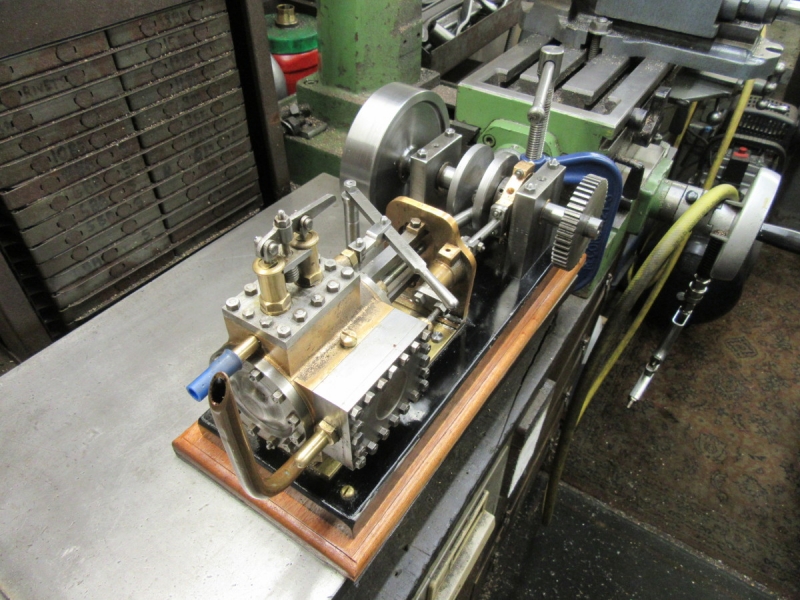
One last look at this miserable object! Today I shall make and fit another one.
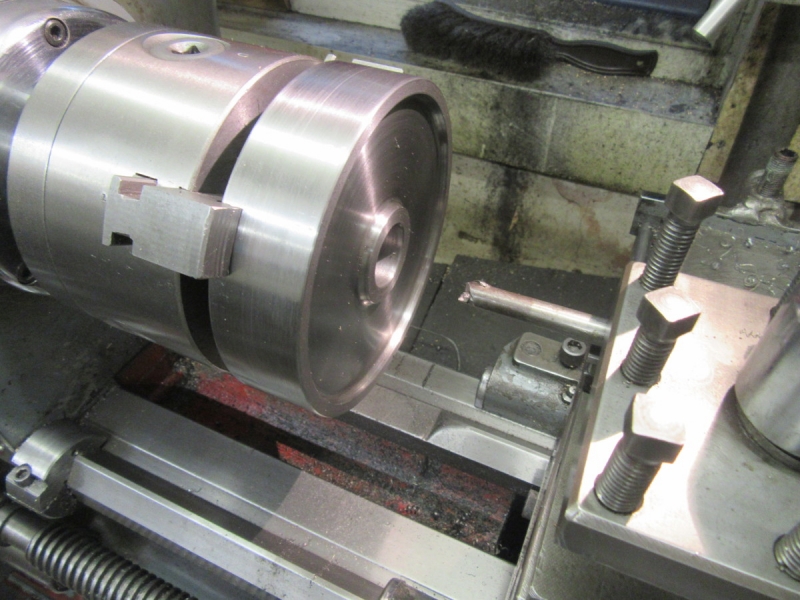
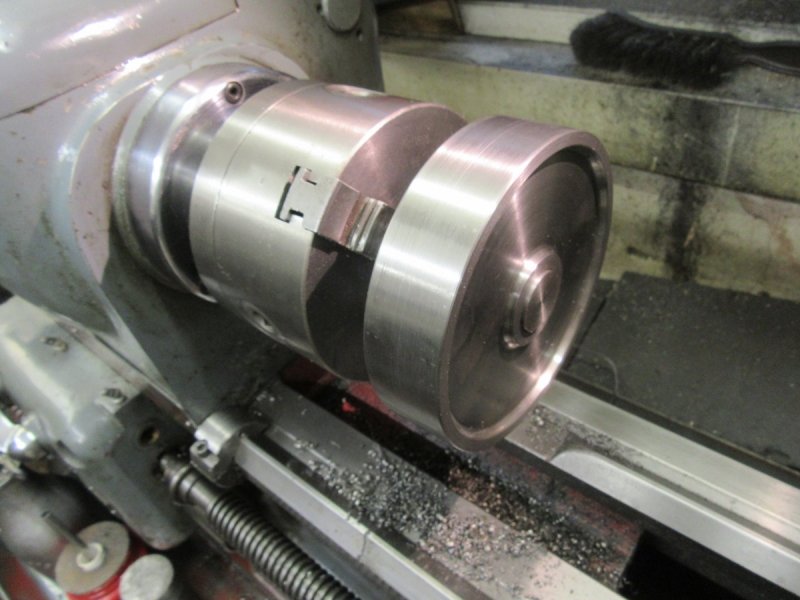
I need to skim the bore in the flywheel to make sure it contains no surprises! The small bar will do, it's only a skim and I won't have to change it when I bore the bush. A couple of light passes, the last one a reverse spring cut. A smooth bore. Then a careful measure......
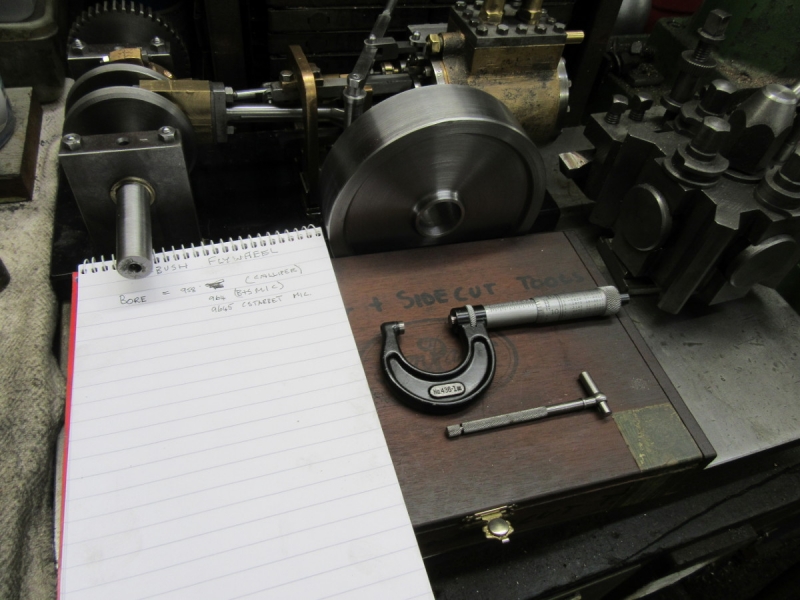
A bit of bleeding obvious popped up here. I love my old Brown and Sharpe micrometer but have difficulty reading it because it's old and worn and the divisions were small when it was new. The light dawned this morning and I got my Starrett 1" micrometer out. It's a lot easier to read and measures tenths as well. Anyway, a careful measure of the bore.....
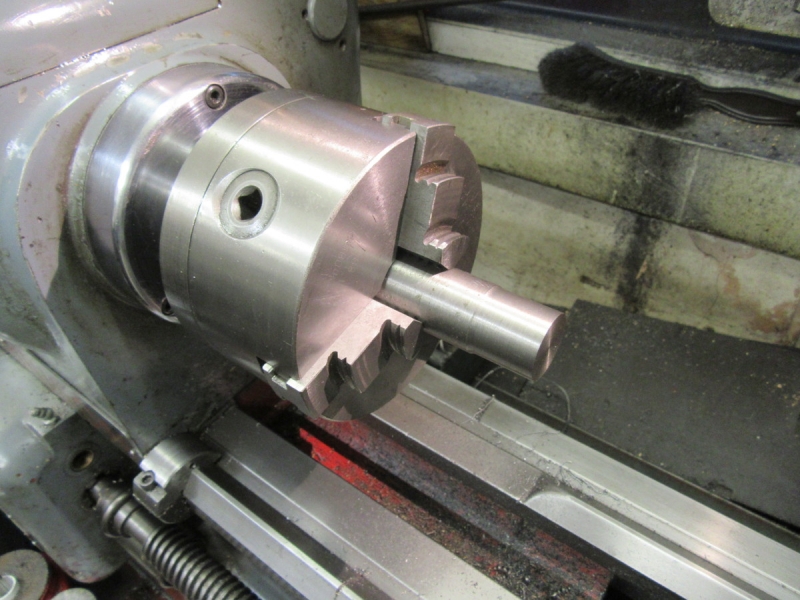
Into my ever generous scrap box for a piece of stock that's close to what I need.
A bit of careful turning, lots of measuring and a trial fit. It's an exact push fit, no play at all.
I parted it off, cleaned the bore and the bush with brake cleaner and fitted it with Loctite 638, a firm push fit. I think that tomorrow I might make double sure by locking it with a couple of dowels.... I'll give that some thought overnight. We are on the way to putting the cock-up right..... Nice.
Stanley Challenger Graham
Stanley's View
scg1936 at talktalk.net
"Beware of certitude" (Jimmy Reid)
The floggings will continue until morale improves!
Stanley's View
scg1936 at talktalk.net
"Beware of certitude" (Jimmy Reid)
The floggings will continue until morale improves!
-
Stanley
- Global Moderator
- Posts: 90295
- Joined: 23 Jan 2012, 12:01
- Location: Barnoldswick. Nearer to Heaven than Gloria.
Re: Shed Matters 3
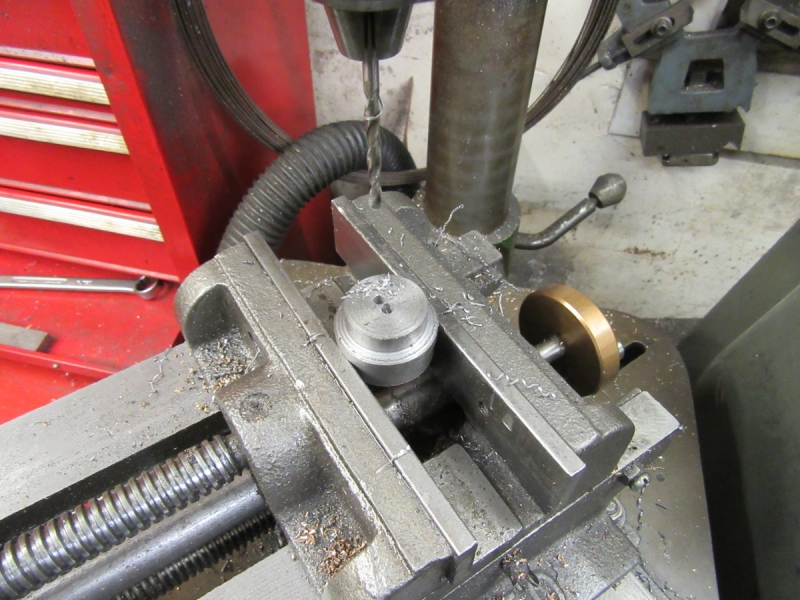
If you are going to use dowels to lock a bush in place, once you have chosen the material for the dowels, in this case 4mm silver steel rod, drill a test hole in a piece of scrap and do a trial fit because all drills make oversize holes. 4mm was too big, 3.9mm just allowed the dowel entry so I settled on that.
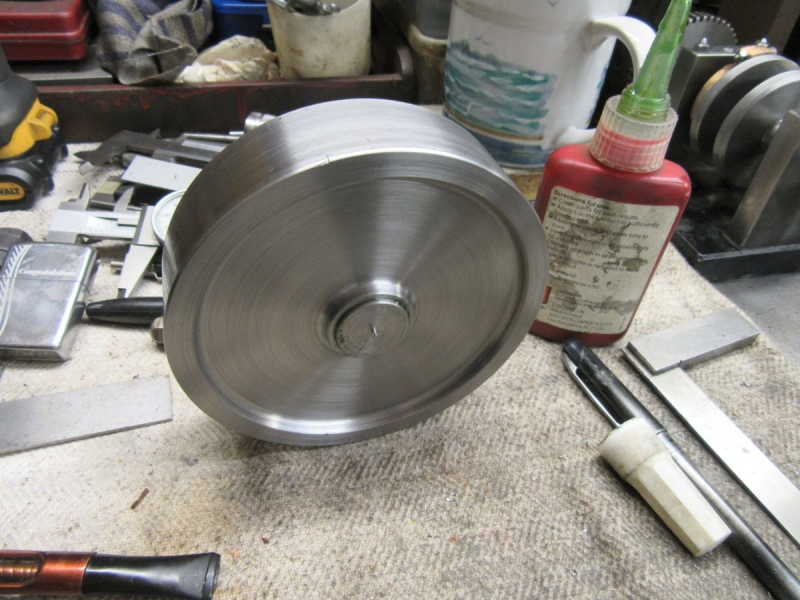
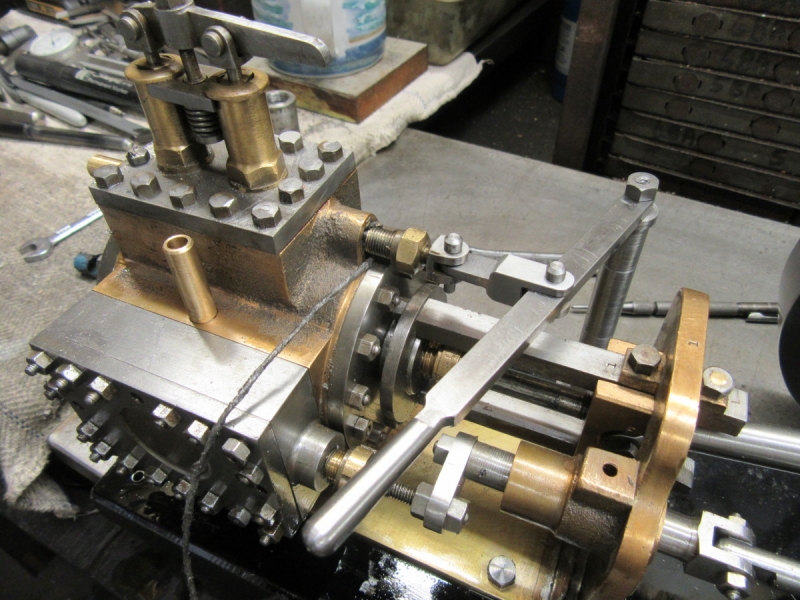
Next job was to clean up the face of the bush so that it's level with the wheel. Both sides done and while I was at it I trued the rim on one side, for some reason it was wambling a bit. This was the time to do it!
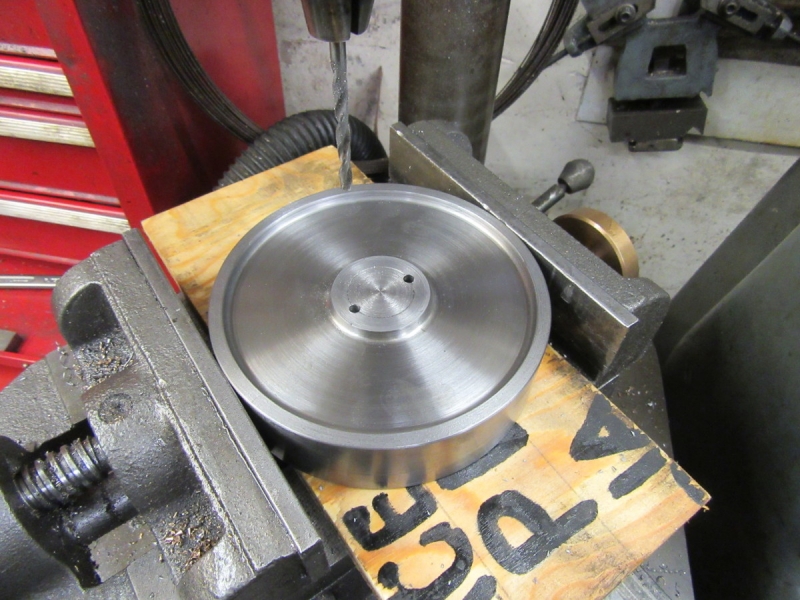
Next job was to drill two 3.9mm holes on the joint between the bush and the wheel. I had got the fit a bit too tight. OK for the first inch but then too tight to drive in any further. No matter, the dowels have plenty of hold and the holes can be on the back side of the wheel where they won't be seen. Than I popped the flywheel in the chuck again and faced off the bush again to get rid of the remaining heads of the dowels after I had sawn the excess off.
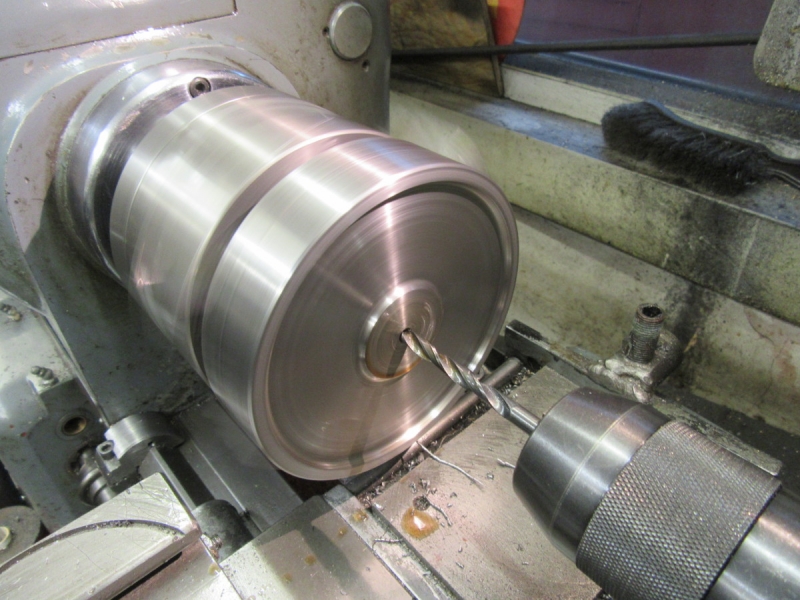
Next job was a careful re-measure of the shaft and settle on the target bore, in this case .621". Then drill out to 9/16" to give room for the boring bar and leave a couple of light cuts with the boring bar.
Then two light cuts, each of them with a reverse spring cut rather than just pulling the bar back. After the second I measured and found I was .001" short of target. Not surprising with a lathe this old, there is always a bit of play in the fit of the saddle and this makes a difference especially if you reverse the cut. My last cut was .0005", a bit of an achievement with a lathe of this vintage.

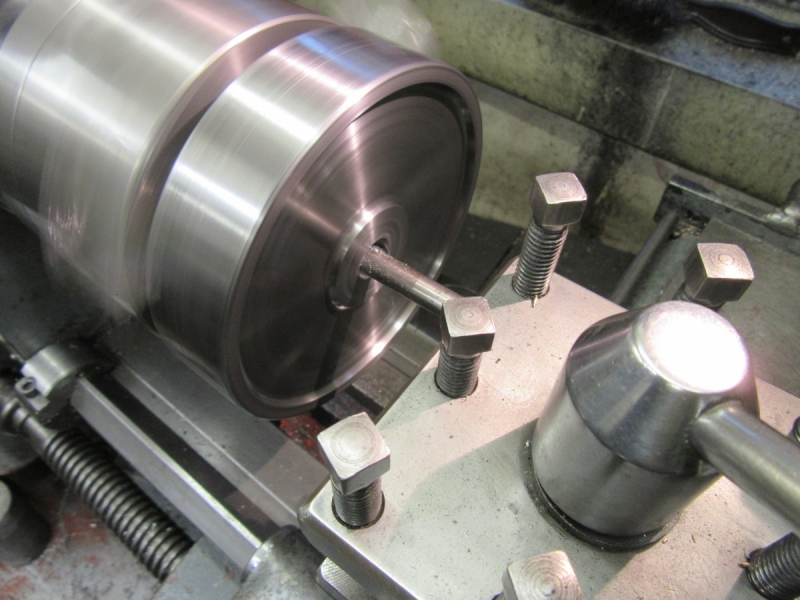
I dry fitted and found that even though my measurements were spot on the wheel was a touch tight so I polished the end of the shaft with emery strip until I knew I had an exact fit. The bottom of the flywheel clears the surface plate so I could fit it now knowing that the base board won't interfere with it. I cleaned the bore and shaft with brake cleaner, dried them with compressed air, put a coat of Loctite 638 on and pushed it on, it was tight but an exact fit and I could do it with my hands, no violence needed!
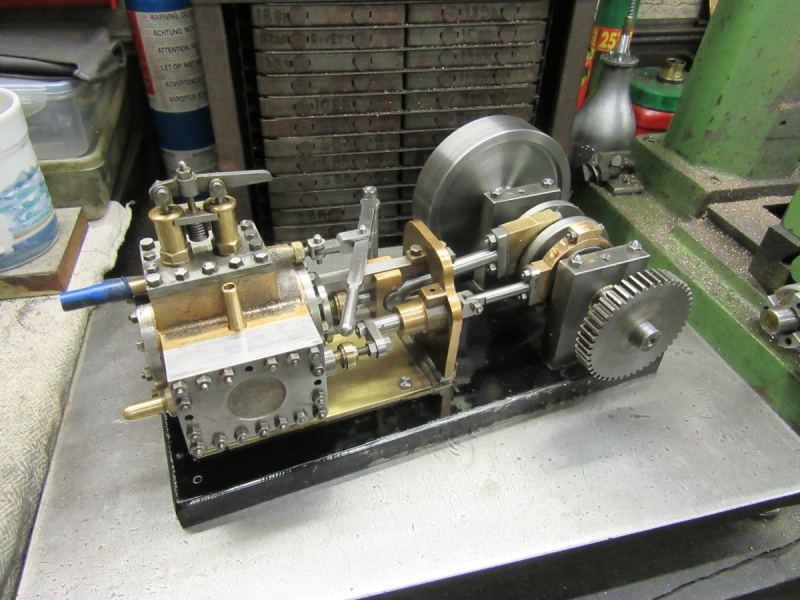
This is where I should have been on the day of the disaster! The wheel is perfectly concentric on the shaft and will run nicely. Tomorrow I'll fit the base board and have a trial run! Always an exciting moment and you know you have earned it!
On the whole, one of the better mornings!
Stanley Challenger Graham
Stanley's View
scg1936 at talktalk.net
"Beware of certitude" (Jimmy Reid)
The floggings will continue until morale improves!
Stanley's View
scg1936 at talktalk.net
"Beware of certitude" (Jimmy Reid)
The floggings will continue until morale improves!
-
Stanley
- Global Moderator
- Posts: 90295
- Joined: 23 Jan 2012, 12:01
- Location: Barnoldswick. Nearer to Heaven than Gloria.
Re: Shed Matters 3
I turned the flywheel as I was passing the engine later in the day and noticed that the valve eccentric was loose on the shaft. I missed that up to now! It goes on the list of things to do.
Stanley Challenger Graham
Stanley's View
scg1936 at talktalk.net
"Beware of certitude" (Jimmy Reid)
The floggings will continue until morale improves!
Stanley's View
scg1936 at talktalk.net
"Beware of certitude" (Jimmy Reid)
The floggings will continue until morale improves!
-
Stanley
- Global Moderator
- Posts: 90295
- Joined: 23 Jan 2012, 12:01
- Location: Barnoldswick. Nearer to Heaven than Gloria.
Re: Shed Matters 3
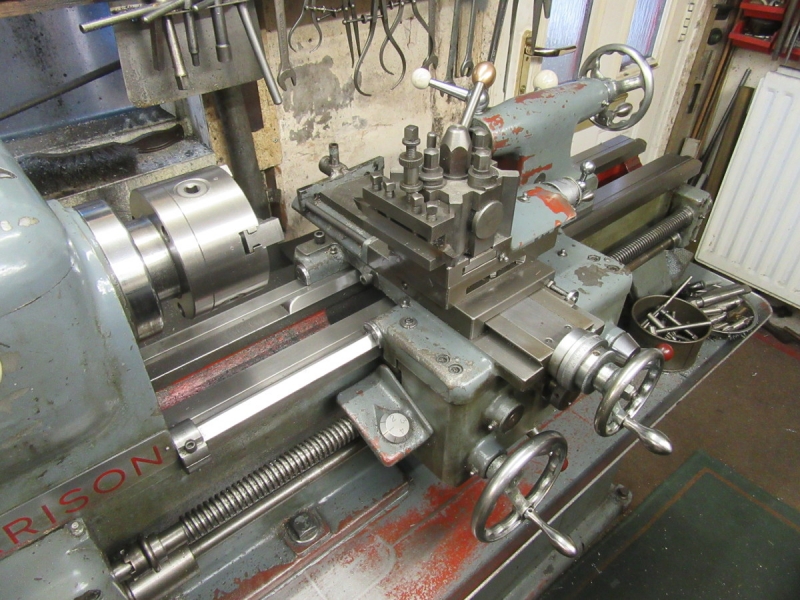
First order of the day was to clean Mrs Harrison and put the tackle away I have been using. I could hear my old woodwork master, "Clean up as you go along!" he was right, it clears your head.
I had a look at the eccentric, good to tell why it was loose, I had forgotten to completely tighten the grub screws that locate it on the shaft. I set the valve, lined the crank up, tightened the grub screws and then turned it to check it had the same opening at each end of the stroke. No problem, it was as good as it gets. I didn't give it any compression, my instinct tells me it isn't needed. Then I put the lid back on and tightened all the nuts.
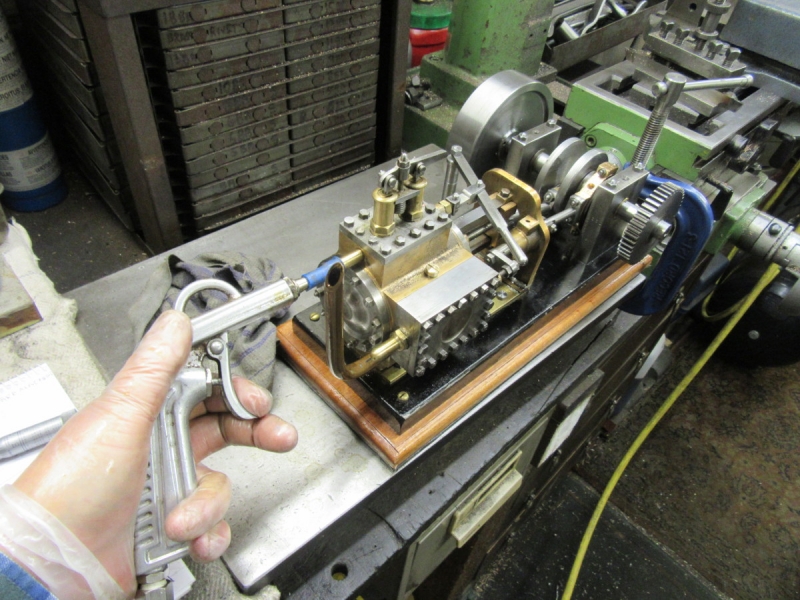
Next little job, which turned out to be a right fiddle, was to pack the gland of the regulator rod. The problem was that the gland nut is slightly long and there was hardly any gap to get the packing in. It needed a tiny screwdriver and a lot of patience but I got there in the end. If anything the gland is a bit too tight at the moment but it will soon ease off.
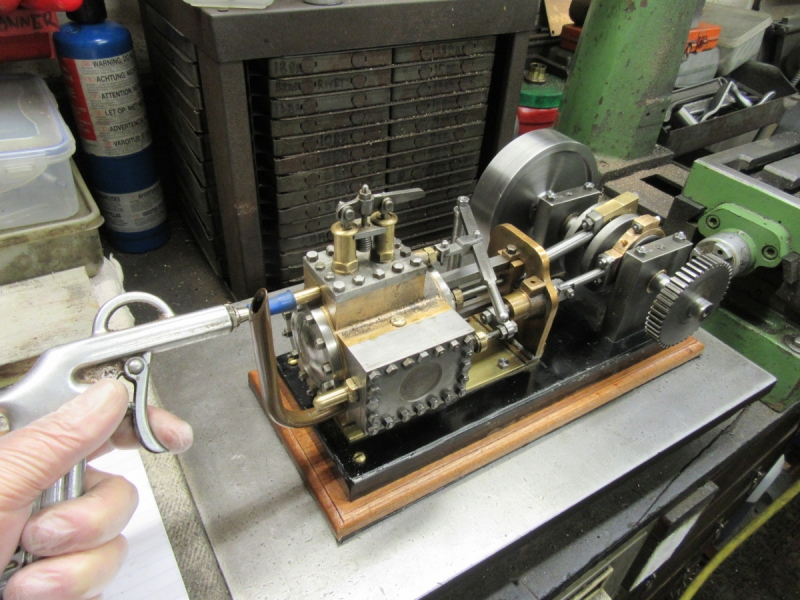
I shrank some plastic pipe on the steam inlet to give me a seal for the compressed air gun and gave it a blast of compressed air. I had flooded the regulator box with oil so that I got a good dose into the cylinder and when I put the air on it it blew it out all over the place. You remember the three holes on the valve cover which Newton had drilled for studs which couldn't be fitted because they broke through into other passages? I hadn't checked whether they actually connected but it's evident they have! Only one way to cure this, take the valve cover off and plug the three holes. My own fault, I should have done it in the first place! That will be be the first job tomorrow.
Still a good morning, we are closing in on the little bugger but it's fighting me right to the finish! Newton would be laughing at me now and saying "Now you know why I scrapped it!". Perseverance is the name of the game.
Stanley Challenger Graham
Stanley's View
scg1936 at talktalk.net
"Beware of certitude" (Jimmy Reid)
The floggings will continue until morale improves!
Stanley's View
scg1936 at talktalk.net
"Beware of certitude" (Jimmy Reid)
The floggings will continue until morale improves!
-
Stanley
- Global Moderator
- Posts: 90295
- Joined: 23 Jan 2012, 12:01
- Location: Barnoldswick. Nearer to Heaven than Gloria.
Re: Shed Matters 3
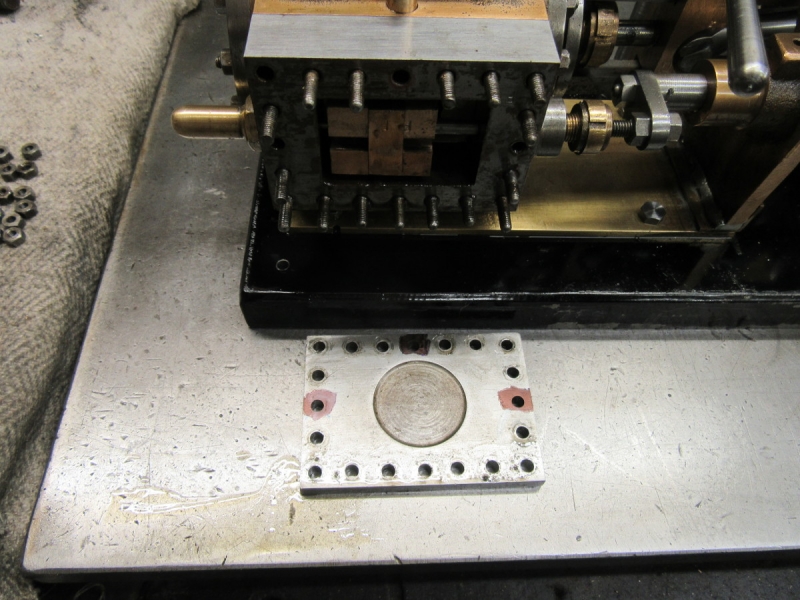
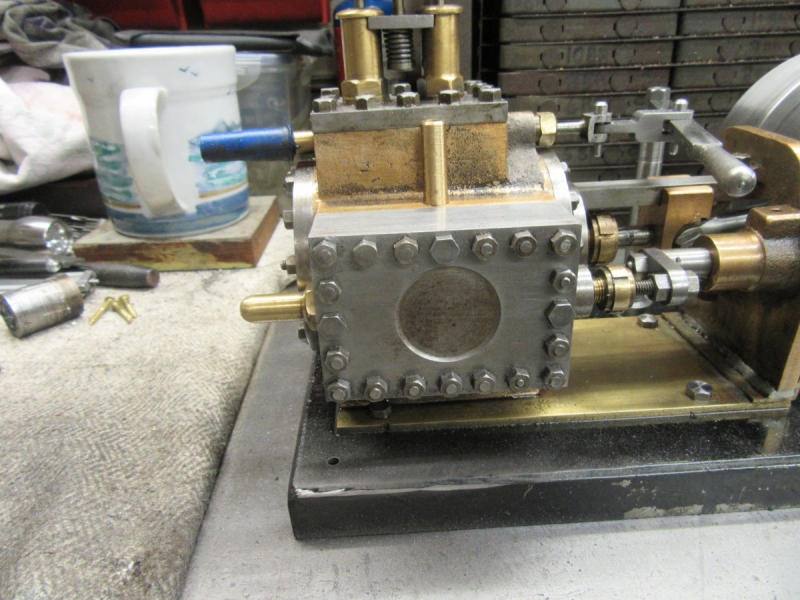
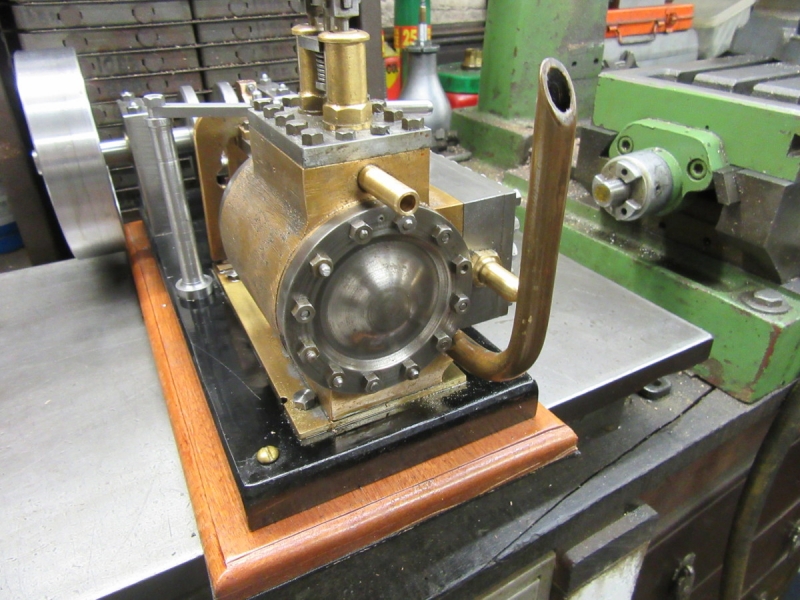
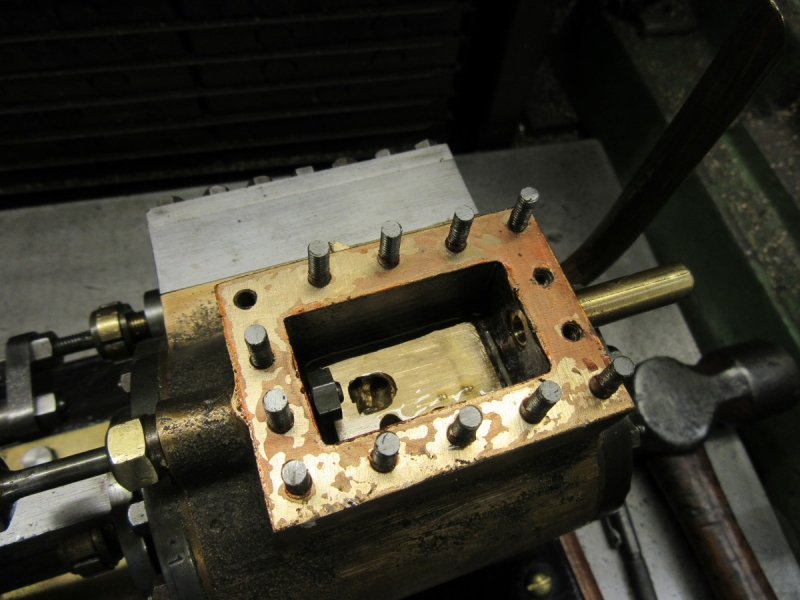
This cover is getting dizzy, off it came again but I marked the three holes that need bunging up, it would be a disaster to do the wrong ones.
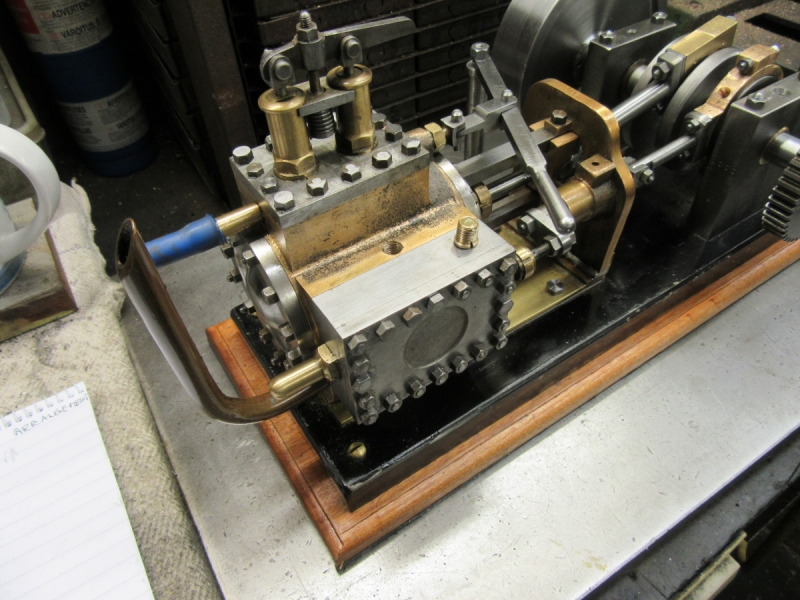
I was already getting suspicious about certain matters. I had noted how badly the exhaust was blowing. You can't see them here but just above the valve itself there are two steam passages from the regulator box and I know that one was a dud, it has been blocked. I checked that the valve was floating on it's driving block so I am sure it is a good seal on the face.
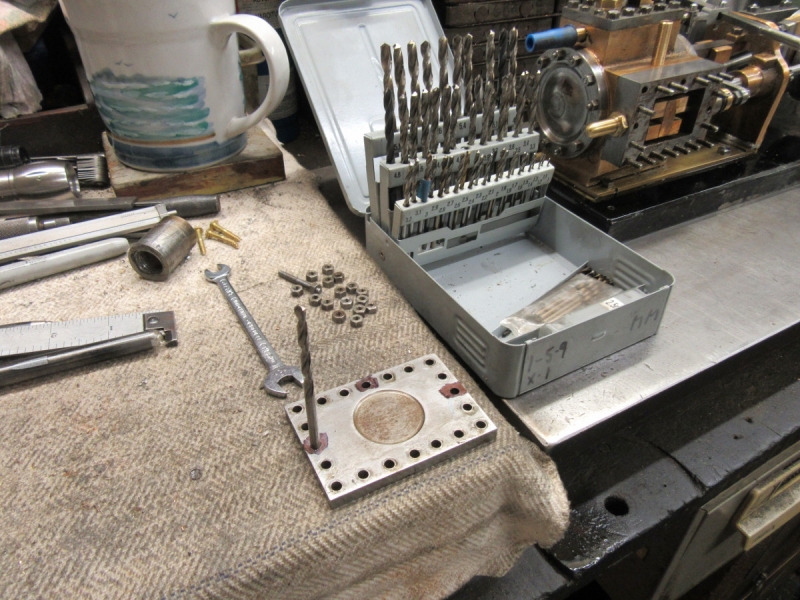
The plan is to find out the size of the holes and pick a thread that can be cut in them so I can screw a bolt in. You have numerous hole gauges, the shanks of your drills. I soon found that I was dealing with 4.1mm diameter holes and that's just 0.1mm more than the tapping drill for 2BA so I settled on that and got a tap out.
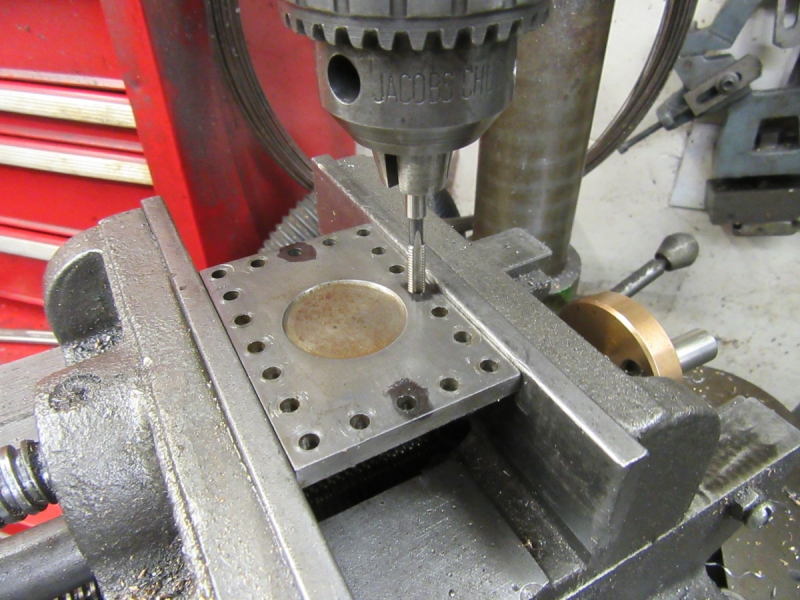
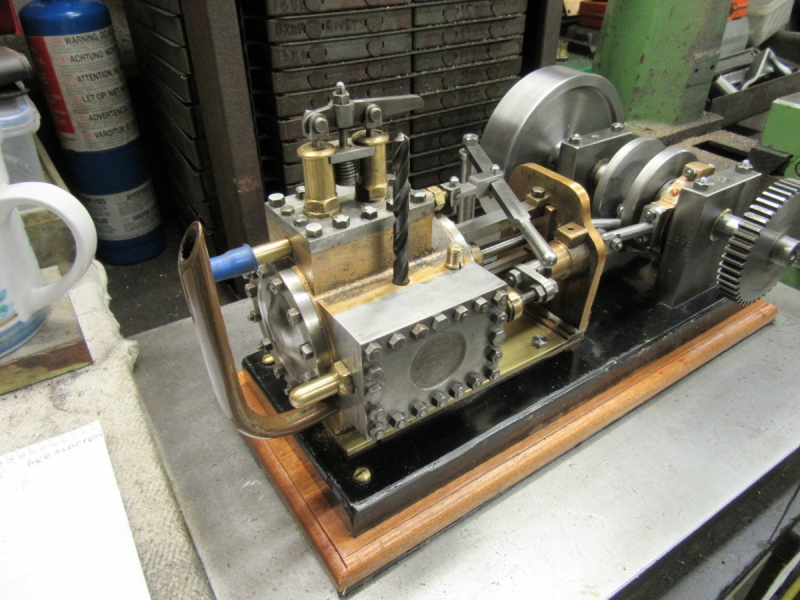
The easiest way to ensure that the holes are perpendicular is to do the threading on the pillar drill.
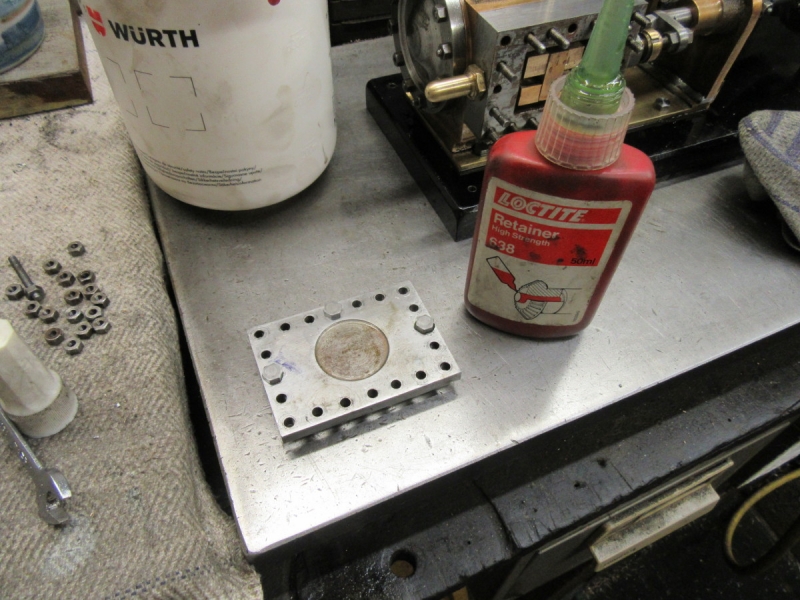
I found three 2BA set screws with smaller heads (They can vary a bit at times) popped a drop of Loctite in the holes and screwed them up tight.
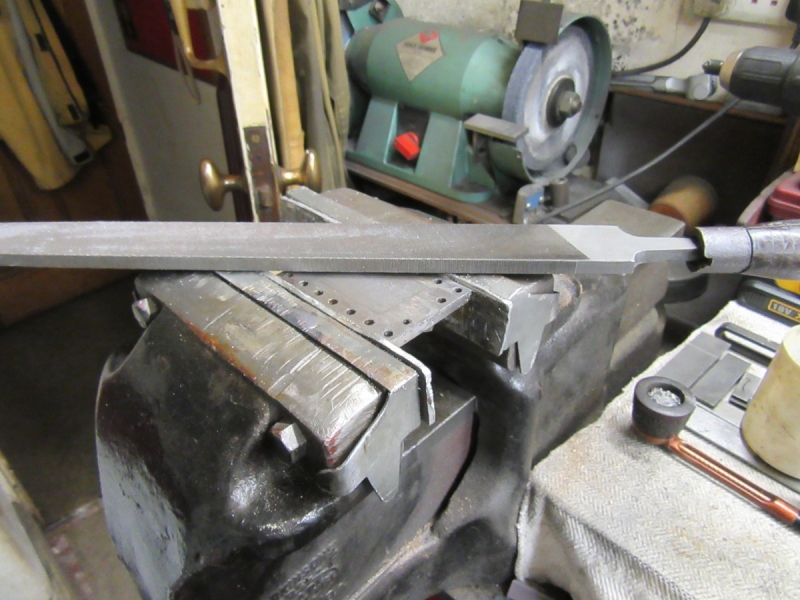
I sawed the excess off and levelled the playing field with my favourite file.
I put some Loctite plastic gasket on and refitted the lid. It is not coming off again so I cleaned up all the protruding threads off the studs. It's looking better. Now to see if I have got a runner.
Every picture tells a story...... I put compressed air on it and it simply blew straight out of the exhaust pipe no matter where the valve was. It was as I had suspected, when Newton had drilled the passage from the regulator box to the steam chest he had realised he was off course with the first, stopped drilling and done another hole. Unfortunately he must have broken through into the exhaust passage and that's why it is blowing through the exhaust pipe and no pressure on the valve. He was a bit economical with the truth when he said he scrapped it because his dad had criticised it!
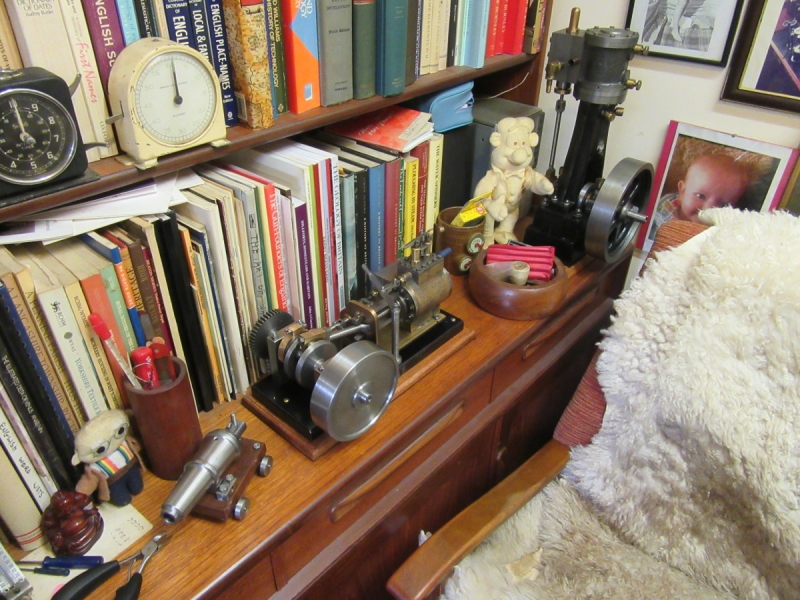
This wasn't a big surprise, I have been suspecting something like this. I put the engine back on it's base and now it is simply a very interesting looking paper weight. Never mind, I have enjoyed converting it and don't count it as time wasted. I had an unusable bit of an engine and now it is at least, an interesting conversation piece. How many of my engines will ever be run by anyone?
Stanley Challenger Graham
Stanley's View
scg1936 at talktalk.net
"Beware of certitude" (Jimmy Reid)
The floggings will continue until morale improves!
Stanley's View
scg1936 at talktalk.net
"Beware of certitude" (Jimmy Reid)
The floggings will continue until morale improves!

Re: Shed Matters 3
Now you need a small electric motor to drive it. You could connect this to the cog wheel and it would look like the engine was driving a generator, or I wonder if it will nag you until you think of a solution to separate the interconnected passages?
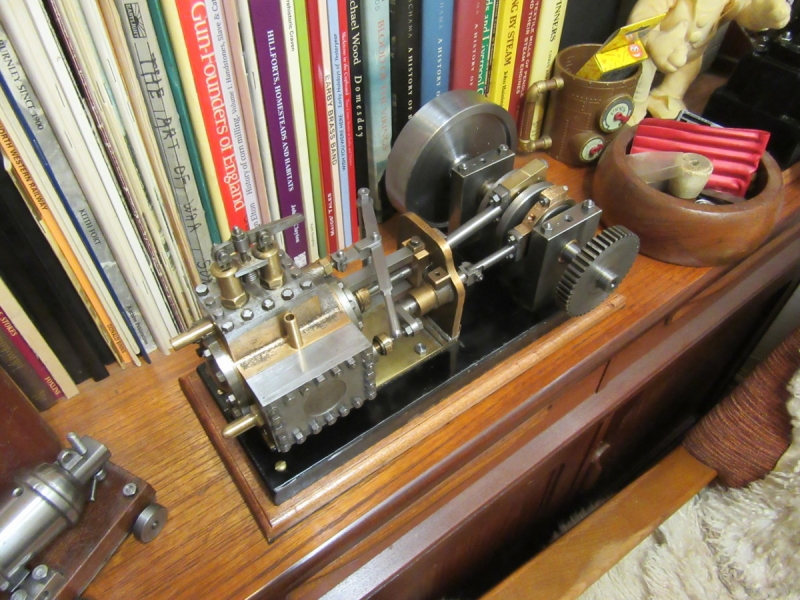
Looks nice, well done, and I've enjoyed reading about you making it, so thanks for that.
Looks nice, well done, and I've enjoyed reading about you making it, so thanks for that.
-
Stanley
- Global Moderator
- Posts: 90295
- Joined: 23 Jan 2012, 12:01
- Location: Barnoldswick. Nearer to Heaven than Gloria.
Re: Shed Matters 3
Thanks China, but read on, there is a revision to what I said yesterday!
Despite declaring the engine finished but imperfect and blaming it all on Newton I couldn't stop thinking about it as something was nagging me.... I went back though my fag packet drawings (I keep them intact in a notebook until I have finished) and reminded myself of an early stage in the conversion. What I had forgotten yesterday was that Newton arranged his exhaust to emerge on the front of the assembly so that it could be eventually piped into a blast pipe in the funnel to augment draught on the boiler, the usual practice with traction engines. I had plugged that passage as it didn't fit in with my conversion.
It was me that drilled the present exhaust passage and though I looked and was sure I was missing the steam passages I must have broken into one of them. The cylinder casting is riddled with steam passages! So it wasn't Newton, it was me!
The cure is easy, strip the engine down completely, drill out the plug in the original steam passage and fit the exhaust pipe there, plug the one I drilled and the engine will run. My mistake was to misunderstand the original steam passages.....
So, will I be rectifying the matter? Not at the moment. Mind you, I have an idea I can get round the problem without a strip down, I may revisit this at some time in the future! Sorry for blaming you Newton.... It was all down to me!! (It's still an impressive paper weight!)
Stanley Challenger Graham
Stanley's View
scg1936 at talktalk.net
"Beware of certitude" (Jimmy Reid)
The floggings will continue until morale improves!
Stanley's View
scg1936 at talktalk.net
"Beware of certitude" (Jimmy Reid)
The floggings will continue until morale improves!
Re: Shed Matters 3
Looks superb that stanley
If it been me i would be leaving it as it is and get a perspect tank like to cover it and leave on sideboard but i know you wont settle for that. That little problem will niggle you to a point where you will sort it out and remedy the problem
I think you are a bit of a perfectionist and you wont settle untill its sorted
Il think newton will forgive you for blaming him he be up there laughing his socks of at you
-
Stanley
- Global Moderator
- Posts: 90295
- Joined: 23 Jan 2012, 12:01
- Location: Barnoldswick. Nearer to Heaven than Gloria.
Re: Shed Matters 3
You could well be right. I have already worked out a possible high risk solution that doesn't involve any strip down.....
Meanwhile I improved the shining hour with two articles for the paper yesterday, I am up to January 11th now.
There could be a bit of light cleaning and plotting going on in the shed today..... (I like plotting!)
Meanwhile I improved the shining hour with two articles for the paper yesterday, I am up to January 11th now.
There could be a bit of light cleaning and plotting going on in the shed today..... (I like plotting!)
Stanley Challenger Graham
Stanley's View
scg1936 at talktalk.net
"Beware of certitude" (Jimmy Reid)
The floggings will continue until morale improves!
Stanley's View
scg1936 at talktalk.net
"Beware of certitude" (Jimmy Reid)
The floggings will continue until morale improves!
-
Stanley
- Global Moderator
- Posts: 90295
- Joined: 23 Jan 2012, 12:01
- Location: Barnoldswick. Nearer to Heaven than Gloria.
Re: Shed Matters 3
You were right Mick......
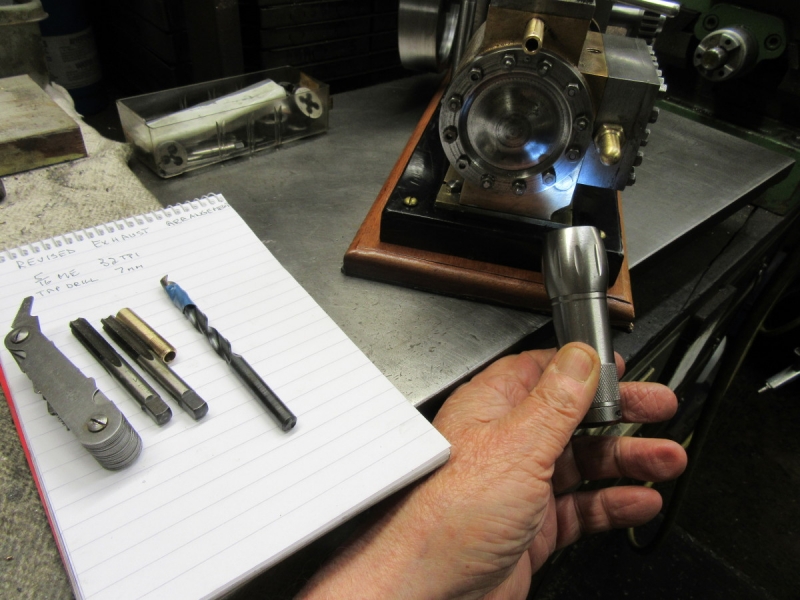
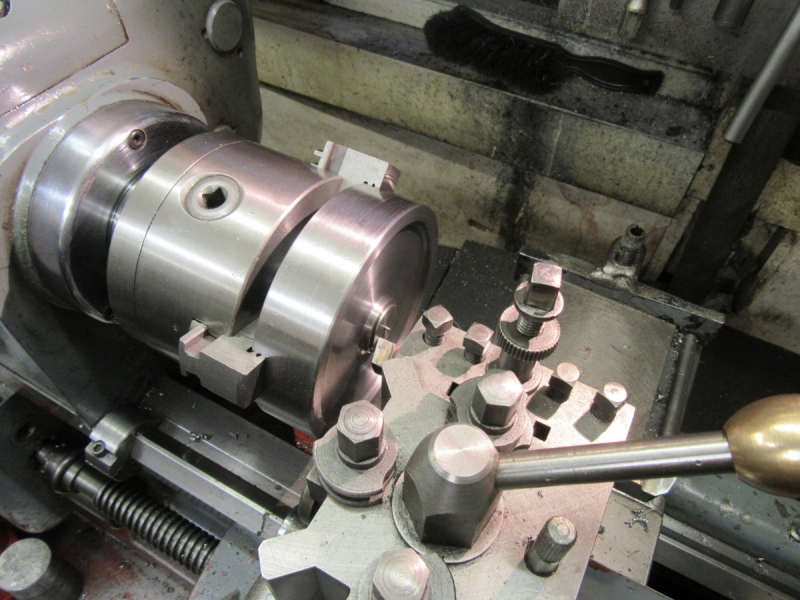
I decided to have a look to see whether I was right and I could get access into Newton's exhaust gallery from the back which means that I can put things right without stripping the engine down. When I got it on the bench and had a good look I got a surprise, I could have sworn that this plug that I put in was at the front end of the cylinder. This started me thinking and I realised where I had gone wrong, my misapprehension is down to the fact that I have always assumed that this was a traction engine cylinder which would require the exhaust to be at the front to feed the blast pipe in the chimney. God knows why I did this, I have worked with enough engines to know that both traction and overtype engines have the cylinder lid facing forward! So, as you can see here, the plug is easy to get at. I sorted out the size of the exhaust pipe I put in and decided that I would drill the same size hole in the plug, 7mm for 5/16" ME which is 32tpi.
When I started to drill the plug I found it was screwing into the hole so I simply screwed it out. It is 3/8" ME also 32tpi. When I attempted to run the tap down the threads to clean them out and found the cylinder lid was interfering with the tap so I took it off. I ran the tap in and blew down my exhaust passage to clear it of swarf and any muck. By the way, this confirms that this is indeed an exhaust passage!

No problem about the tap with the lid off.
Here's where I ended up. By a stroke of luck I had this 3'8" ME threaded bend in one of my treasure chests, I cleaned the thread with the matching die, wrapped some PTFE tape round it and popped it in. I found that it was fouling the lid as it is an old heavier 3/8" piece of pipe so I had to file a flat on it and ease the lid periphery a bit to get it to fit. Looking good!
I swapped the jaws in the chuck, went into the treasure chest and found the piece I had made the original SG exhaust pipe out of. It had a hole in the end where I had bored it because I was certain it wouldn't interfere with the plug, I don't like wasting valuable non ferocious. It didn't take long to make my plug and I popped it in the vice to cut a slot in it. That was when I broke into the bore! I was faced with a choice, make another or do something about it.....
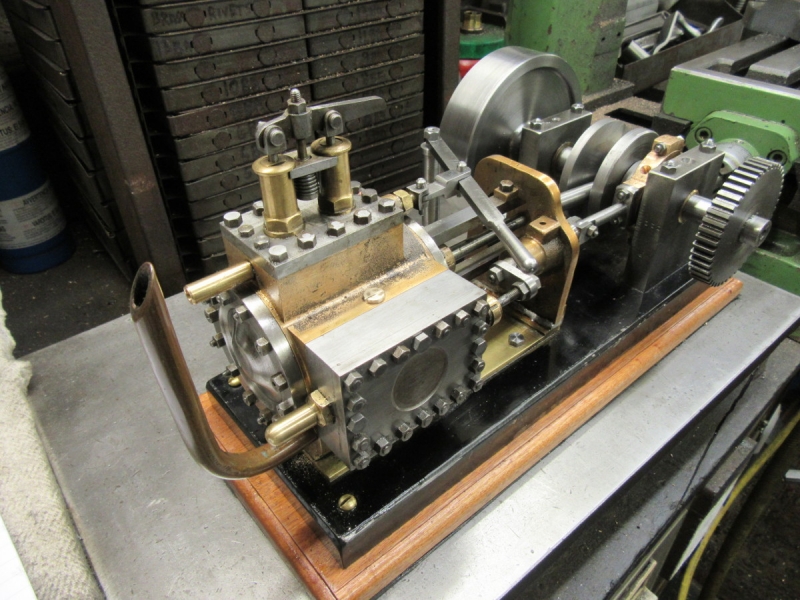
I mixed up some Araldite and plugged the bore with it, then I fitted it. I shall leave having a trial run until tomorrow when it will have set. It's been a good morning! I am confident we will have a runner, look in tomorrow to find out!
I decided to have a look to see whether I was right and I could get access into Newton's exhaust gallery from the back which means that I can put things right without stripping the engine down. When I got it on the bench and had a good look I got a surprise, I could have sworn that this plug that I put in was at the front end of the cylinder. This started me thinking and I realised where I had gone wrong, my misapprehension is down to the fact that I have always assumed that this was a traction engine cylinder which would require the exhaust to be at the front to feed the blast pipe in the chimney. God knows why I did this, I have worked with enough engines to know that both traction and overtype engines have the cylinder lid facing forward! So, as you can see here, the plug is easy to get at. I sorted out the size of the exhaust pipe I put in and decided that I would drill the same size hole in the plug, 7mm for 5/16" ME which is 32tpi.
When I started to drill the plug I found it was screwing into the hole so I simply screwed it out. It is 3/8" ME also 32tpi. When I attempted to run the tap down the threads to clean them out and found the cylinder lid was interfering with the tap so I took it off. I ran the tap in and blew down my exhaust passage to clear it of swarf and any muck. By the way, this confirms that this is indeed an exhaust passage!
No problem about the tap with the lid off.
Here's where I ended up. By a stroke of luck I had this 3'8" ME threaded bend in one of my treasure chests, I cleaned the thread with the matching die, wrapped some PTFE tape round it and popped it in. I found that it was fouling the lid as it is an old heavier 3/8" piece of pipe so I had to file a flat on it and ease the lid periphery a bit to get it to fit. Looking good!
I swapped the jaws in the chuck, went into the treasure chest and found the piece I had made the original SG exhaust pipe out of. It had a hole in the end where I had bored it because I was certain it wouldn't interfere with the plug, I don't like wasting valuable non ferocious. It didn't take long to make my plug and I popped it in the vice to cut a slot in it. That was when I broke into the bore! I was faced with a choice, make another or do something about it.....
I mixed up some Araldite and plugged the bore with it, then I fitted it. I shall leave having a trial run until tomorrow when it will have set. It's been a good morning! I am confident we will have a runner, look in tomorrow to find out!
Stanley Challenger Graham
Stanley's View
scg1936 at talktalk.net
"Beware of certitude" (Jimmy Reid)
The floggings will continue until morale improves!
Stanley's View
scg1936 at talktalk.net
"Beware of certitude" (Jimmy Reid)
The floggings will continue until morale improves!
Re: Shed Matters 3
Wow, as easy as that? Keeping my fingers crossed for you until tomorrow!
-
Stanley
- Global Moderator
- Posts: 90295
- Joined: 23 Jan 2012, 12:01
- Location: Barnoldswick. Nearer to Heaven than Gloria.
Re: Shed Matters 3
Don't bother China. The Design Committee met overnight and have told me that I have made another mistake. The root cause of the leakage is not the exhaust blowing live steam to the atmosphere by my misplaced exhaust port but the fact that the drilling for this broke through into the live steam passage. Putting a plug in it doen't alter this, the live steam and exhaust are still connected inside the casting and so it will still not run.
The cure is to get rid of that connection deep in the casting and as yet I haven't come up with an answer. I shall try it this morning but am certain the DC is right. At the moment the route seems to be to relegate the engine to complicated paper weight status on the sideboard for a while while I think again. I have a germ of an idea but will keep that to myself until I have given it another coat of deep thought!
The cure is to get rid of that connection deep in the casting and as yet I haven't come up with an answer. I shall try it this morning but am certain the DC is right. At the moment the route seems to be to relegate the engine to complicated paper weight status on the sideboard for a while while I think again. I have a germ of an idea but will keep that to myself until I have given it another coat of deep thought!
Stanley Challenger Graham
Stanley's View
scg1936 at talktalk.net
"Beware of certitude" (Jimmy Reid)
The floggings will continue until morale improves!
Stanley's View
scg1936 at talktalk.net
"Beware of certitude" (Jimmy Reid)
The floggings will continue until morale improves!
-
Stanley
- Global Moderator
- Posts: 90295
- Joined: 23 Jan 2012, 12:01
- Location: Barnoldswick. Nearer to Heaven than Gloria.
Re: Shed Matters 3
No surprises, a very short trip into the shed. I put a soft end on the steam pipe and put compressed air down it. As the DC said, straight out through the exhaust. So that proves that the break through into the steam passage is the problem. Question is, what to do about it.
The engine is once more a conversation piece and a complicated paper weight! I know how I can cure it, I want to give it thought and then get up the will to do it. Newton is laughing his socks off!
Stanley Challenger Graham
Stanley's View
scg1936 at talktalk.net
"Beware of certitude" (Jimmy Reid)
The floggings will continue until morale improves!
Stanley's View
scg1936 at talktalk.net
"Beware of certitude" (Jimmy Reid)
The floggings will continue until morale improves!
-
PanBiker

- Site Administrator

- Posts: 16447
- Joined: 23 Jan 2012, 13:07
- Location: Barnoldswick - In the West Riding of Yorkshire, always was, always will be.
Re: Shed Matters 3
We used the same ploy in the TV trade when you had a fault that defied logic, when you had tried everything we used to say the cabinet must be faulty! Under the bench for a day or two and come back to it with a fresh mind, usually fixed in 10 or 15 minutes. 

Ian

Re: Shed Matters 3
Stanley, you can't give up at this stage. Just look at what you could do with it. Steam engine.
-
Stanley
- Global Moderator
- Posts: 90295
- Joined: 23 Jan 2012, 12:01
- Location: Barnoldswick. Nearer to Heaven than Gloria.
Re: Shed Matters 3
P, nice video. Belgian engineering. Did you see the heavy flange tied to the drop rod for the cut-off motion to the front valve? It's on the engine being driven by the bloke in the blue shirt. Belgian engines and probably the mills also, they did good stuff.
The DC met last night and I think we have a possible solution that doesn't involve any of the methods I was considering yesterday.
The DC met last night and I think we have a possible solution that doesn't involve any of the methods I was considering yesterday.
Stanley Challenger Graham
Stanley's View
scg1936 at talktalk.net
"Beware of certitude" (Jimmy Reid)
The floggings will continue until morale improves!
Stanley's View
scg1936 at talktalk.net
"Beware of certitude" (Jimmy Reid)
The floggings will continue until morale improves!
-
Stanley
- Global Moderator
- Posts: 90295
- Joined: 23 Jan 2012, 12:01
- Location: Barnoldswick. Nearer to Heaven than Gloria.
Re: Shed Matters 3
The DC have come to the conclusion that the immediate cause of the blow through from the live steam passage into the exhaust is that my drilling cut into the steam passage and it was very unlikely to be a direct hit but a glancing blow. Therefore, completely plugging the drilling I made that caused the problem will block the break-through into the steam passage but not totally obstruct it. This makes sense and is worth a shot. The first unknown was whether any of the Araldite had got in the thread of my plug, it hadn't and the plug came out easily.
Next job was to measure exactly what size that drilling was so I tried the shanks of various drills until I found that 6.7mm was a perfect fit.
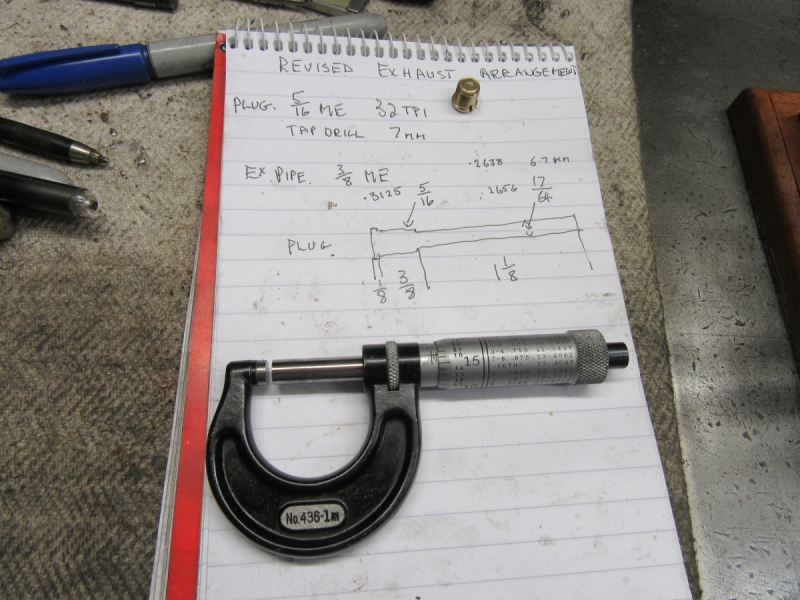
A bit of conversion to Imperial and a fag packet drawing.
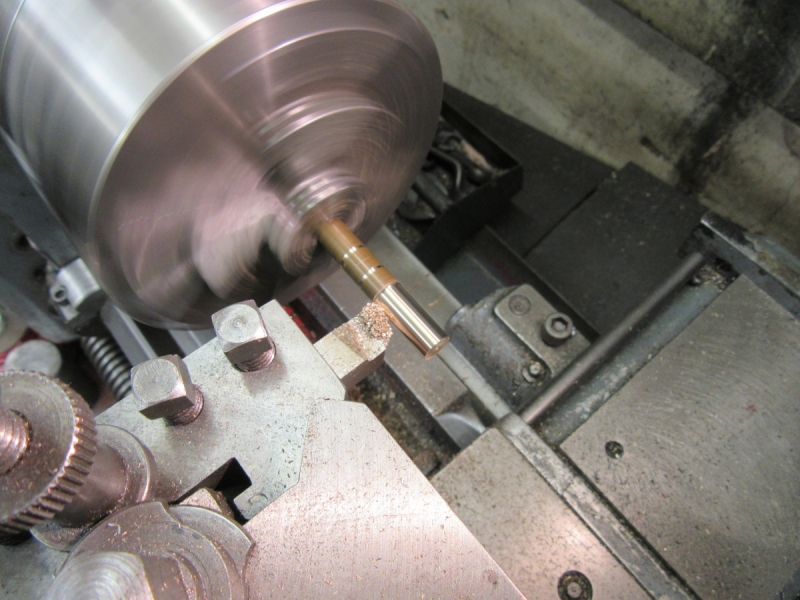
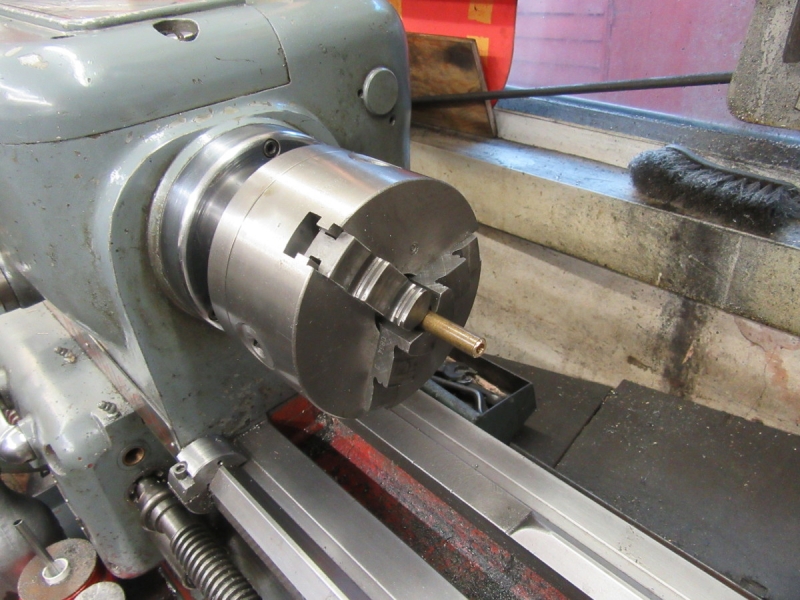
Then into the lathe with my 3/8" brass stock and a bit of careful turning with frequent measuring.
A short time later and after a bit of adjustment I have my plug for the drilling.
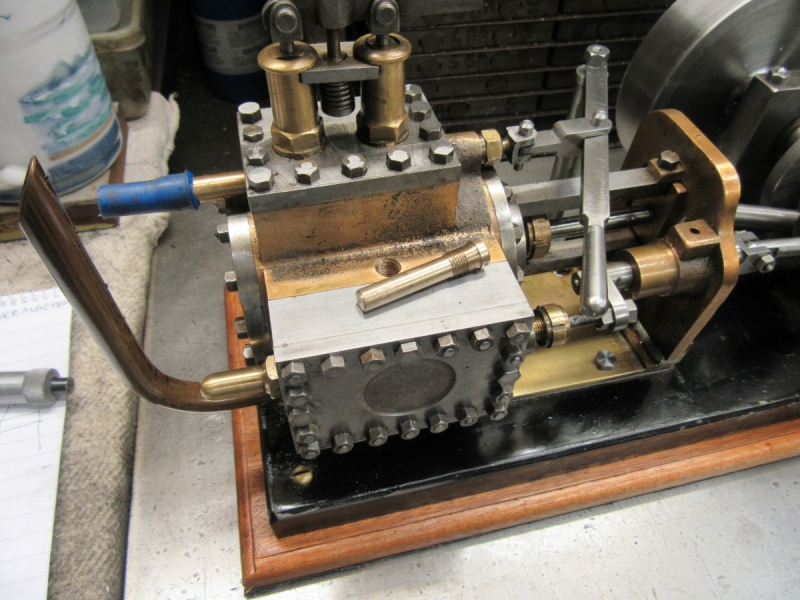
Every picture tells a story and this one tells you that this is a final fit! The Loctite 638 means that it isn't expecting to be removed again!
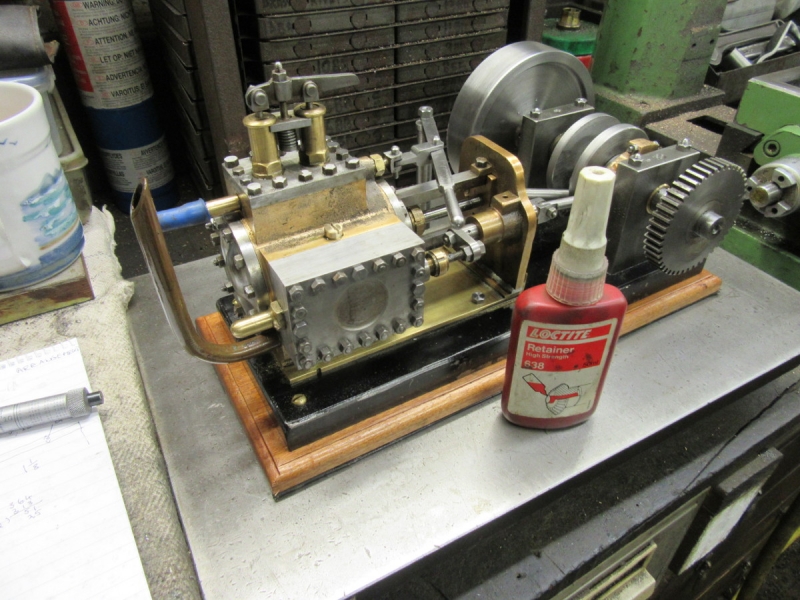
Then I clamped the engine down to the surface plate, blew the compressor up to full pressure and tried it out. It has worked, there is very little blow by into the exhaust, no more than you would expect with any new engine before the sliding valve surfaces have got bedded in. The only problem is that whilst the engine is trying to run, it isn't managing it because for some reason it is short of pressure from the regulator box. Two possible reasons, either the interference with the steam was greater than I thought or there is another problem in the maze of steam passages in the casting, remember it was originally drilled from the curved base which bolted onto the boiler top. I do know that there are two drillings in the original steam supply to the regulator, evidently Newton had a problem with one of them. Whatever, it isn't a runner in my terms and that's as far as I am going to go!
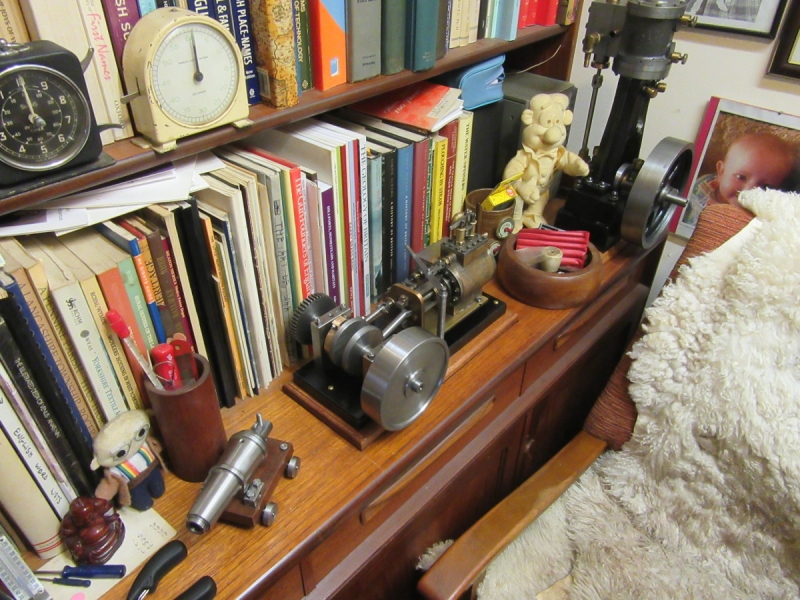
So here we are at journey's end. It isn't a runner but I'm not blaming Newton. At the very least it is no longer a discarded item in the scrap box but an interesting little artefact. Time to move on!
Stanley Challenger Graham
Stanley's View
scg1936 at talktalk.net
"Beware of certitude" (Jimmy Reid)
The floggings will continue until morale improves!
Stanley's View
scg1936 at talktalk.net
"Beware of certitude" (Jimmy Reid)
The floggings will continue until morale improves!
Re: Shed Matters 3
Its a shame you couldnt get the engine running properly but it does look nice on your sideboard. I did show the wife the last picture and she likes it aswell as the cannon you made i told her that you had no diagrams or measurements only the ones you found via google and this has given me an idea to make something simaler for her birthday or our wedding anniversary next year
What will your next project be ?? Have you any ideas
Also do you have a copy of machinery hand book
Im after making a couple of backplates for my lathe and im wondering how far to bore it out before i screwcut the bore 12tpi
The backplate thread is 1-1/8" with a 12tpi thread ( same as a myford ml7 nose spindle thread )
Cant find anything on google and i thought it might say in machinery hand book
-
Stanley
- Global Moderator
- Posts: 90295
- Joined: 23 Jan 2012, 12:01
- Location: Barnoldswick. Nearer to Heaven than Gloria.
Re: Shed Matters 3
I have one more trick up my sleeve for the engine..... I'm still thinking about it.
Making it up as you go along is fun and it always works out for me. The carronade was interesting.
Yes, I have Machinery's Handbook but the backplate is easy. Start with a casting or stock that is as thick as the combined thread and register on the lathe plus the thickness of the mounting plate plus 1/4". Before you start measure the diameter and length of the plain register on the nose, measure the overall diameter you need to match the geometry of the nose. Put your chuck on and mount the stock. Rough it out to the shape with the spigot on the tailstock end. Bore it to threading size, Face the end of the spigot, finish turn the outside of the spigot to the diameter that matches the nose mounting and face the Backside of the actual backplate. Then thread the bore all the way through. Bore the end out to your nose measurements.Take the casting out of the chuck and take the chuck off the lathe. Mount the backplate tight on the nose and do all your finish turning without shifting it at all. That way you finish up with it being dead centre on the headstock.
Stanley Challenger Graham
Stanley's View
scg1936 at talktalk.net
"Beware of certitude" (Jimmy Reid)
The floggings will continue until morale improves!
Stanley's View
scg1936 at talktalk.net
"Beware of certitude" (Jimmy Reid)
The floggings will continue until morale improves!
-
Stanley
- Global Moderator
- Posts: 90295
- Joined: 23 Jan 2012, 12:01
- Location: Barnoldswick. Nearer to Heaven than Gloria.
Re: Shed Matters 3
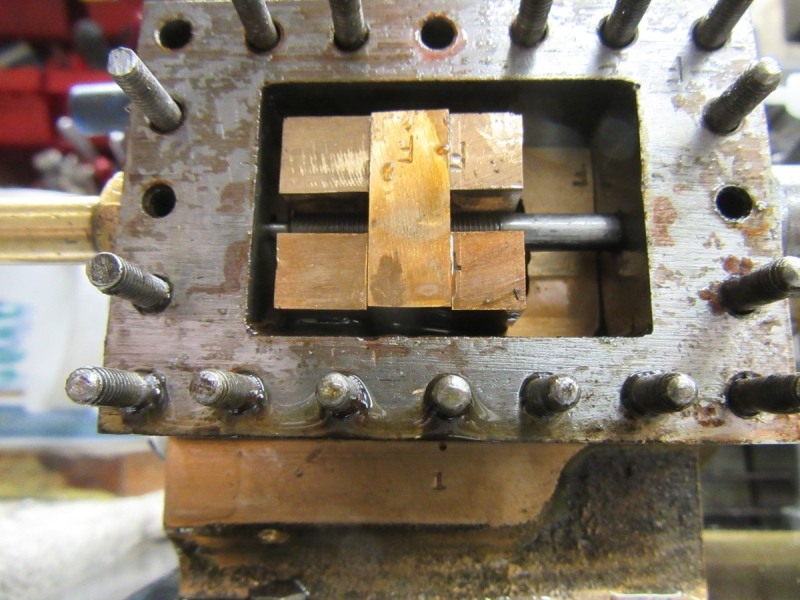
After a lot of thought my current thinking is that perhaps the drilling I made hit the steam passage from the regulator box full on and so the plug I put in yesterday has blocked it. So I started the morning by opening the regulator box up and having a look at the rabbit.
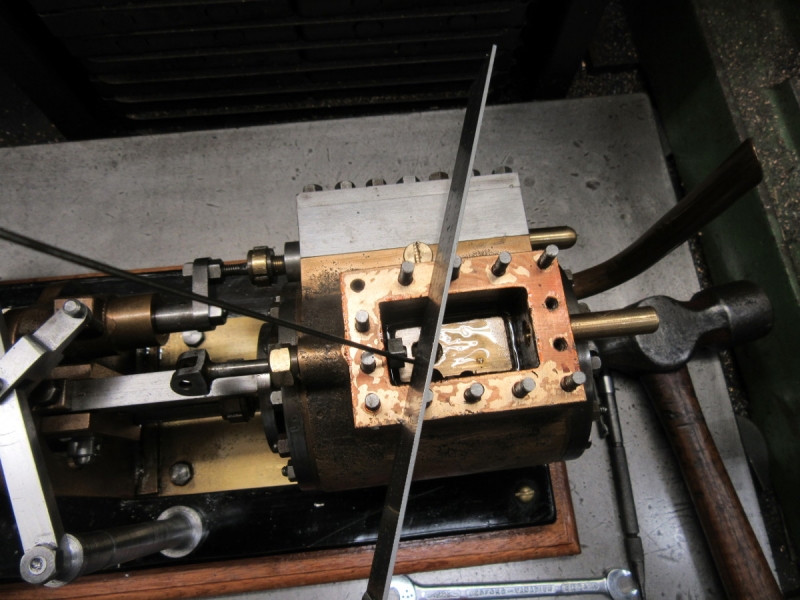
It's obvious that the drilling for the steam was made from the valve chest so that was looking like a bit of a problem if the passage was blocked but before I jumped to any conclusions I used a this piece of flexible wire to probe the passage. Big does and little does convinced me that the passage was open past the plug and in this pic I've laid my scale across the top of the box in the same orientation as the wire and this indicates that the drilling is nowhere near the plug. This is a bit puzzling because I can't see how we were getting full bore air up the exhaust pipe and the plug stopped that. However looking closely at the drillings from the opening in the valve seat there are two. I think one of them was a first attempt and that is the one that is on the same line as my drilling. I think the first was either abandoned by Newton or more likely was a second passage to make sure the valve got full steam from the regulator box. But there is no way I can prove that. I altered the position of the regulator valve when I replaced it to ensure that I had as big an opening when the valve was open as possible and then laced it all up again.
I wasn't very optimistic but I set up for a trial run again. I put air on it and there is no improvement on yesterday. All I can say is that there is something sadly wrong with the passages in the casting and I don't know what it is.
So how long do you go on trying? I said yesterday that I wasn't going to try again but of course I did. The reason was that there was a chance I knew what the problem was but I have proved that any conjecture about the passage being fully blocked is wrong. That being the case I have hit a dead end..... So, the engine is a paper weight again! Of course, anyone looking at it will not know that it doesn't run and it is still a nice conversation piece. It's the first time I have built an engine with someone else's cylinder and the first time I have failed to produce a runner. There's a lesson in there somewhere! Newton has won, no wonder he scrapped it!
Stanley Challenger Graham
Stanley's View
scg1936 at talktalk.net
"Beware of certitude" (Jimmy Reid)
The floggings will continue until morale improves!
Stanley's View
scg1936 at talktalk.net
"Beware of certitude" (Jimmy Reid)
The floggings will continue until morale improves!
-
Stanley
- Global Moderator
- Posts: 90295
- Joined: 23 Jan 2012, 12:01
- Location: Barnoldswick. Nearer to Heaven than Gloria.
Re: Shed Matters 3
One thing I have proved with this conversion is what complicated little beasts steam engines can be! Using Newton's cylinder when he had scrapped it was always high risk and I failed but it has been an interesting attempt and I don't regret it.
Today is shopping day and I shall give the shed a miss, perhaps write yet another article for the paper. This takes me well into January so I have plenty of time for plotting. I have some big lumps of non-ferocious stock that would cost a fortune at today's prices.....
By the way, if you have a look at 'Medical Matters' you will see that I have had some encouraging news about my cancer and it looks as though it isn't going to get me just yet!
Stanley Challenger Graham
Stanley's View
scg1936 at talktalk.net
"Beware of certitude" (Jimmy Reid)
The floggings will continue until morale improves!
Stanley's View
scg1936 at talktalk.net
"Beware of certitude" (Jimmy Reid)
The floggings will continue until morale improves!
-
Stanley
- Global Moderator
- Posts: 90295
- Joined: 23 Jan 2012, 12:01
- Location: Barnoldswick. Nearer to Heaven than Gloria.
Re: Shed Matters 3
Today is article writing lads. Sorry about that but I am conserving my energy!
Stanley Challenger Graham
Stanley's View
scg1936 at talktalk.net
"Beware of certitude" (Jimmy Reid)
The floggings will continue until morale improves!
Stanley's View
scg1936 at talktalk.net
"Beware of certitude" (Jimmy Reid)
The floggings will continue until morale improves!
-
Stanley
- Global Moderator
- Posts: 90295
- Joined: 23 Jan 2012, 12:01
- Location: Barnoldswick. Nearer to Heaven than Gloria.
Re: Shed Matters 3

I went in the shed this morning to tidy up and clean after Newton's engine. The first thing was to put tackle away clean what always lives on the bench and clean and oil the big surface plate and put a new tablecloth on. At the same time I had a major chip chase and clean up of Mrs Harrison.
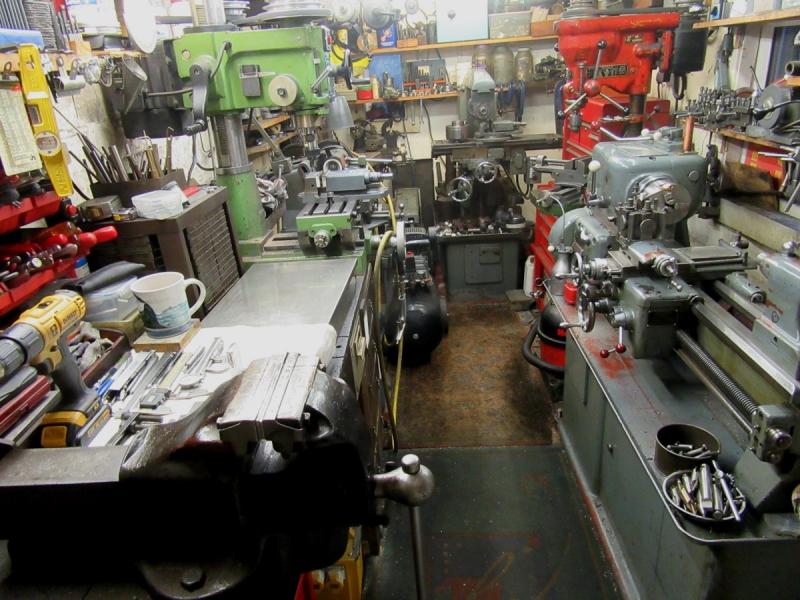
I finished off by vacuuming and oiling all my surfaces. It may be that I shall be out of the shed for a few days after my operation and I want to make sure that everything is OK. Because I have CH in the shed rust is not a big problem as long as surfaces have been cleaned and oiled. The danger is electrolytic corrosion where dissimilar metals like brass borings are left on polished surfaces. Worst of the lot actually is wood glue, it corrodes polished surfaces instantly!
So, not a biggie but we have a clean shed.
Stanley Challenger Graham
Stanley's View
scg1936 at talktalk.net
"Beware of certitude" (Jimmy Reid)
The floggings will continue until morale improves!
Stanley's View
scg1936 at talktalk.net
"Beware of certitude" (Jimmy Reid)
The floggings will continue until morale improves!
Re: Shed Matters 3
I'd love you to get the engine operational, seems such a shame to give up on it. After opening it up once again, would it be possible to blow compressed air or smoke in a reverse direction, ie from the exhaust, and would this show up anything abnormal? Perhaps you could block off wherever the smoke exits one passage at a time? Then maybe you could 'sleeve' the offending passage?