Shed Matters 3
Re: Shed Matters 3
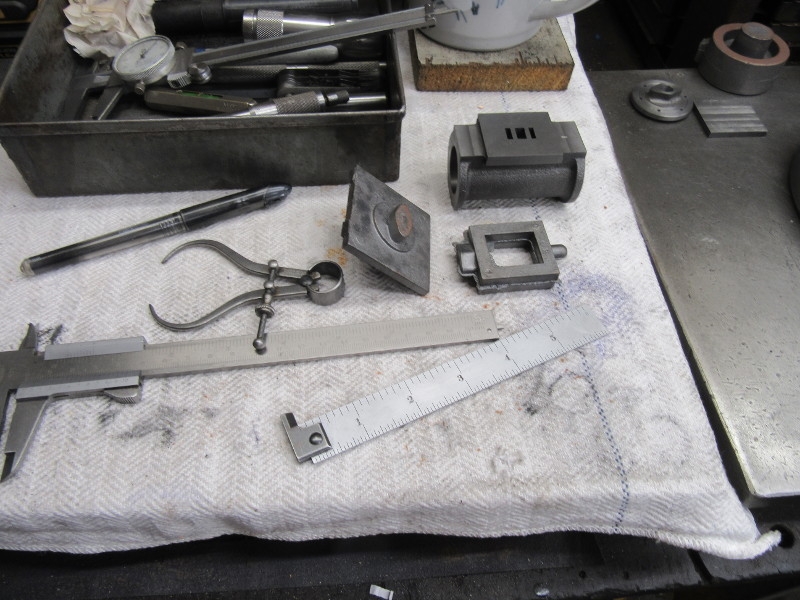
This little gadget reads to 0.1 degree but I am not sure how accurate it is. I have spirit levels that are accurate to 1mm in 1m but are far too big to go on the mill! I have seen accurate machine levels but I suspect they are a bit expensive. Good measuring gear is worth paying for but I generally weigh up whether I really need it against buying more materials.
-
Stanley

- Global Moderator

- Posts: 90301
- Joined: 23 Jan 2012, 12:01
- Location: Barnoldswick. Nearer to Heaven than Gloria.
Re: Shed Matters 3
Just seen your post Bob. I have two everyday levels, a vest pocket billiard table level and a magnetic German Stabila and I use them all the time. I also have two super accurate machine levels but I only use them for checking machine levels. They are annoyingly accurate!
Here's this morning's endeavour!
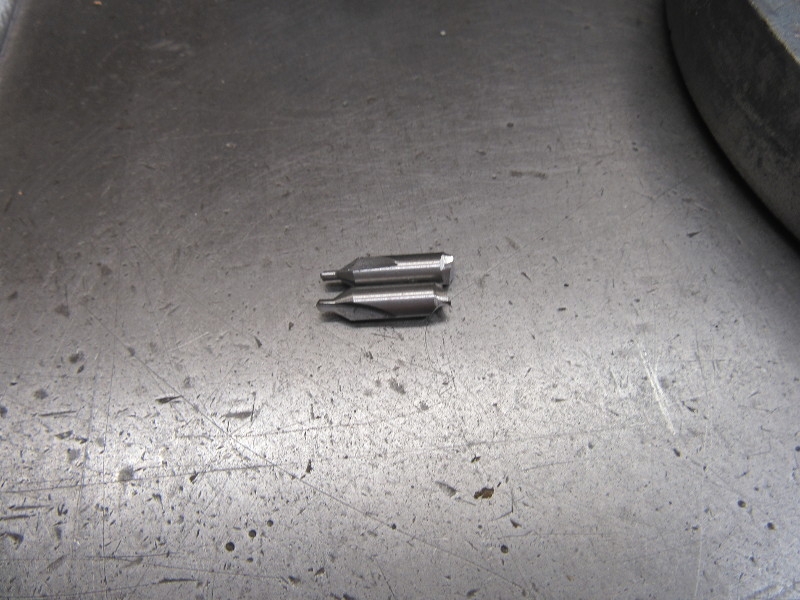
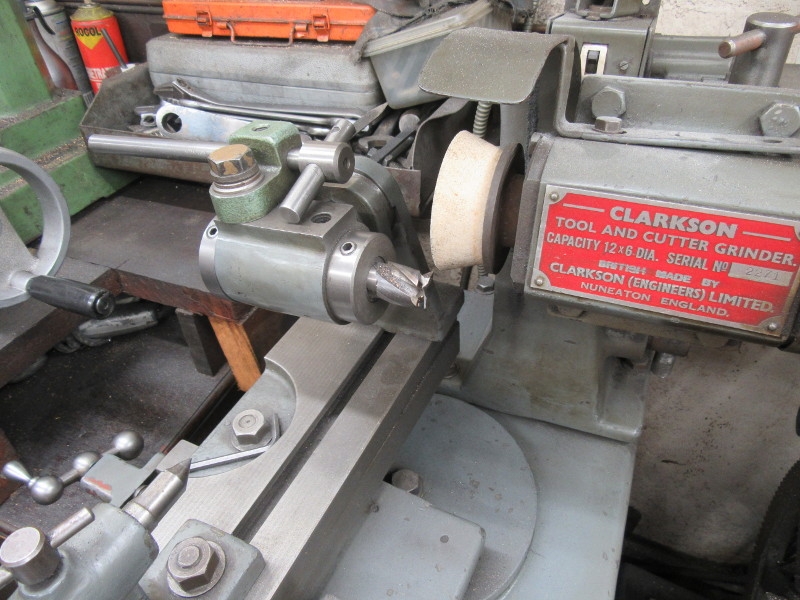
I started the day with what looks like vandalism. I cut a brand new centre drill in two. Let me explain. This morning's plan is to go in the front room, set Johnny's 1927 lathe up for dividing and spot the locations of the stud holes on the cylinder lid. I have been putting up with the centre drill that was in the chuck on the gizmo that has to be installed and run with the overhead gear. I put the new centre drill in (Banggood) the chuck and it wouldn't run true. I soon realised that this was why the old one was a stub, it didn't have the flutes on the back end. The chuck isn't deep enough to accept the normal centre drill so I had to weaken the drill by cutting a groove round it with the grinding wheel. (Today's tip, If you are doing this, put it in the vise, cover with a cloth and give it a smart blow with a hammer. It will snap off at the groove and you won't lose it or risk eye injury because the cloth will catch it.)
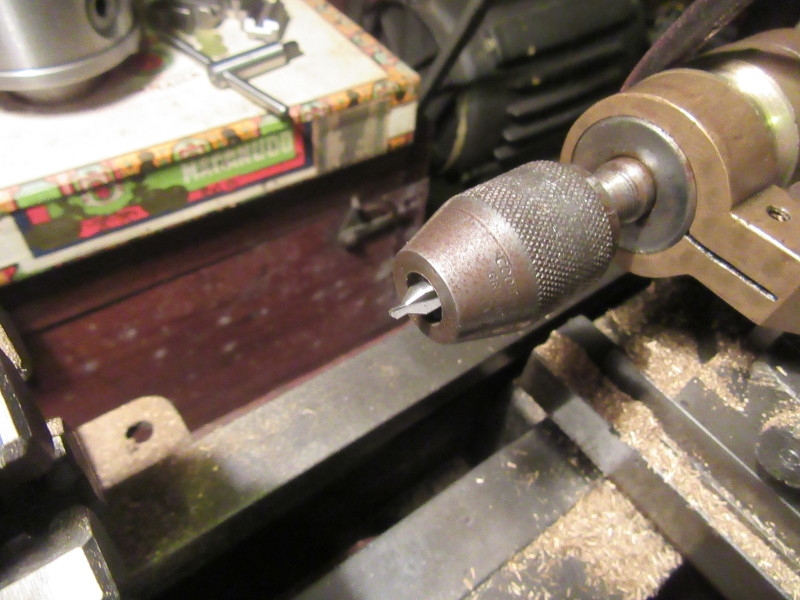
Here it is, it's running true now but I soon realised I had a problem, the chuck was fouling the casting before the drill bit so a quick adjustment to give it a bit more stick out. Then change the 4 jaw chuck for the 3 jaw SC, set the overhead gear up. and engage the dividing plate on the front of the bull gear, there's a handy 12 hole circle on it. Next set the cylinder lid so that when installed the gland is at right angles and the stud holes won't interfere with the steam ports. Once all that was done it was dead simple to mark the six stud holes. The sharp centre drill is a great improvement! That wasn't the end of it because once that was done I cleaned the lathe up, I have neglected that job off late and there were brass chips all over the place. Quietly away (and that included emptying the hand held vacuum cleaner) and I managed to get back in the shed! It all took time, the actual dividing took less than 5 minutes.
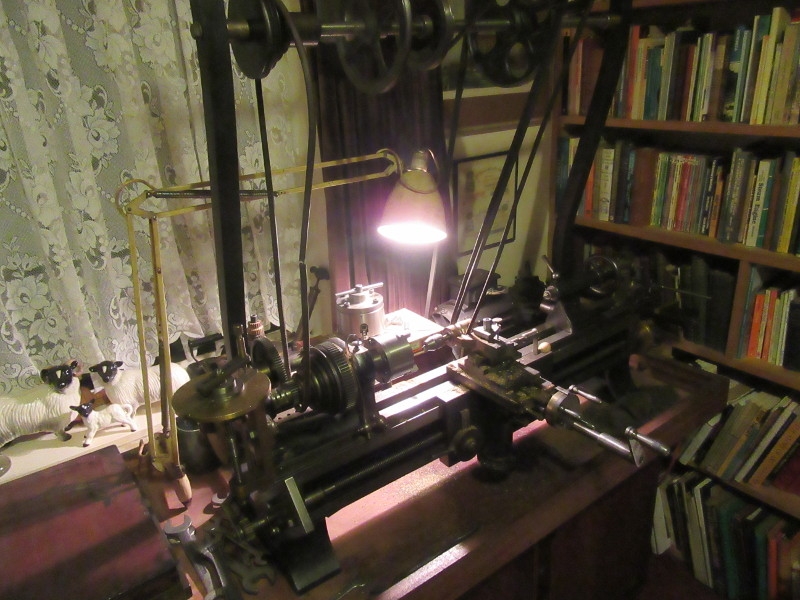
Here's the 1927 lathe set up for dividing using the overhead gear. Everyone should have one in their front room!
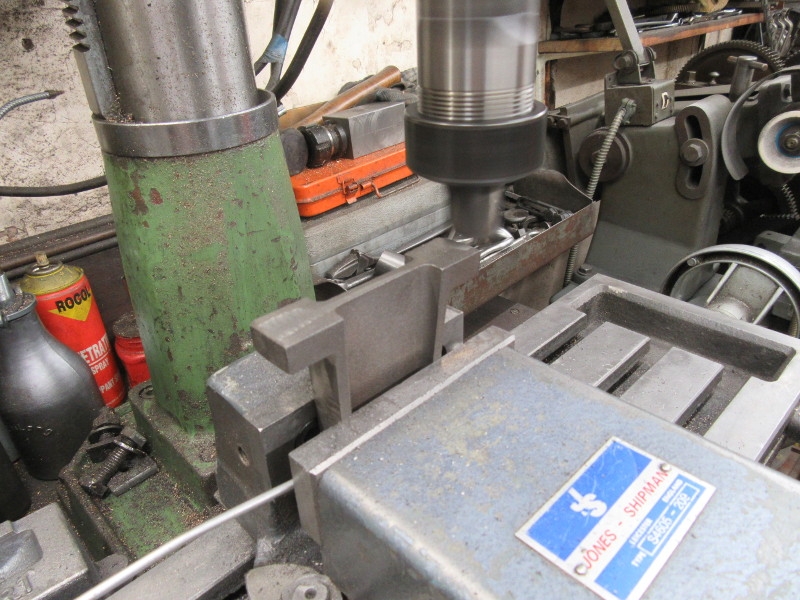
Back in the shed (after emptying the vacuum cleaner!) and we are ready for drilling 7BA tapping size as the lid will become the template for the stud holes in each end of the cylinder.
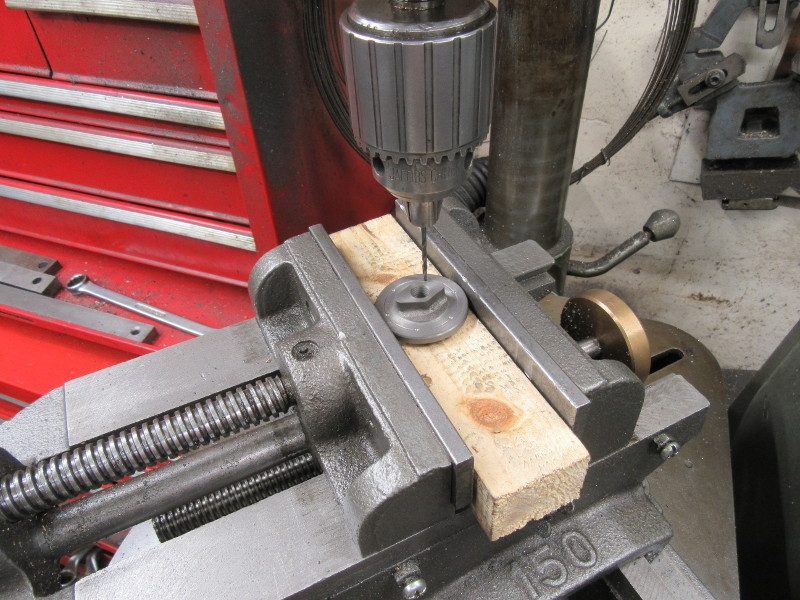
Under the pillar drill with a No. 43 number drill, dead easy to get the holes in with good pop marks.
Knocking off time. This was the aim, a lid drilled accurately on the PCD for the cylinder studs. The gland casting is at 90 degrees and the drillings don't interfere with the steam ports. That was enough for this morning. A long way round I know but we finished in better shape in the front room and with the lid drilled. That was the job, I am satisfied. A nice hour and a half in the shed.
Here's this morning's endeavour!
I started the day with what looks like vandalism. I cut a brand new centre drill in two. Let me explain. This morning's plan is to go in the front room, set Johnny's 1927 lathe up for dividing and spot the locations of the stud holes on the cylinder lid. I have been putting up with the centre drill that was in the chuck on the gizmo that has to be installed and run with the overhead gear. I put the new centre drill in (Banggood) the chuck and it wouldn't run true. I soon realised that this was why the old one was a stub, it didn't have the flutes on the back end. The chuck isn't deep enough to accept the normal centre drill so I had to weaken the drill by cutting a groove round it with the grinding wheel. (Today's tip, If you are doing this, put it in the vise, cover with a cloth and give it a smart blow with a hammer. It will snap off at the groove and you won't lose it or risk eye injury because the cloth will catch it.)
Here it is, it's running true now but I soon realised I had a problem, the chuck was fouling the casting before the drill bit so a quick adjustment to give it a bit more stick out. Then change the 4 jaw chuck for the 3 jaw SC, set the overhead gear up. and engage the dividing plate on the front of the bull gear, there's a handy 12 hole circle on it. Next set the cylinder lid so that when installed the gland is at right angles and the stud holes won't interfere with the steam ports. Once all that was done it was dead simple to mark the six stud holes. The sharp centre drill is a great improvement! That wasn't the end of it because once that was done I cleaned the lathe up, I have neglected that job off late and there were brass chips all over the place. Quietly away (and that included emptying the hand held vacuum cleaner) and I managed to get back in the shed! It all took time, the actual dividing took less than 5 minutes.
Here's the 1927 lathe set up for dividing using the overhead gear. Everyone should have one in their front room!
Back in the shed (after emptying the vacuum cleaner!) and we are ready for drilling 7BA tapping size as the lid will become the template for the stud holes in each end of the cylinder.
Under the pillar drill with a No. 43 number drill, dead easy to get the holes in with good pop marks.
Knocking off time. This was the aim, a lid drilled accurately on the PCD for the cylinder studs. The gland casting is at 90 degrees and the drillings don't interfere with the steam ports. That was enough for this morning. A long way round I know but we finished in better shape in the front room and with the lid drilled. That was the job, I am satisfied. A nice hour and a half in the shed.
Stanley Challenger Graham
Stanley's View
scg1936 at talktalk.net
"Beware of certitude" (Jimmy Reid)
The floggings will continue until morale improves!
Stanley's View
scg1936 at talktalk.net
"Beware of certitude" (Jimmy Reid)
The floggings will continue until morale improves!
Re: Shed Matters 3
It might have been suggested before but Stanley have you ever thought of copying sections of this blog to a magazine such as Model Engineer? They pay money, which could fund a few castings and your hints and tips would go down well. They have even published a few of my writings over the years!
-
Stanley
- Global Moderator
- Posts: 90301
- Joined: 23 Jan 2012, 12:01
- Location: Barnoldswick. Nearer to Heaven than Gloria.
Re: Shed Matters 3
Don't want the responsibility Bob. I had the BET column for years and it's quite nice not to have to worry about deadlines any more.
Stanley Challenger Graham
Stanley's View
scg1936 at talktalk.net
"Beware of certitude" (Jimmy Reid)
The floggings will continue until morale improves!
Stanley's View
scg1936 at talktalk.net
"Beware of certitude" (Jimmy Reid)
The floggings will continue until morale improves!
Re: Shed Matters 3
Yes Stanley I quite understand. Youngsters probably would not realise that as we get older and wiser? we Like to do what we want wish no pressures.
I’ve just looked at the 14 day weather forecast, looks like lots of showers so plenty of time in the shed.
I’ve just looked at the 14 day weather forecast, looks like lots of showers so plenty of time in the shed.
-
Stanley
- Global Moderator
- Posts: 90301
- Joined: 23 Jan 2012, 12:01
- Location: Barnoldswick. Nearer to Heaven than Gloria.
Re: Shed Matters 3
Dead right Bob. Time we had our way!
Stanley Challenger Graham
Stanley's View
scg1936 at talktalk.net
"Beware of certitude" (Jimmy Reid)
The floggings will continue until morale improves!
Stanley's View
scg1936 at talktalk.net
"Beware of certitude" (Jimmy Reid)
The floggings will continue until morale improves!
-
Stanley
- Global Moderator
- Posts: 90301
- Joined: 23 Jan 2012, 12:01
- Location: Barnoldswick. Nearer to Heaven than Gloria.
Re: Shed Matters 3

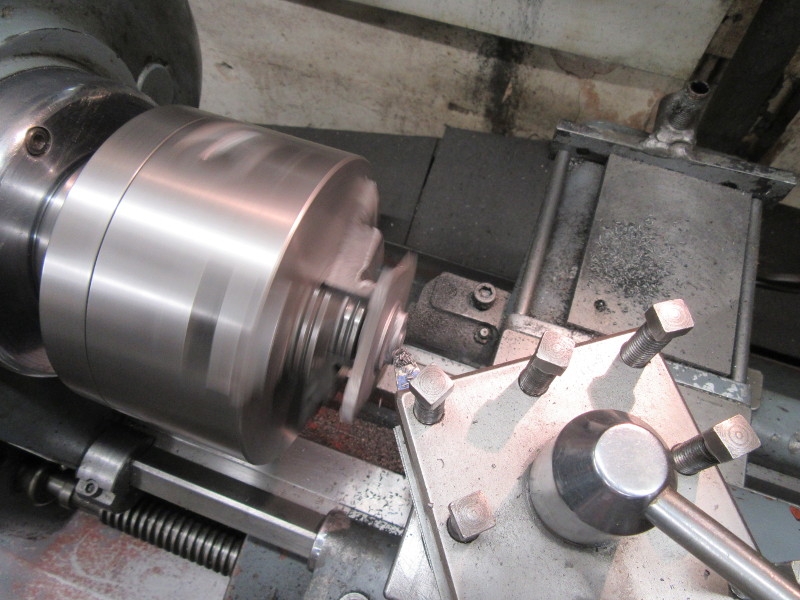
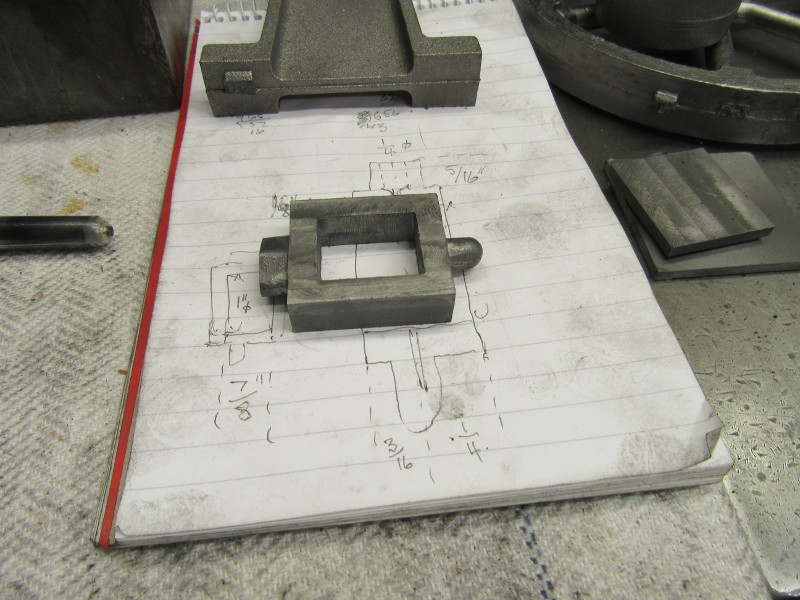
Today I don't want to do a lot, just get the steam chest lid to the right size and thickness. Not as simple as it first appears. The trouble with very small thin castings is that they cool too fast when poured and the corners of a small casting like this can be pot-hard! It turned out that it was, sparks were flying off the cutter.
So, once I had the lid somewhere near I sharpened my cutter for the final cuts.
The lid is the right size and ready for marking for drilling but Before I do that....
I want to do all the drilling and tapping at the same time so as well as the steam chest lid, I need the body and also the cylinder base ready for drilling and fitting. I'll start into them tomorrow.
Stanley Challenger Graham
Stanley's View
scg1936 at talktalk.net
"Beware of certitude" (Jimmy Reid)
The floggings will continue until morale improves!
Stanley's View
scg1936 at talktalk.net
"Beware of certitude" (Jimmy Reid)
The floggings will continue until morale improves!
Re: Shed Matters 3
Stanley, do you know anything about reheating castings to overcome the problem of hard spots. I recently saw an online discussion onthe subject. It was said that you put the castings into the embers of your fire after finally stoking it up for the evening. Apparently The idea is to get the casting up to red heat and let it cool gently Ready to machine the next morning.
-
Stanley
- Global Moderator
- Posts: 90301
- Joined: 23 Jan 2012, 12:01
- Location: Barnoldswick. Nearer to Heaven than Gloria.
Re: Shed Matters 3
That could do it Bob as long as the temperature was right. Very common process with light commercial CI parts especially those with a complex shape called 'Normalisation'. If done badly it could introduce other stresses of course.
It's all to do with the different crystalline structures that are possible in cast iron depending on carbon content and temperature gradients. If I remember right, a hard chilled shop is an area of Martensite and the carbon has cooled too quickly to crystallise out as graphite which is a lubricant of course. It stays in the structure as I think Carbon Ferrite which is almost diamond hard. The old lads called it 'White Iron'. Think about how you would manage it in the days before tool steel and carbides when all you had was high carbon steel.
Not to be confused with the normal 'skin' on a casting which is a combination of iron foundry sand and perhaps some even harder nasties in small quantities. The cure for that is a slow speed and a first cut deep enough to get under the skin and into the grey iron. (Not high speed and a carbide cutter like I saw Keith Rucker using on a gear blank yesterday! He buggered three tips before he finally got into clean iron.)
Stanley Challenger Graham
Stanley's View
scg1936 at talktalk.net
"Beware of certitude" (Jimmy Reid)
The floggings will continue until morale improves!
Stanley's View
scg1936 at talktalk.net
"Beware of certitude" (Jimmy Reid)
The floggings will continue until morale improves!
-
Stanley
- Global Moderator
- Posts: 90301
- Joined: 23 Jan 2012, 12:01
- Location: Barnoldswick. Nearer to Heaven than Gloria.
Re: Shed Matters 3

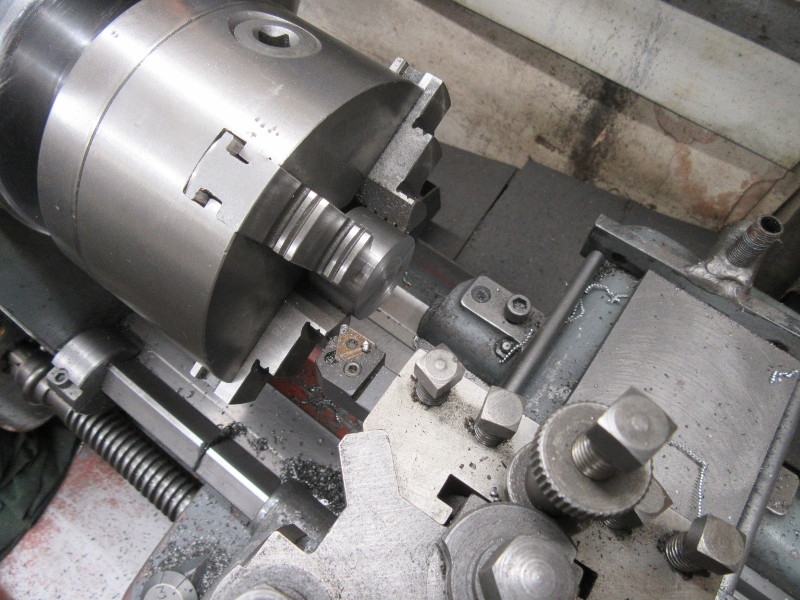
The first thing I did this morning was check my Avometer to make sure there isn't a battery dying in there. There wasn't, I'd already taken it out but it does no harm to check!
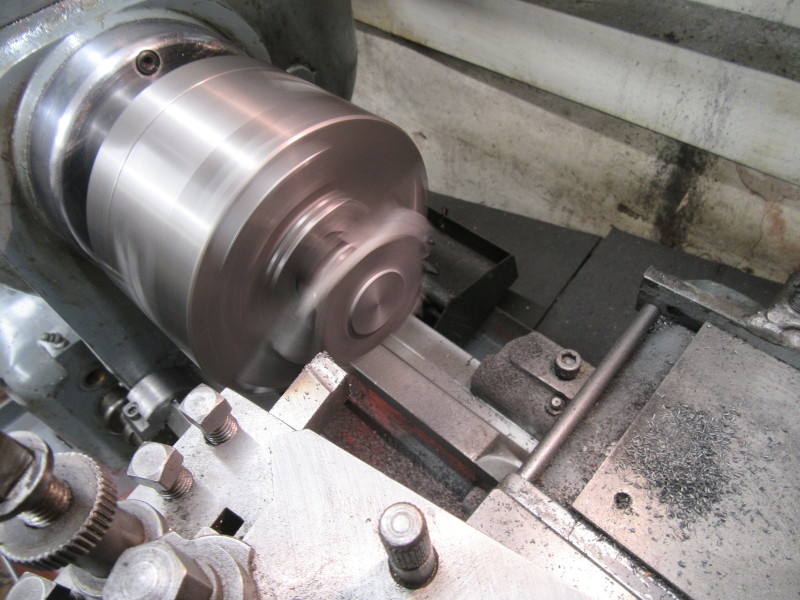
Our job this morning is to get the base casting of the cylinder ready. First turn the gland casting off, not needed. Then Turn the base flat with a 1/16" register on it. Only one way to check the fit! It's good.
I did all the other cuts in the mill because I could grip the casting more securely. Same concerns with Hard shops in the corners of the lid. These played hell with the cutter and so I had to re-sharpen it. But before that I got all the dimensions somewhere near right!
Stanley Challenger Graham
Stanley's View
scg1936 at talktalk.net
"Beware of certitude" (Jimmy Reid)
The floggings will continue until morale improves!
Stanley's View
scg1936 at talktalk.net
"Beware of certitude" (Jimmy Reid)
The floggings will continue until morale improves!
Re: Shed Matters 3
Is that Avo meter a robust army model, Stanley? I have only seen leather cases. Like you, I check the battery in mine now and again. Mine takes 2 batteries, a high voltage one for the high resistance range and an ordinary single cell for the two lower resistance ranges. The high, 22.5 I think, voltage one is nigh impossible to get now.
-
Stanley
- Global Moderator
- Posts: 90301
- Joined: 23 Jan 2012, 12:01
- Location: Barnoldswick. Nearer to Heaven than Gloria.
Re: Shed Matters 3
N Bob, I found that case in a bin in Gargrave many years ago and thought it looked too good for the tip. Its the case off a Ferrograph depth sounder, didn't know they made them until I found this. I put some shaped foam blocks inside and it's perfect for the Avo.
It takes one U2 cell. Nothing in it because I doubt if I'll ever use it again. I have a little hand held one that is my go to meter if I need one.
No shed this morning, I went shopping instead! I don't fancy rushing anything and I'm not on piece work!
It takes one U2 cell. Nothing in it because I doubt if I'll ever use it again. I have a little hand held one that is my go to meter if I need one.
No shed this morning, I went shopping instead! I don't fancy rushing anything and I'm not on piece work!
Stanley Challenger Graham
Stanley's View
scg1936 at talktalk.net
"Beware of certitude" (Jimmy Reid)
The floggings will continue until morale improves!
Stanley's View
scg1936 at talktalk.net
"Beware of certitude" (Jimmy Reid)
The floggings will continue until morale improves!
-
Stanley
- Global Moderator
- Posts: 90301
- Joined: 23 Jan 2012, 12:01
- Location: Barnoldswick. Nearer to Heaven than Gloria.
Re: Shed Matters 3
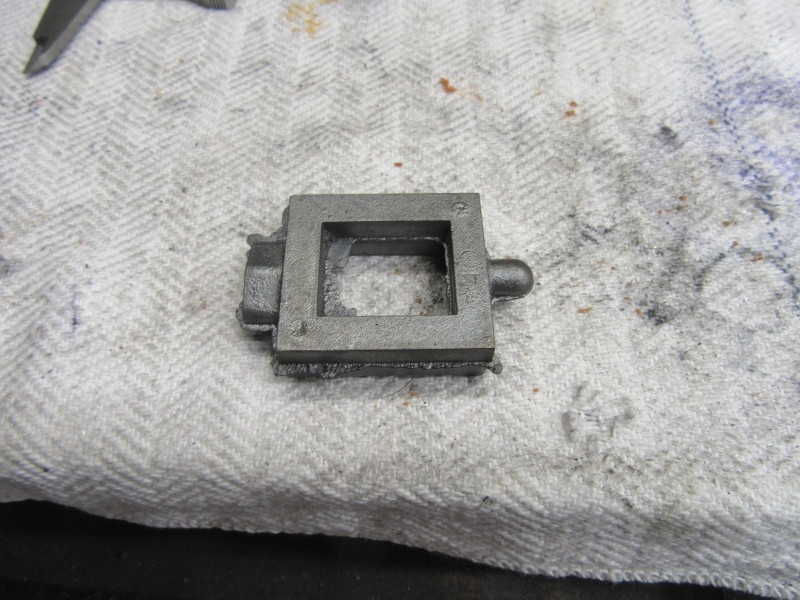
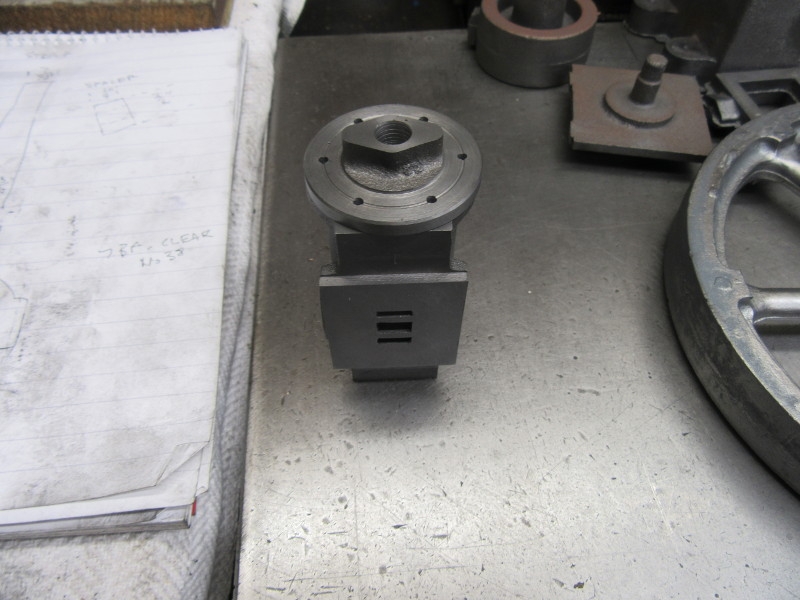
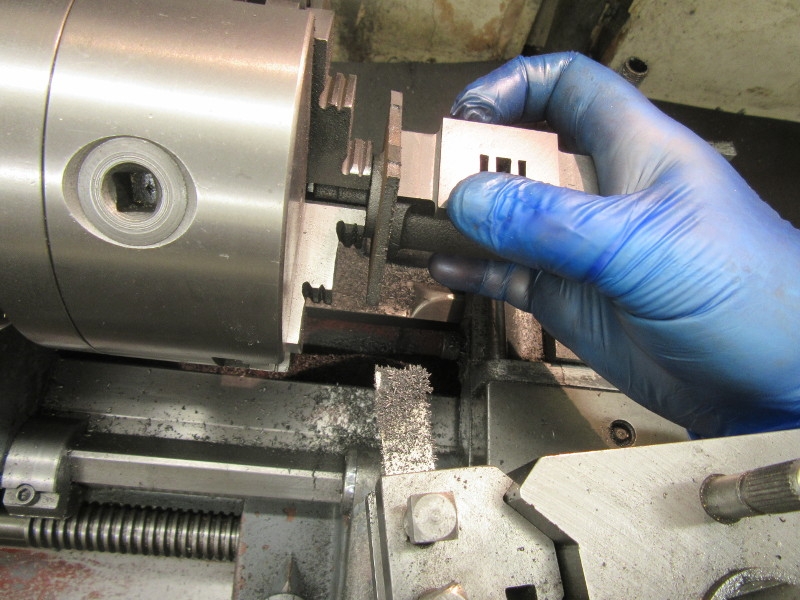
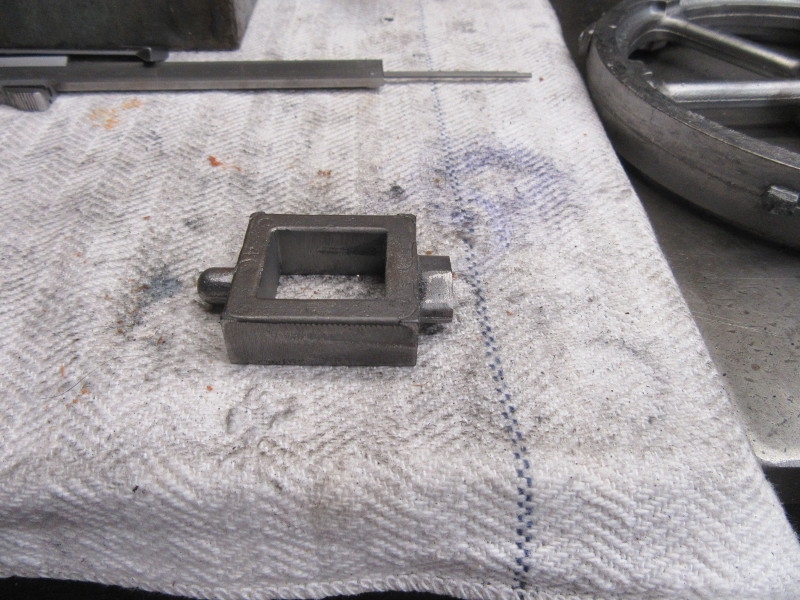
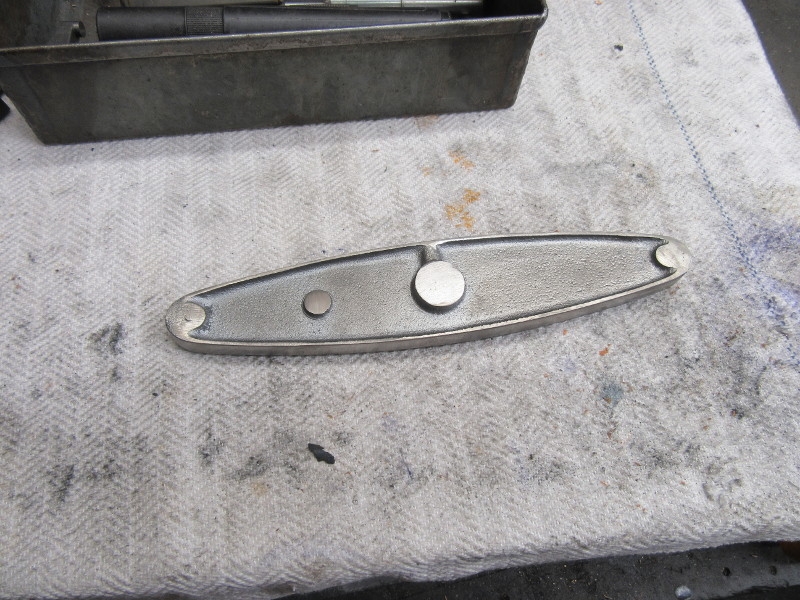
Today we are working on the steam chest casting.

So the first job was go round all the surfaces with a file and get it looking something like.
Now we need to get the finish, dimensions and squareness right. For that we need to go into the mill.
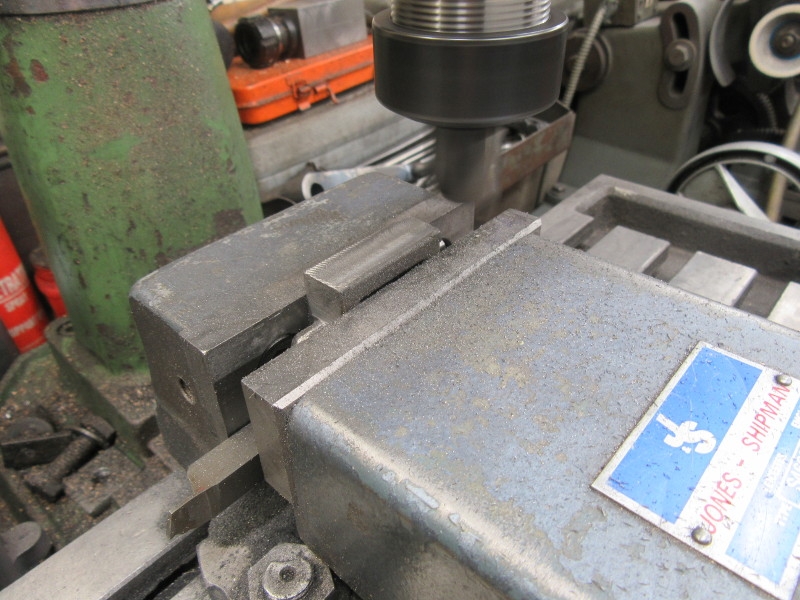
All the surfaces finished to size and squareness. As usual the corners are pot hard and as I am not taking much off I can't get underneath the skin. I just have to put up with it and use two cutters.
Here we are, all surfaces finished and ready for the next steps.
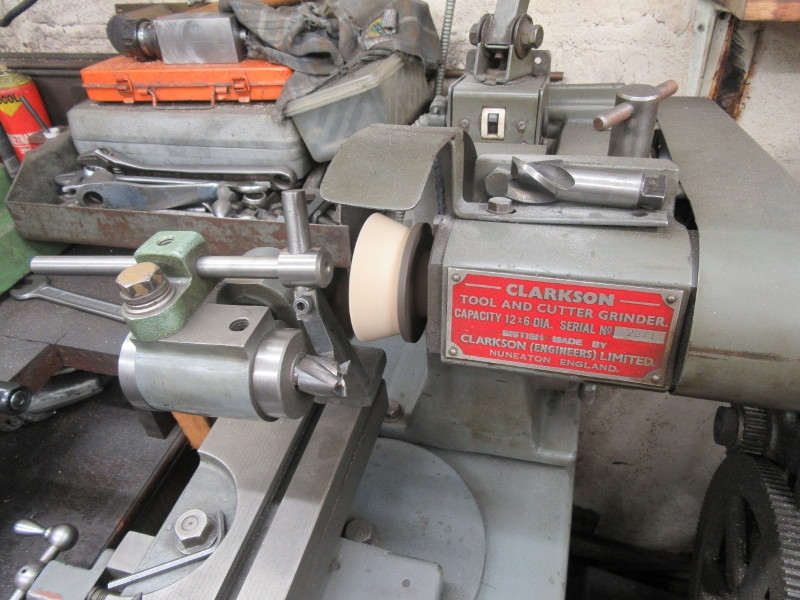
So then I had a spell rescuing my two damaged cutters. I'm getting to the stage where I might have to find an end mill. I shall have to give the NE mafia a shout!
Here we are at knocking off time. I have a cylinder ready for a lot of drilling and tapping. I shall start that as soon as my new HSS 7BA taps arrive! Plenty of other things I can be doing. A good morning...
Stanley Challenger Graham
Stanley's View
scg1936 at talktalk.net
"Beware of certitude" (Jimmy Reid)
The floggings will continue until morale improves!
Stanley's View
scg1936 at talktalk.net
"Beware of certitude" (Jimmy Reid)
The floggings will continue until morale improves!
-
Stanley
- Global Moderator
- Posts: 90301
- Joined: 23 Jan 2012, 12:01
- Location: Barnoldswick. Nearer to Heaven than Gloria.
Re: Shed Matters 3
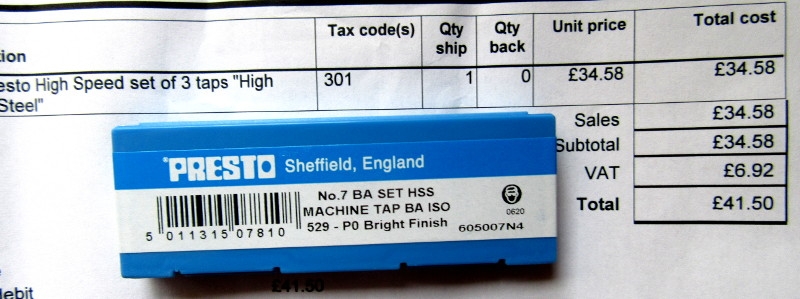
Note, nothing to say they were made in England.....
Stanley Challenger Graham
Stanley's View
scg1936 at talktalk.net
"Beware of certitude" (Jimmy Reid)
The floggings will continue until morale improves!
Stanley's View
scg1936 at talktalk.net
"Beware of certitude" (Jimmy Reid)
The floggings will continue until morale improves!
-
Stanley
- Global Moderator
- Posts: 90301
- Joined: 23 Jan 2012, 12:01
- Location: Barnoldswick. Nearer to Heaven than Gloria.
Re: Shed Matters 3
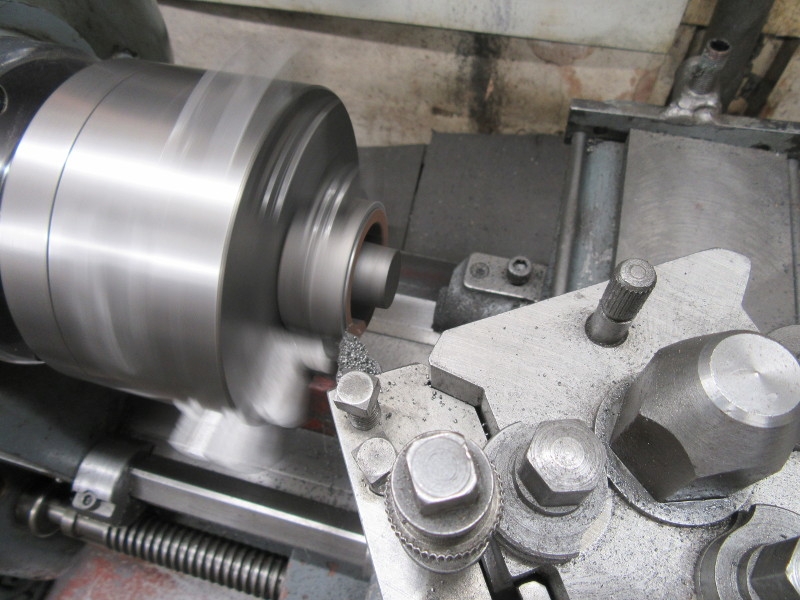
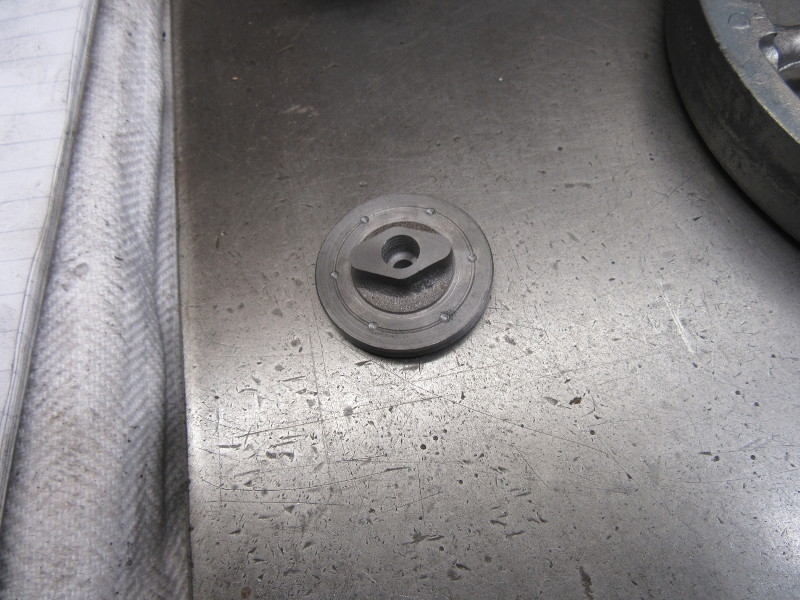
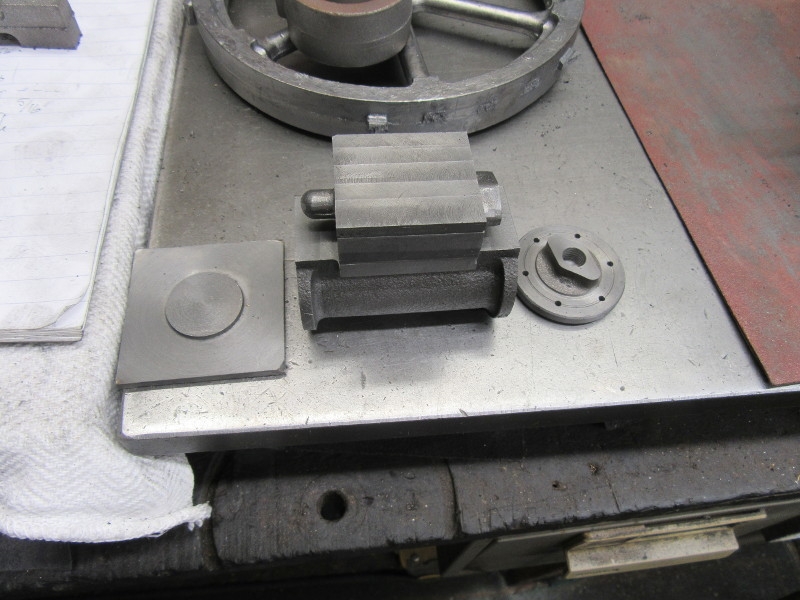
I didn't go in the shed yesterday because I couldn't face drilling and tapping. I realised this morning that there were other alternatives! I started with the pulley that goes on the flyshaft.
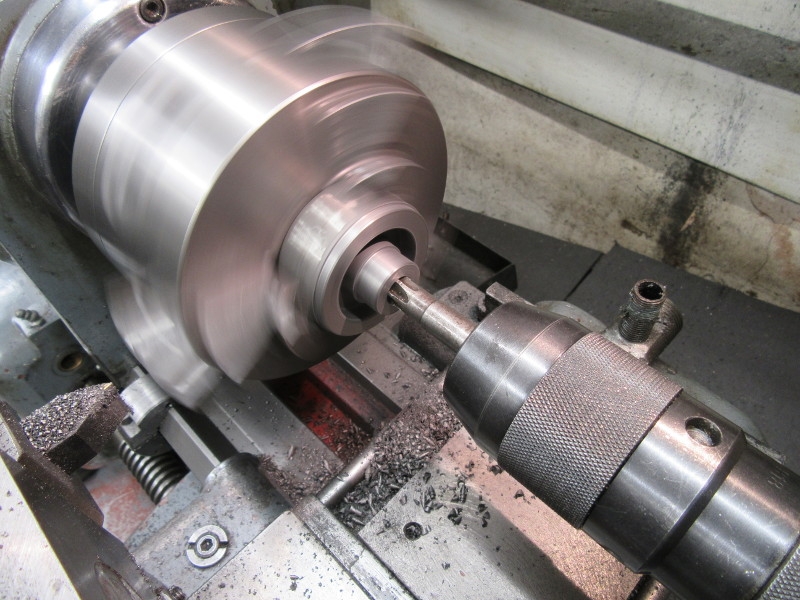
Just a reminder, if you are using an old reamer, always use the full length, the last part to enter will be the least used and nearest the size.
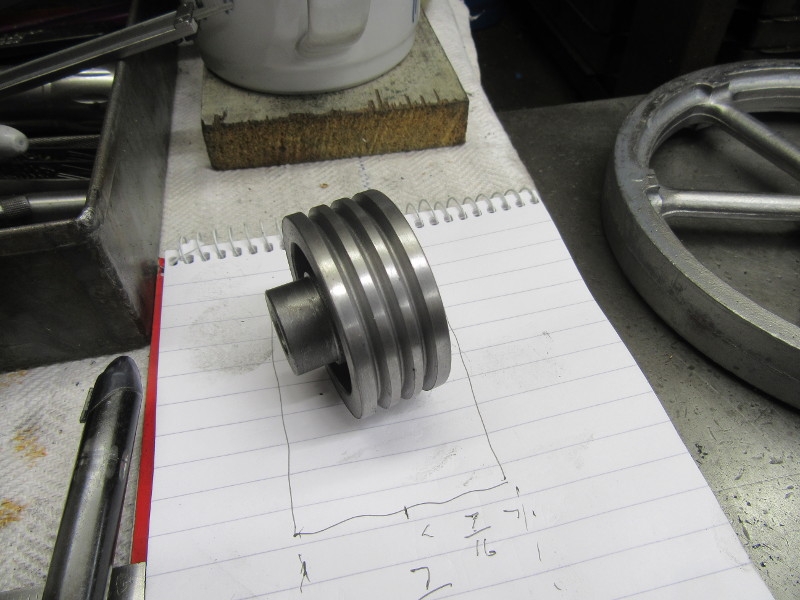
Here we are after a polish, it needs drilling and tapping for the 1/4" Unbrako set screw but that can wait, I have another nice bit of turning in mind.
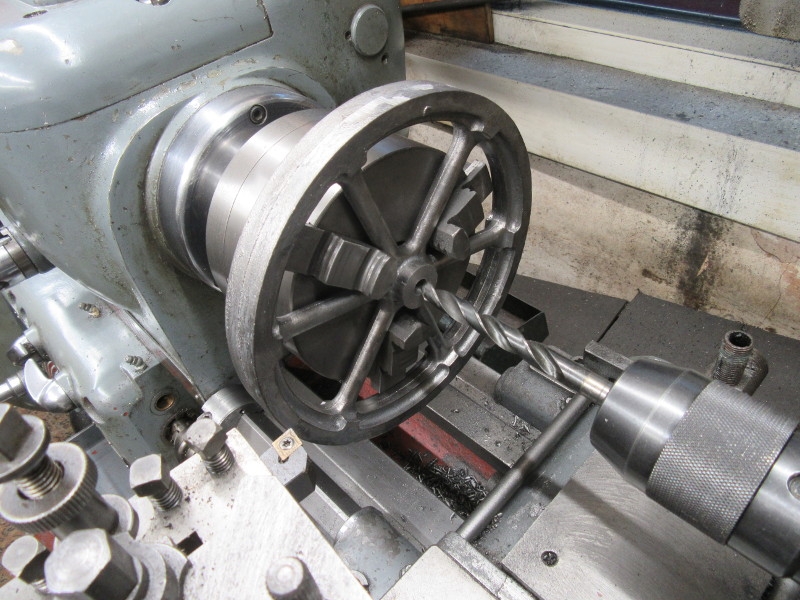
I like turning flywheels....
One clean cut across the face and then one down the side. I'll finish it tomorrow.
Stanley Challenger Graham
Stanley's View
scg1936 at talktalk.net
"Beware of certitude" (Jimmy Reid)
The floggings will continue until morale improves!
Stanley's View
scg1936 at talktalk.net
"Beware of certitude" (Jimmy Reid)
The floggings will continue until morale improves!
Re: Shed Matters 3
Not much to report from Rochdale, Stanley. I started the drain cock but slipped up putting the chamfer on the valve core so may start again later today. My M5 HSS die arrived so I can also continue with the main shaft. That delay was following the realisation that I only had a carbon steel die. OK for cleaning up threads and perhaps cutting brass but not so good for the shaft.
-
Stanley
- Global Moderator
- Posts: 90301
- Joined: 23 Jan 2012, 12:01
- Location: Barnoldswick. Nearer to Heaven than Gloria.
Re: Shed Matters 3
You're right Bob. Eventually you have to grasp the nettle and get a shock like I did this week!
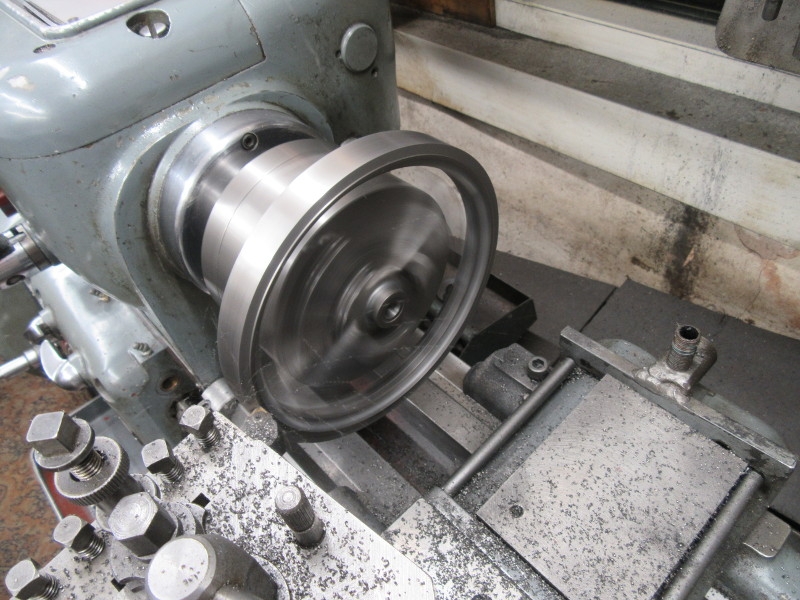
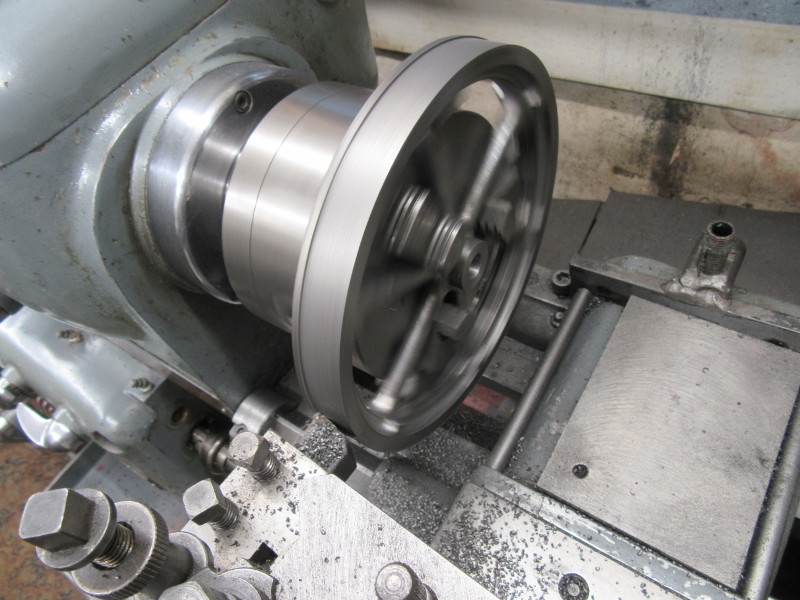
Last cut on the flywheel followed by general polishing and finishing the spokes with a file.
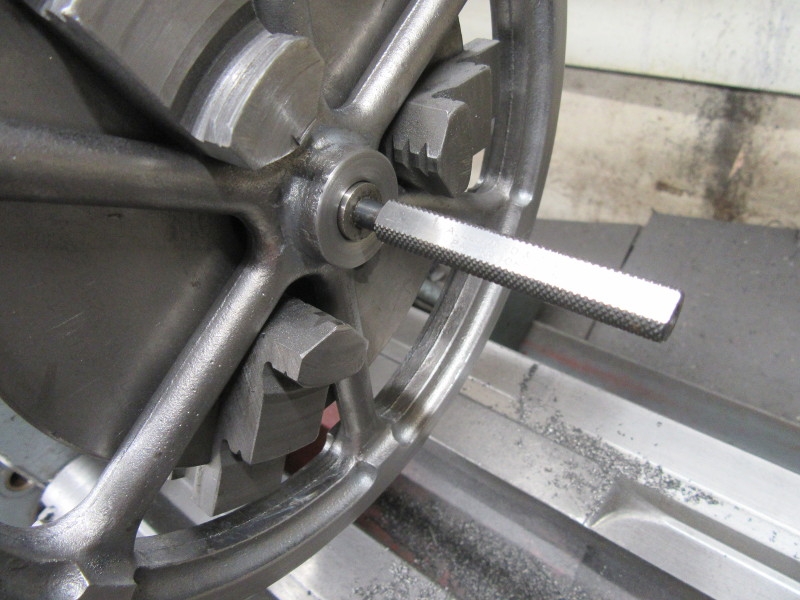
Oh, and just for interest I checked the bore with a 7/16" standard. Perfect!
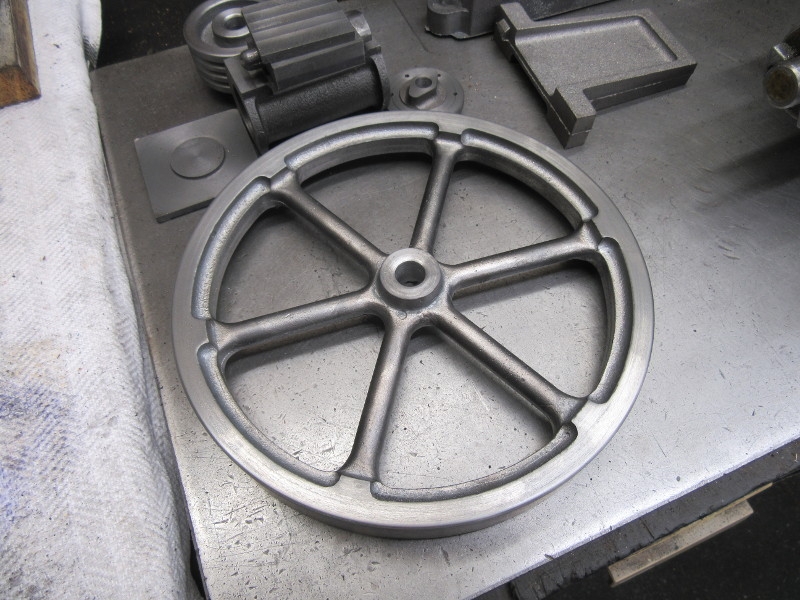
Nice looking flywheel!
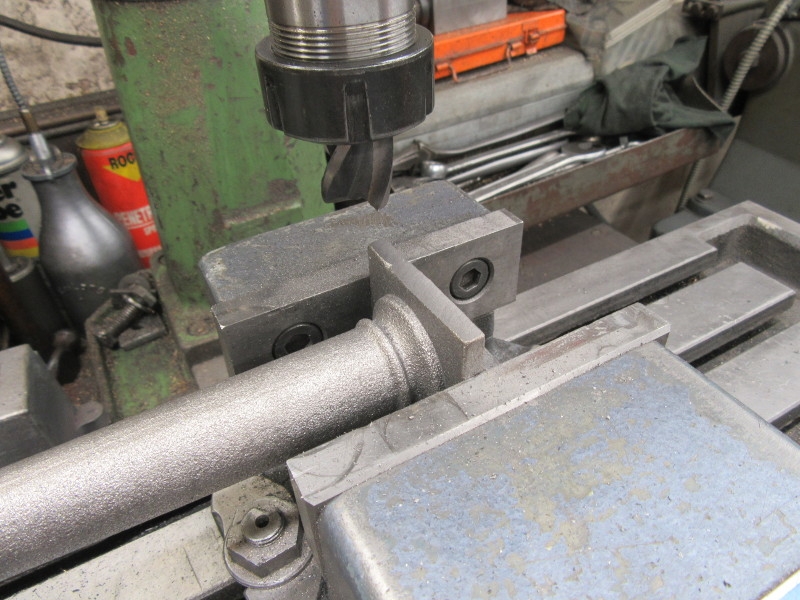
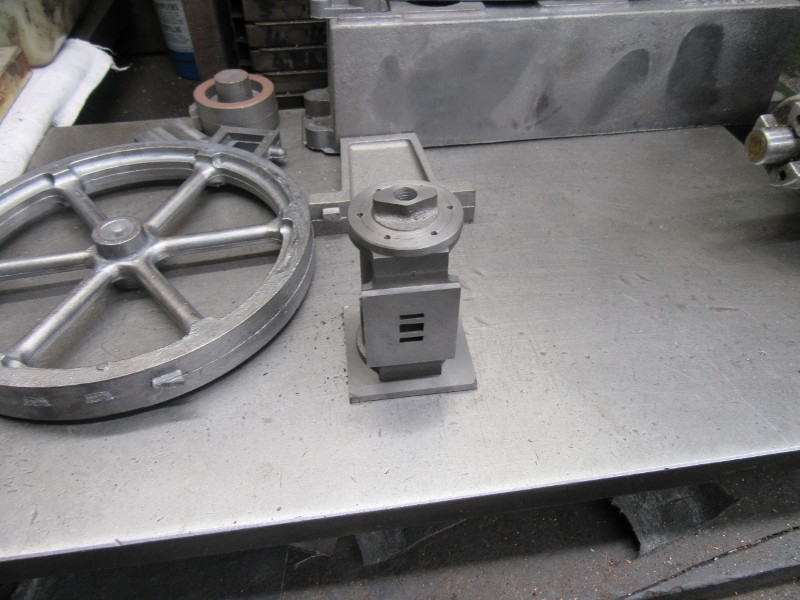
Now I move on to the column, first job was to get the top and bottom to the right size.
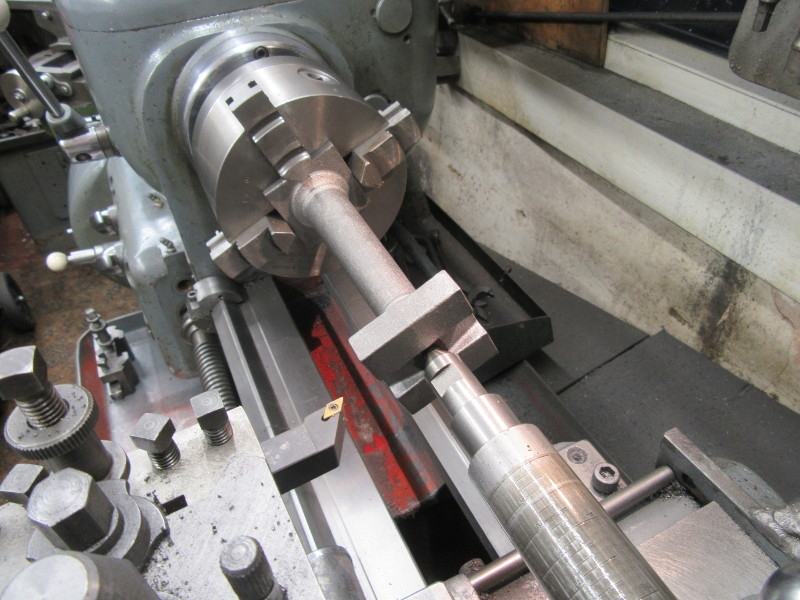
Once I had the tops square I could mark them for centres and drill them by hand. Pop the 4 jaw SC chuck on and I could turn the top and base parallel and the right distance between them.
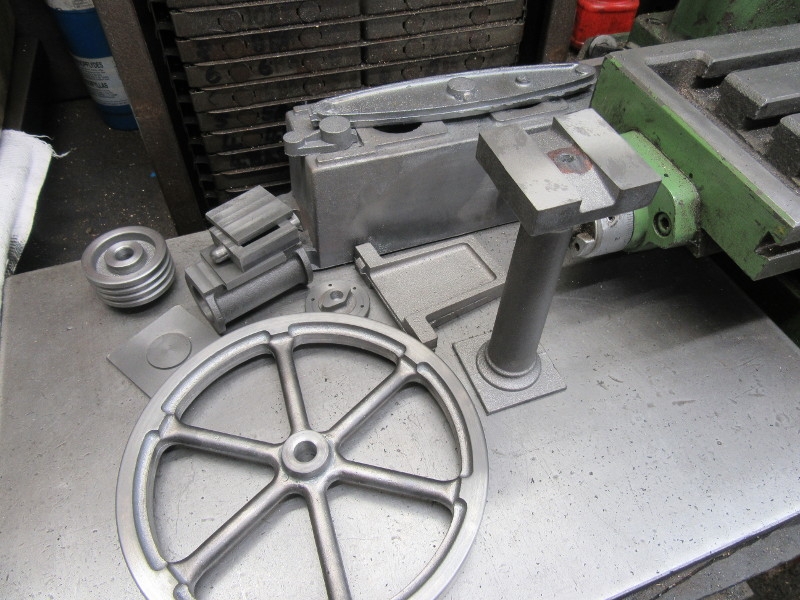
Knocking off time. The number of castings that have had some attention grows.....
Last cut on the flywheel followed by general polishing and finishing the spokes with a file.
Oh, and just for interest I checked the bore with a 7/16" standard. Perfect!
Nice looking flywheel!
Now I move on to the column, first job was to get the top and bottom to the right size.
Once I had the tops square I could mark them for centres and drill them by hand. Pop the 4 jaw SC chuck on and I could turn the top and base parallel and the right distance between them.
Knocking off time. The number of castings that have had some attention grows.....
Stanley Challenger Graham
Stanley's View
scg1936 at talktalk.net
"Beware of certitude" (Jimmy Reid)
The floggings will continue until morale improves!
Stanley's View
scg1936 at talktalk.net
"Beware of certitude" (Jimmy Reid)
The floggings will continue until morale improves!
Re: Shed Matters 3
Most of my time in the workshop has been spent making the drain cock. Whilst the lathe tool was set over 6deg. after machining the valve core I made a taper reamer to match. I used that to cut the taper in the body and got a nice fit. I could have bought a commercial drain cock but this one was included in the drawing so I decided to make it. In the past I have always purchased drain cocks.
You do not have the required permissions to view the files attached to this post.


-
Stanley
- Global Moderator
- Posts: 90301
- Joined: 23 Jan 2012, 12:01
- Location: Barnoldswick. Nearer to Heaven than Gloria.
Re: Shed Matters 3
Indeed Ian and Bob's saved himself £16 for every one he makes. I shall have to read LBSC again on making his own reamers and using them to make cocks and injectors. He makes it sound so easy!
Stanley Challenger Graham
Stanley's View
scg1936 at talktalk.net
"Beware of certitude" (Jimmy Reid)
The floggings will continue until morale improves!
Stanley's View
scg1936 at talktalk.net
"Beware of certitude" (Jimmy Reid)
The floggings will continue until morale improves!
-
Stanley
- Global Moderator
- Posts: 90301
- Joined: 23 Jan 2012, 12:01
- Location: Barnoldswick. Nearer to Heaven than Gloria.
Re: Shed Matters 3
Straight into the castings and I started by cleaning the beam up.
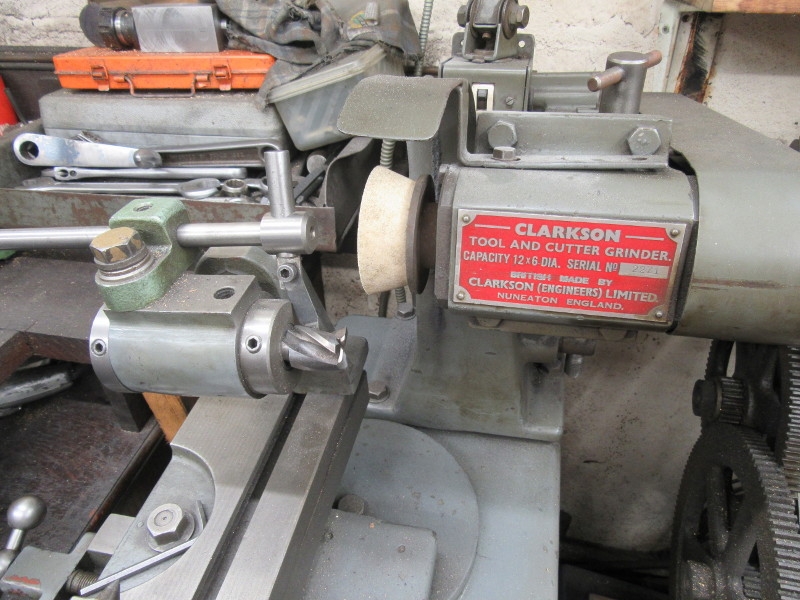
Then I got diverted! (I like diversions...) I have been meaning to address this for a while, I didn't have a quick change block with a left hand tool in it. I tripped over the tool this morning and fitted it. Here I am checking centre height by facing a piece of scrap. Then I tested my HSS cutter for centre as well. Once I had that out of my system....
I cleaned up the outrigger casting.
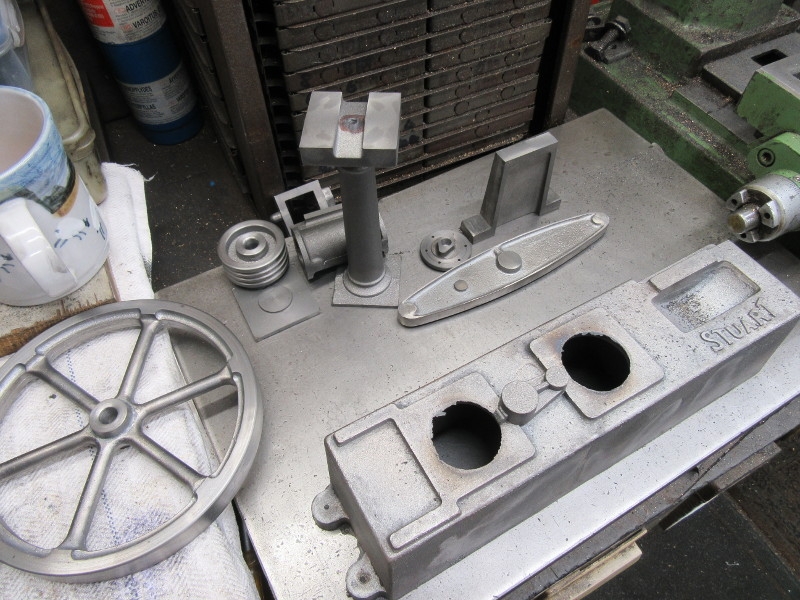
Knocking off time. I have two castings left to attend to, the biggest and the smallest. The base and the crank. I shall address these tomorrow.
Stanley Challenger Graham
Stanley's View
scg1936 at talktalk.net
"Beware of certitude" (Jimmy Reid)
The floggings will continue until morale improves!
Stanley's View
scg1936 at talktalk.net
"Beware of certitude" (Jimmy Reid)
The floggings will continue until morale improves!
-
Stanley
- Global Moderator
- Posts: 90301
- Joined: 23 Jan 2012, 12:01
- Location: Barnoldswick. Nearer to Heaven than Gloria.
Re: Shed Matters 3
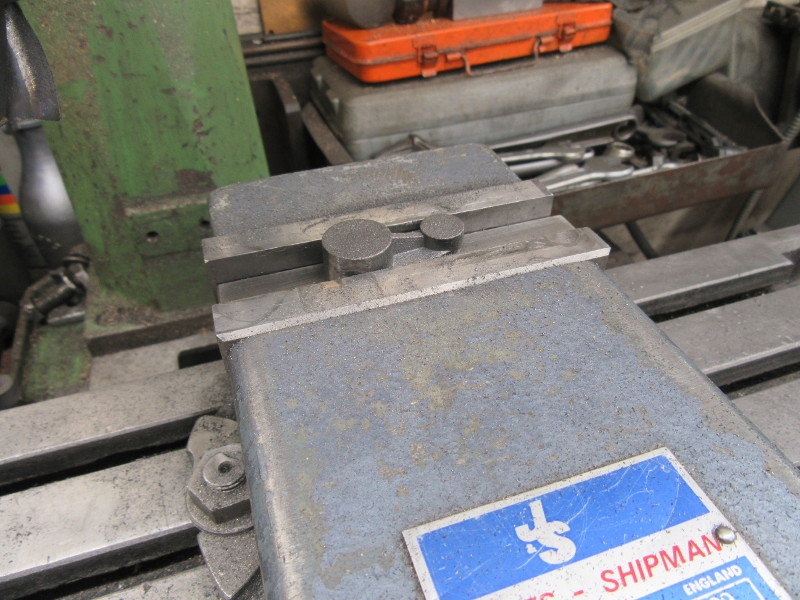
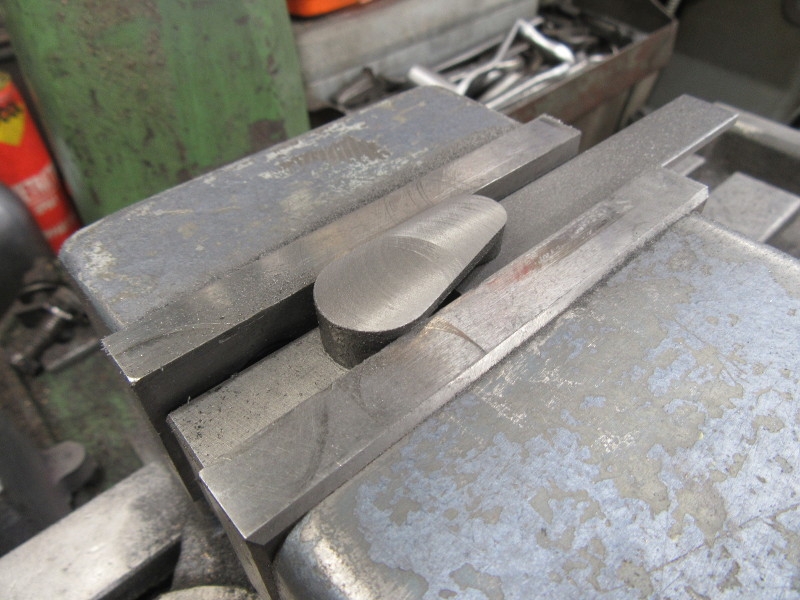
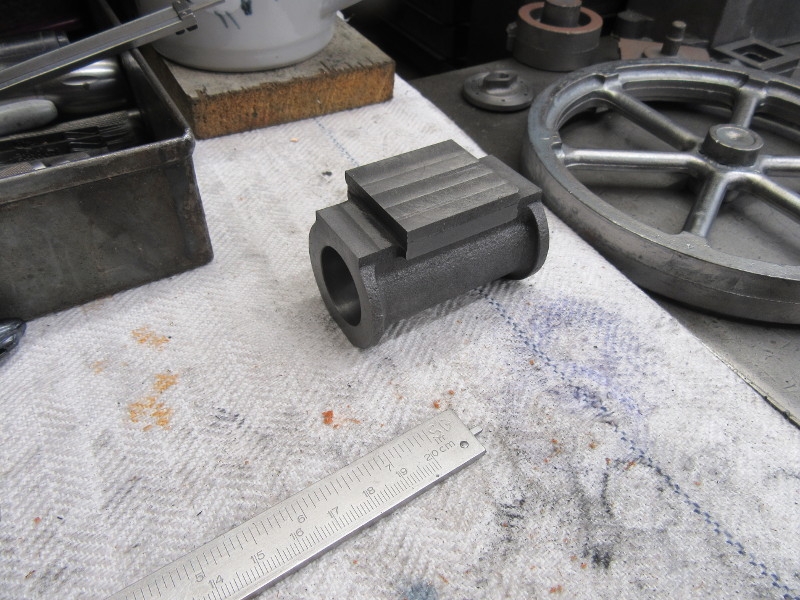
Only an hour in the shed as I had to do my weekly shop at the Co-op so all I aimed for was getting a clean crank casting. After a rough grind I got it in the mill and adjusted it to the correct size,
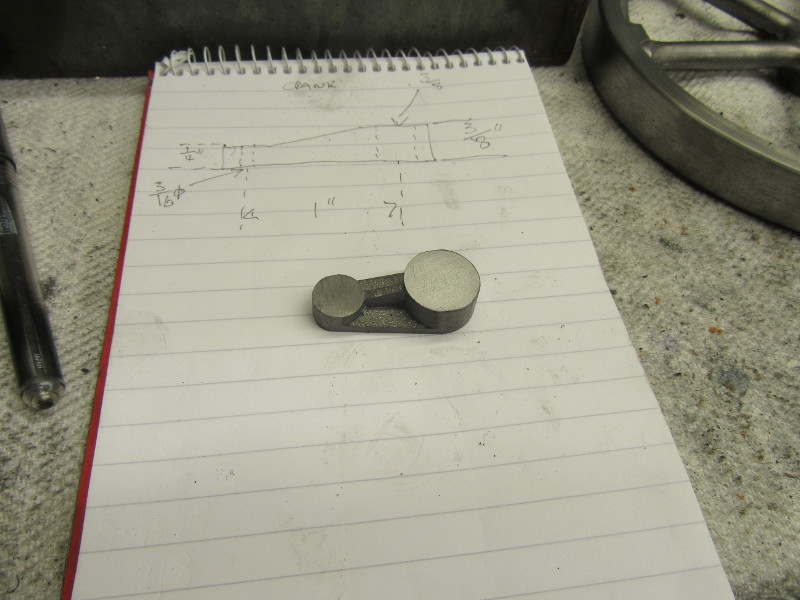
Once I had it dimensionally accurate I did some polishing and prettifying and here's where we finished. I am ready to mark and bore it for the shaft and the crank pin. Don't worry Ken, I'll remember not to grab it too hard!
Stanley Challenger Graham
Stanley's View
scg1936 at talktalk.net
"Beware of certitude" (Jimmy Reid)
The floggings will continue until morale improves!
Stanley's View
scg1936 at talktalk.net
"Beware of certitude" (Jimmy Reid)
The floggings will continue until morale improves!

Re: Shed Matters 3
Never said you were ham fisted Twice.
Bob's post on making his own reamers for the drain valves reminded me that I have given old taps and dies a bit more mileage by using a Dremel tool with a fine grinder to get the cutting edge back.
Bob's post on making his own reamers for the drain valves reminded me that I have given old taps and dies a bit more mileage by using a Dremel tool with a fine grinder to get the cutting edge back.
-
Stanley
- Global Moderator
- Posts: 90301
- Joined: 23 Jan 2012, 12:01
- Location: Barnoldswick. Nearer to Heaven than Gloria.
Re: Shed Matters 3
Ken, two engines ago you quite rightly pointed out my mistake in gripping the crank while boring it. That's certainly allowed and you were quite right. I mention it each time I make an engine to let you know how highly I regard anything you have to say.
Yes you can rescue taps in an emergency but the smaller they are the more difficult it is and when you get down to 7BA you need all the help you can get!
Yes you can rescue taps in an emergency but the smaller they are the more difficult it is and when you get down to 7BA you need all the help you can get!
Stanley Challenger Graham
Stanley's View
scg1936 at talktalk.net
"Beware of certitude" (Jimmy Reid)
The floggings will continue until morale improves!
Stanley's View
scg1936 at talktalk.net
"Beware of certitude" (Jimmy Reid)
The floggings will continue until morale improves!
Re: Shed Matters 3
I find the exchange of tips very helpful, thanks everyone. I too only spent a short time in the workshop today Making swarf as I reduced the turbine rotor casting to size. Cleaning up the aluminium swarf after I wondered if aluminium swarf could be a fire hazard. Of course fresh cut aluminium gets coated in a fine layer of oxide very quickly but finely divided flammable metal looks prone to problems to me.