Shed Matters 3
Re: Shed Matters 3
Do you lock the rod into the tapped hole in the piston, Stanley? Perhaps it is just screwed up tight. I have known a few model locomotives have a piston come loose. It will then hit the end cover of course.
-
Stanley

- Global Moderator

- Posts: 90300
- Joined: 23 Jan 2012, 12:01
- Location: Barnoldswick. Nearer to Heaven than Gloria.
Re: Shed Matters 3
I used to put a taper on the rod in the piston Bob but then realised that a good tight thread and locking the nut down with a socket was invariably fine. If it wasn't you soon realised and simply whipped off the cover and re-tightened the nut perhaps with a couple of pop marks into the thread on the end. If only compressed air running, Loctite is fine but not on steam! Different kettle of fish on full size engines of course. All sorts of cunning ploys used!
Stanley Challenger Graham
Stanley's View
scg1936 at talktalk.net
"Beware of certitude" (Jimmy Reid)
The floggings will continue until morale improves!
Stanley's View
scg1936 at talktalk.net
"Beware of certitude" (Jimmy Reid)
The floggings will continue until morale improves!
-
Stanley
- Global Moderator
- Posts: 90300
- Joined: 23 Jan 2012, 12:01
- Location: Barnoldswick. Nearer to Heaven than Gloria.
Re: Shed Matters 3
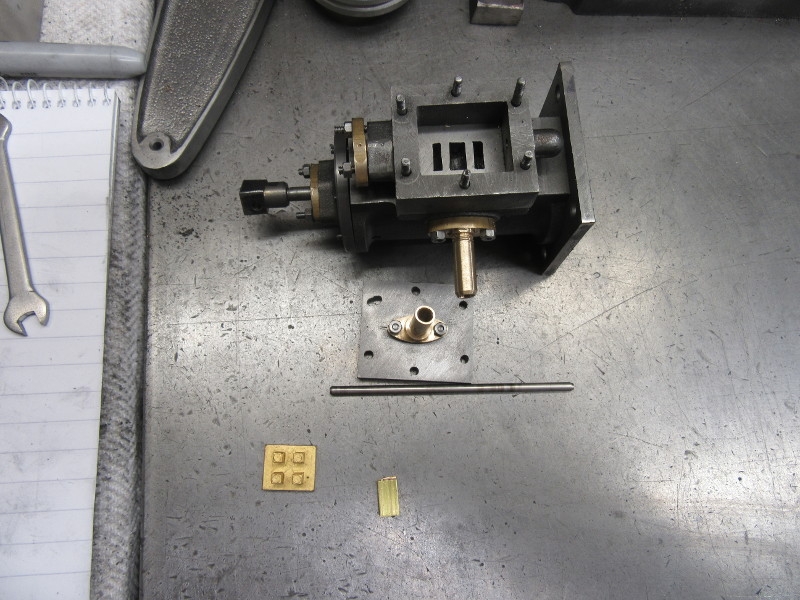
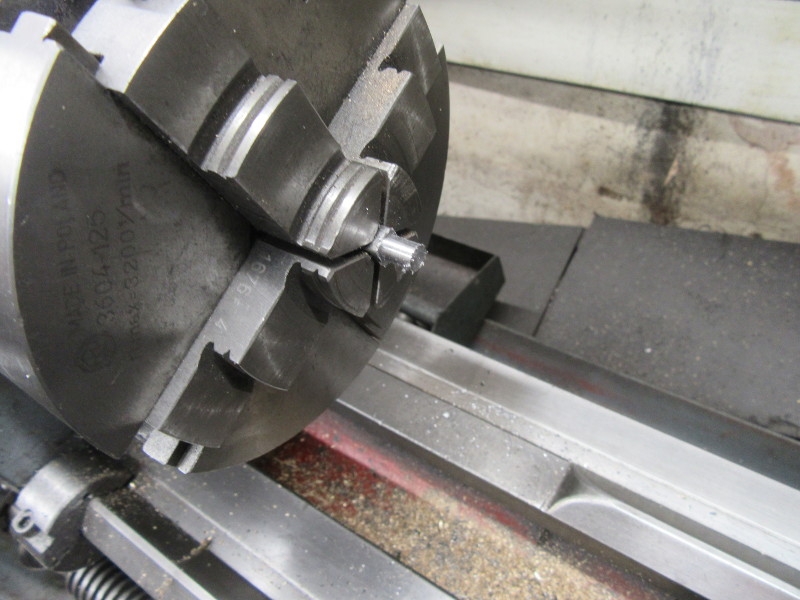
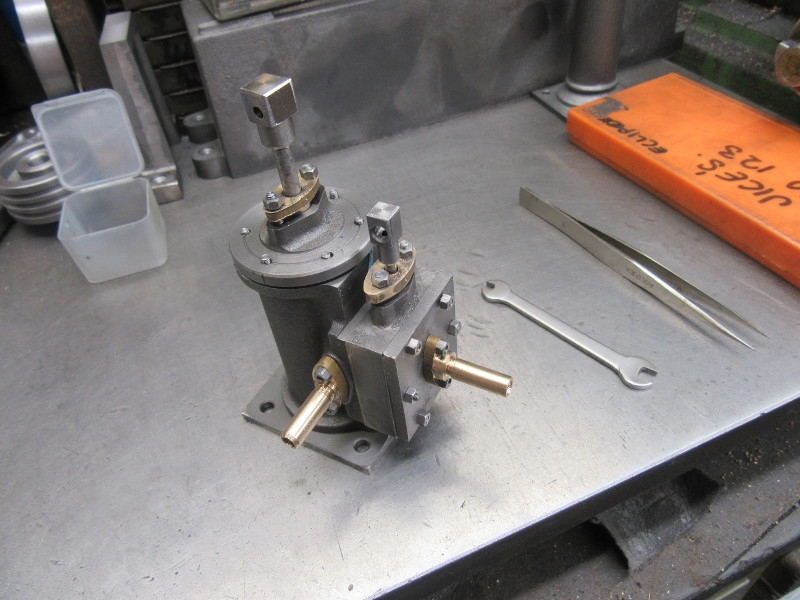
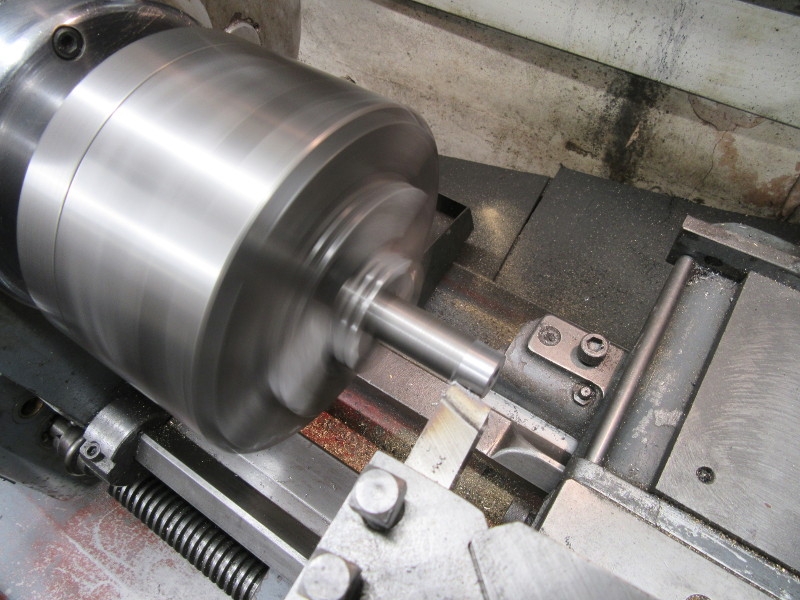
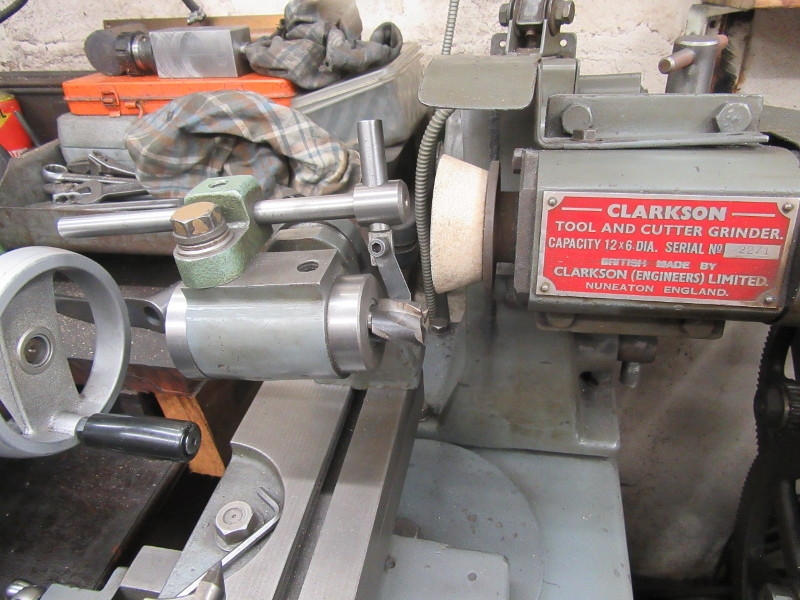
First job was a quick check on the diameter of the piston, it's fine.

I need a 1/2" diameter recess in the piston and thought it was about time I sharpened this slot drill. Definitely not time wasted.
I cut the recess then used the parting tool to cut the recess for the piston ring/sealer.
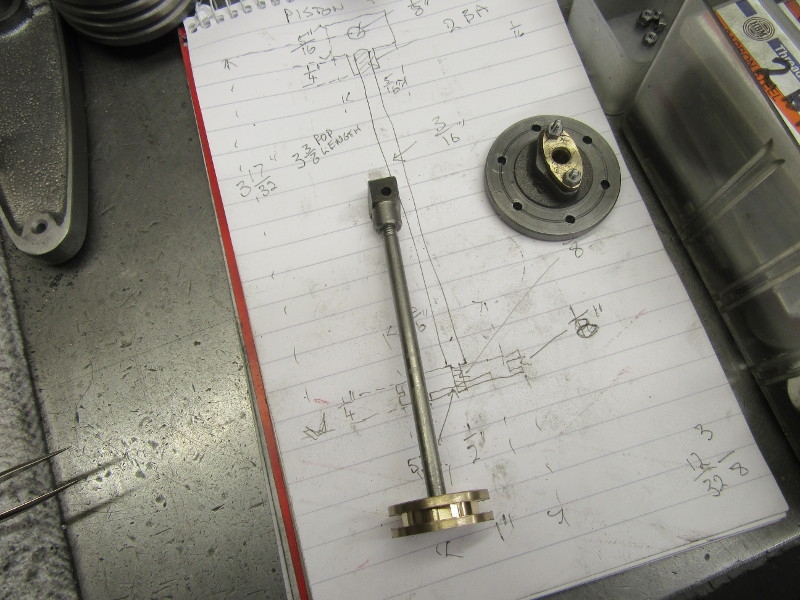
Everything fine, once I had the rod finished I made the crosshead.
Perfect until I did a check and measured the assembly. I had made the rod 1/4" too short. Bugger! I'm getting old. I shall make another rod the right length tomorrow.....
Stanley Challenger Graham
Stanley's View
scg1936 at talktalk.net
"Beware of certitude" (Jimmy Reid)
The floggings will continue until morale improves!
Stanley's View
scg1936 at talktalk.net
"Beware of certitude" (Jimmy Reid)
The floggings will continue until morale improves!

Re: Shed Matters 3
Who the hell uses measurements like 3 &17/32 . These went out with the ark. But now we are leaving the EU they may be making a comeback. 
-
Stanley
- Global Moderator
- Posts: 90300
- Joined: 23 Jan 2012, 12:01
- Location: Barnoldswick. Nearer to Heaven than Gloria.
Re: Shed Matters 3
Not with me they didn't Ken. That is an absolutely accurate measurement. Try expressing it as a decimal value and you'll find it ceases to be accurate but only an approximation. I love Vulgar Fractions!
Stanley Challenger Graham
Stanley's View
scg1936 at talktalk.net
"Beware of certitude" (Jimmy Reid)
The floggings will continue until morale improves!
Stanley's View
scg1936 at talktalk.net
"Beware of certitude" (Jimmy Reid)
The floggings will continue until morale improves!
-
Stanley
- Global Moderator
- Posts: 90300
- Joined: 23 Jan 2012, 12:01
- Location: Barnoldswick. Nearer to Heaven than Gloria.
Re: Shed Matters 3

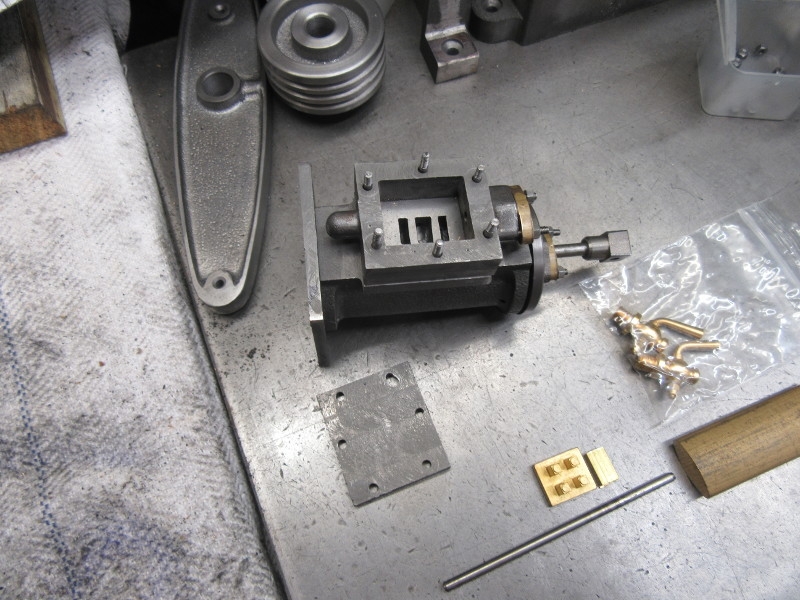
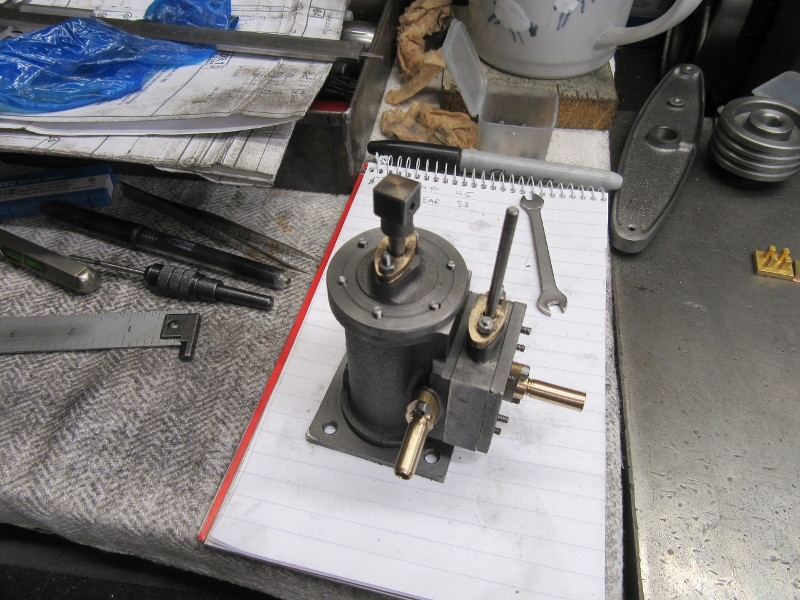
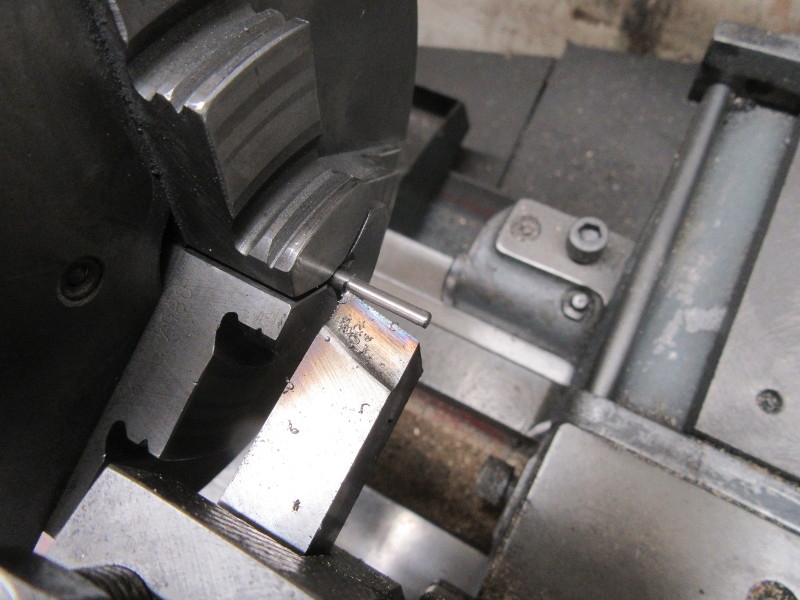
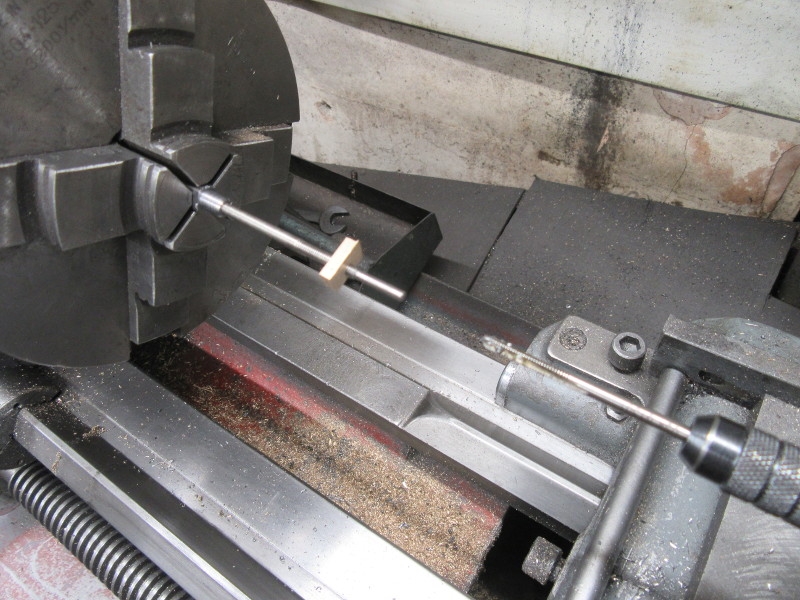
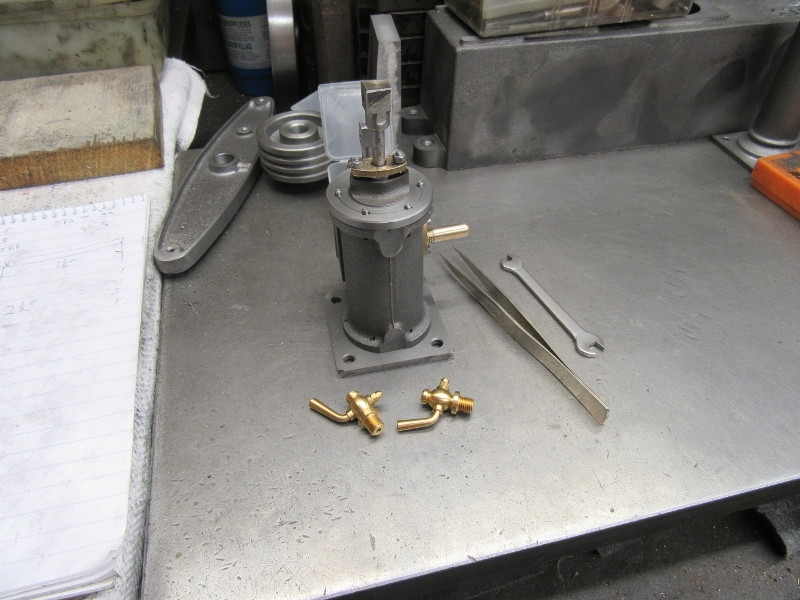
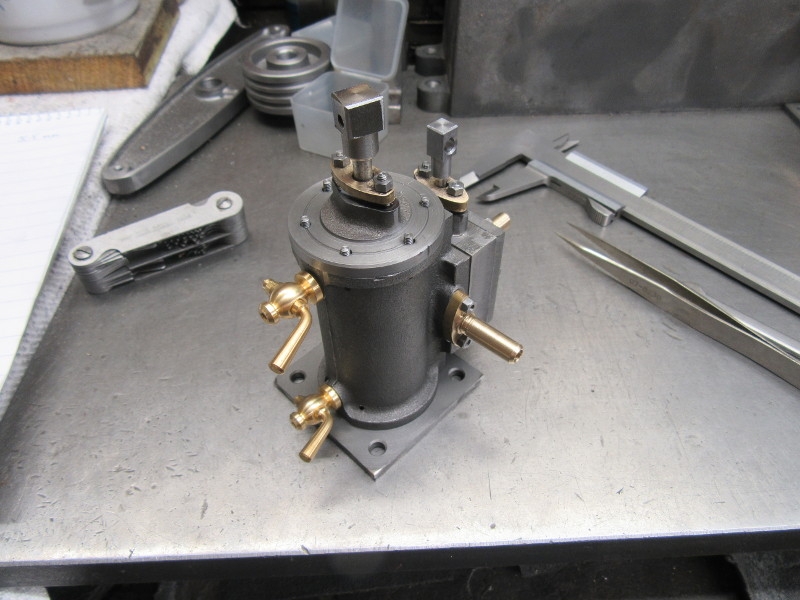
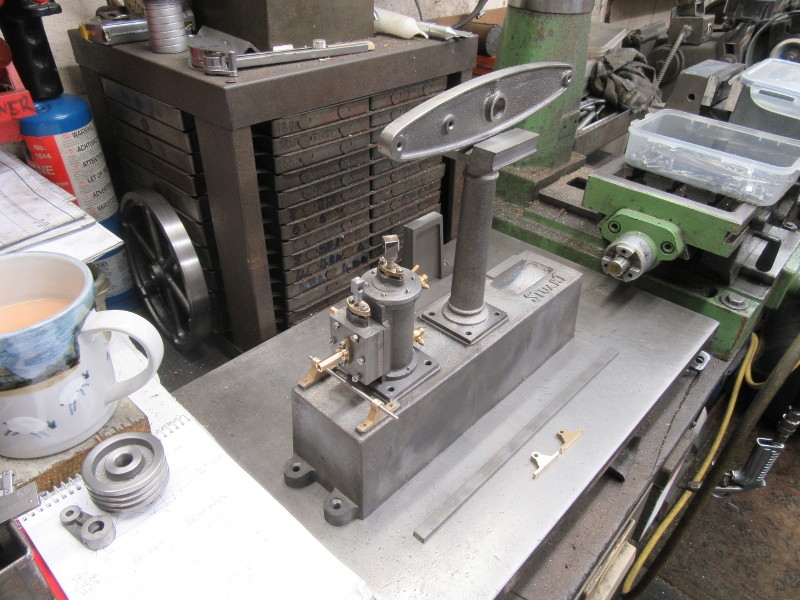
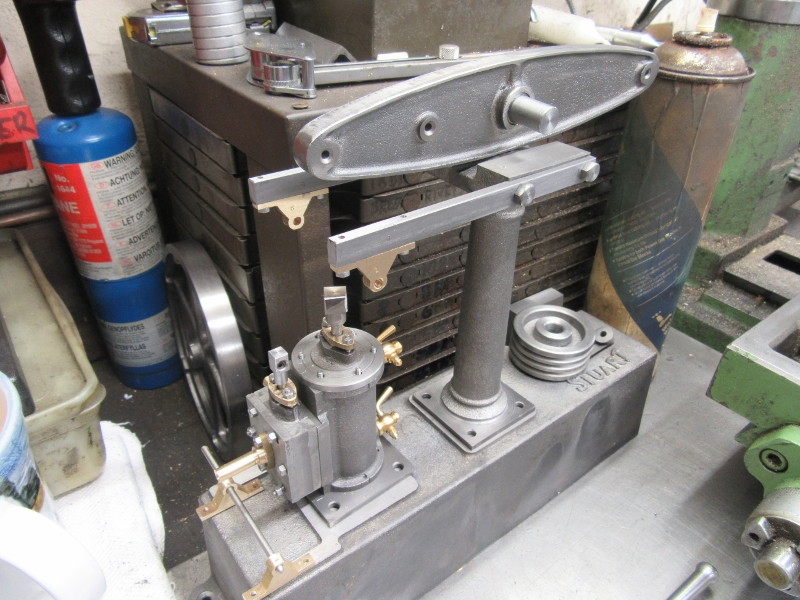
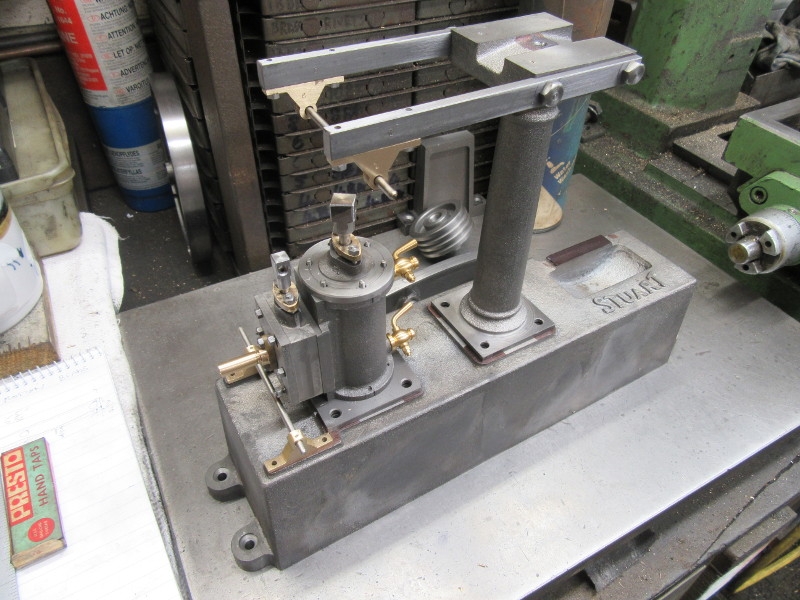
Just one pic this morning. It says it all. We have a piston rod that is the right length, ready for fitting with a ring and final fitting. We now have to fit the valve to the rod and give it its own crosshead. Then we have the pads that the steam and exhaust pipes mount on, they have to be made and fitted. Finally we have to drill and tap and fit the drain cocks. That means I am then ready for final build and the cylinder assembly will be ready for painting with the rest of the castings.
No rush, quietly away and one thing at a time! (A bit more accurate than that bloody piston rod!)
Stanley Challenger Graham
Stanley's View
scg1936 at talktalk.net
"Beware of certitude" (Jimmy Reid)
The floggings will continue until morale improves!
Stanley's View
scg1936 at talktalk.net
"Beware of certitude" (Jimmy Reid)
The floggings will continue until morale improves!
-
Stanley
- Global Moderator
- Posts: 90300
- Joined: 23 Jan 2012, 12:01
- Location: Barnoldswick. Nearer to Heaven than Gloria.
Re: Shed Matters 3
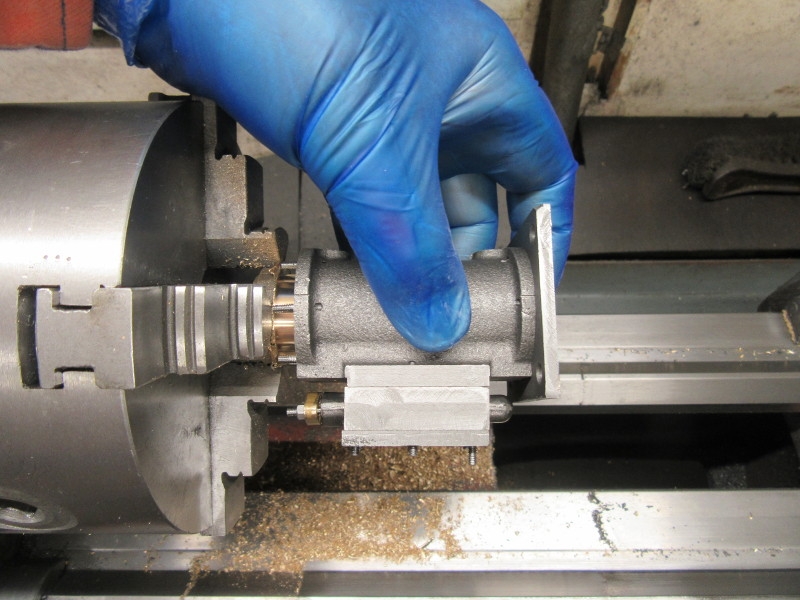
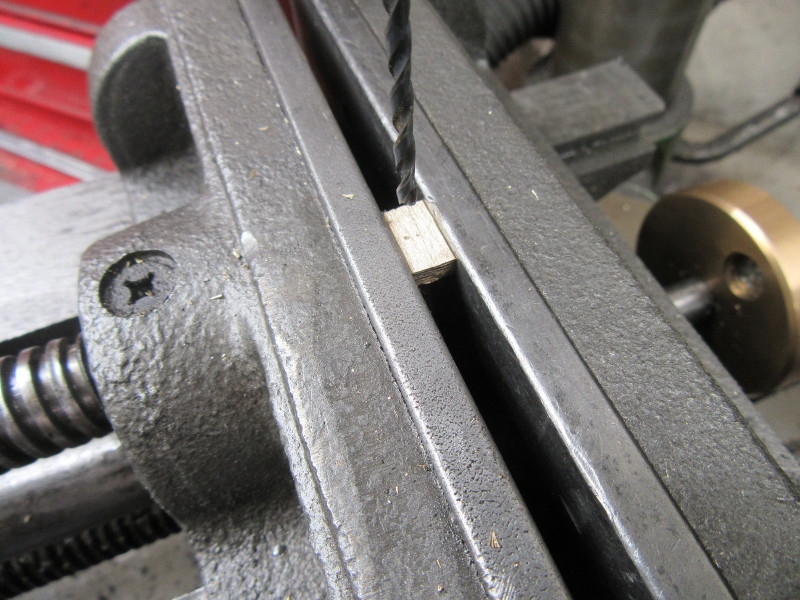
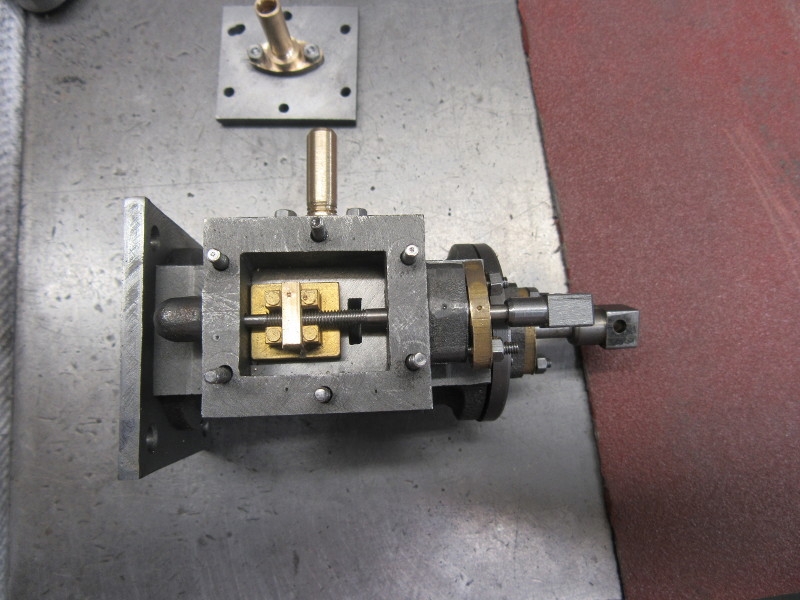
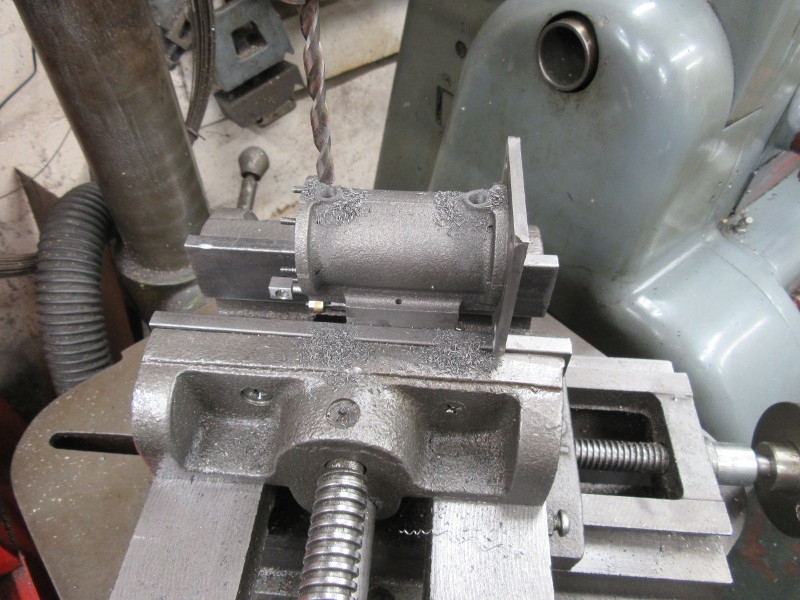
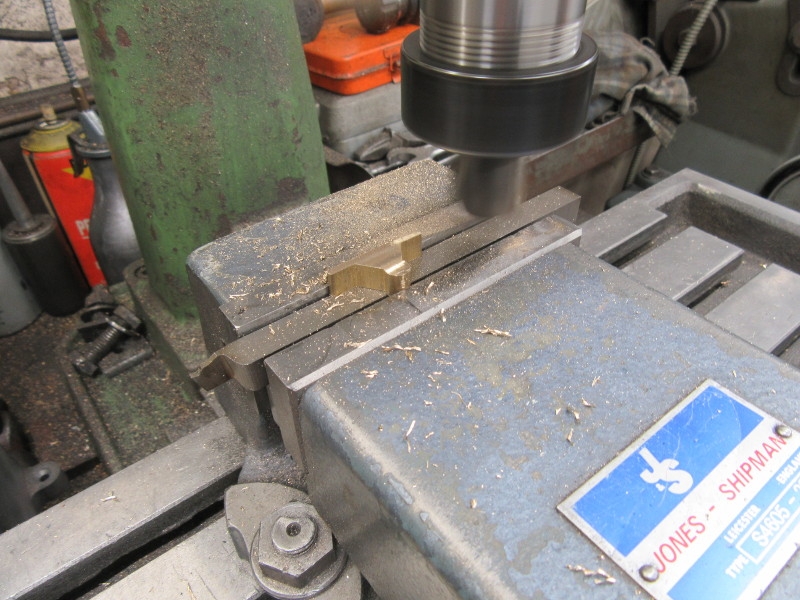
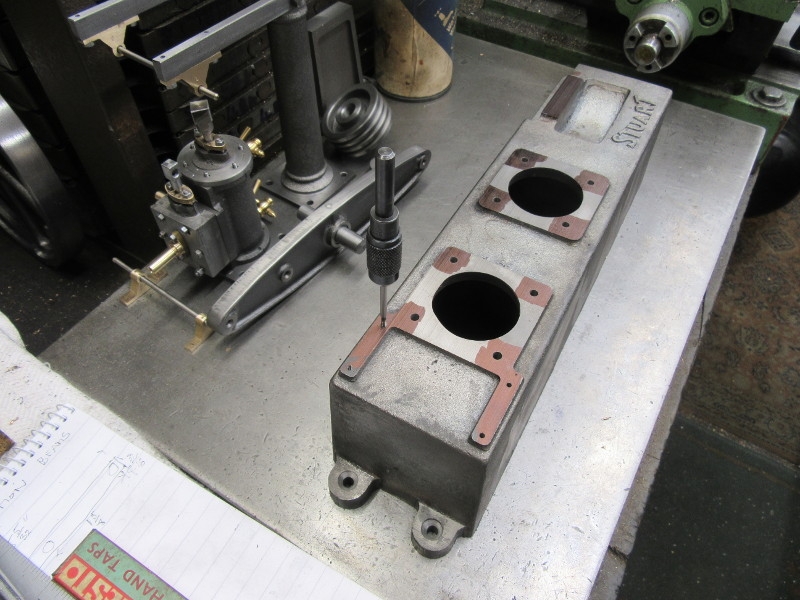
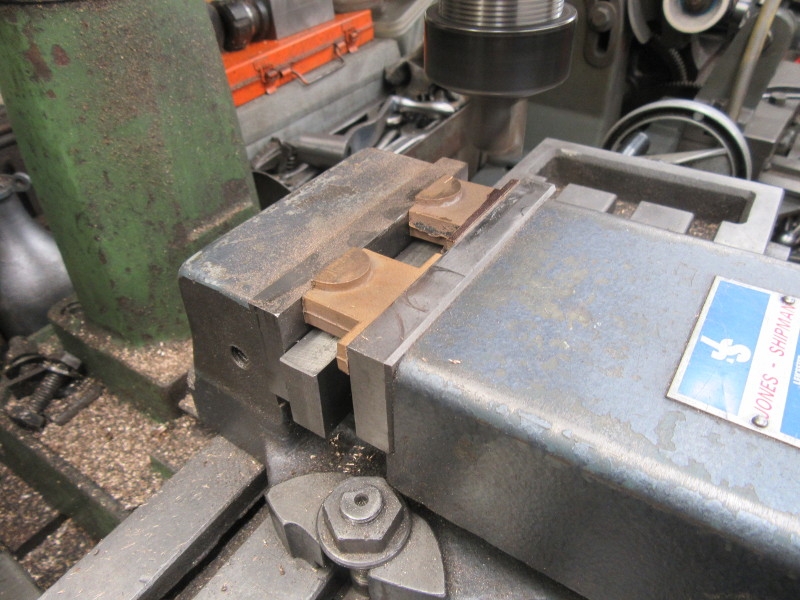
I took the lid off the steam chest and then immediately decided that I wanted to attend to the exhaust and steam connections first. Small bronze bits means the 1927 lathe in the front room and a lot of fiddling.

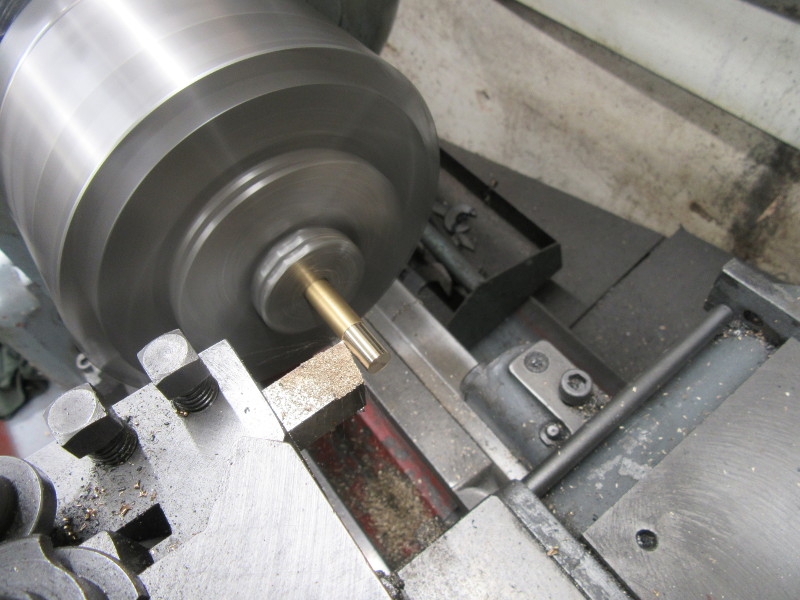

Just a selection of operations. To tell you the truth I was too busy doing small things carefully to bother much about pics.
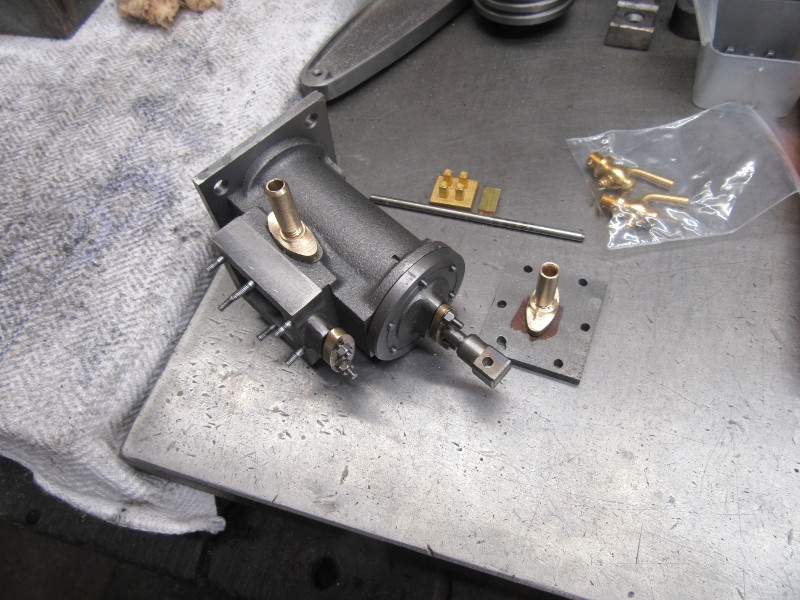
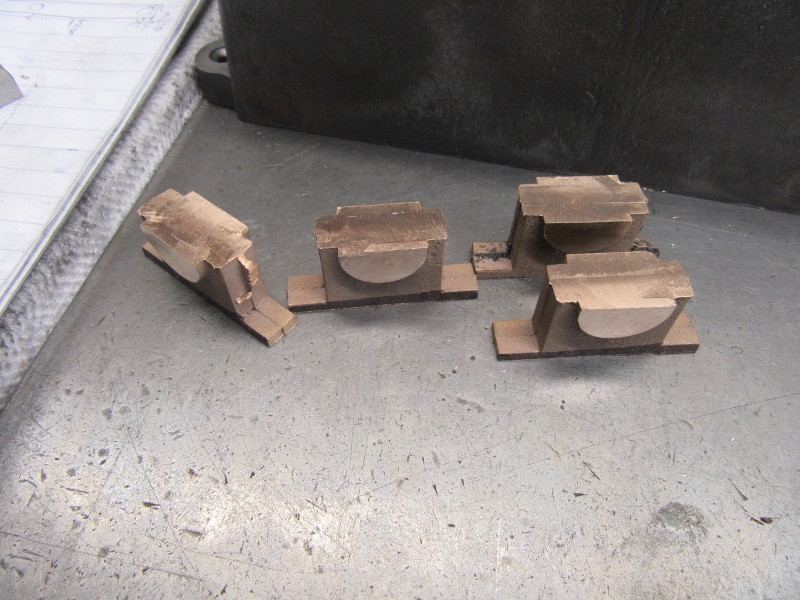
Here's where I ended up and suddenly it makes more sense. Here are the two connections on their pads ready to mount on the cylinder, they need drilling for the connections and drilling and tapping for the 7BA studs that will fasten them down. Plenty to do tomorrow....
Stanley Challenger Graham
Stanley's View
scg1936 at talktalk.net
"Beware of certitude" (Jimmy Reid)
The floggings will continue until morale improves!
Stanley's View
scg1936 at talktalk.net
"Beware of certitude" (Jimmy Reid)
The floggings will continue until morale improves!
-
Stanley
- Global Moderator
- Posts: 90300
- Joined: 23 Jan 2012, 12:01
- Location: Barnoldswick. Nearer to Heaven than Gloria.
Re: Shed Matters 3
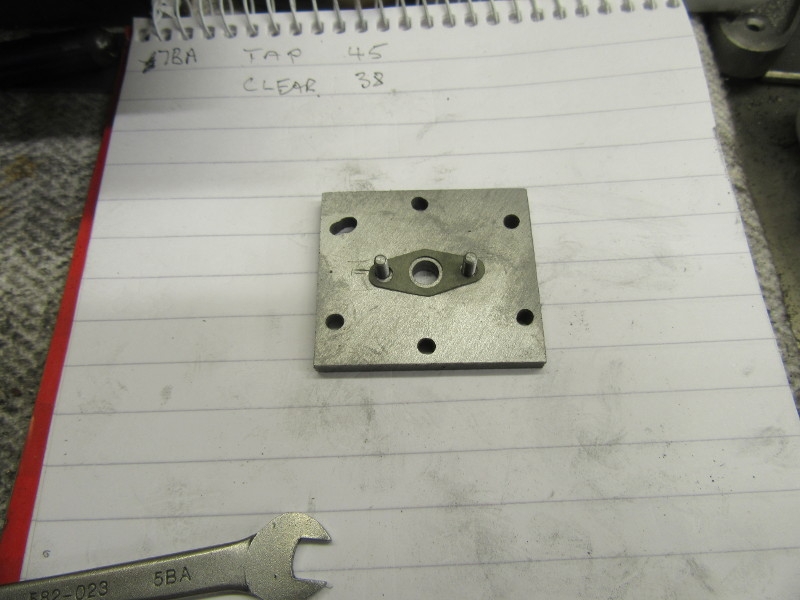
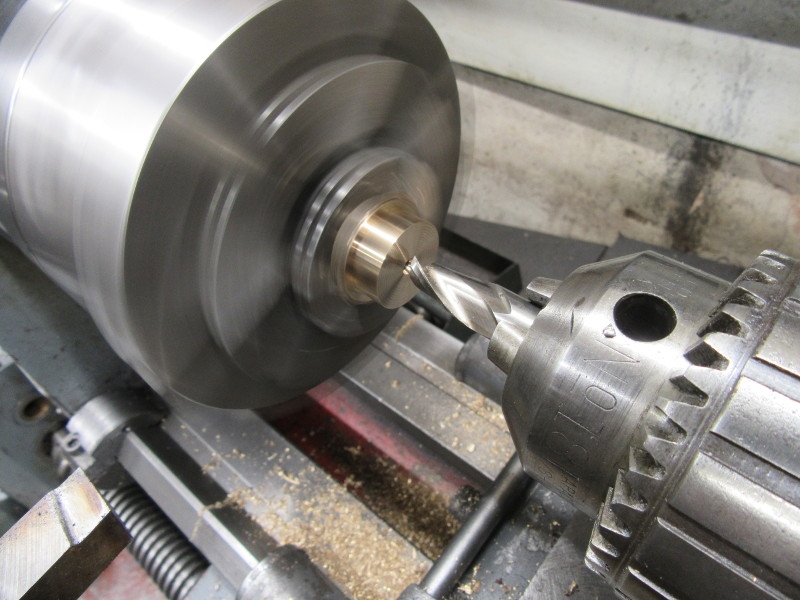
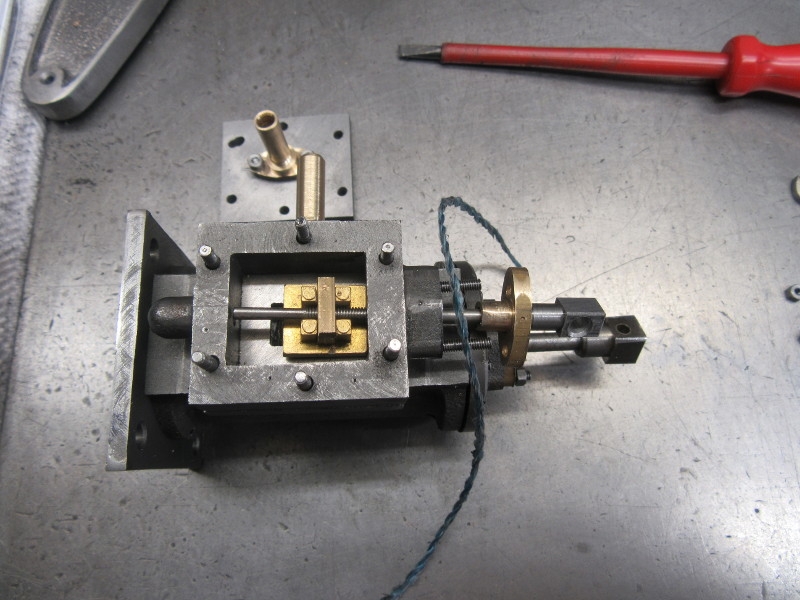
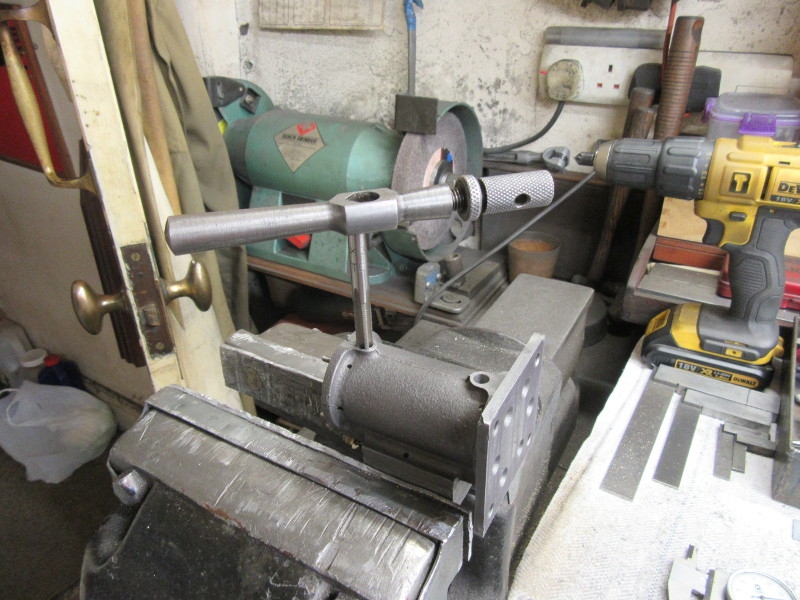
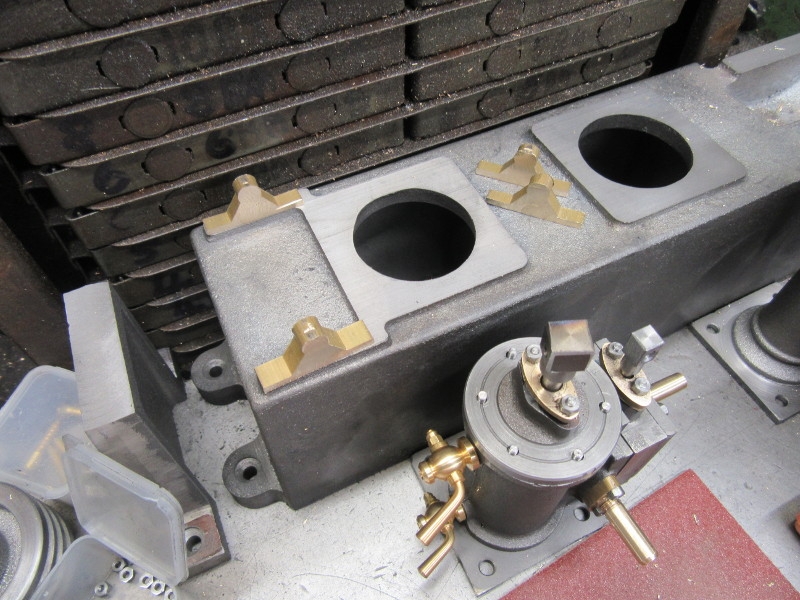
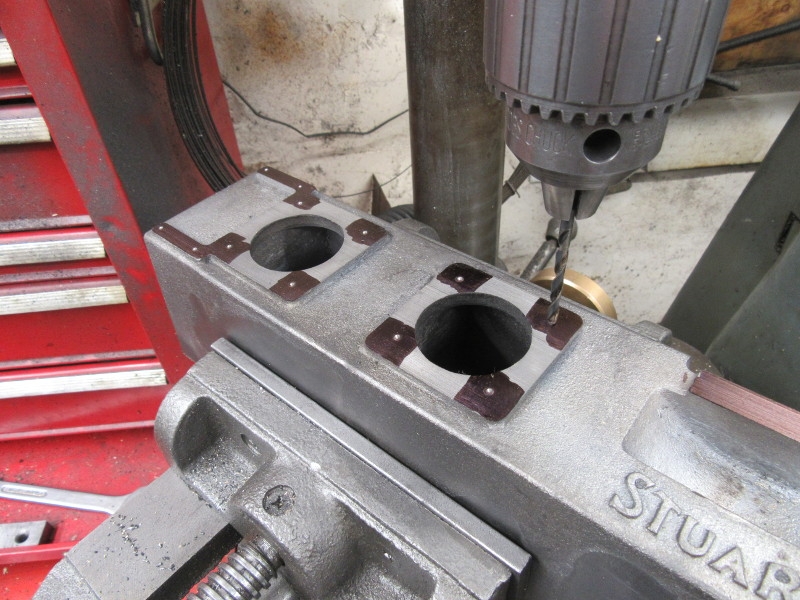
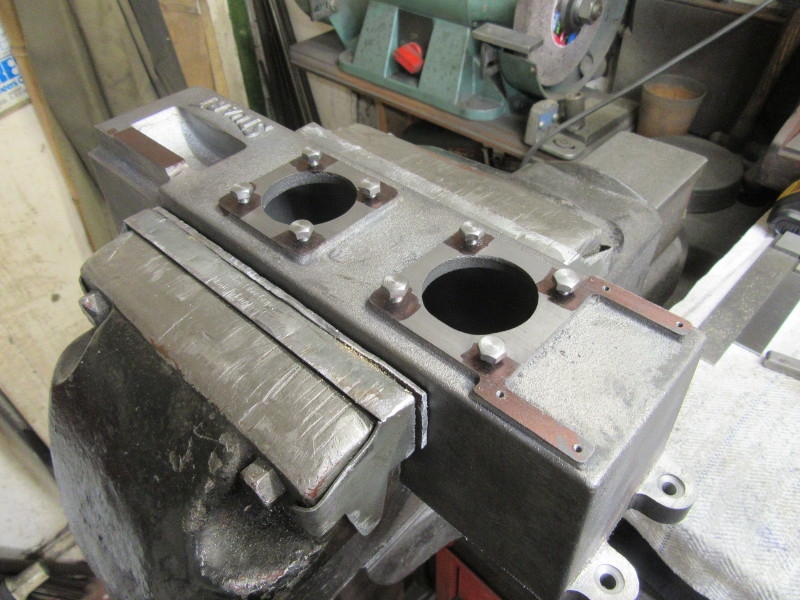
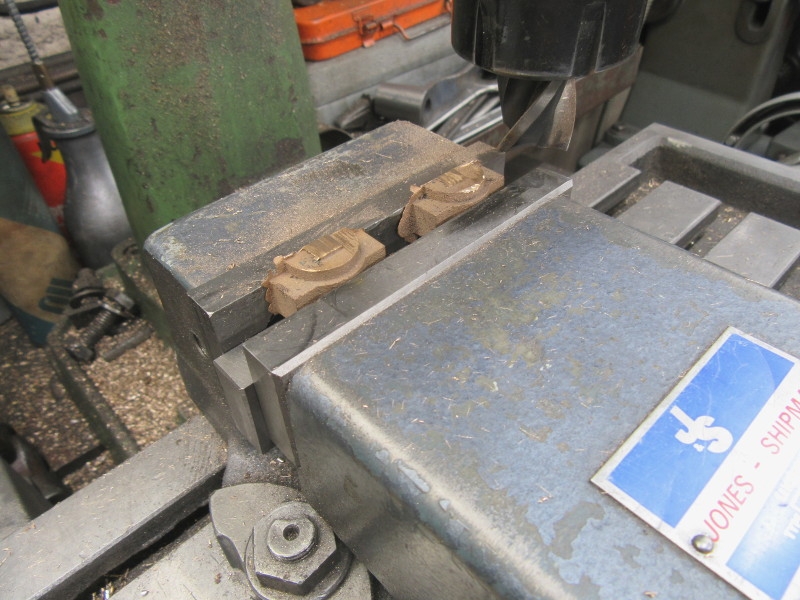
Again, no need for a lot of pics. We are going steadily away at the fitting of the cylinder assembly and this morning it's the attachment of the steam and exhaust connections. I used the packings as the template and didn't pop mark, I just made a permanent marker dot and drilled to that. It seemed to work. Here I have the studs fitted to the steam chest lid.
Next was the studs for the exhaust connection, here I am drilling and tapping under the drill. Then I had to drill the clearance holes in the flanges but forgot to do a pic of that. Suffice it to say it was done very carefully as there was nothing to get a firm hold of!
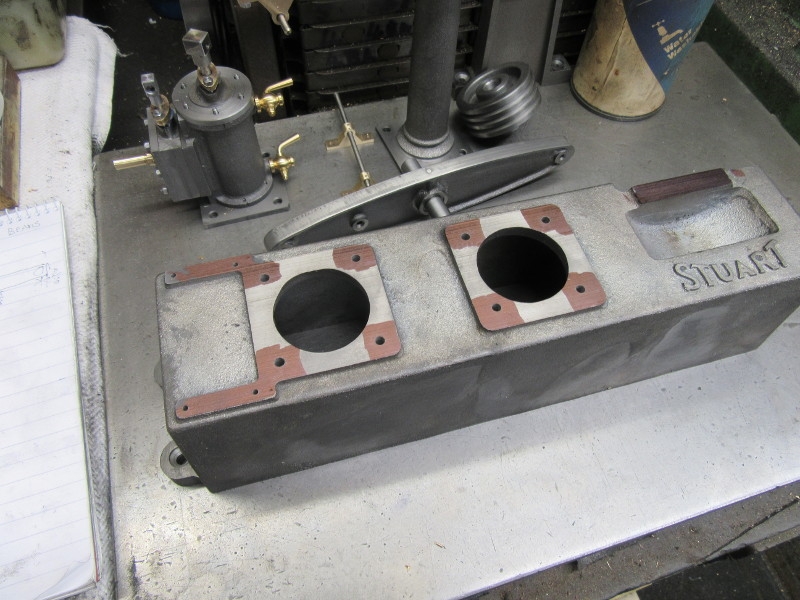
Closing time, we have both connections ready for permanent fastening when all the other matters are dealt with. Only two small parts but an hour and a half of honest endeavour with no rushing!
Stanley Challenger Graham
Stanley's View
scg1936 at talktalk.net
"Beware of certitude" (Jimmy Reid)
The floggings will continue until morale improves!
Stanley's View
scg1936 at talktalk.net
"Beware of certitude" (Jimmy Reid)
The floggings will continue until morale improves!
-
Stanley
- Global Moderator
- Posts: 90300
- Joined: 23 Jan 2012, 12:01
- Location: Barnoldswick. Nearer to Heaven than Gloria.
Re: Shed Matters 3
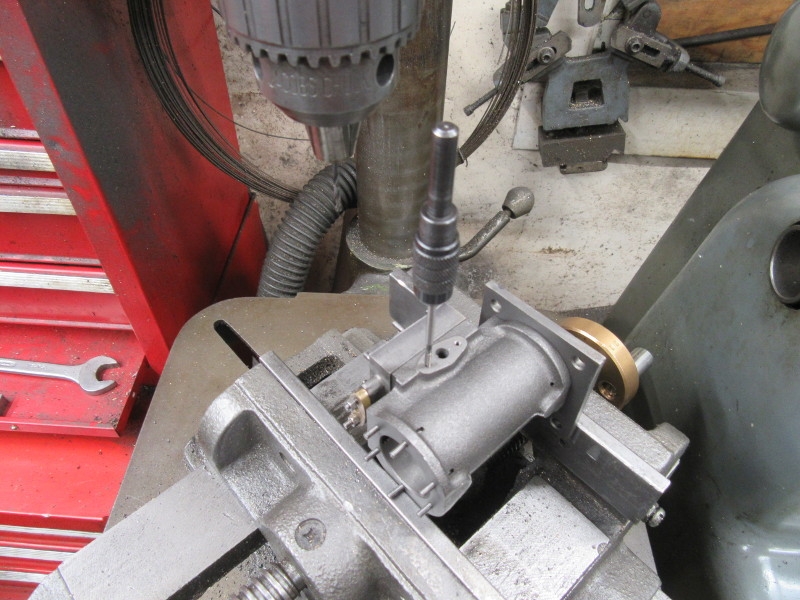
We'll have a look at the valve this morning. More fiddly work so quietly and carefully away.

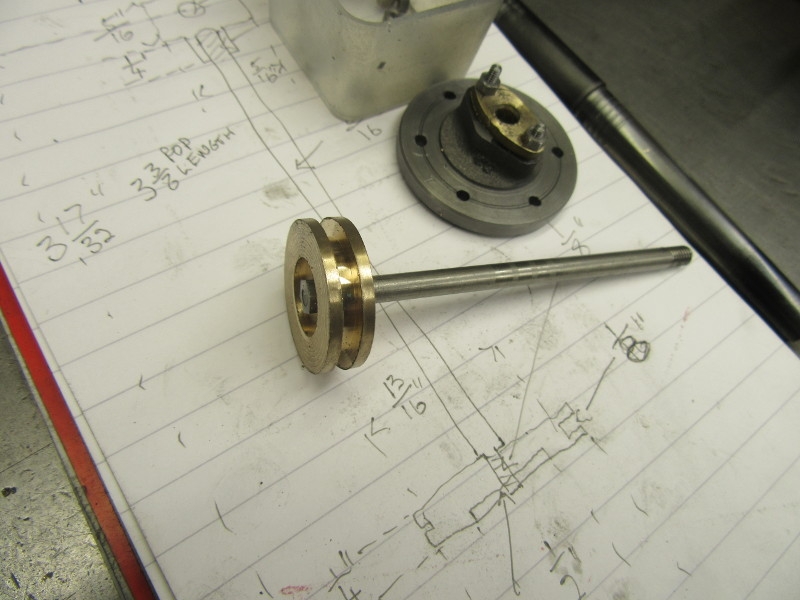
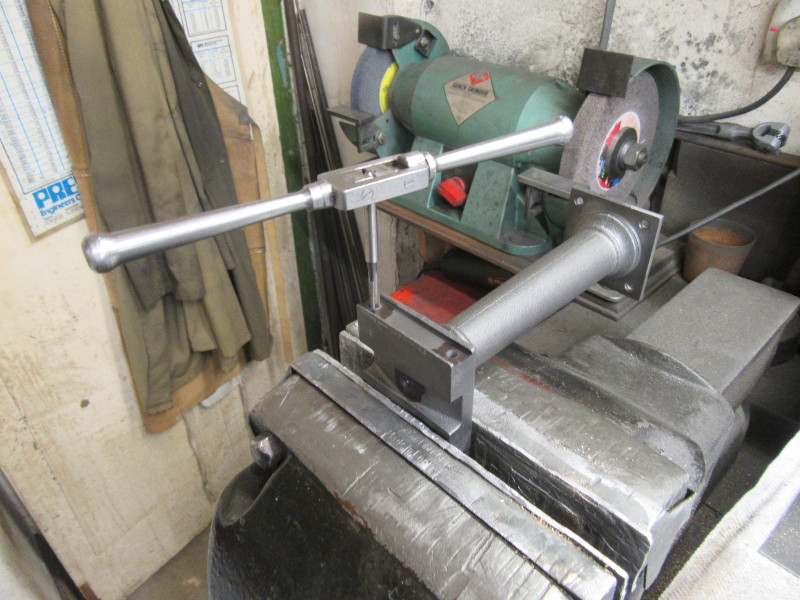
I think those pics are self explanatory. There are operations not shown of course, getting the valve and driver bar ready and to size. I had a new 5BA HSS tap which I bought a while ago and that made things easier and allowed me to make a really good tapped hole in the driver bar because I could use the smallest tapping drill possible.
Knocking off time. Good progress, we need a crosshead now and then the valve is ready for fitting. Slow I know but good work.
One thing I learned this morning. I opened a box of disposable gloves I got quite a long time ago. They are latex and what I found this morning is that they are no good for the shed because they are too grippy and won't stand oil, they just dissolve as you work! I didn't intend to buy latex they were all that was available and I didn't know enough to realise they were the wrong ones. So I shall open a box of the vinyl gloves I got this week. These are going to be for normal domestic and anti Covid purposes. You live and learn!
Stanley Challenger Graham
Stanley's View
scg1936 at talktalk.net
"Beware of certitude" (Jimmy Reid)
The floggings will continue until morale improves!
Stanley's View
scg1936 at talktalk.net
"Beware of certitude" (Jimmy Reid)
The floggings will continue until morale improves!
-
Stanley
- Global Moderator
- Posts: 90300
- Joined: 23 Jan 2012, 12:01
- Location: Barnoldswick. Nearer to Heaven than Gloria.
Re: Shed Matters 3
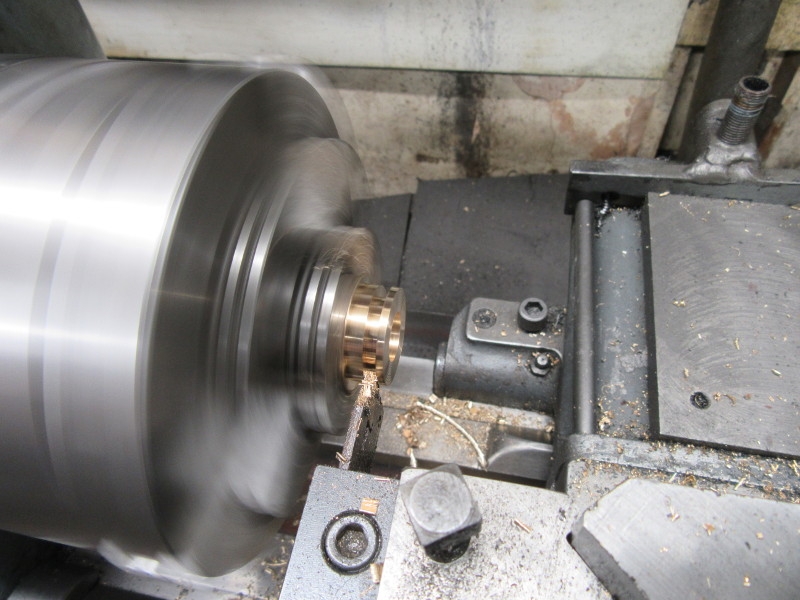
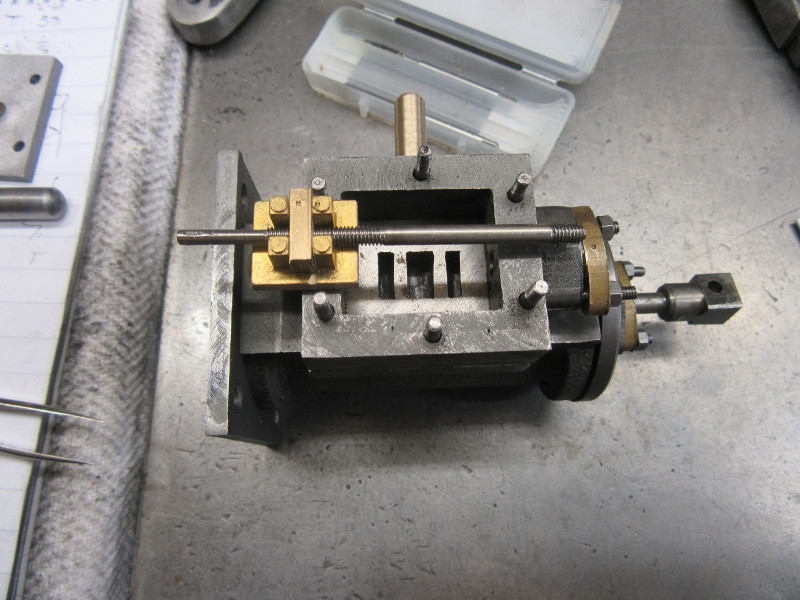
Today is crosshead day so the first thing was to swap back to the 4 jaw SC, then some very careful work particularly threading the end for the valve rod. It's fine and so is my tap!
Then I packed the glands on the valve and piston rod while I could get at them easier. Next I replaced the nuts on the steam chest lid.
Here we are at knocking off time. Ready to drill and tap to fit the drain cocks. Nice quiet morning......
Stanley Challenger Graham
Stanley's View
scg1936 at talktalk.net
"Beware of certitude" (Jimmy Reid)
The floggings will continue until morale improves!
Stanley's View
scg1936 at talktalk.net
"Beware of certitude" (Jimmy Reid)
The floggings will continue until morale improves!
-
Stanley
- Global Moderator
- Posts: 90300
- Joined: 23 Jan 2012, 12:01
- Location: Barnoldswick. Nearer to Heaven than Gloria.
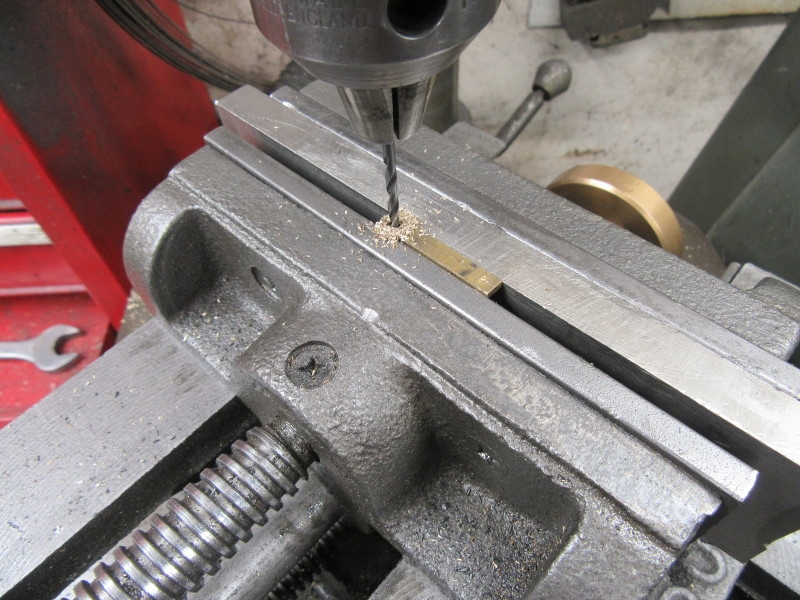
Re: Shed Matters 3
Short morning as I have to go to the Co-op for my weekly shop at 07:00. Simple task, fit the two £16 drain cocks. (That's each!)

As usual I had to scratch my head because the cocks are 1/4" X 32TPI which is a series I don't recognise. I know I can find it by looking it up but all I need to know is that thanks to using my head a long time ago, I have the 32TPI taps and drills in the treasure chest. I know from experience that it needs a 5.5mm tapping drill in CI.
I drilled and tapped and blew the cylinder out to get rid of the chips.
Knocking off time. That's the cocks sorted. Now for the Co-op and I'll have a look at the rabbit tomorrow and decide what next. Nice hour...... I enjoyed that.
Stanley Challenger Graham
Stanley's View
scg1936 at talktalk.net
"Beware of certitude" (Jimmy Reid)
The floggings will continue until morale improves!
Stanley's View
scg1936 at talktalk.net
"Beware of certitude" (Jimmy Reid)
The floggings will continue until morale improves!
-
Stanley
- Global Moderator
- Posts: 90300
- Joined: 23 Jan 2012, 12:01
- Location: Barnoldswick. Nearer to Heaven than Gloria.
Re: Shed Matters 3
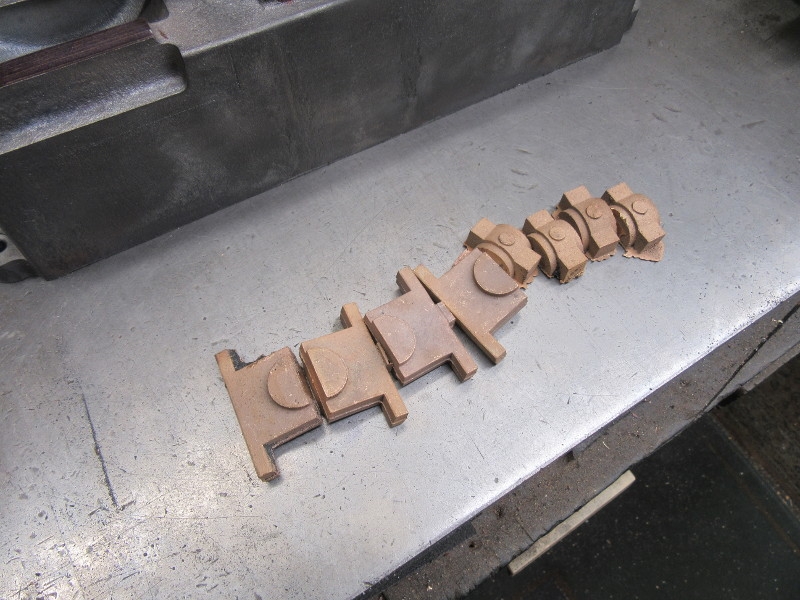
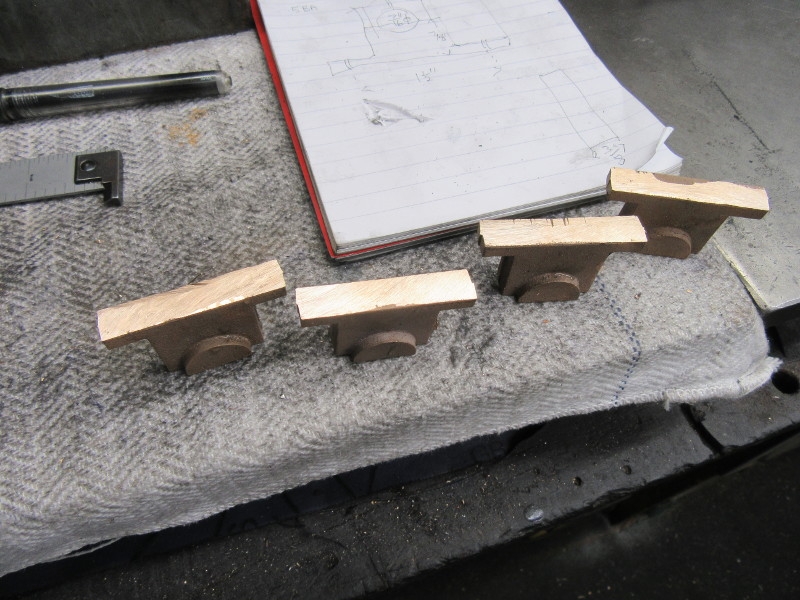
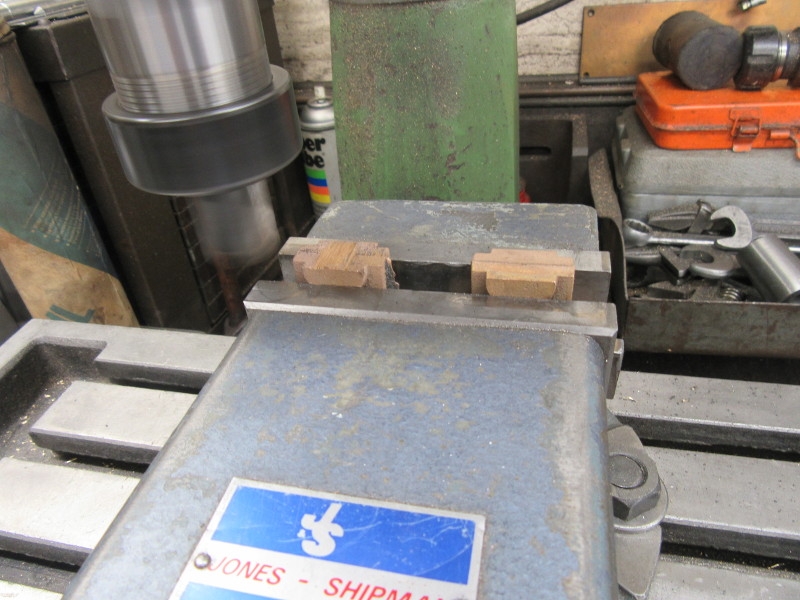
I had a look at where we are this morning and decided that what I really want to do is paint the castings but before I can do that I need to finish the drilling and tapping needed on the bed. Before I can do that I need to make the small bearings for the valve gear and fit them. This means that as they are almost exactly like the bearings for the parallel motion they have to be made as well. So this morning is making the four small but very awkward little bearings. I sawed them off and then squared them up under the VM.
So here we are when I stopped. I have the four bearing blanks made, two slightly heavier for the valve gear and the other two for the parallel motion. Tomorrow I'll finish them.... And of course that means making the supporting bars for the parallel motion.
Stanley Challenger Graham
Stanley's View
scg1936 at talktalk.net
"Beware of certitude" (Jimmy Reid)
The floggings will continue until morale improves!
Stanley's View
scg1936 at talktalk.net
"Beware of certitude" (Jimmy Reid)
The floggings will continue until morale improves!
-
Stanley
- Global Moderator
- Posts: 90300
- Joined: 23 Jan 2012, 12:01
- Location: Barnoldswick. Nearer to Heaven than Gloria.
Re: Shed Matters 3
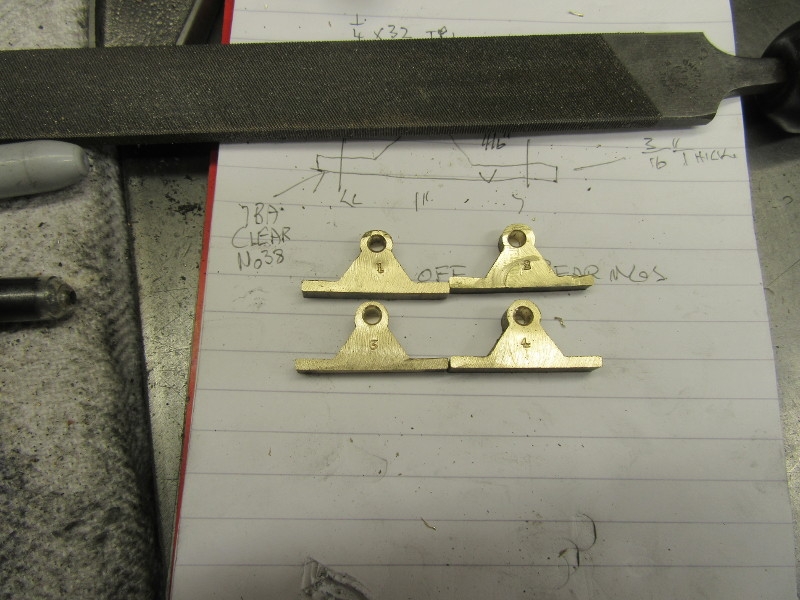
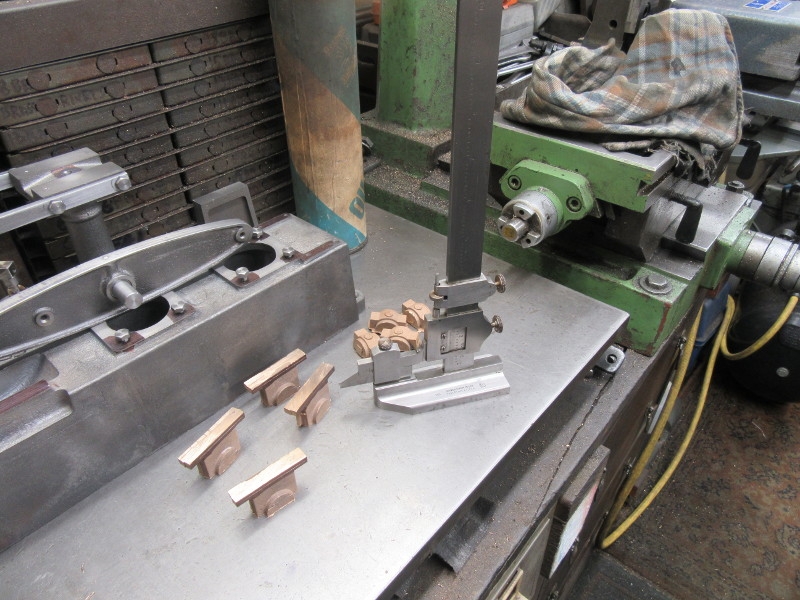
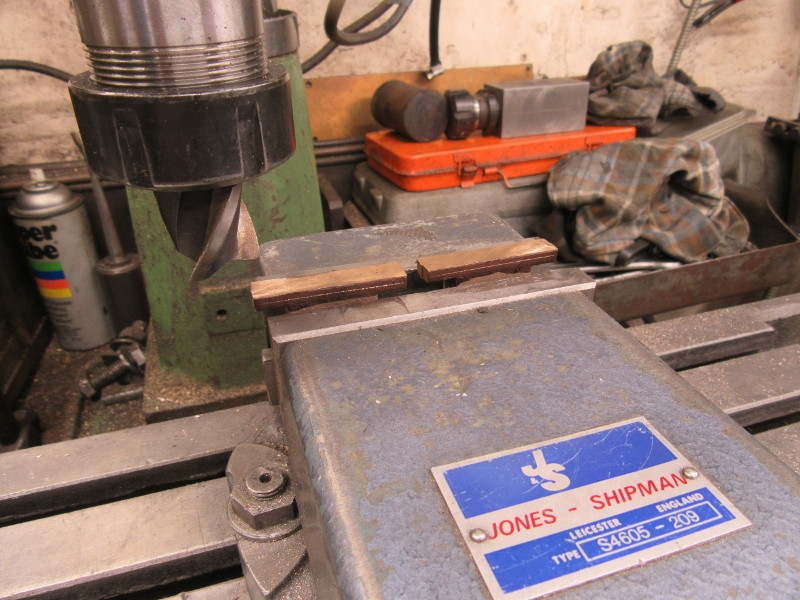
More work on my small bearings. I have the blanks made yesterday and started by numbering them so they can be allocated and identified. Then I marked them for the 1/8" hole in each of them which carries the shafts that support the parallel motion and the valve gear and drilled them. Then I had to check that the holes were the right size for the shafts and break the edges of the bores.
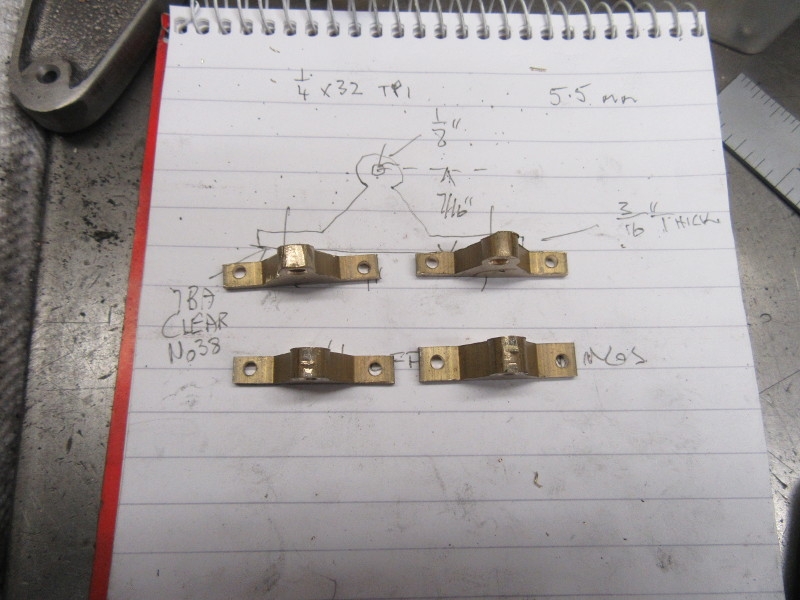
Next I marked and drilled the holes for the attachment bolts to the engine. You know about my eyes, a lot of squinting and fiddling went into these eight holes!
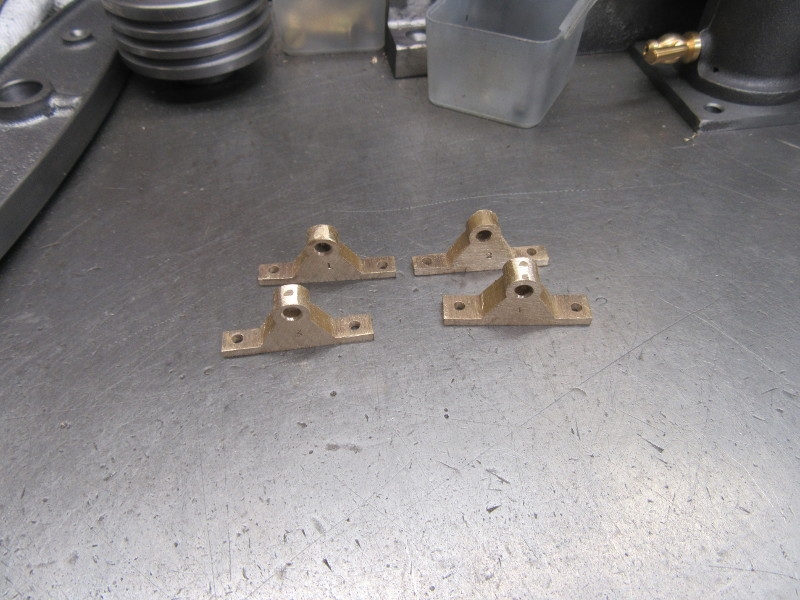
Then I spent half an hour rubbing the bearings down on emery paper until I had them looking pretty enough to attach to the engine. Thanking about painting, the next thing is to drill and tap the bed for the column, the cylinder and the two valve gear bearings. A fiddling hour and a half but well worth it.
Stanley Challenger Graham
Stanley's View
scg1936 at talktalk.net
"Beware of certitude" (Jimmy Reid)
The floggings will continue until morale improves!
Stanley's View
scg1936 at talktalk.net
"Beware of certitude" (Jimmy Reid)
The floggings will continue until morale improves!
-
Stanley
- Global Moderator
- Posts: 90300
- Joined: 23 Jan 2012, 12:01
- Location: Barnoldswick. Nearer to Heaven than Gloria.
Re: Shed Matters 3
I was going to mark holes on the base and tap and drill the morning away but somehow I got diverted into making the trunnion shaft for the beam. Lots of good reasons for going that way.
As usual the stock I had been given in the kit was slightly undersize so I went into the scrap box and found a piece that would do nicely.
Knocking off time. Again not a lot to see but I now have a beam with a trunnion fitted. dowelled and Loctited into place. That points towards trunnion bearings. I'll look into that tomorrow.
Stanley Challenger Graham
Stanley's View
scg1936 at talktalk.net
"Beware of certitude" (Jimmy Reid)
The floggings will continue until morale improves!
Stanley's View
scg1936 at talktalk.net
"Beware of certitude" (Jimmy Reid)
The floggings will continue until morale improves!
-
Stanley
- Global Moderator
- Posts: 90300
- Joined: 23 Jan 2012, 12:01
- Location: Barnoldswick. Nearer to Heaven than Gloria.
Re: Shed Matters 3
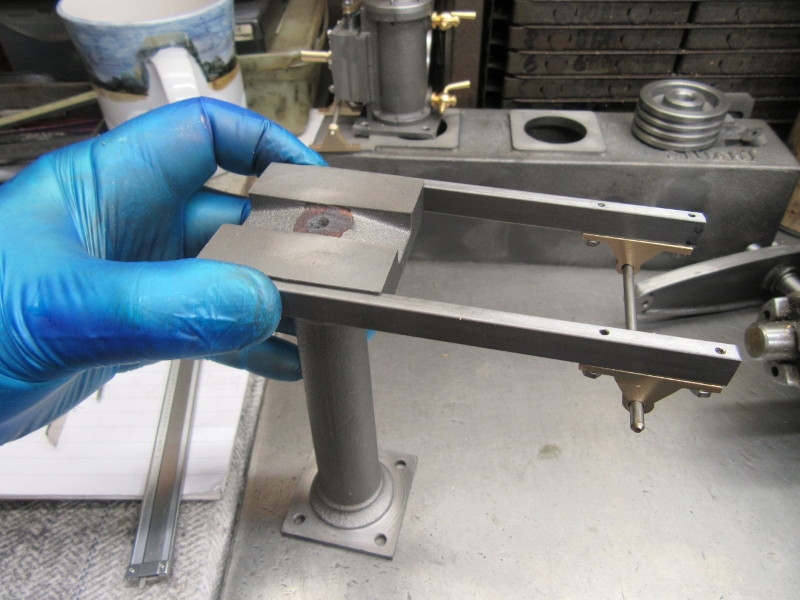
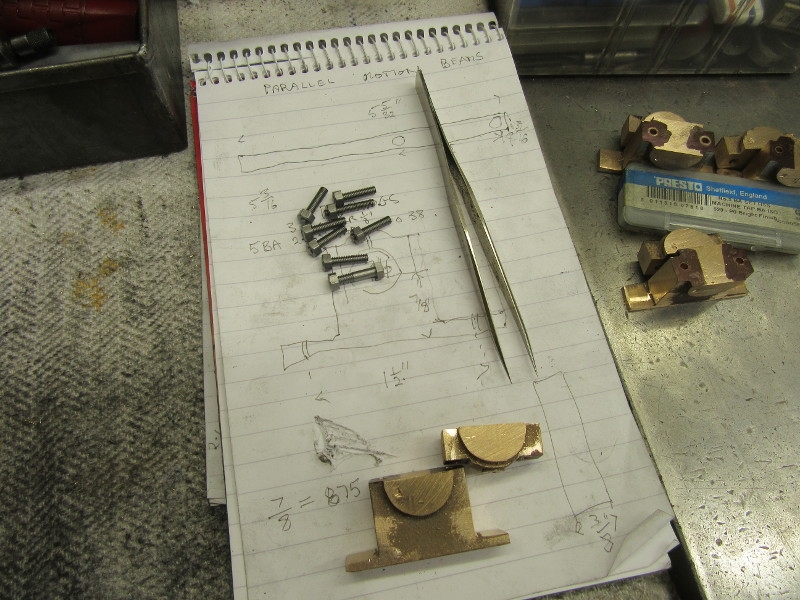
I surveyed the piste this morning and was still leaning towards making and fitting the trunnion bearings but then I had a rethink. Being a masochist I decided to play in the world of 7BA.
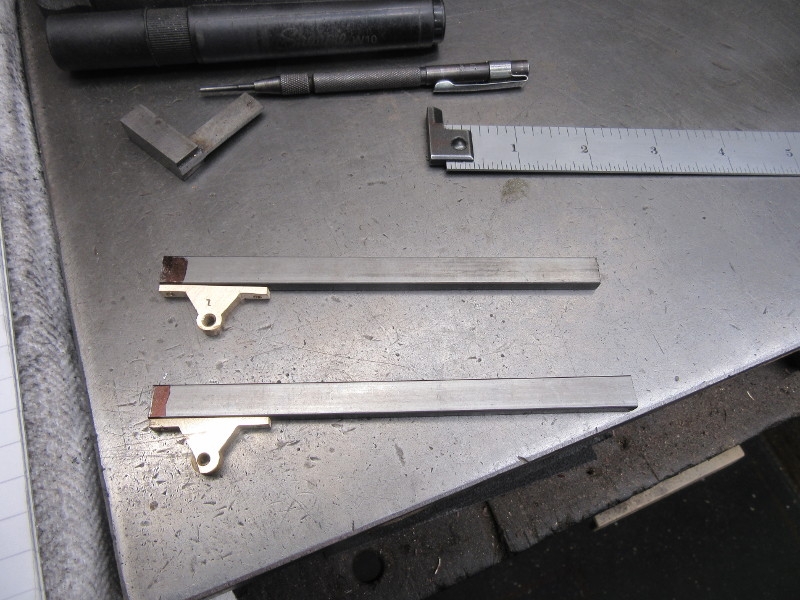
I cut the two parallel motion beams to length and set to to mount the bearings that are the anchor point for the parallel motion. Very important that they should be accurate and balanced so very careful measurement and marking.
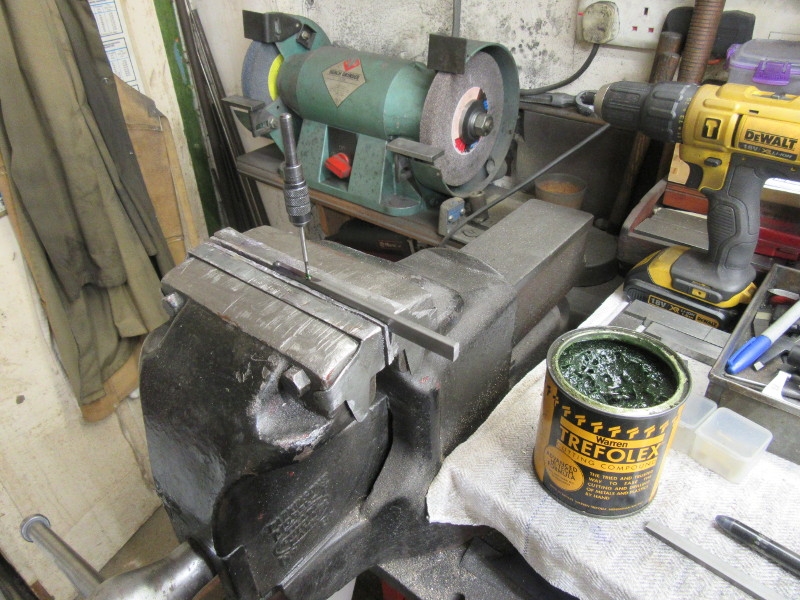
First I had to drill the bars accurately and then tap them. Yes, you're right, I have enough Trefolex to last me out. carefully done, I don't want any broken taps!
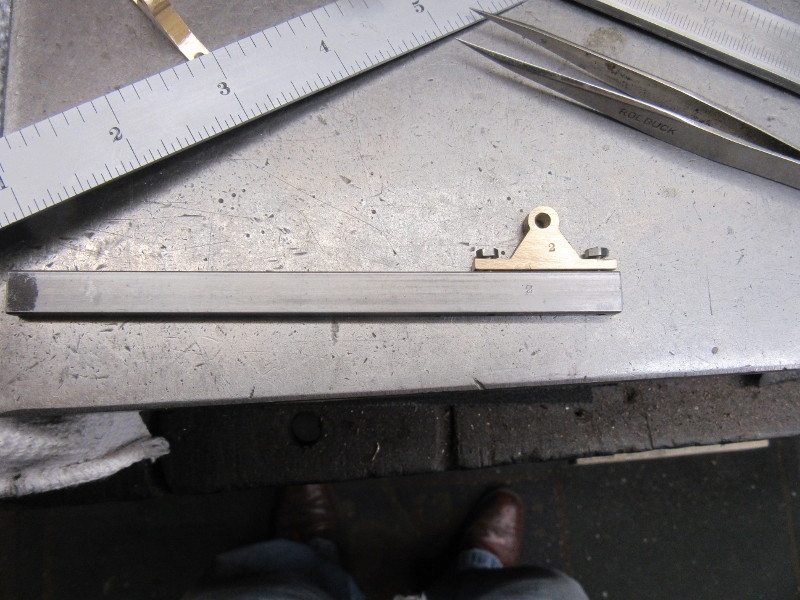
One bar cut to length and the bearing fitted. I could have rushed in and started the other one but I do this for pleasure so it can wait until tomorrow.
Knocking off time. You can always tell when I have been thronged.....
Stanley Challenger Graham
Stanley's View
scg1936 at talktalk.net
"Beware of certitude" (Jimmy Reid)
The floggings will continue until morale improves!
Stanley's View
scg1936 at talktalk.net
"Beware of certitude" (Jimmy Reid)
The floggings will continue until morale improves!
Re: Shed Matters 3
I had a pot of Taptite which I finished last year. It was the pot that I was using up until the Company shut our workshop in 1992. Rather than put it in the skip it went in my car boot and ended up at home. I now have some Rocol from a workshop clearance. I too doubt that I will ever have to buy any tapping compound.

Re: Shed Matters 3
And pound , shillings and pence perhaps, real money

If you keep searching you will find it
-
Stanley
- Global Moderator
- Posts: 90300
- Joined: 23 Jan 2012, 12:01
- Location: Barnoldswick. Nearer to Heaven than Gloria.
Re: Shed Matters 3
I'll leave you two playing in the shed, I'm going for a WALK BECAUSE i AM READY FOR MY BREAKFAST!
Stanley Challenger Graham
Stanley's View
scg1936 at talktalk.net
"Beware of certitude" (Jimmy Reid)
The floggings will continue until morale improves!
Stanley's View
scg1936 at talktalk.net
"Beware of certitude" (Jimmy Reid)
The floggings will continue until morale improves!
-
Stanley
- Global Moderator
- Posts: 90300
- Joined: 23 Jan 2012, 12:01
- Location: Barnoldswick. Nearer to Heaven than Gloria.
Re: Shed Matters 3
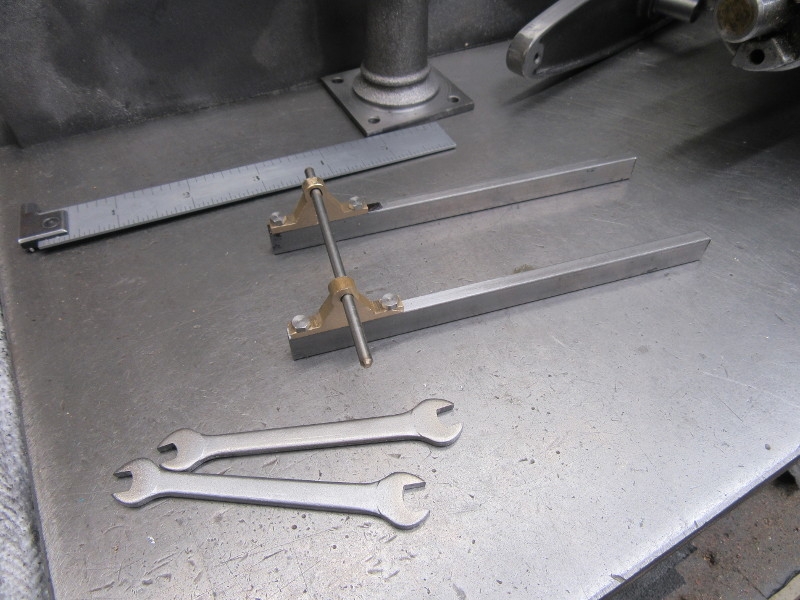
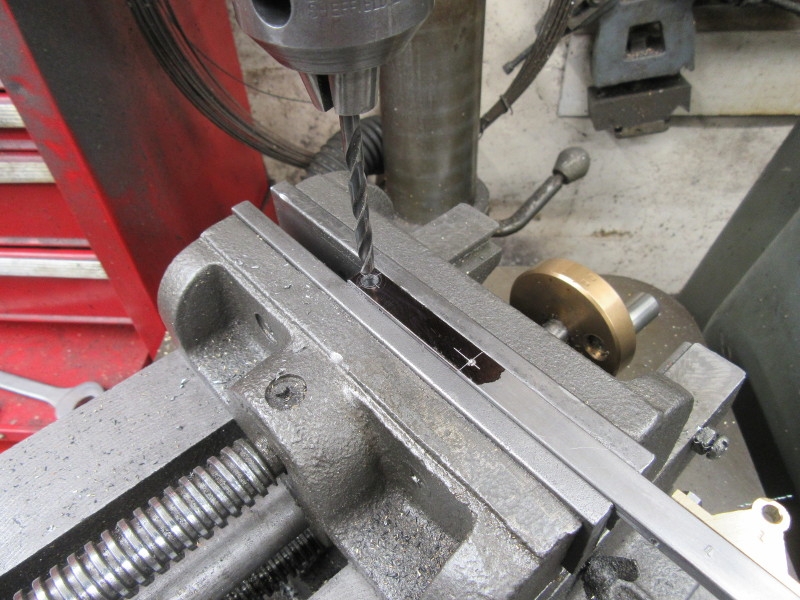
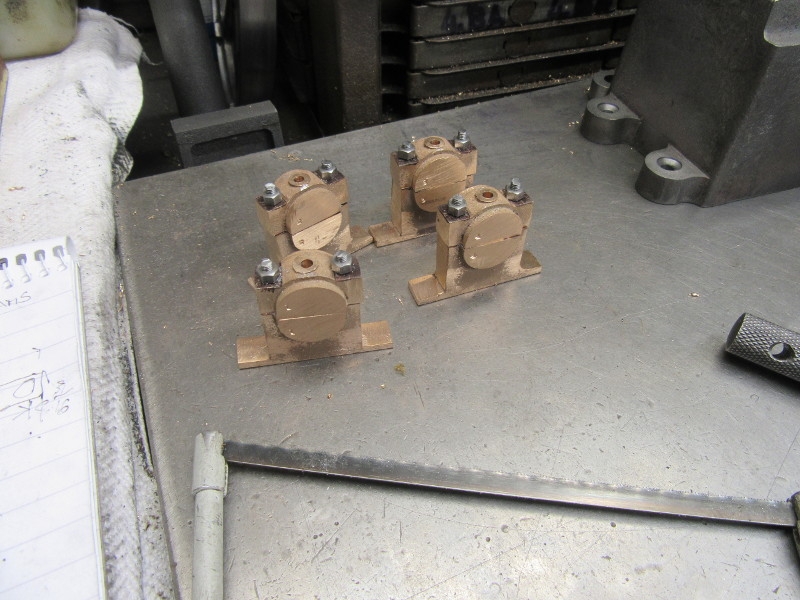
My first job this morning was to attach the other bearing to the second bar and line bore them to make sure the axle will fit.
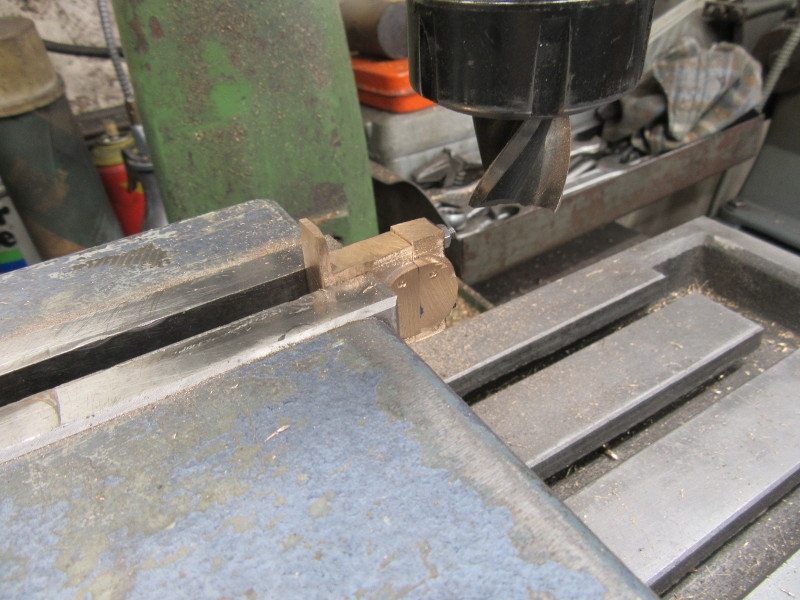
This is what we are looking for. I decided to carry on down this route and do the necessary work to fix the beams to the column.
The next job was to measure and mark the locations for the 2BA set screws that will fasten the bars to the column. Then drill them 3/16", the clearance size for 2BA.
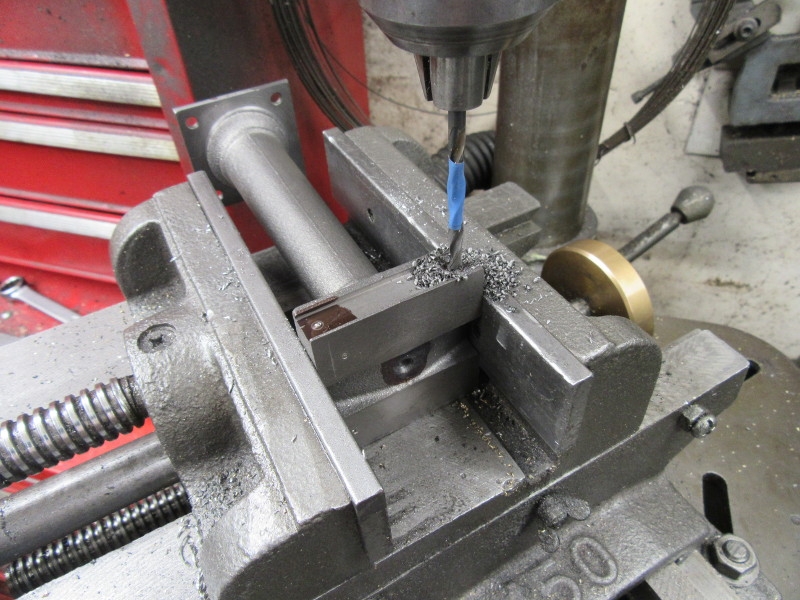
After transferring the the hole locations to the head of the column I drilled them 4mm, the tapping size for 2BA.
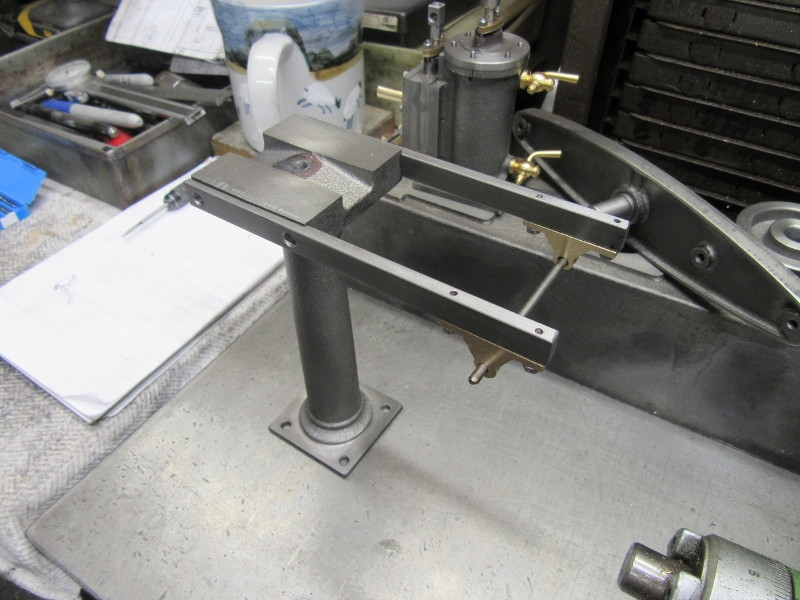
I like this pic. It's closing time and all that needs to be done now is tap the head of the column for the 2BA set screws and that will be the first job tomorrow. The reason I like this is because the locations for the bars are milled so accurately that the bars will stay in place simply by reason of a good fit. Nice....
Stanley Challenger Graham
Stanley's View
scg1936 at talktalk.net
"Beware of certitude" (Jimmy Reid)
The floggings will continue until morale improves!
Stanley's View
scg1936 at talktalk.net
"Beware of certitude" (Jimmy Reid)
The floggings will continue until morale improves!
-
Stanley
- Global Moderator
- Posts: 90300
- Joined: 23 Jan 2012, 12:01
- Location: Barnoldswick. Nearer to Heaven than Gloria.
Re: Shed Matters 3
First job this morning was to drill and tap for the 2BA set screws that hold the parallel motion bars onto the column.
It begins to look like an engine doesn't it.
I marked for the holding down bolts, 4 X 7BA for the valve gear bearings and 8 X 2BA for the cylinder and column. Then under the pillar drill and drill them all ready for tapping.
Here we are ready for tapping and I was going to stop there.....
I did this for the knocking off pic but then cracked and started tapping!
I started by just doing the 7BA holes for the bearings.
But then did the 2BA ones as well so this became my knocking off picture! A good two hours and I think we have taken a good step forwards.
Stanley Challenger Graham
Stanley's View
scg1936 at talktalk.net
"Beware of certitude" (Jimmy Reid)
The floggings will continue until morale improves!
Stanley's View
scg1936 at talktalk.net
"Beware of certitude" (Jimmy Reid)
The floggings will continue until morale improves!
-
Stanley
- Global Moderator
- Posts: 90300
- Joined: 23 Jan 2012, 12:01
- Location: Barnoldswick. Nearer to Heaven than Gloria.
Re: Shed Matters 3
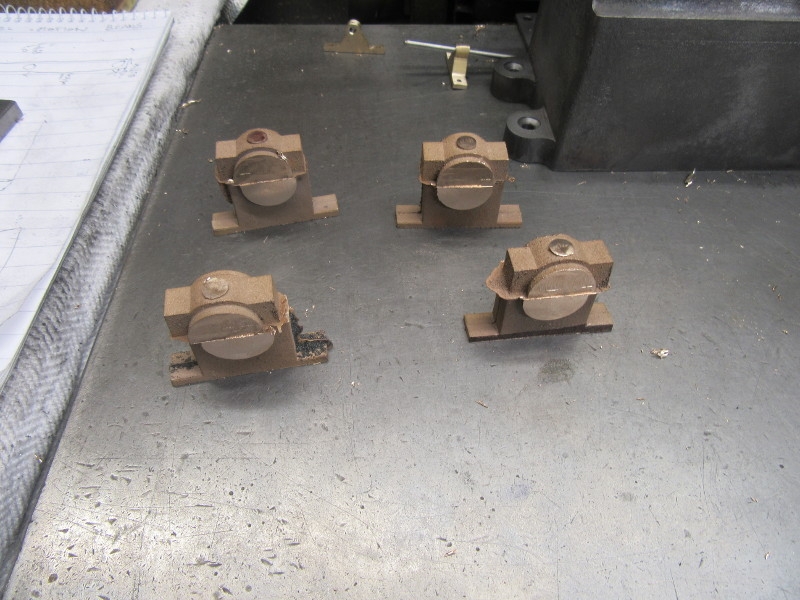
After yesterday's good day on drilling and tapping it looked sensible to attack the four bearings that are needed for the crankshaft and the beam trunnions. If they are done the rest of the drilling and tapping on the castings can be done and that will be tidy. So I got the castings together.
I didn't immediately go for the flash, that can be done as necessary as we go through the castings. I started by grinding one flat face on the base casting so I could get a level start on them.
I put them through the mill two by two and not altering the cut between the pairs so all the bases are exactly the same height.
Here I have brought the heavy guns out to mark the castings at 7/8", not necessary, there are many ways it could be done but nice to use the tackle if you have it.
This was knocking off time at 07:00 because I have to do my weekly shop while the Co-op is quiet. I have the castings marked and set up to cut for the 7/8" depth of the base. That's for tomorrow.....
Stanley Challenger Graham
Stanley's View
scg1936 at talktalk.net
"Beware of certitude" (Jimmy Reid)
The floggings will continue until morale improves!
Stanley's View
scg1936 at talktalk.net
"Beware of certitude" (Jimmy Reid)
The floggings will continue until morale improves!
-
Stanley
- Global Moderator
- Posts: 90300
- Joined: 23 Jan 2012, 12:01
- Location: Barnoldswick. Nearer to Heaven than Gloria.
Re: Shed Matters 3
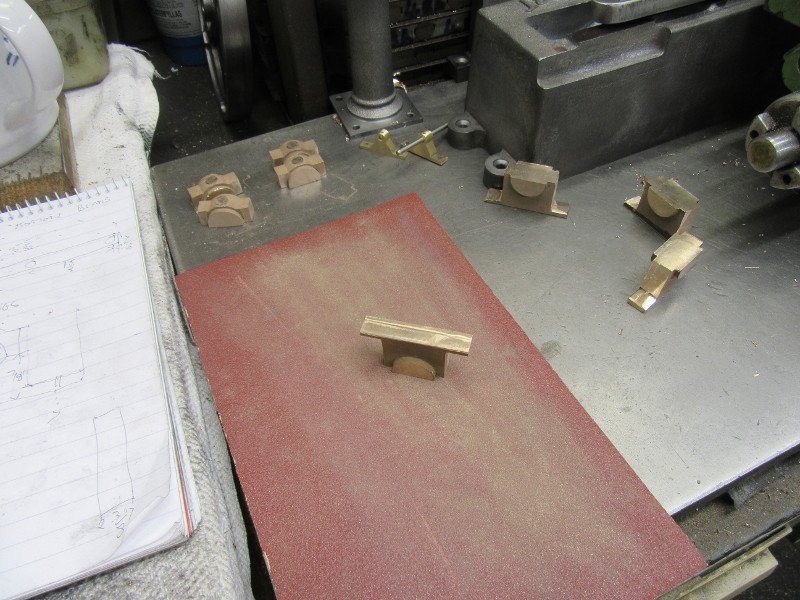
I started the day by making sure my end mill was razor sharp.

All four castings have two parallel sides exactly 7/8" apart.
Next I attended to the cheeks of the bases, two more cuts, all done in pairs.
That's enough for the bases....
Now for the tops.
Knocking off time. Lots to do yet to clean the castings up but we've made good progress. A nice morning.
Stanley Challenger Graham
Stanley's View
scg1936 at talktalk.net
"Beware of certitude" (Jimmy Reid)
The floggings will continue until morale improves!
Stanley's View
scg1936 at talktalk.net
"Beware of certitude" (Jimmy Reid)
The floggings will continue until morale improves!
-
Stanley
- Global Moderator
- Posts: 90300
- Joined: 23 Jan 2012, 12:01
- Location: Barnoldswick. Nearer to Heaven than Gloria.
Re: Shed Matters 3

More work on the four bearings. I started by going through them all and, using the file and the grinder, getting all the flash off them.
Then I went through them again but this time using emery paper on the surface plate and getting to a higher level of finish.

Here's where I got to, a big improvement but still a lot to do.

Then some measuring and marking ready for starting the job of fitting the 5BA studs that hold the caps on. I need to get both halves of each bearing fixed firmly together so the final overall machining can be done.
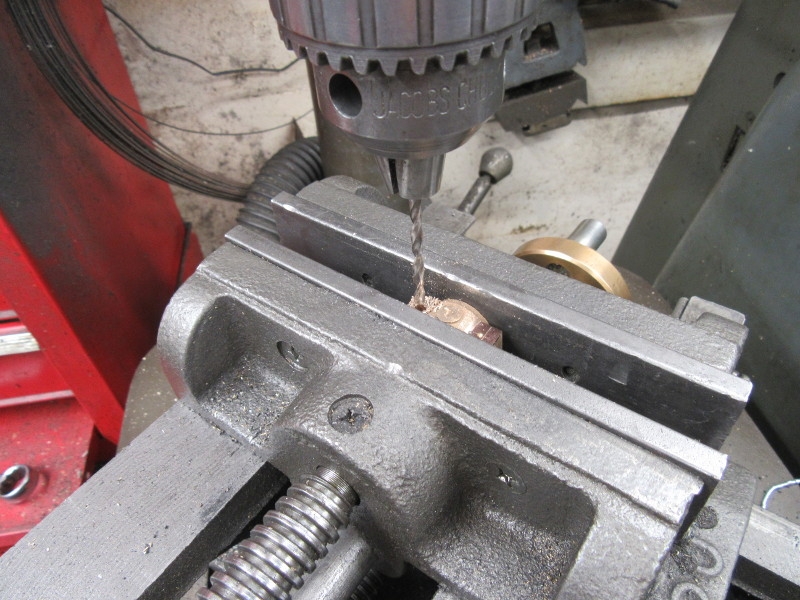
Three holes in each top casting, the two clearance holes for the 5BA bolts and the central oil hole while we are at it.
Knocking off time. Ready for transferring the tapping holes on to the bottom casting, the next job. A good morning, I've made progress and no mistakes. Always a good day when you can say that.
Stanley Challenger Graham
Stanley's View
scg1936 at talktalk.net
"Beware of certitude" (Jimmy Reid)
The floggings will continue until morale improves!
Stanley's View
scg1936 at talktalk.net
"Beware of certitude" (Jimmy Reid)
The floggings will continue until morale improves!
-
Stanley
- Global Moderator
- Posts: 90300
- Joined: 23 Jan 2012, 12:01
- Location: Barnoldswick. Nearer to Heaven than Gloria.
Re: Shed Matters 3
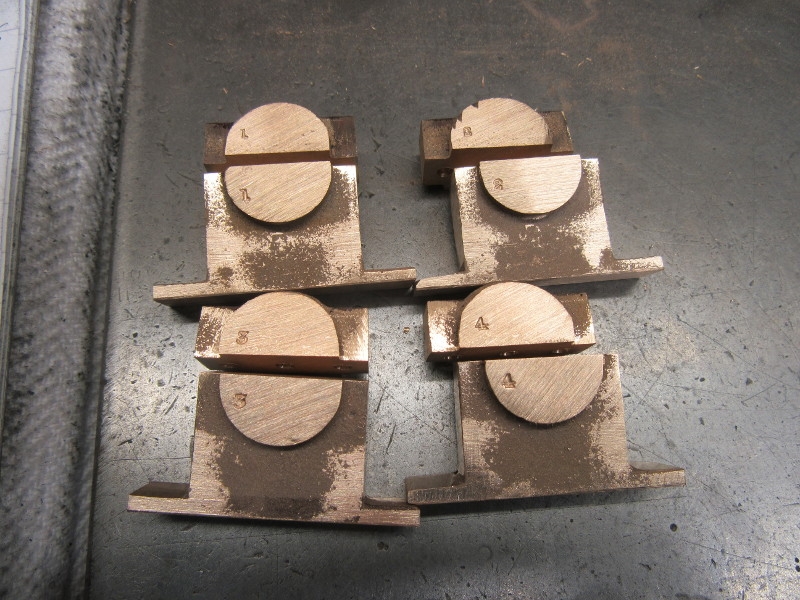
The object of today's work on the bearings is to get to a position where I have both halves of each bearing matched with its other half and firmly bolted together so that I can do the final external cosmetic machining and then boring them. The first job was to number the parts so that I can keep track of them.
Then mark each base and drill the tapping holes.
Knocking off time after only an hour in the shed, (cooking had to be done), I am ready to tap all my drillings 5BA but that's for tomorrow.
Stanley Challenger Graham
Stanley's View
scg1936 at talktalk.net
"Beware of certitude" (Jimmy Reid)
The floggings will continue until morale improves!
Stanley's View
scg1936 at talktalk.net
"Beware of certitude" (Jimmy Reid)
The floggings will continue until morale improves!
-
Stanley
- Global Moderator
- Posts: 90300
- Joined: 23 Jan 2012, 12:01
- Location: Barnoldswick. Nearer to Heaven than Gloria.
Re: Shed Matters 3
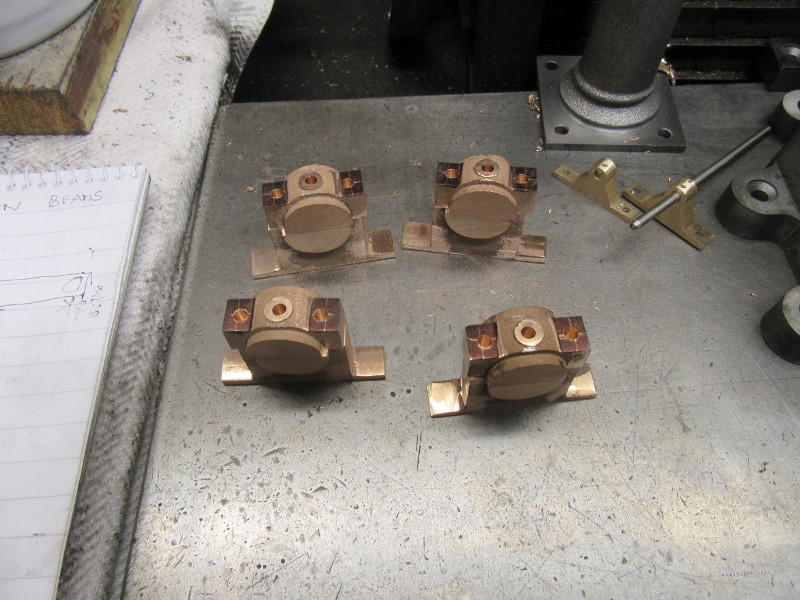
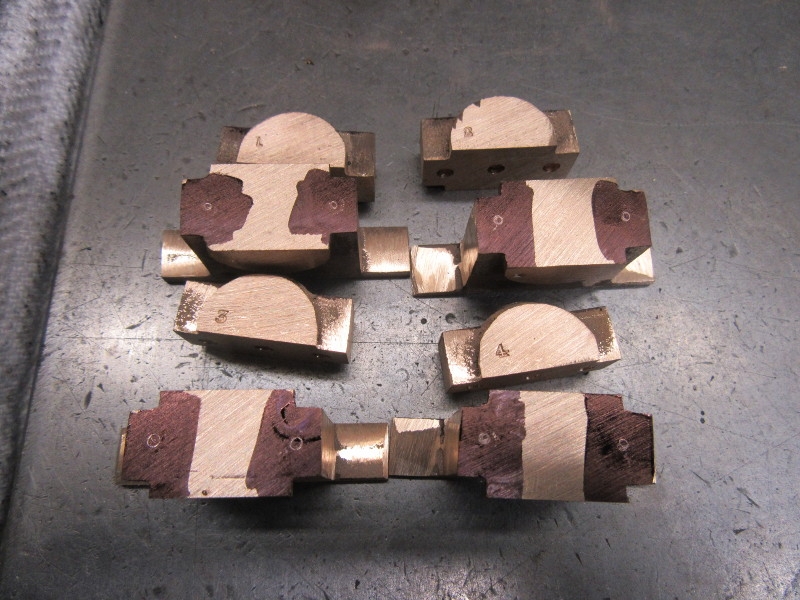
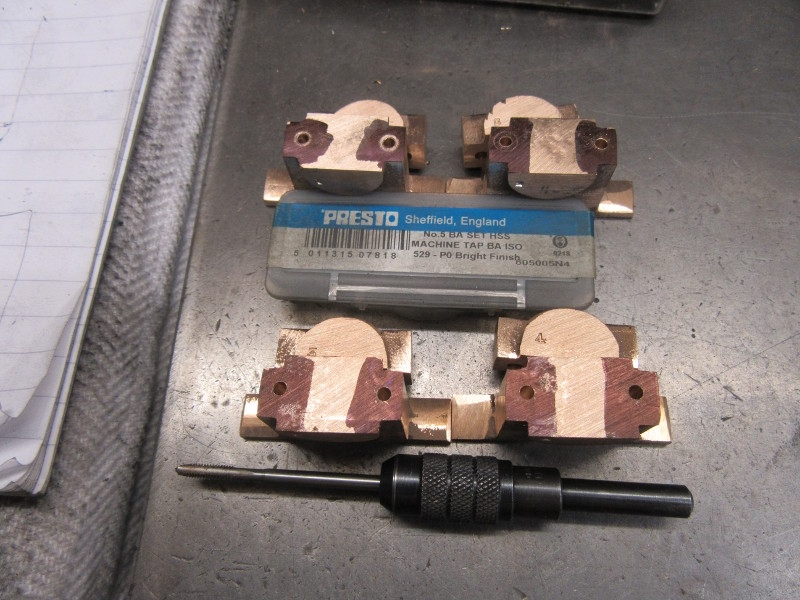
Dead simple, tap eight holes 5BA. First find your tackle and the studs and nuts. Then find that the studs in the stock supplied aren't long enough. Go to the treasure chest and find the 5BA studding you bought the last time you hit this problem.
I'm not going to load you with pics. Every hole had to be tapped twice, once with a taper tap and once with a bottoming tap. Then install the studding and cut to length, then pop the nut on. The last was made easy by using a new Junior hacksaw blade and cutting the threaded rod using a template. This gave a clean cut and the nut engaged with it easily on all eight studs. Quietly away, no broken taps!
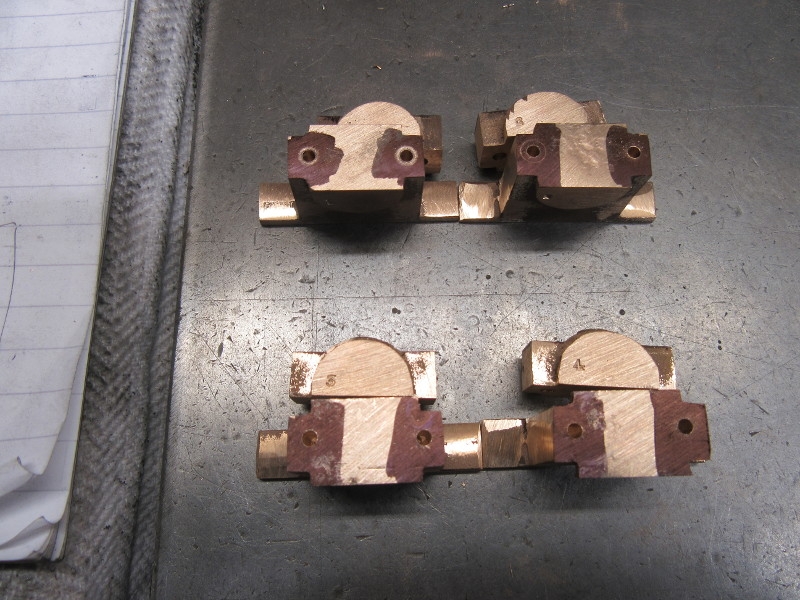
All the nuts tight on the studs.
I'd done over an hour and a half but just for a laugh popped one of the bearings in the VM and squared up the faces. This is what I have to do to the other four bearings tomorrow as the next stage.
Stanley Challenger Graham
Stanley's View
scg1936 at talktalk.net
"Beware of certitude" (Jimmy Reid)
The floggings will continue until morale improves!
Stanley's View
scg1936 at talktalk.net
"Beware of certitude" (Jimmy Reid)
The floggings will continue until morale improves!