SHED MATTERS 2
-
Stanley

- Global Moderator

- Posts: 106457
- Joined: 23 Jan 2012, 12:01
- Location: Barnoldswick. Nearer to Heaven than Gloria.
Re: SHED MATTERS 2
That's what I have used it for in the past and it seems to work!
Stanley Challenger Graham
Stanley's View
scg1936 at talktalk.net
"Beware of certitude" (Jimmy Reid)
The floggings will continue until morale improves!
Old age isn't for cissies!
Stanley's View
scg1936 at talktalk.net
"Beware of certitude" (Jimmy Reid)
The floggings will continue until morale improves!
Old age isn't for cissies!
Re: SHED MATTERS 2
Hi Stanley , got some more done with the lathe, its looking like a lathe again now , just finishing bits to fit then a good check over and adjust this that and the other, test then probably re adjust things.
This is what it looks like now, still the end covers to fit , that horrible old maroon bakalite forward reverse knob for the power feed needs replaced and the screw cutting badges still to be done and the steadies , collet chuck etc to clean and paint, coolant hose.
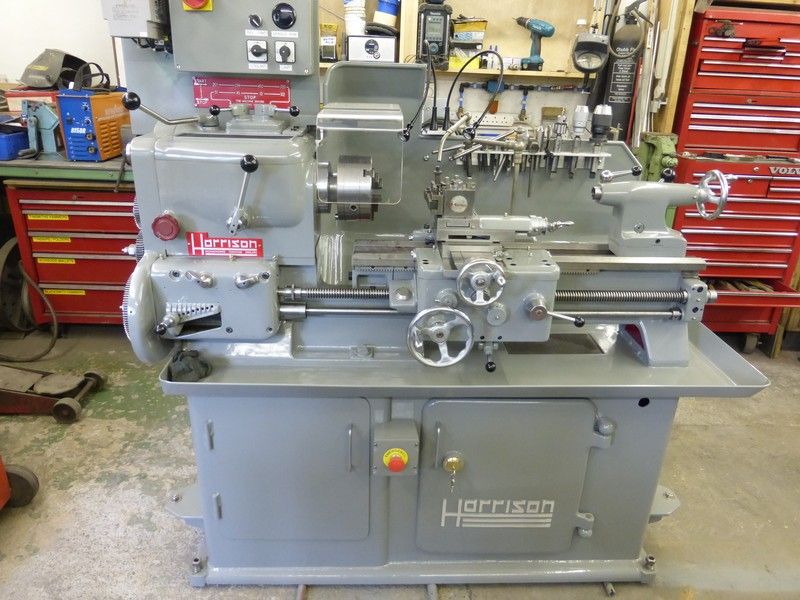
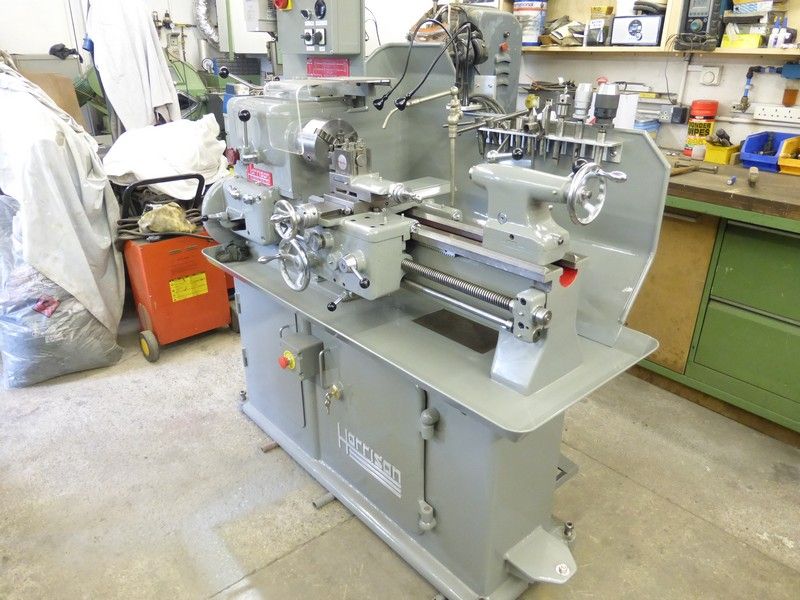
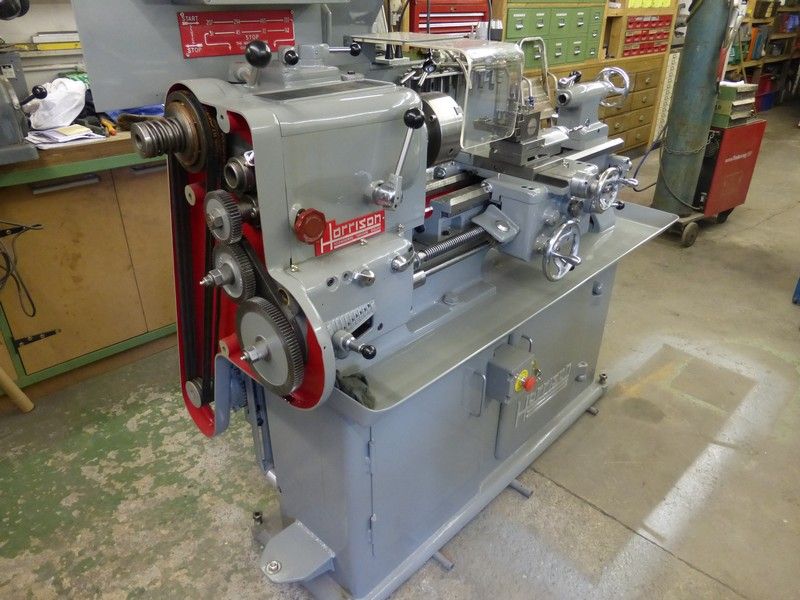
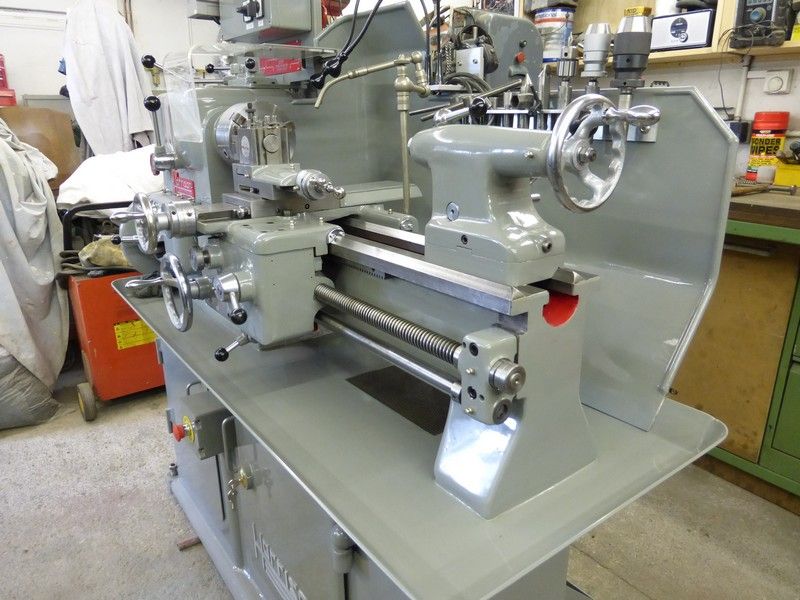
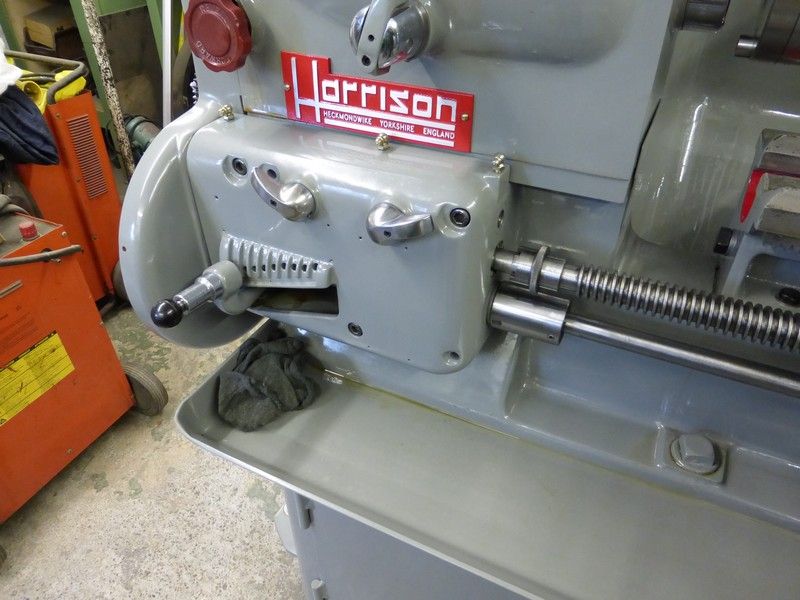

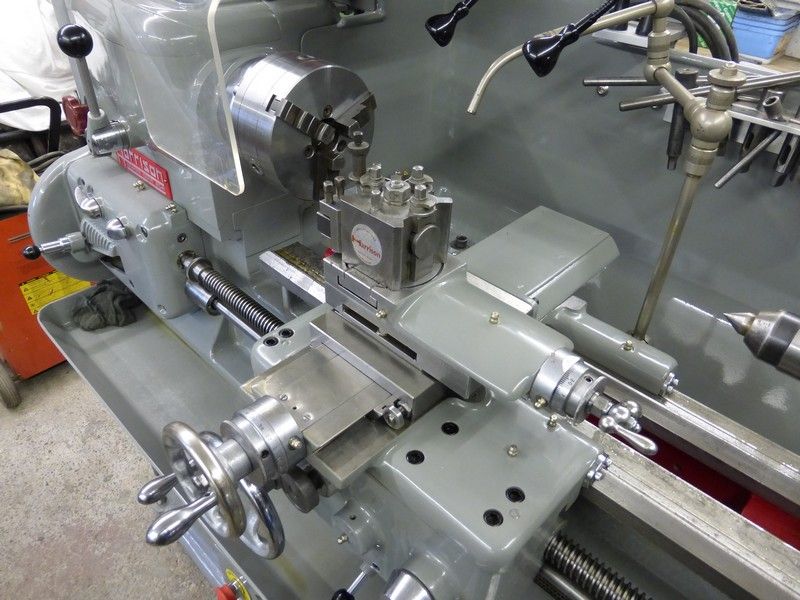
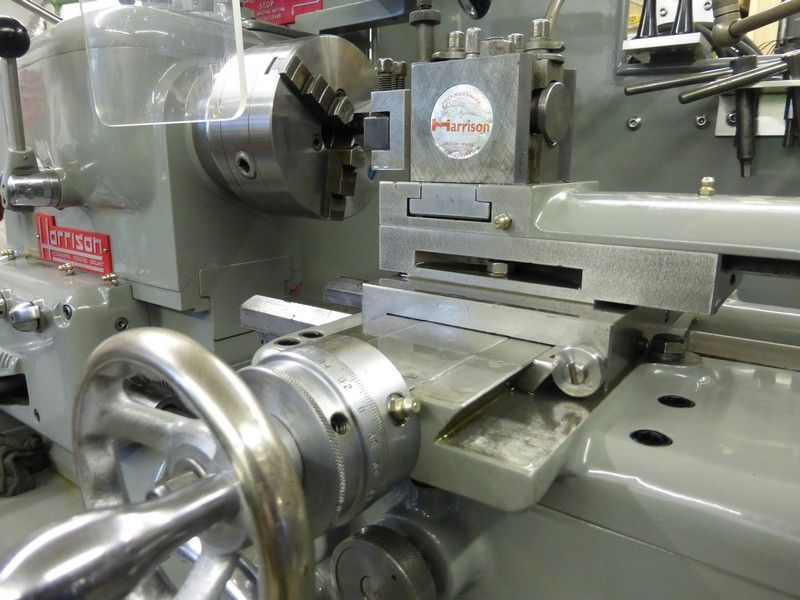
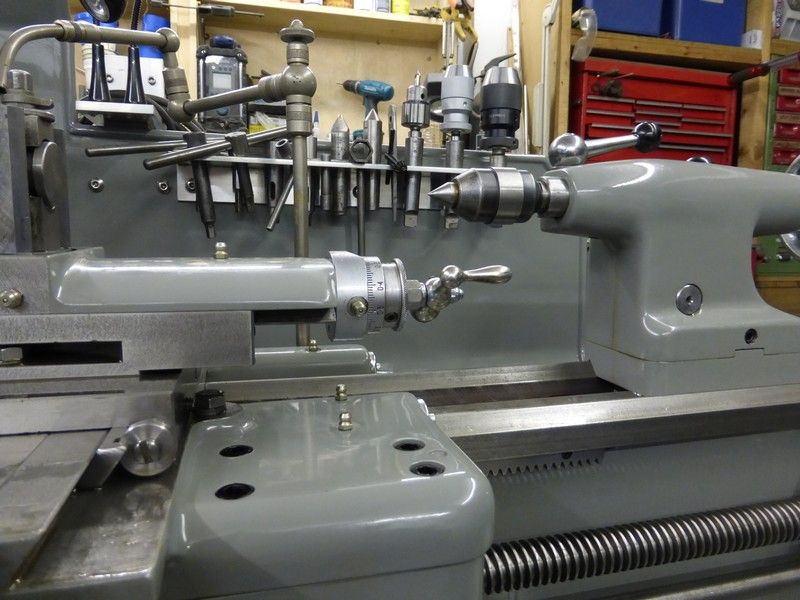
Not long until the first swarf hits the tray now !
Cheers Mick
This is what it looks like now, still the end covers to fit , that horrible old maroon bakalite forward reverse knob for the power feed needs replaced and the screw cutting badges still to be done and the steadies , collet chuck etc to clean and paint, coolant hose.


Not long until the first swarf hits the tray now !
Cheers Mick


-
Stanley
- Global Moderator
- Posts: 106457
- Joined: 23 Jan 2012, 12:01
- Location: Barnoldswick. Nearer to Heaven than Gloria.
Re: SHED MATTERS 2
Only trouble is it'll scratch the paint......
Stanley Challenger Graham
Stanley's View
scg1936 at talktalk.net
"Beware of certitude" (Jimmy Reid)
The floggings will continue until morale improves!
Old age isn't for cissies!
Stanley's View
scg1936 at talktalk.net
"Beware of certitude" (Jimmy Reid)
The floggings will continue until morale improves!
Old age isn't for cissies!
Re: SHED MATTERS 2
Cheers Ian , Hi Stanley do you have any tricks of the trade to help with my latest problem here, I hope so 
Hi all , I am hoping that someone can help with a problem of a chuck that is stuck on my lathe spindle. I am on the finishing jobs of my rebuilt Harrison L5 and had screwed the chuck on with very light hand pressure only after cleaning both spindle and chuck then applying light oil. I have not even turned anything in the lathe but when I have come to remove the chuck its stuck fast. Proper stuck fast too.
So far I have tried .
large hex bar in the chuck and big spanner on it, tapping the spanner to shock it and jerking spanner with the gear train locked so the spindle can not rotate.
The usual realeasing oils etc, left over night and also repeated after heat applied
Removing the chuck from the backplate , incerting 3 bolts through backplate holes and levering with 3 feet long 1 inch bar , hitting said bar to shock
Heating the backplate up with propane torch and trying to shift while hot , then when cooled again, tapping all around trying to break seal
Replacing chuck and chucking large hex bar then trying to loosen with large socket and windy gun. ( only thought of this after the other attempts )
The force used so far and the hits have gradually reached the point where something is likely to break if any more force used so looking for ideas. It would seem totally impossible that it has become stuck this tight. I know 100% the threads are clean, there is film of light oil and the chuck has not been tightened other than by light hand pressure. I am assuming the rear face is seated against the spindle shoulder and the 'lock' is between this and the threads, will this be the case ? I think it must be as this chuck has been on and off many times before and I know the register is clean and oiled as are the threads.
Here are some photos of what I am dealing with.
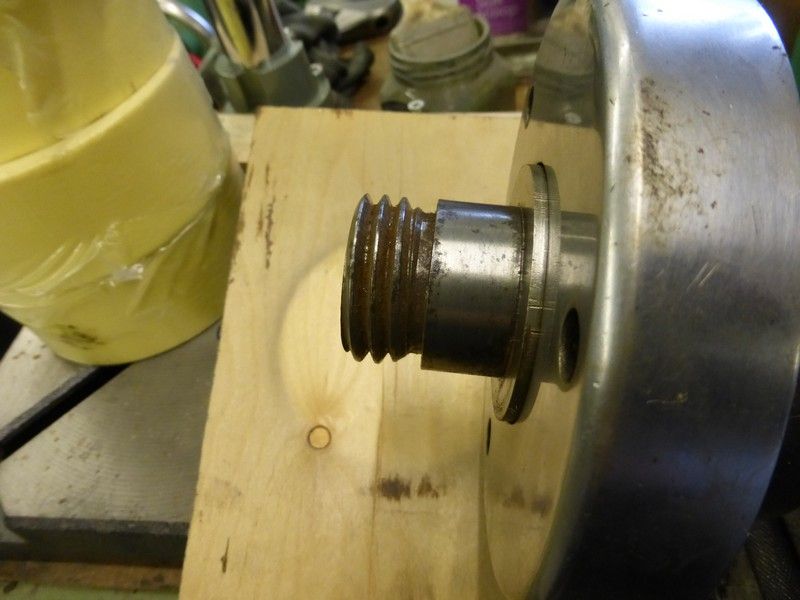
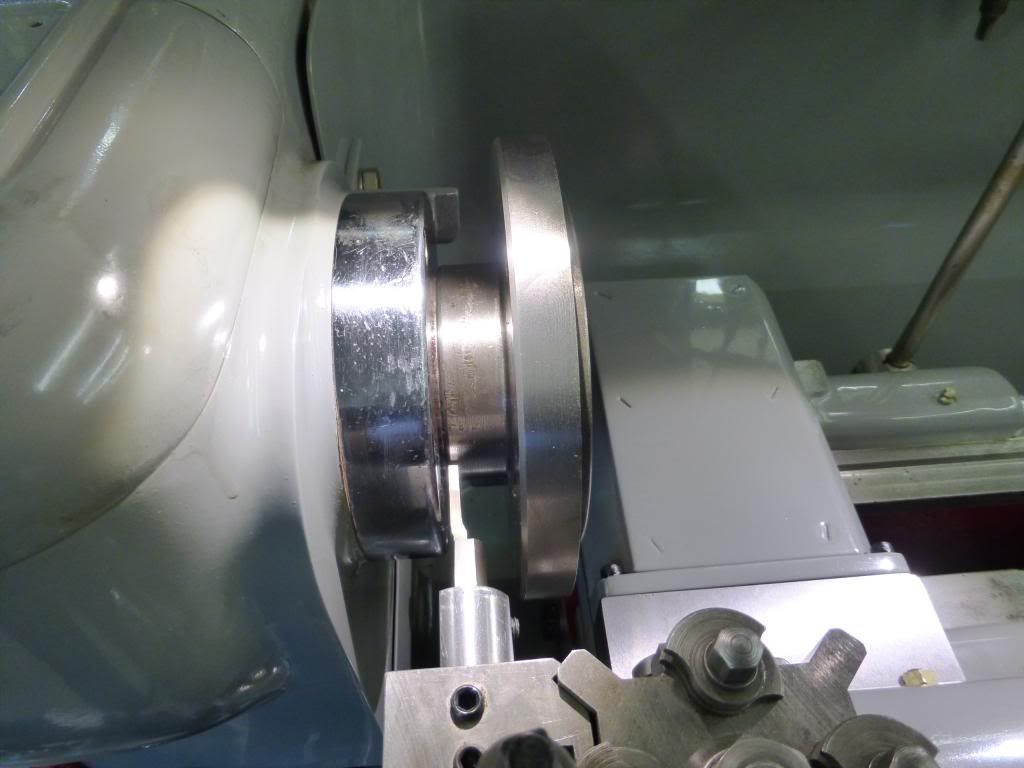
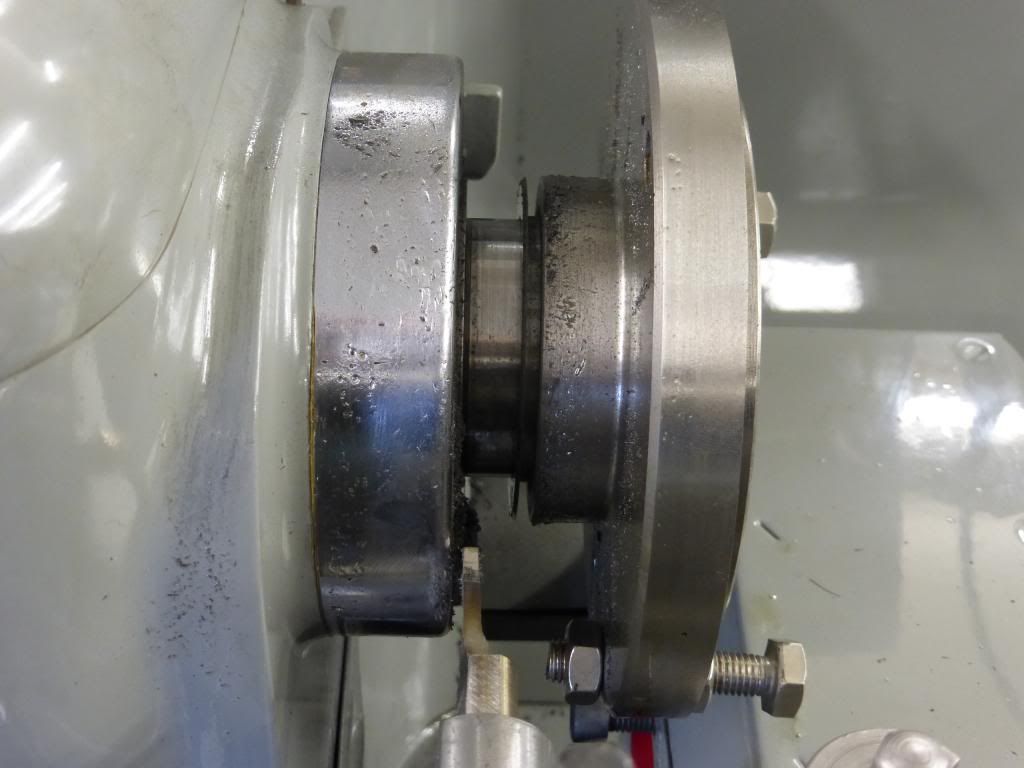
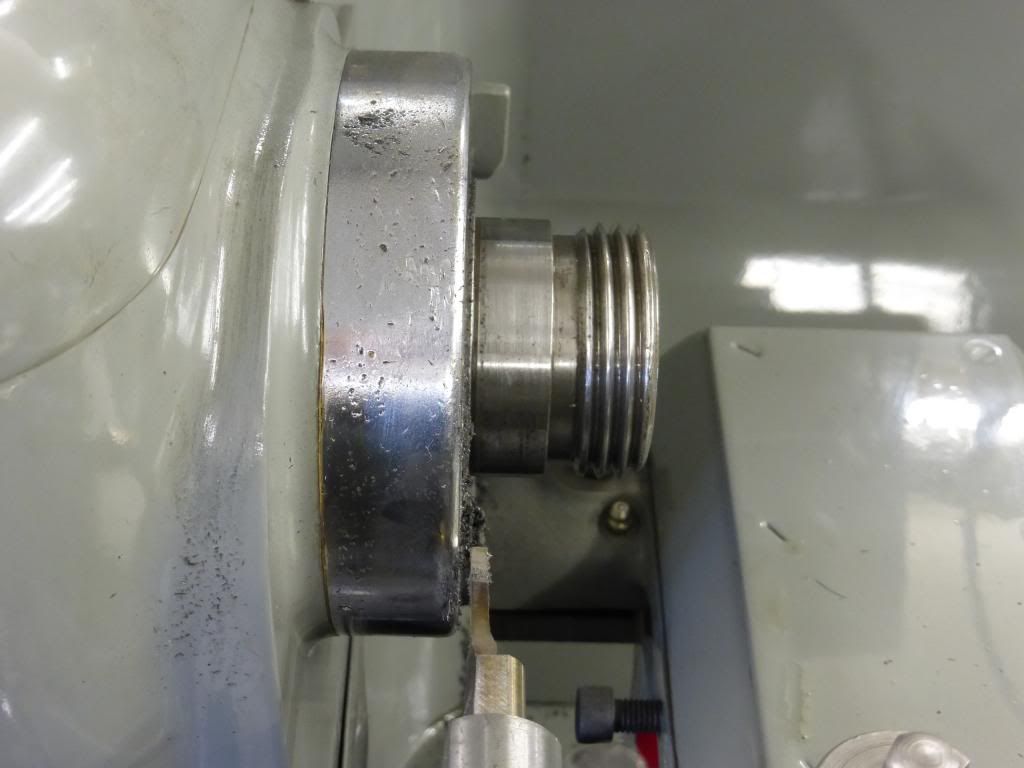
This is a samller bore Harrison spindle of the exact same design showing the thread, register and shoulder, then the chrome cover, note the shoulder sticks out the chrome cover a small amount. The actual one on the lathe is clean and spottless and oiled.
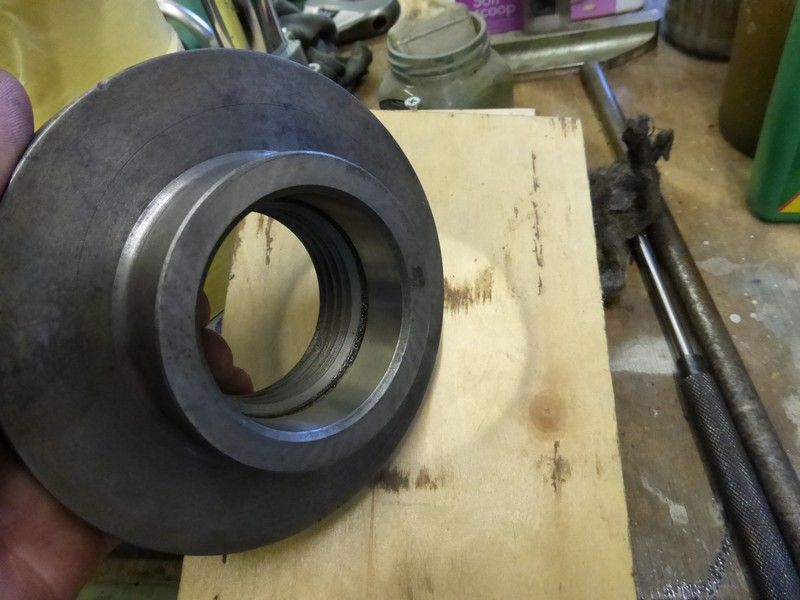
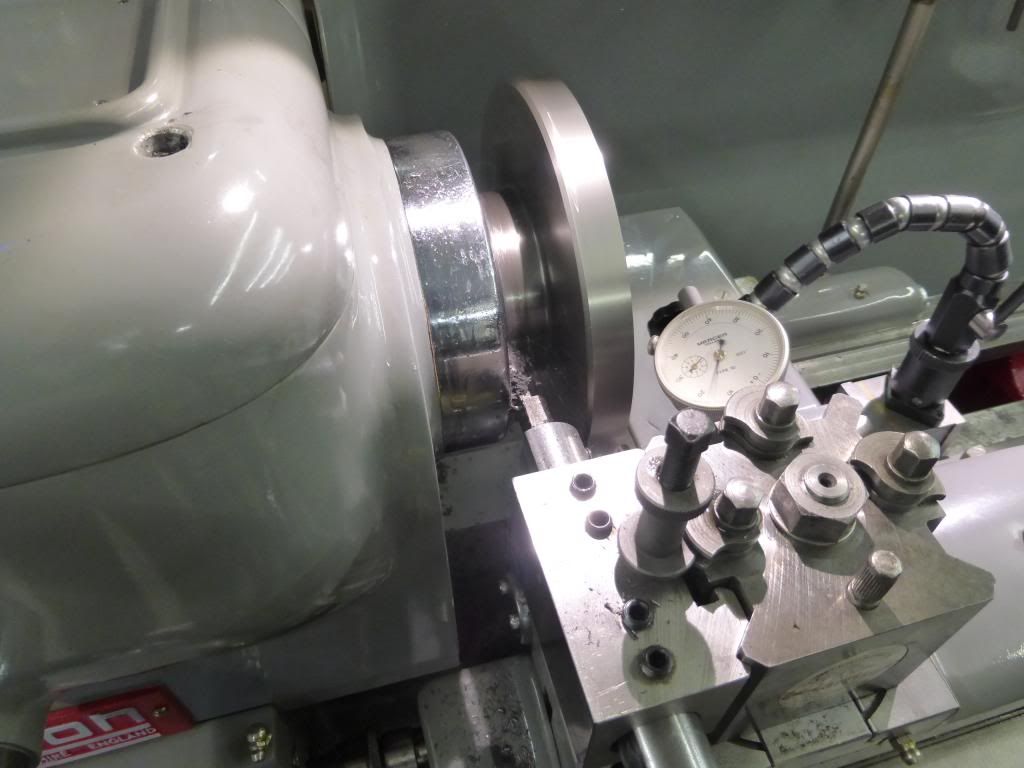
This is the same design backplate that is stuck on my spindle, showing the register and rear face that is butted tight to the shoulder on the spindle.
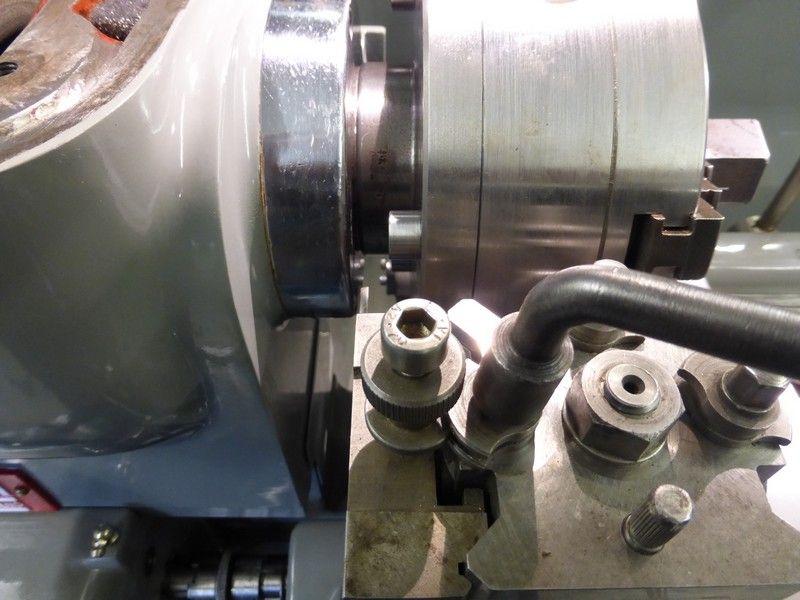
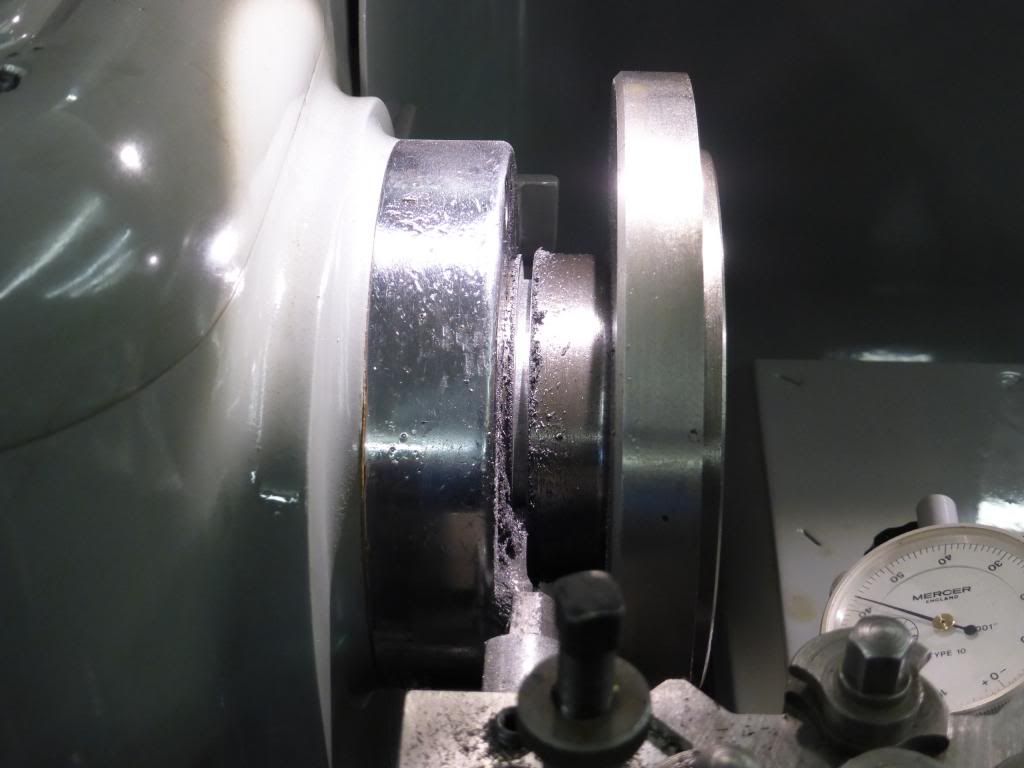
This is the stuck backplate with the bolts through it , that the large bar was acting against both jerking and hitting with the gear train locked stopping the spindle rotating, I have gone to maximum force with this , it would have shifted a truck wheel nut in my opinion.
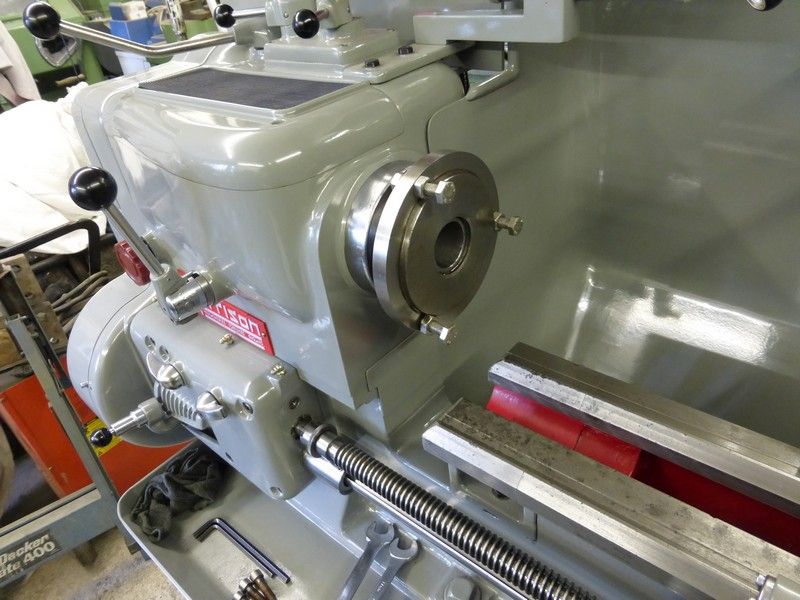
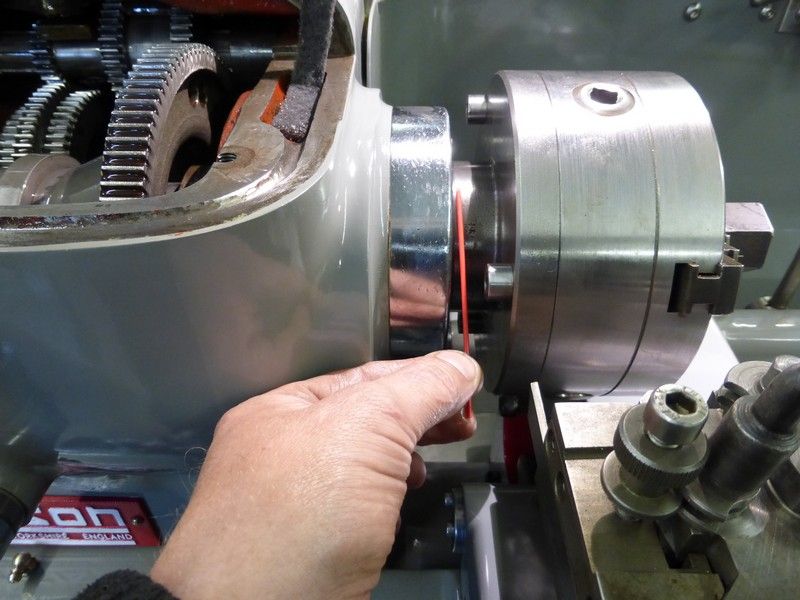
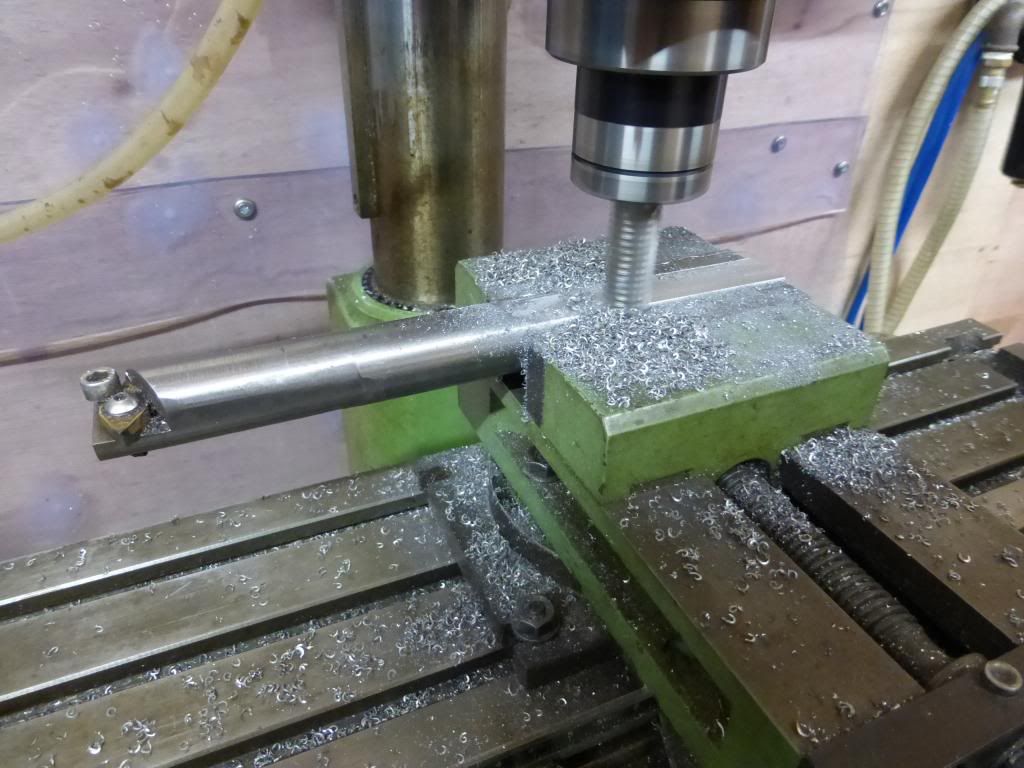
This is a shot to show the spindle shoulder just visible coming out the chrome cover, the backplate is mated up to this. I have a parting tool in the tool holder to show roughly what a plan might be ?
The red small tube is pointing to the spot that I could with a slim parting tool slice into the backplate just shy of where it mates to the spindle shoulder and releave the tension or compression causing the locking.
So really what do peolle think is causing the thing to be seized, what I think some sort of hydraulic type lock or taper type lock between the backplate mating to the spindle shoulder or could it be the threads ? they are clean and oiled. I would really like to svae tha backplate as a hard job to find them for decent price and do not want to have to make another one, I do not want to damage the lathe in any way.
All Myself and a friend can come up with is to maybe drill very small holes in the backplate so releasing fluid could be directly introduced into the threaded area ( if that is what the problem will be) Or to make a special parting tool so it could part away the very end section of the backplate nearest to the spindle shoulder yet miss the spindle by a thou or two, I could also make the tool so it could not go in too deep and mark the spindle as I have a smaller spare backplate with the exact same register to measure.
Any help most appreciated
Cheers Mick
Hi all , I am hoping that someone can help with a problem of a chuck that is stuck on my lathe spindle. I am on the finishing jobs of my rebuilt Harrison L5 and had screwed the chuck on with very light hand pressure only after cleaning both spindle and chuck then applying light oil. I have not even turned anything in the lathe but when I have come to remove the chuck its stuck fast. Proper stuck fast too.
So far I have tried .
large hex bar in the chuck and big spanner on it, tapping the spanner to shock it and jerking spanner with the gear train locked so the spindle can not rotate.
The usual realeasing oils etc, left over night and also repeated after heat applied
Removing the chuck from the backplate , incerting 3 bolts through backplate holes and levering with 3 feet long 1 inch bar , hitting said bar to shock
Heating the backplate up with propane torch and trying to shift while hot , then when cooled again, tapping all around trying to break seal
Replacing chuck and chucking large hex bar then trying to loosen with large socket and windy gun. ( only thought of this after the other attempts )
The force used so far and the hits have gradually reached the point where something is likely to break if any more force used so looking for ideas. It would seem totally impossible that it has become stuck this tight. I know 100% the threads are clean, there is film of light oil and the chuck has not been tightened other than by light hand pressure. I am assuming the rear face is seated against the spindle shoulder and the 'lock' is between this and the threads, will this be the case ? I think it must be as this chuck has been on and off many times before and I know the register is clean and oiled as are the threads.
Here are some photos of what I am dealing with.
This is a samller bore Harrison spindle of the exact same design showing the thread, register and shoulder, then the chrome cover, note the shoulder sticks out the chrome cover a small amount. The actual one on the lathe is clean and spottless and oiled.

This is the same design backplate that is stuck on my spindle, showing the register and rear face that is butted tight to the shoulder on the spindle.

This is the stuck backplate with the bolts through it , that the large bar was acting against both jerking and hitting with the gear train locked stopping the spindle rotating, I have gone to maximum force with this , it would have shifted a truck wheel nut in my opinion.

This is a shot to show the spindle shoulder just visible coming out the chrome cover, the backplate is mated up to this. I have a parting tool in the tool holder to show roughly what a plan might be ?

The red small tube is pointing to the spot that I could with a slim parting tool slice into the backplate just shy of where it mates to the spindle shoulder and releave the tension or compression causing the locking.

So really what do peolle think is causing the thing to be seized, what I think some sort of hydraulic type lock or taper type lock between the backplate mating to the spindle shoulder or could it be the threads ? they are clean and oiled. I would really like to svae tha backplate as a hard job to find them for decent price and do not want to have to make another one, I do not want to damage the lathe in any way.
All Myself and a friend can come up with is to maybe drill very small holes in the backplate so releasing fluid could be directly introduced into the threaded area ( if that is what the problem will be) Or to make a special parting tool so it could part away the very end section of the backplate nearest to the spindle shoulder yet miss the spindle by a thou or two, I could also make the tool so it could not go in too deep and mark the spindle as I have a smaller spare backplate with the exact same register to measure.
Any help most appreciated
Cheers Mick

Re: SHED MATTERS 2
I think machining would be my last resort. When things get stuck like this shocking appears to be the best tactic. I would try to pack up from the bed of the lathe under the neck of the backplate, where your red pointer is, as solid as possible. Then with a hammer and long blunt drift hit the top diameter several times, sort of squeezing and stretching the backplate neck over the thread area. Try this in several places round the neck then go back to your bar and unscrewing technique. Repeat until you are blue in the face then have a cup of tea. I can't make any guarantees but this is always my approach in such situations.
Best of luck
Best of luck
-
Stanley
- Global Moderator
- Posts: 106457
- Joined: 23 Jan 2012, 12:01
- Location: Barnoldswick. Nearer to Heaven than Gloria.
Re: SHED MATTERS 2
Mick, I don't know why your backplate has frozen, all I can say is that the problem is most likely to be the interface between the mating surfaces of the backplate and the spindle. You seem to have done everything that I would have done. P's idea is good, stretching the metal but only if the problem is the internal diameter, if it's the mating surfaces you could actually make it worse. You've already identified the safe and foolproof solution, turn the backplate off and make a new one, far quicker and safer than all this faffing about! Newton would never attempt to shift a piston stuck in a cylinder, he'd simply bore it out.
The cause of the problem is almost certainly a foreign body or substance on the mating face which you've not noticed, it has ragged up and seized. If this is the case, heating the backplate makes it worse because the expansion forces the contact even tighter. Only other course I can suggest is to get some dry ice or a CO2 fire extinguisher, set up for the long bar and the shock and get the backplate as cold as possible. This might shrink it enough to take pressure off the interface. Good luck!
The cause of the problem is almost certainly a foreign body or substance on the mating face which you've not noticed, it has ragged up and seized. If this is the case, heating the backplate makes it worse because the expansion forces the contact even tighter. Only other course I can suggest is to get some dry ice or a CO2 fire extinguisher, set up for the long bar and the shock and get the backplate as cold as possible. This might shrink it enough to take pressure off the interface. Good luck!
Stanley Challenger Graham
Stanley's View
scg1936 at talktalk.net
"Beware of certitude" (Jimmy Reid)
The floggings will continue until morale improves!
Old age isn't for cissies!
Stanley's View
scg1936 at talktalk.net
"Beware of certitude" (Jimmy Reid)
The floggings will continue until morale improves!
Old age isn't for cissies!
Re: SHED MATTERS 2
Hi Stanley , I have got the backplate off , after having quite a few ideas and comments from another forum I posted it on I decided to part off the backplate just shy of where it was contacting up against the shoulder of the spindle. As you would expect a tool had to be made etc but it worked, Photos will follow but I cut into it leaving a sliver of backplate against the shoulder of the spindle and stoped just short of going all the way through the backplate and it came free with the slightest of pressure leaving the spindle unmarked.
Soon as I looked at the threads of the backplate I remembered it did have a fault , a blowhole that the threads ran through, it was on the lathe when I got it and has been used like this for years so why it jammed this time I dont know but I think its scrap anyway as not worth the risk of it happening again.
I will post photos soon.
Cheers Mick.
Re: SHED MATTERS 2
This is the story of how the chuck was removed
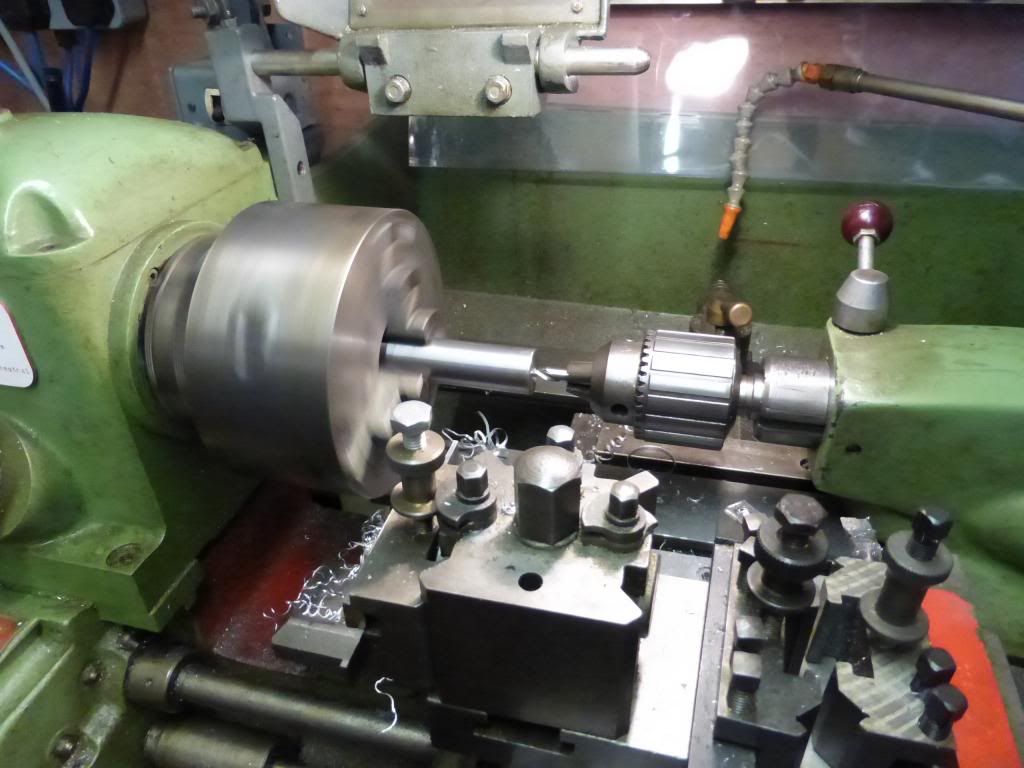
I already had a boring bar I had made and a quick change tool holder that would hold it. The basic plan was to drill the end of this boring bar and make a parting tool incert to fit in the end of it that would align with the very rear edge of the backplate just short of where it mated with the spindle shoulder.
Thes shots of making the bar are in my mate Daves workshop, using hid Kerry AG lathe and Emco FB2 mill, cheers again Dave.
Centre drilling the bar
Drilling the bar for the incert to fit
The incert test fitted in the bar, this was something Dave had lying around so just needed altering as it was already roughly what we needed.
The side of the bar needed milled of for clearance and the other side was milled flat, drilled , tapped M6 and grub screws used to lock the incert in place
This is the new tool in the holder lined up for action
Note the DTI this was to gauge how far the tool advanced to make sure it did not mark the spindle
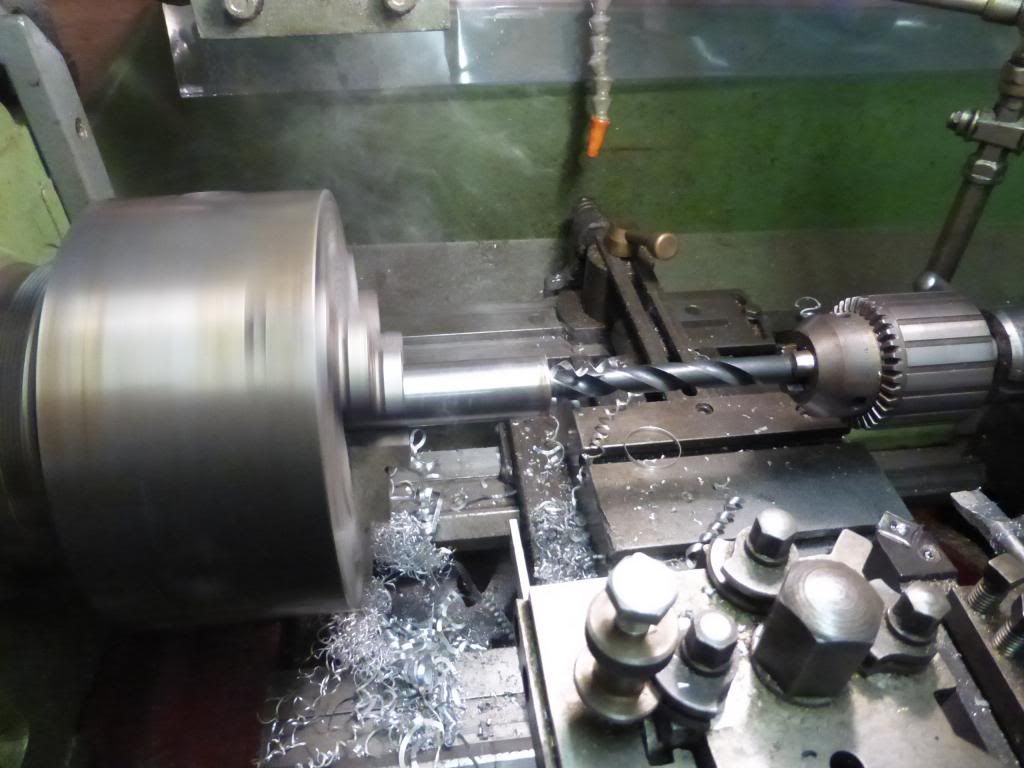
So far so good , just going slowly, once it was only a fracion to go, I tried putting bolts back through the backplate and the slightest of taps loosened the B*****d
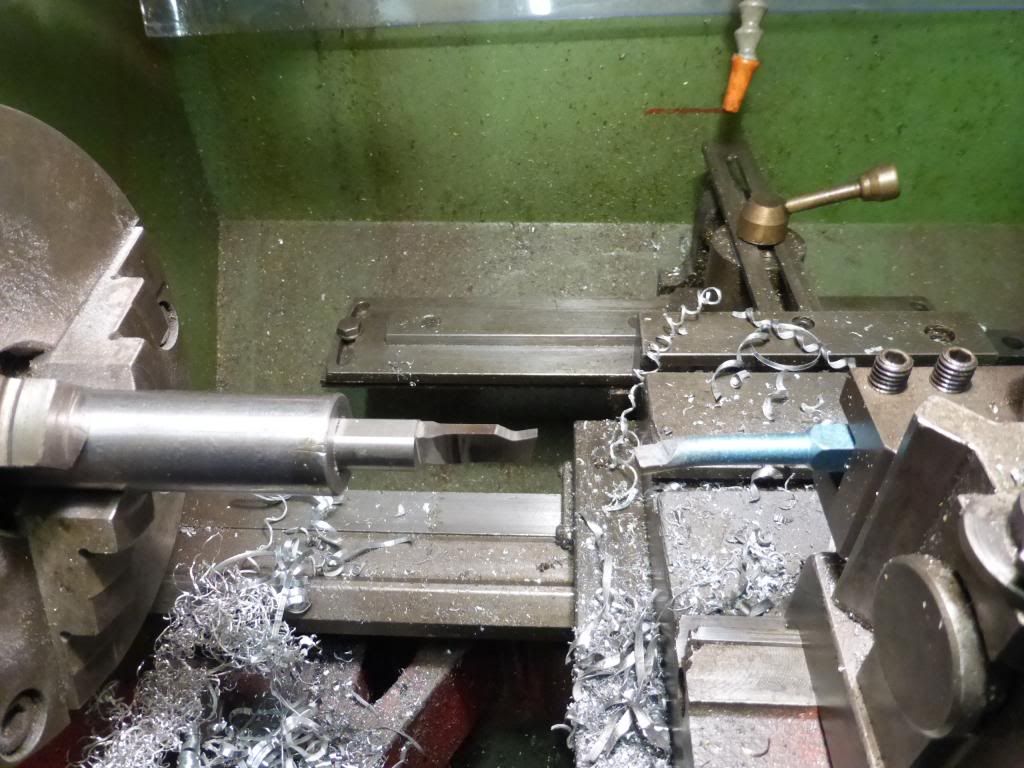
This is the backplate after its surgery, just as planned , the spindle not touched but the stress locking the thread releaved so free
The spindle survived the ordeal
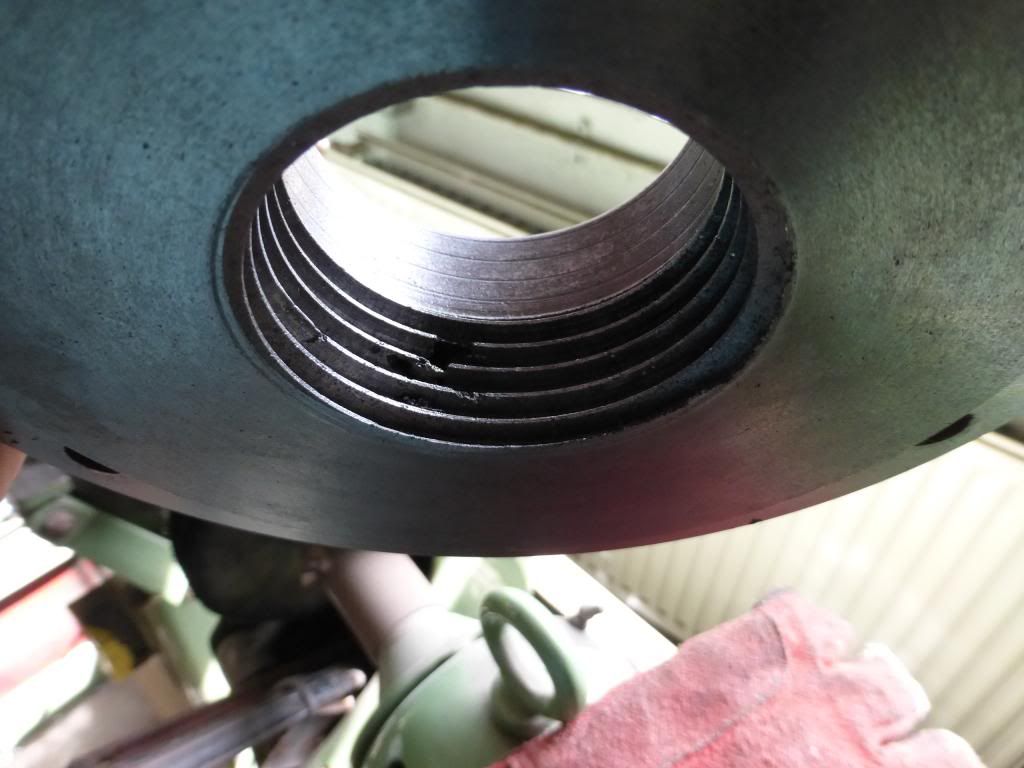
This it the blow hole in the casting that has been threaded, soon as I saw this I remembered it was like this before, it was like this when the chuck came with the lathe and has been used many times, do people think this is what will have caused the problem and is it savable by filling with metal putty and reshaping or bin it ? bearing in mind its either hassle or expensive to get a six inch backplate.
So at least someone else will be able to use this method to remove a locked on chuck without damage .........the back plate has enough 'meat' to be used again if its repairable too.
Cheers Mick
I already had a boring bar I had made and a quick change tool holder that would hold it. The basic plan was to drill the end of this boring bar and make a parting tool incert to fit in the end of it that would align with the very rear edge of the backplate just short of where it mated with the spindle shoulder.
Thes shots of making the bar are in my mate Daves workshop, using hid Kerry AG lathe and Emco FB2 mill, cheers again Dave.
Centre drilling the bar

Drilling the bar for the incert to fit

The incert test fitted in the bar, this was something Dave had lying around so just needed altering as it was already roughly what we needed.

The side of the bar needed milled of for clearance and the other side was milled flat, drilled , tapped M6 and grub screws used to lock the incert in place

This is the new tool in the holder lined up for action

Note the DTI this was to gauge how far the tool advanced to make sure it did not mark the spindle

So far so good , just going slowly, once it was only a fracion to go, I tried putting bolts back through the backplate and the slightest of taps loosened the B*****d

This is the backplate after its surgery, just as planned , the spindle not touched but the stress locking the thread releaved so free

The spindle survived the ordeal

This it the blow hole in the casting that has been threaded, soon as I saw this I remembered it was like this before, it was like this when the chuck came with the lathe and has been used many times, do people think this is what will have caused the problem and is it savable by filling with metal putty and reshaping or bin it ? bearing in mind its either hassle or expensive to get a six inch backplate.

So at least someone else will be able to use this method to remove a locked on chuck without damage .........the back plate has enough 'meat' to be used again if its repairable too.
Cheers Mick
-
Stanley
- Global Moderator
- Posts: 106457
- Joined: 23 Jan 2012, 12:01
- Location: Barnoldswick. Nearer to Heaven than Gloria.
Re: SHED MATTERS 2
Mick, glad you have it off! (I hate small parting tools!) That casting should never have been used, it was scrap before it started! If it was me I'd stop looking for an 'easy way', do it properly and then you can forget it. Have a word with a foundry, they usually have stock patterns for back plate blanks, or get a piece of black bar big enough to make the backplate and start making some muck. Turn it on your own lathe of course once you have threaded it using your big four jaw (or get your mate to bore and tap it for you!) Pop it on the nose and away you go. Turn the back face first then reverse it for the final fitting. What looks like the long way round is actually the fastest and most satisfactory because you can forget it.
I know you won't take any notice of this but I would do it Newton's way, no fancy measuring beyond callipers for the rough turning, measure final cut by offering the chuck up to the plate. I promise it will be perfect.
One advantage of the black bar route is that it's more reliable material. It's amazing how a new casting can change when the stresses come out of it over time and any casting will move if it hasn't been relieved in a furnace after initial shaping. When I got Johnny's 1927 lathe I thought the mandrel was bent, turned out it was the cast back to the chuck that had moved over time. I turned the face straight again on the nose and refitted it, perfect.
Stanley Challenger Graham
Stanley's View
scg1936 at talktalk.net
"Beware of certitude" (Jimmy Reid)
The floggings will continue until morale improves!
Old age isn't for cissies!
Stanley's View
scg1936 at talktalk.net
"Beware of certitude" (Jimmy Reid)
The floggings will continue until morale improves!
Old age isn't for cissies!
Re: SHED MATTERS 2
Hi Stanley , I have been on holiday so not got anything else done but have got a slab of steel to make a new back plate from, I agree its the best thing to do as I will be kicking myself if it happens again.
I have gathered more car boot goodness today.
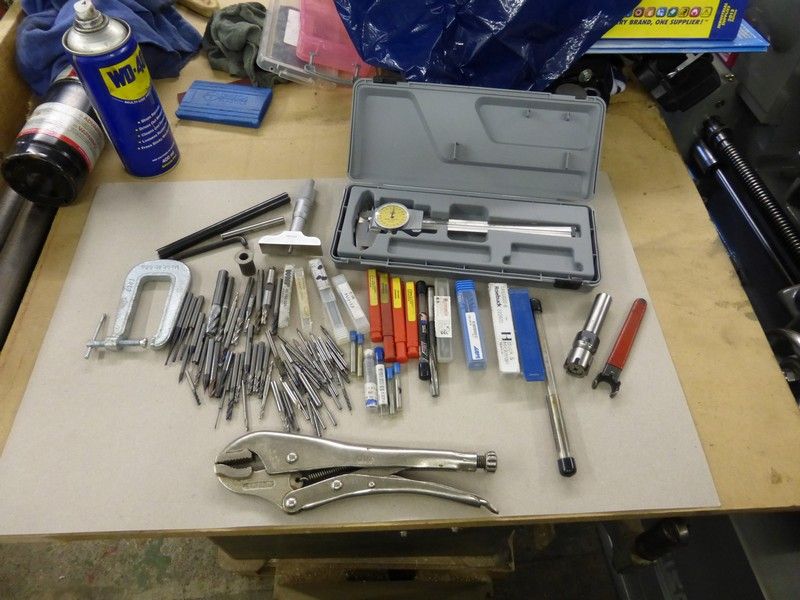
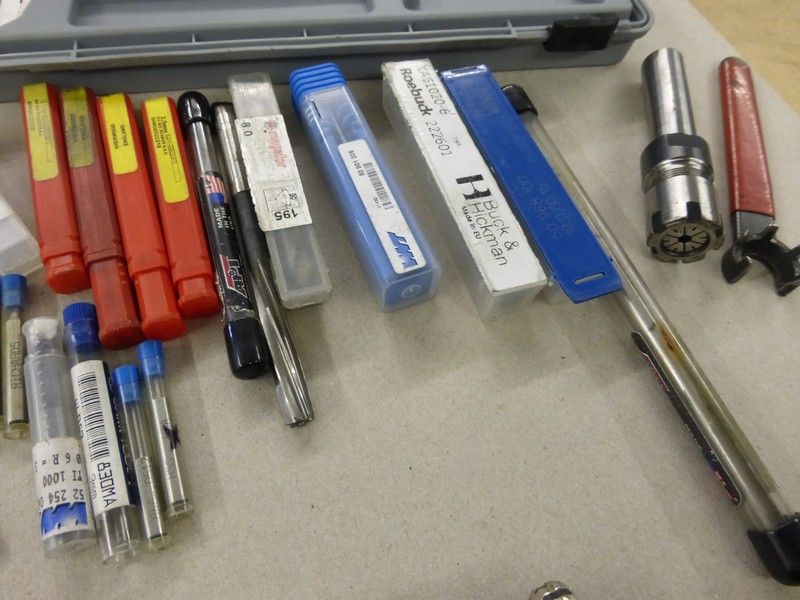
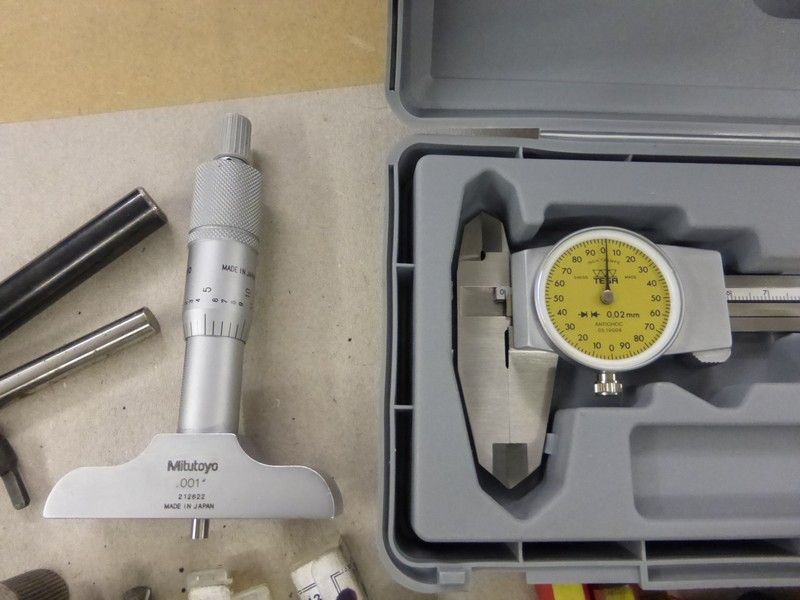
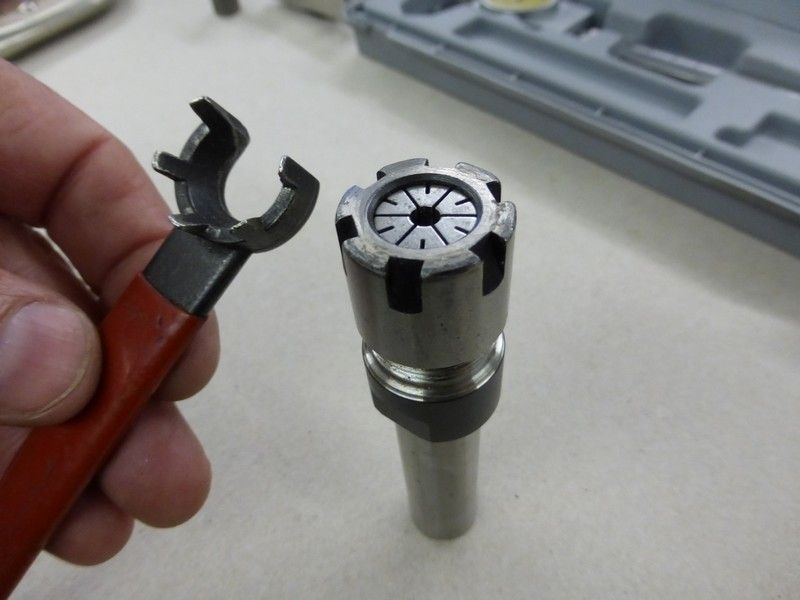
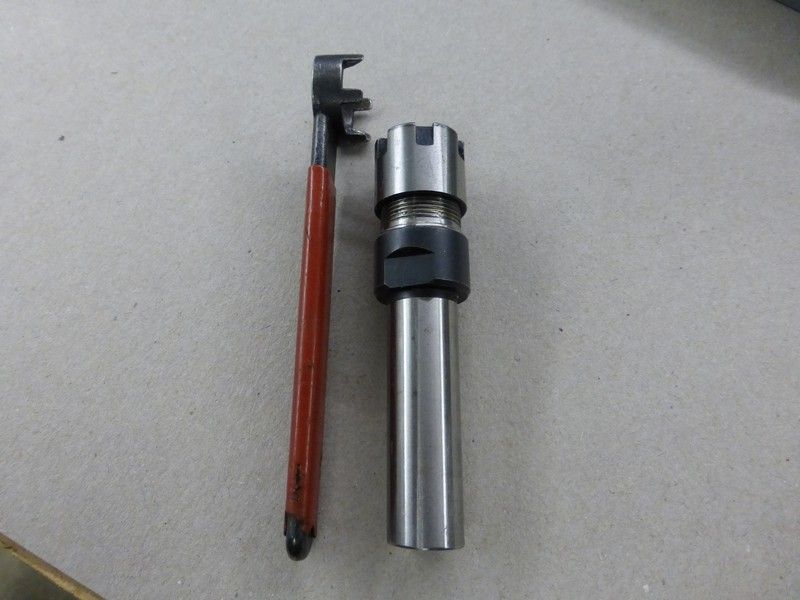
I called in a a boot sale that does not have much in the way of tools etc and almost all the way around the place I was muttering to myself how it was a waste of space......................... then I spied a plastic box with some milling cutters in it a Miatoyo depth mic and Tesa dial calipers and did a deal £22 for the lot.
There is a small ER collet chuck, various reamers, milling cutters and engraving cutters 90% carbide and all sharp or new, when I counted up there was 80 in total !.
Later in the day I went to two more boot sales with John Doubleboost but only got a pair of Mole grips and a small long reach G clamp but £3 for the pair I was not robbed.
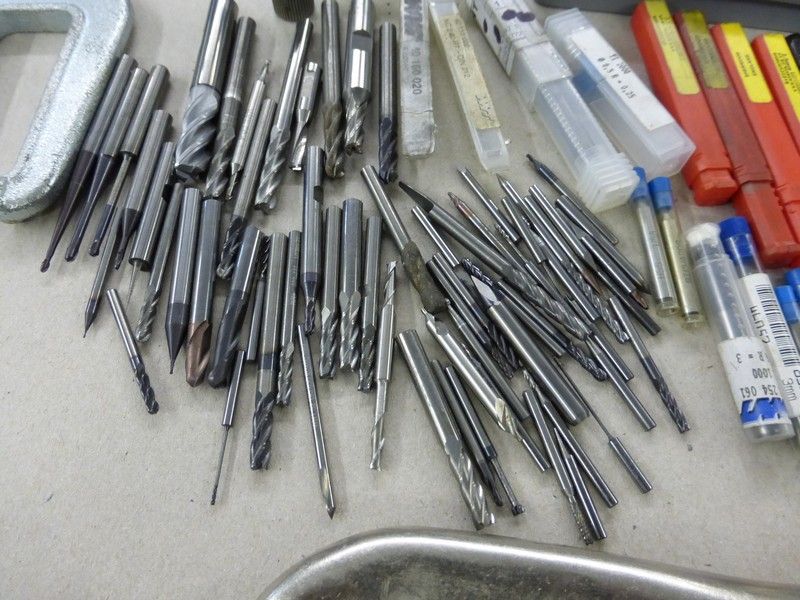
Days like this make the days you get nothing seem worth it, I should never need another samll milling cutter for a while anyway !
Cheers Mick
I have gathered more car boot goodness today.
I called in a a boot sale that does not have much in the way of tools etc and almost all the way around the place I was muttering to myself how it was a waste of space......................... then I spied a plastic box with some milling cutters in it a Miatoyo depth mic and Tesa dial calipers and did a deal £22 for the lot.
There is a small ER collet chuck, various reamers, milling cutters and engraving cutters 90% carbide and all sharp or new, when I counted up there was 80 in total !.
Later in the day I went to two more boot sales with John Doubleboost but only got a pair of Mole grips and a small long reach G clamp but £3 for the pair I was not robbed.


Days like this make the days you get nothing seem worth it, I should never need another samll milling cutter for a while anyway !
Cheers Mick
-
Stanley
- Global Moderator
- Posts: 106457
- Joined: 23 Jan 2012, 12:01
- Location: Barnoldswick. Nearer to Heaven than Gloria.
Re: SHED MATTERS 2
That ER holder alone would have cost an arm and a leg. I still wince when I remember how much mine cost straight from the factory in Rawtenstall. You're doing exactly what I used to do. Don't worry about being a jackdaw, it will all come in handy in years to come. Remember your gas set is sat here.....
Stanley Challenger Graham
Stanley's View
scg1936 at talktalk.net
"Beware of certitude" (Jimmy Reid)
The floggings will continue until morale improves!
Old age isn't for cissies!
Stanley's View
scg1936 at talktalk.net
"Beware of certitude" (Jimmy Reid)
The floggings will continue until morale improves!
Old age isn't for cissies!
Re: SHED MATTERS 2
Hi Stanley,
I had not forgot about the Gas set , just not been passing yet but might be going to my mates at Burnley soon I think so will let you know before hand and call in for a cuppa and chat. I always just get what is there at the boot sales Stanley as its no good waiting until you need something as its all too expensive new really, so just collect whatever look as if it will come in handy one day. I enjoy having a root about at the boot sales and if you do find stuff its always a decent price. Just a pity there is not much engineering type stuff about now. I just wish I collected kids toys and old clothes lol.
Cheers Mick
-
Stanley
- Global Moderator
- Posts: 106457
- Joined: 23 Jan 2012, 12:01
- Location: Barnoldswick. Nearer to Heaven than Gloria.
Re: SHED MATTERS 2
In the 1980s and 1990s the market was flooded with stuff as factories closed down. I saw a huge Polish horizontal borer in Dixons one day, brand new, never been used and there were no takers, it was scrapped. It was sad....
Remember to ring me early in the morning.....
Remember to ring me early in the morning.....
Stanley Challenger Graham
Stanley's View
scg1936 at talktalk.net
"Beware of certitude" (Jimmy Reid)
The floggings will continue until morale improves!
Old age isn't for cissies!
Stanley's View
scg1936 at talktalk.net
"Beware of certitude" (Jimmy Reid)
The floggings will continue until morale improves!
Old age isn't for cissies!
-
Stanley
- Global Moderator
- Posts: 106457
- Joined: 23 Jan 2012, 12:01
- Location: Barnoldswick. Nearer to Heaven than Gloria.
Re: SHED MATTERS 2
Gugger (Walter Brunner of Germany) is dead. I got mail from his daughter this morning. This is a detail of one of his model engines, meticulous craftsmanship and attention to detail.
Stanley Challenger Graham
Stanley's View
scg1936 at talktalk.net
"Beware of certitude" (Jimmy Reid)
The floggings will continue until morale improves!
Old age isn't for cissies!
Stanley's View
scg1936 at talktalk.net
"Beware of certitude" (Jimmy Reid)
The floggings will continue until morale improves!
Old age isn't for cissies!
Re: SHED MATTERS 2
Hi Stanley , sorry to hear that sad news I have not checked in for a while so just saw it now, like you say amazing attention to detail a sad loss to craftmanship.
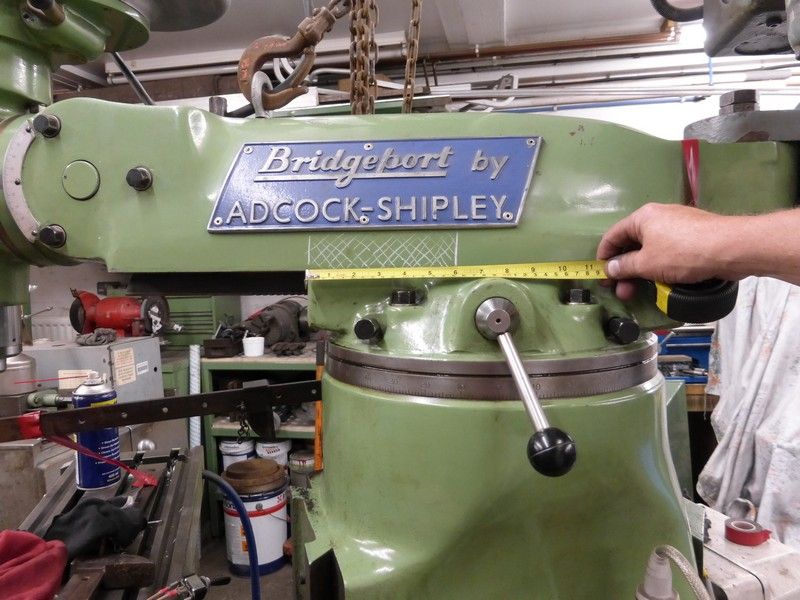
I have been fixing the Bridgport mill ram that was stuck solid, it had worked fine in the past so over time had just seized.
Hi All , this problem happened a good while back but I have just managed to get it fixed.
Well its an age since this problem was shelved due to other things getting done but I have finally solved the problem!.
I could not get the ram to shift with the sash clamps in the corner , I tried various anti seize releasing type oils etc but none worked so I had to eventually move the mill so I could get around it and also use a chain hoist to take the weight of the ram and milling and slotting head when I tried to get it free. Needless to say this was a right job in its self as I had it on a steel frame rawl bolted to the floor then concreted in etc.
Anyway once it was in place it was easier to keep winding the sash clamps back and forth even though they were keep trying to slip off and needed re setting every 3 inches etc, it was still seized tight so the clamps only just managed to slowly shift it back and forward.
This was the set up under the lifting hook and with the weight supported and the sash clamps on each side of the ram.
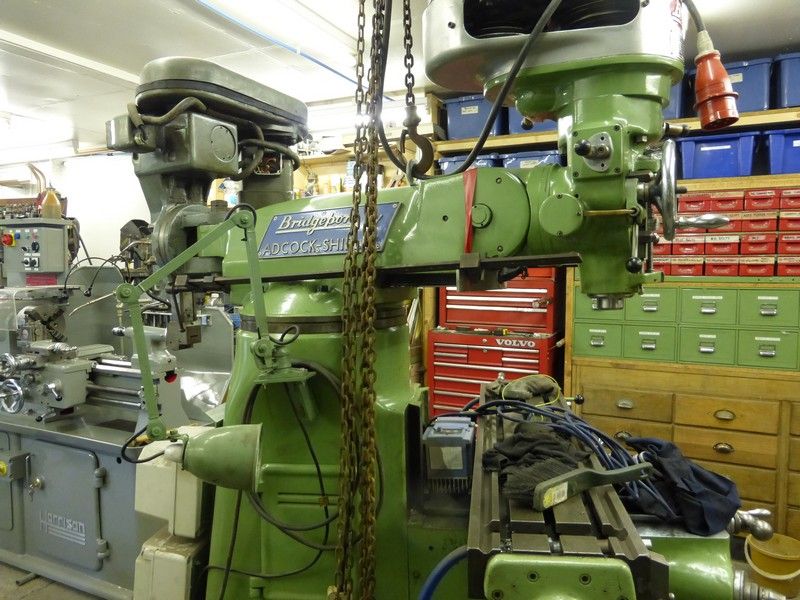
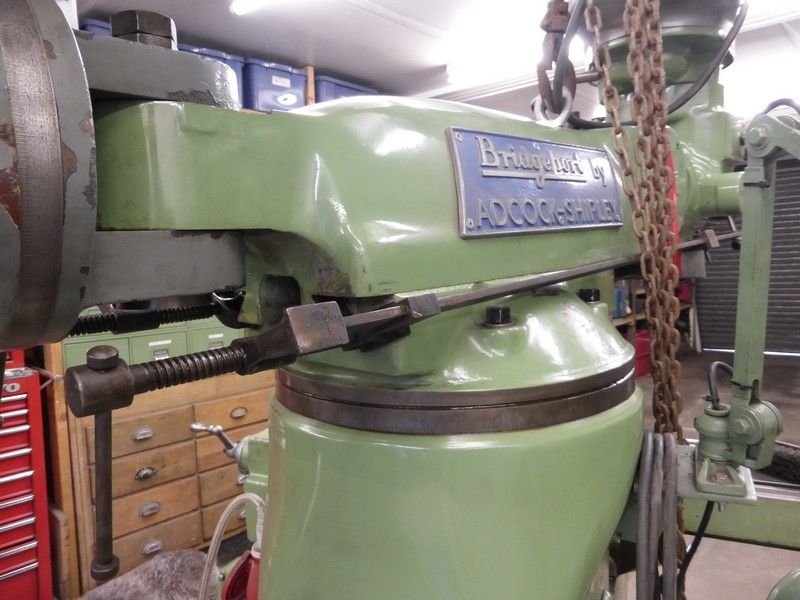
As you can see from this photo even with the ram fully forward then fully back it left a six inch section that never stuck out to be oiled, this must have been the stuck area as the sections that did stick out were spottless and oiled, as you can see in the second photo.
I had the rack and pinion removed and just kept jacking right forward then right back and oiled each time, still nothing improving, I then decided to lift the whole machine on the lifting eye so it was hanging off the ram in effect and the sash clamps were easier to operate, once it was fully at the back of the ram the machine tilted backwards so it was resting on the back corners , I then put light oil at the front of the dovetail and went for my tea hoping it would seep backwards with gravity.................... I replaced the pinion and it moved it an inch or so , so kept working and oiling it and all of a sudden its totally free and able to be moved via the proper lever with one hand easy.
So just a case of the oil dried out ? , it did used to work and once the oile had got under the dovetail again it was sorted. All I can say is if you have a bridgeport or similar mill is operate the ram back and forth every so often as this was a right hassle to get freed off.
After I was thinking I could have drilled the section of the ram that was sticking out from the side then up over and fitted an oil nipple then jacked the new nipples over the machine side of the dovetail and pumped oild between the two surfaces and this would have done the job I think as the problem seems to have been the weight of the ram is wiping the oil off as it goes back into the housing.
Anyway Job done................ I just have to re paint half the mill now lol.
Cheers Mick.
I have been fixing the Bridgport mill ram that was stuck solid, it had worked fine in the past so over time had just seized.
Hi All , this problem happened a good while back but I have just managed to get it fixed.
Well its an age since this problem was shelved due to other things getting done but I have finally solved the problem!.
I could not get the ram to shift with the sash clamps in the corner , I tried various anti seize releasing type oils etc but none worked so I had to eventually move the mill so I could get around it and also use a chain hoist to take the weight of the ram and milling and slotting head when I tried to get it free. Needless to say this was a right job in its self as I had it on a steel frame rawl bolted to the floor then concreted in etc.
Anyway once it was in place it was easier to keep winding the sash clamps back and forth even though they were keep trying to slip off and needed re setting every 3 inches etc, it was still seized tight so the clamps only just managed to slowly shift it back and forward.
This was the set up under the lifting hook and with the weight supported and the sash clamps on each side of the ram.


As you can see from this photo even with the ram fully forward then fully back it left a six inch section that never stuck out to be oiled, this must have been the stuck area as the sections that did stick out were spottless and oiled, as you can see in the second photo.


I had the rack and pinion removed and just kept jacking right forward then right back and oiled each time, still nothing improving, I then decided to lift the whole machine on the lifting eye so it was hanging off the ram in effect and the sash clamps were easier to operate, once it was fully at the back of the ram the machine tilted backwards so it was resting on the back corners , I then put light oil at the front of the dovetail and went for my tea hoping it would seep backwards with gravity.................... I replaced the pinion and it moved it an inch or so , so kept working and oiling it and all of a sudden its totally free and able to be moved via the proper lever with one hand easy.
So just a case of the oil dried out ? , it did used to work and once the oile had got under the dovetail again it was sorted. All I can say is if you have a bridgeport or similar mill is operate the ram back and forth every so often as this was a right hassle to get freed off.
After I was thinking I could have drilled the section of the ram that was sticking out from the side then up over and fitted an oil nipple then jacked the new nipples over the machine side of the dovetail and pumped oild between the two surfaces and this would have done the job I think as the problem seems to have been the weight of the ram is wiping the oil off as it goes back into the housing.
Anyway Job done................ I just have to re paint half the mill now lol.
Cheers Mick.
Re: SHED MATTERS 2
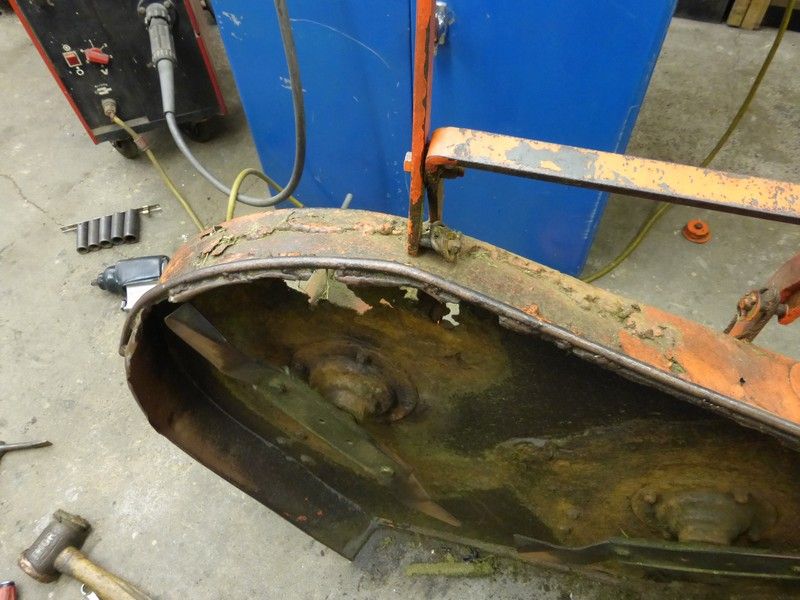
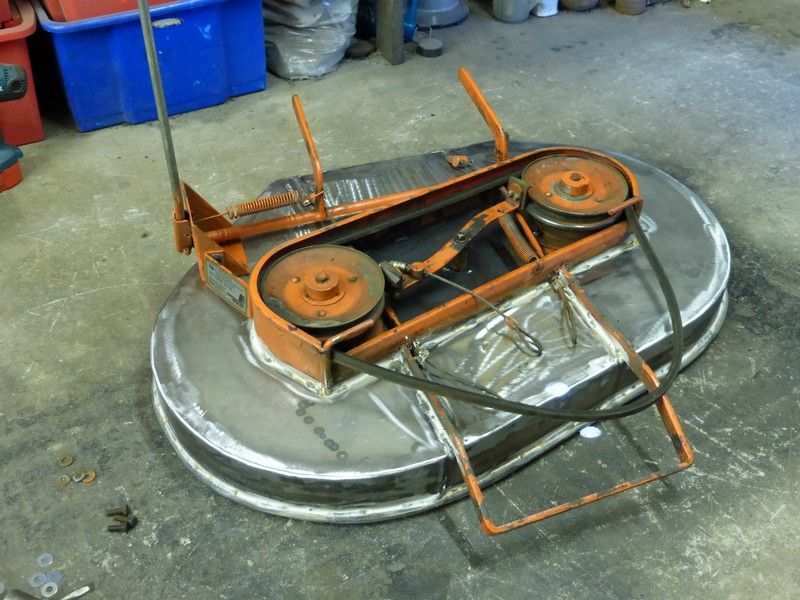
Hi All , I have been fixing a 1980's ride on mower for an old lady I know who still uses this mower to do her lawns at the age of 83. The first problem was a rattle which turned out to be a bearing on the cutter deck blade. When I went to do the deck the front wheel was also leaning right out as she had clipped a tree stump and the box section axle has split, I then noticed that the other front wheel was wobbling all over the place once it was off the ground. So the offending bits were stripped off which left the mower half stripped as one bolt that had to come out up over to get the axle off needed the whole front engine cover grill etc to be removed then the engine itself to be loosened to raise it to get this one bolt out.
Anyway these are the bits, the axle is thin box section welded in places and had just spilt, letting the wheel flop all over.
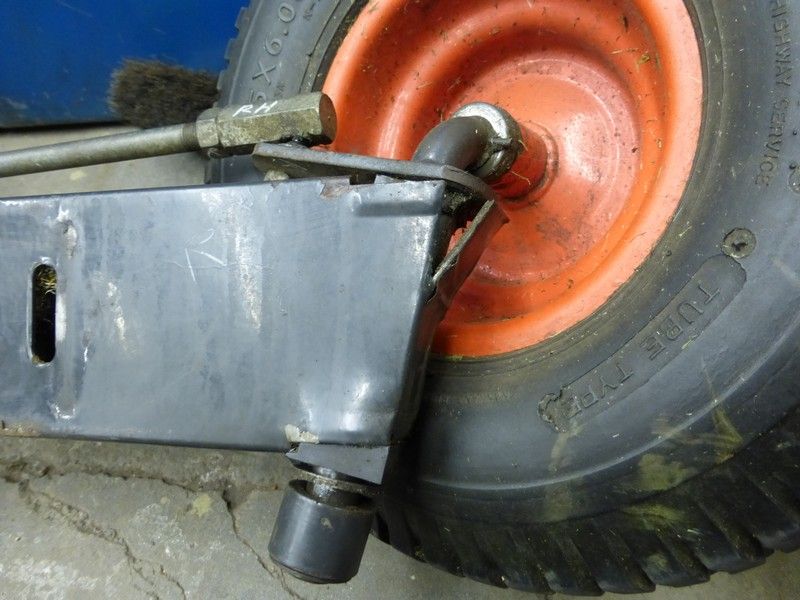
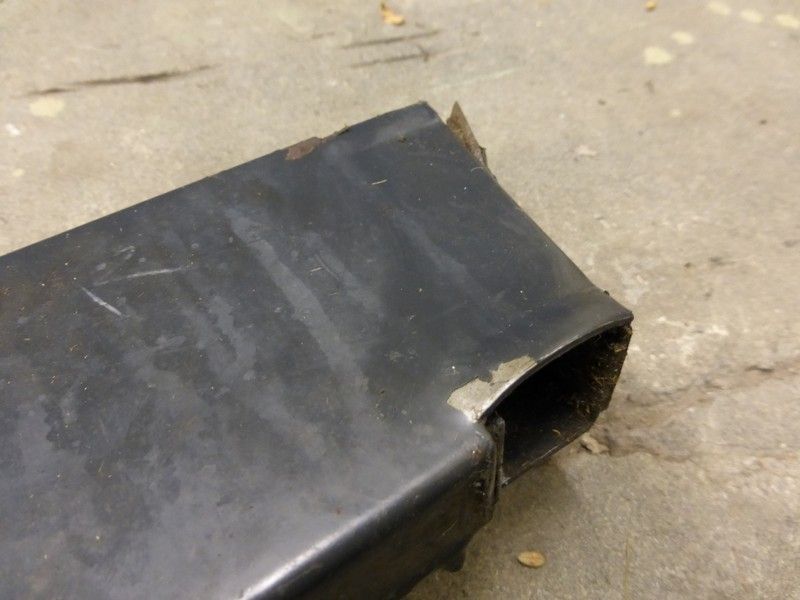
This is the damaged side that has spit.
I then noticed the other side looked different , it looked as if its been repaired in the past for the same problem. It had been plated up to make it stronger.
I hammered the distorted area back into shape around a bit of scrap box section.
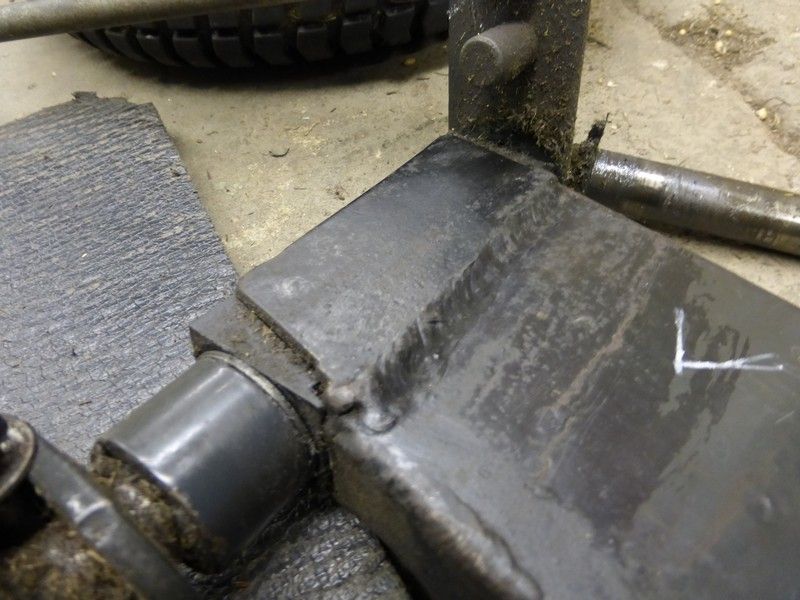
Welded up the splits , then tacked some more heavy plate around the area.
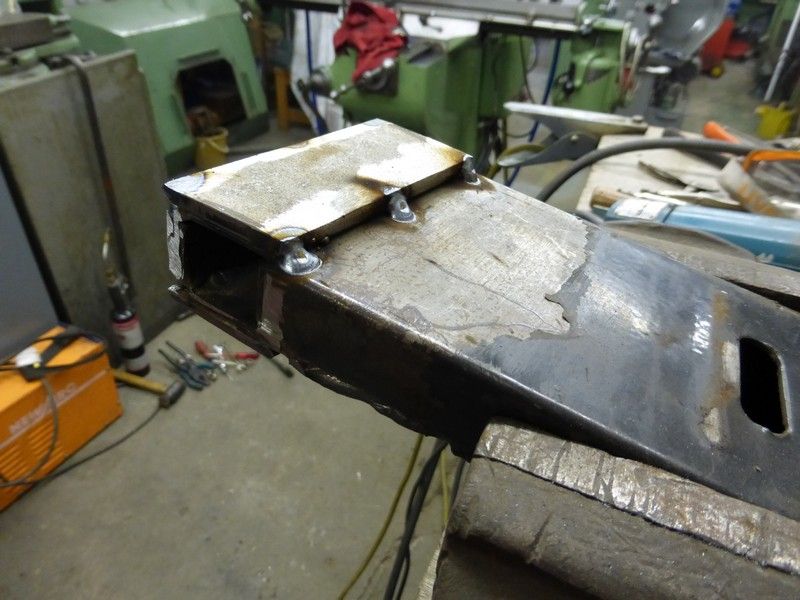
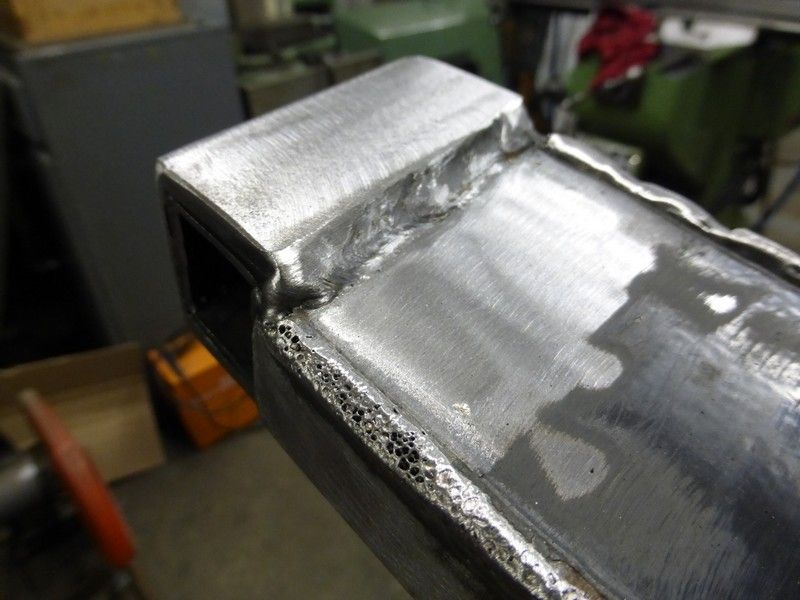
Welded up these new plates, it will not be this are that bends next time !
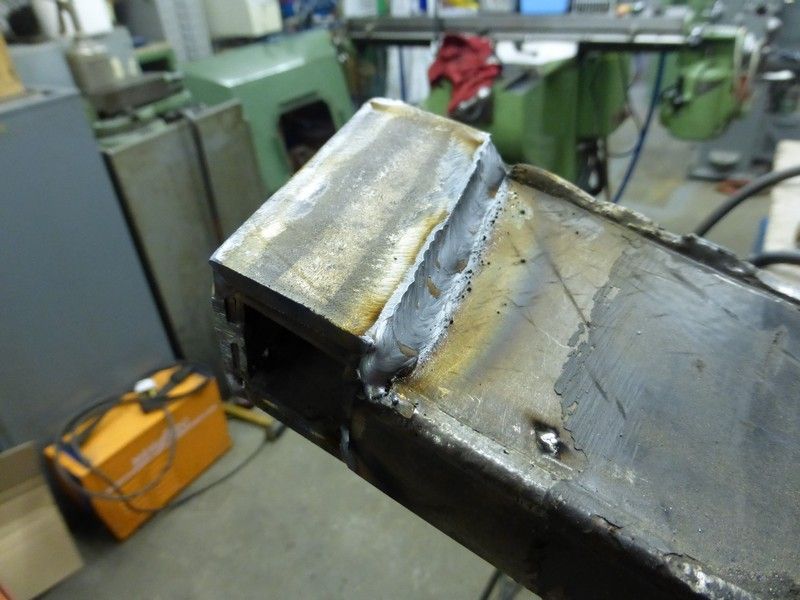
Note the air bubbles in the factory weld !!!!! its like an aero chocolate bar !
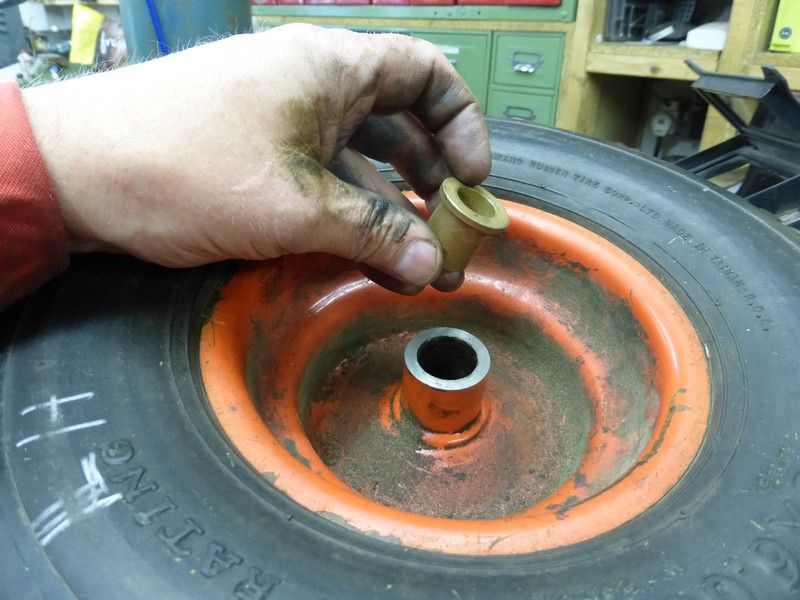
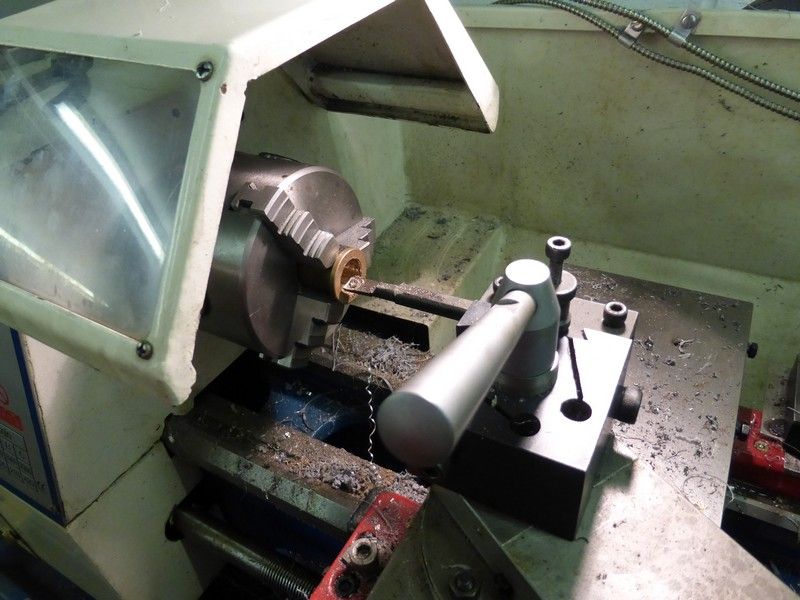
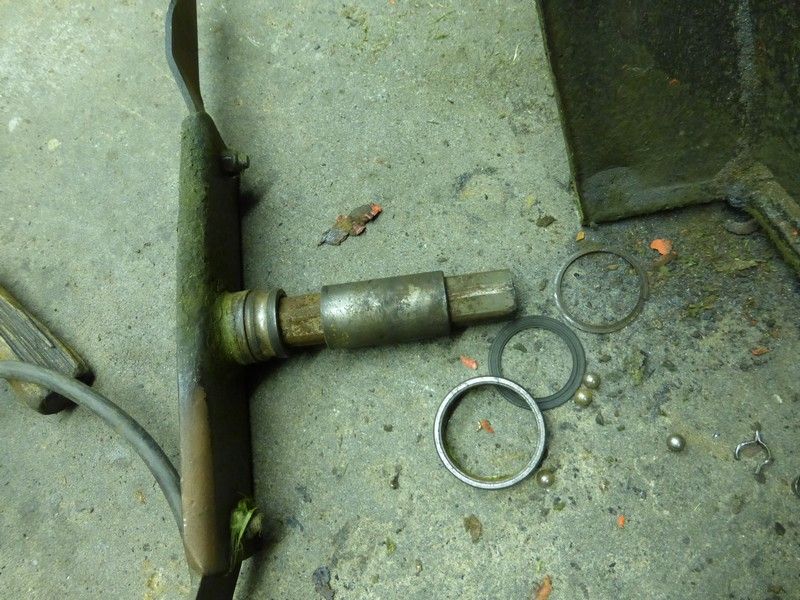
The wheel that was very slack on the shaft was caused due to the bronze bush being worn away to the point of falling to bits.
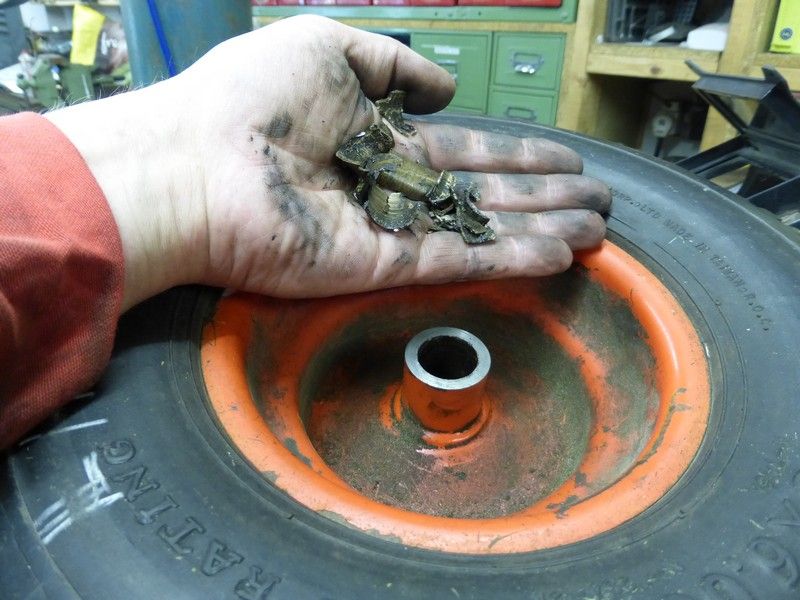
I had some bushes the right outside diameter but too small inside so bored them out to match the axle on the little Chester DB8 lathe, this fixed the wheel, the other one was fine so may have been replace at some time ?
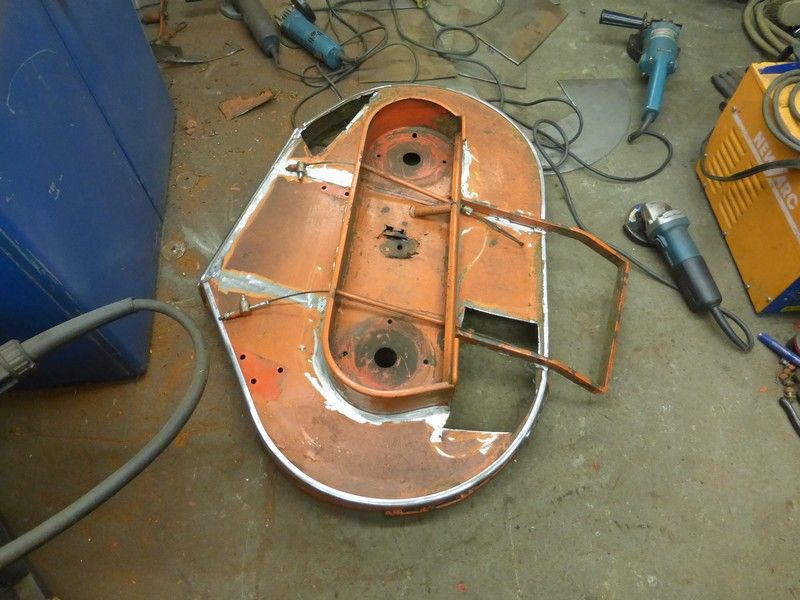
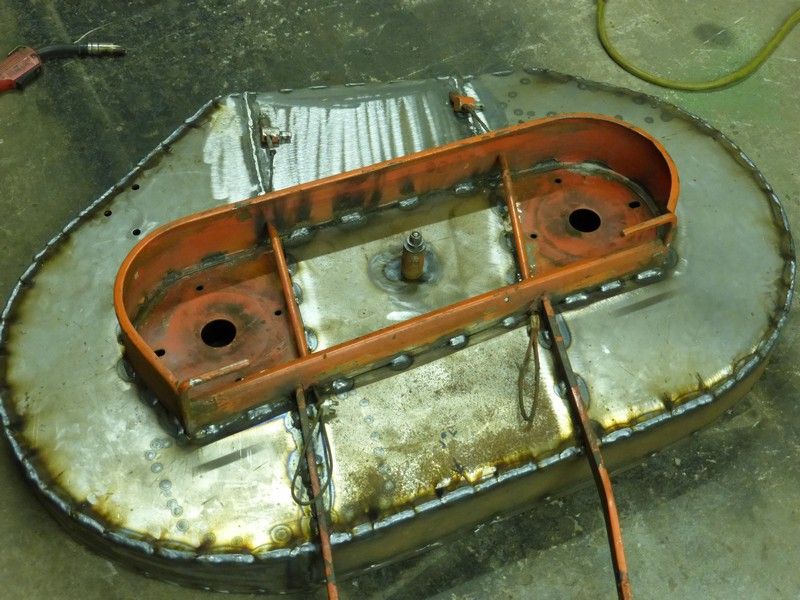
Right thats the bit that had nothing wrong with it last time I saw the mower fixed now for the main job. The cutter deck has rusted through in a few places and been bodged before badly as usual, then the bearings in the shafts for the blade also eeded replacing on bpth sides.
This is the state of the tinwork and previous repairs.
This is what was left of the bearings on one side and the other was not far off this but still in oe bit. I was surprised but nothing was too seized so they replaced ok. I have just ground off all the nuts and bolts as they were rusted beyond ever coming back off and are just M8 bolts.
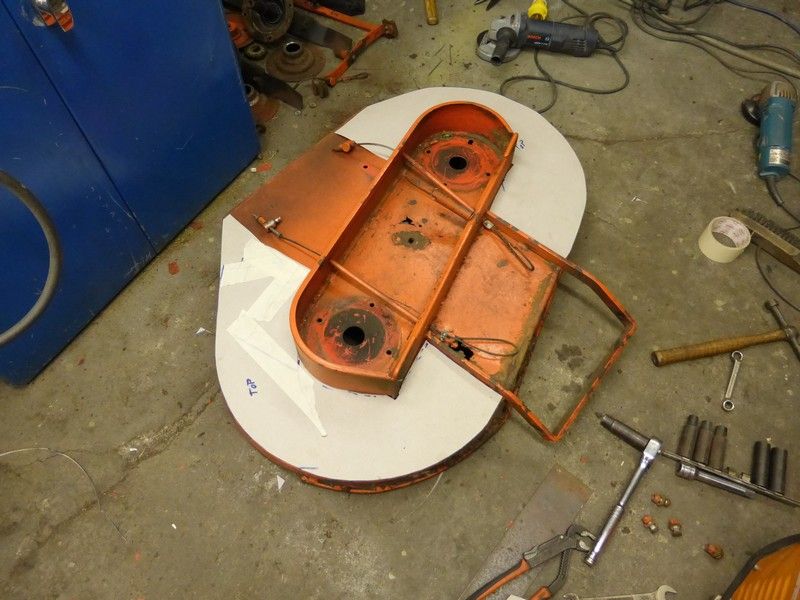
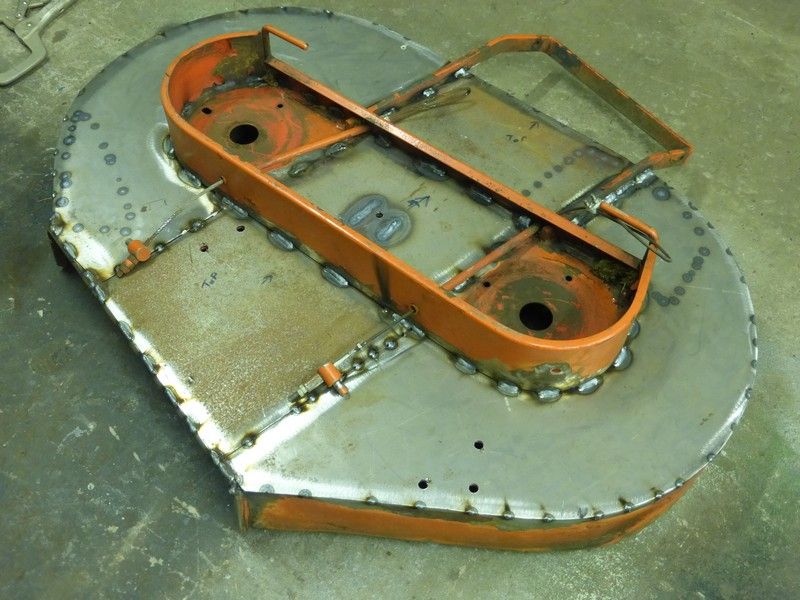
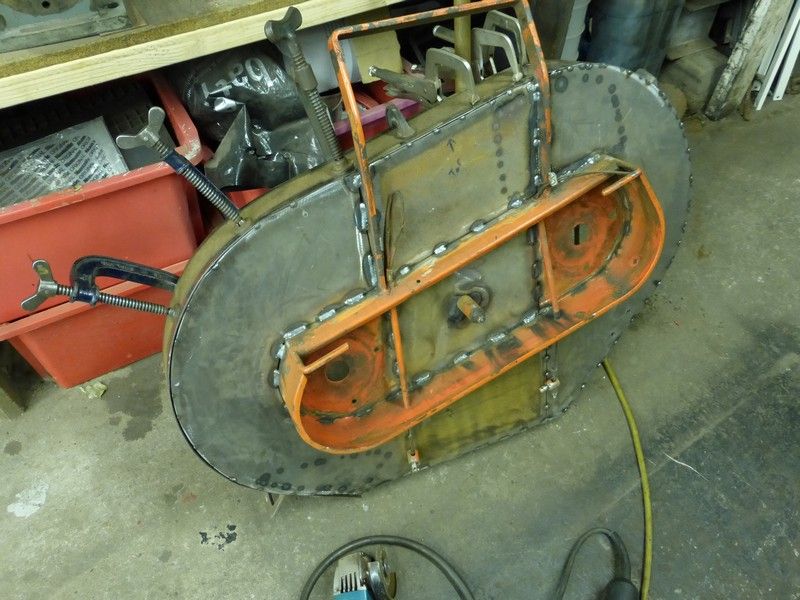
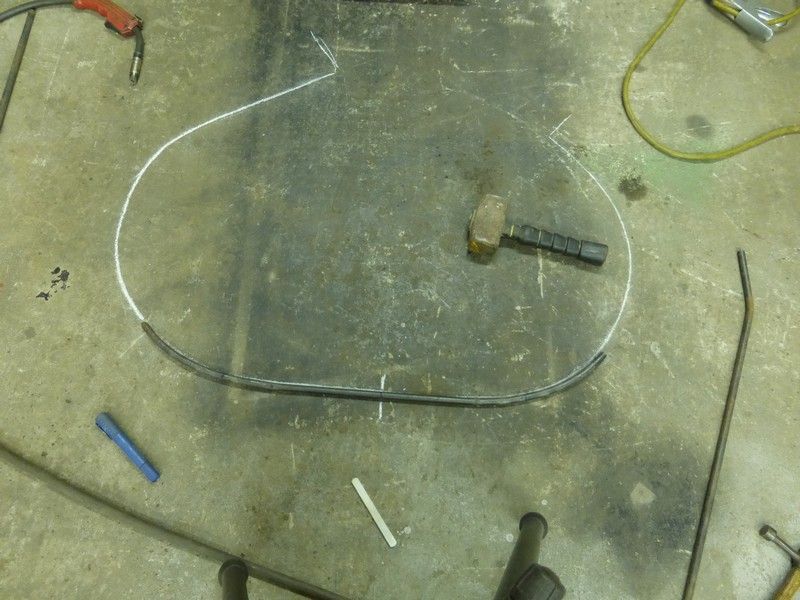
The plan with the cutter deck tinwork is to make do with what steel I have lying about, I have made cardboard patters and will do it in several sections from the outside so it looks decent once done, I have cut the cardboard templates out here and will then fit steel sections inbetween the central gaps then weld a strip around the whole thing like a skirt once this top section is on.
This is the cardboard templates , its worth spending a bit of time and getting these right as its easier than messing about altering the steel a few times.
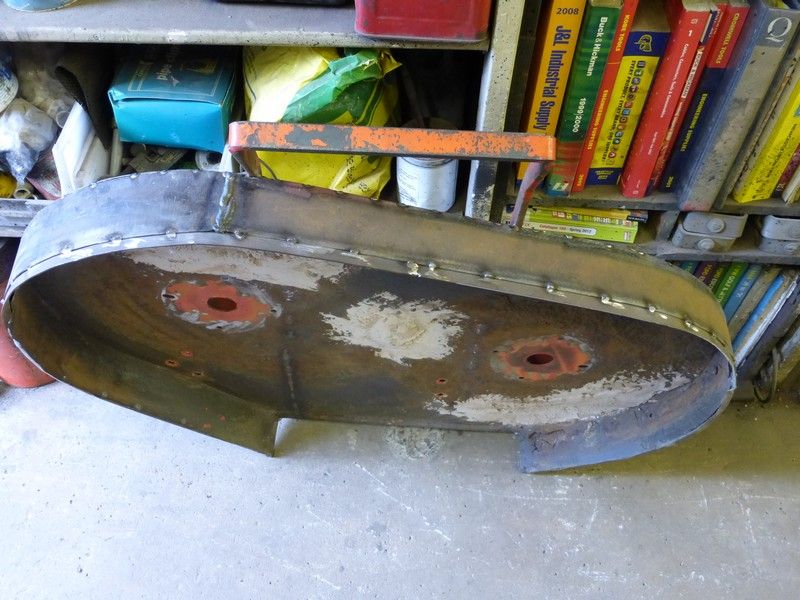
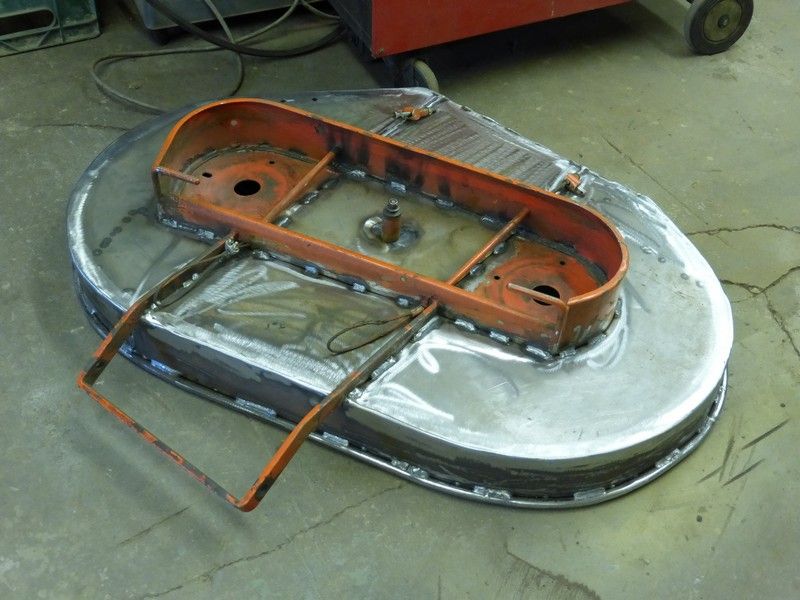
Spot the difference, this is the same two sections in steel , its about 2mm thick so will be good to weld the skirt on to.
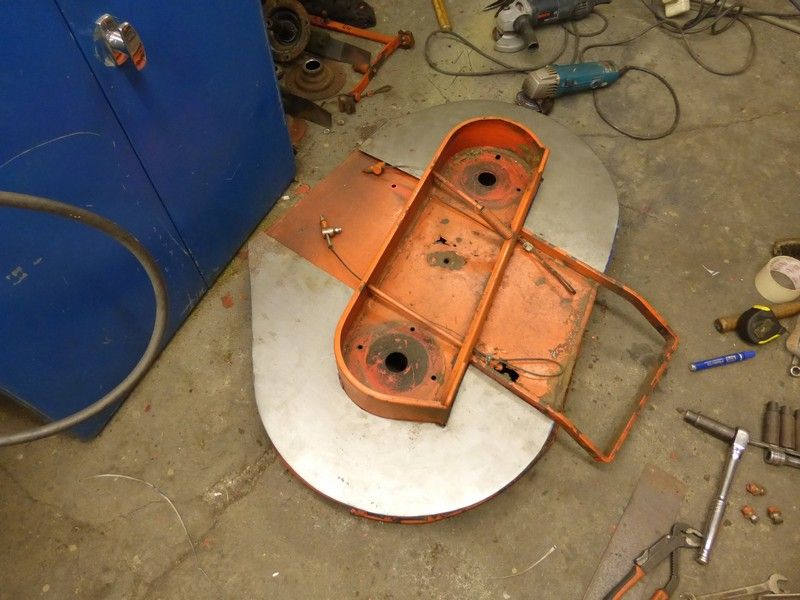
This is as far as I have got up to now so still plenty to do .
Cheers Mick.
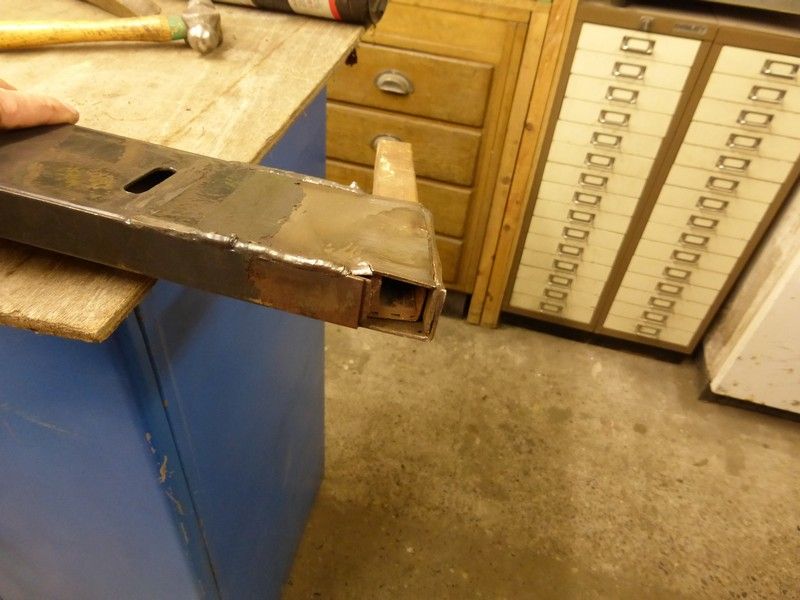
Anyway these are the bits, the axle is thin box section welded in places and had just spilt, letting the wheel flop all over.

This is the damaged side that has spit.

I then noticed the other side looked different , it looked as if its been repaired in the past for the same problem. It had been plated up to make it stronger.

I hammered the distorted area back into shape around a bit of scrap box section.

Welded up the splits , then tacked some more heavy plate around the area.

Welded up these new plates, it will not be this are that bends next time !

Note the air bubbles in the factory weld !!!!! its like an aero chocolate bar !

The wheel that was very slack on the shaft was caused due to the bronze bush being worn away to the point of falling to bits.

I had some bushes the right outside diameter but too small inside so bored them out to match the axle on the little Chester DB8 lathe, this fixed the wheel, the other one was fine so may have been replace at some time ?


Right thats the bit that had nothing wrong with it last time I saw the mower fixed now for the main job. The cutter deck has rusted through in a few places and been bodged before badly as usual, then the bearings in the shafts for the blade also eeded replacing on bpth sides.
This is the state of the tinwork and previous repairs.

This is what was left of the bearings on one side and the other was not far off this but still in oe bit. I was surprised but nothing was too seized so they replaced ok. I have just ground off all the nuts and bolts as they were rusted beyond ever coming back off and are just M8 bolts.

The plan with the cutter deck tinwork is to make do with what steel I have lying about, I have made cardboard patters and will do it in several sections from the outside so it looks decent once done, I have cut the cardboard templates out here and will then fit steel sections inbetween the central gaps then weld a strip around the whole thing like a skirt once this top section is on.
This is the cardboard templates , its worth spending a bit of time and getting these right as its easier than messing about altering the steel a few times.

Spot the difference, this is the same two sections in steel , its about 2mm thick so will be good to weld the skirt on to.

This is as far as I have got up to now so still plenty to do .
Cheers Mick.
-
Stanley
- Global Moderator
- Posts: 106457
- Joined: 23 Jan 2012, 12:01
- Location: Barnoldswick. Nearer to Heaven than Gloria.
Re: SHED MATTERS 2
She's a lucky old lady!
Stanley Challenger Graham
Stanley's View
scg1936 at talktalk.net
"Beware of certitude" (Jimmy Reid)
The floggings will continue until morale improves!
Old age isn't for cissies!
Stanley's View
scg1936 at talktalk.net
"Beware of certitude" (Jimmy Reid)
The floggings will continue until morale improves!
Old age isn't for cissies!
Re: SHED MATTERS 2
Evening Stanley and all,
She is a nice old lady who still likes to do what she can manage herself, including cutting grass , trimming hedges , fixing fences etc
Well I did not get too much chance to do much today but made a little progress, I got the rest of the bits of steel cut out and trimmed to be a good fit then ground off the paint where the welding needs to be and cut out the rotted bits of the old deck.
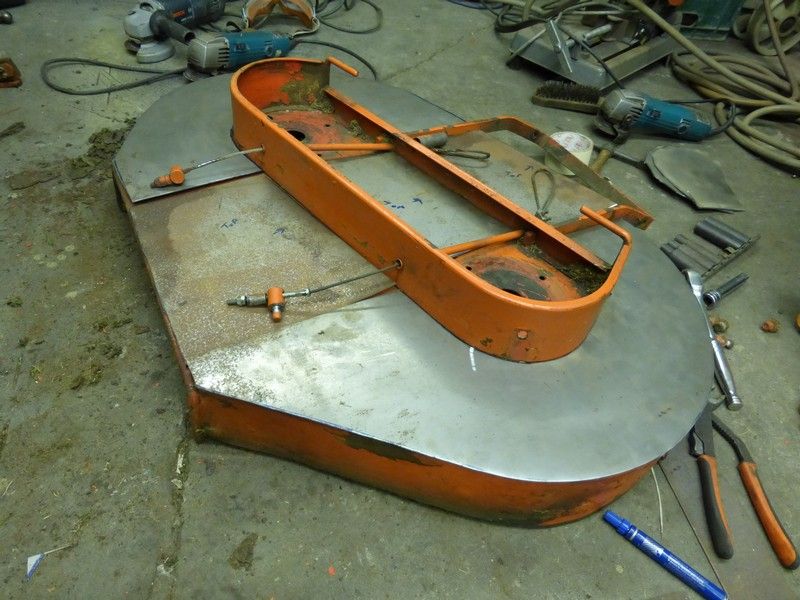
I have a strip of 3 inch wide steel just long enough to do the skirt but will have to cut off the horrible previous repair around the front for it to fit snug, I then plan to weld a bit of round bar around the bottom of the skirt to strengthen it up a bit. I think she will be chuffed to bits with it as she does not know its getting the full works on the deck, just thinks its getting some patches riveted on. Its nice to be able to help someone that age out , I know if a mower place saw it they would write it off to sell a newer one and that would probably be more fragile and less repairable than this one. This one does a good job it just needs a bit of TLC lol.
P.S if anyone is wondering , how many grinders do you need to repair a mower .............. at £10 each from boot sales , I have one for every type of grinding disc lol.
Cheers Mick.
She is a nice old lady who still likes to do what she can manage herself, including cutting grass , trimming hedges , fixing fences etc
Well I did not get too much chance to do much today but made a little progress, I got the rest of the bits of steel cut out and trimmed to be a good fit then ground off the paint where the welding needs to be and cut out the rotted bits of the old deck.


I have a strip of 3 inch wide steel just long enough to do the skirt but will have to cut off the horrible previous repair around the front for it to fit snug, I then plan to weld a bit of round bar around the bottom of the skirt to strengthen it up a bit. I think she will be chuffed to bits with it as she does not know its getting the full works on the deck, just thinks its getting some patches riveted on. Its nice to be able to help someone that age out , I know if a mower place saw it they would write it off to sell a newer one and that would probably be more fragile and less repairable than this one. This one does a good job it just needs a bit of TLC lol.
P.S if anyone is wondering , how many grinders do you need to repair a mower .............. at £10 each from boot sales , I have one for every type of grinding disc lol.
Cheers Mick.
-
Stanley
- Global Moderator
- Posts: 106457
- Joined: 23 Jan 2012, 12:01
- Location: Barnoldswick. Nearer to Heaven than Gloria.
Re: SHED MATTERS 2
I missed the piece on the mill. Glad you got it free. Nice mill.... Almost certainly a patch of oxidised oil or similar, could even be some of the original protective coating when it was new. I only have one angle grinder but at least eight hacksaw frames on the same principle....
Stanley Challenger Graham
Stanley's View
scg1936 at talktalk.net
"Beware of certitude" (Jimmy Reid)
The floggings will continue until morale improves!
Old age isn't for cissies!
Stanley's View
scg1936 at talktalk.net
"Beware of certitude" (Jimmy Reid)
The floggings will continue until morale improves!
Old age isn't for cissies!
Re: SHED MATTERS 2
Hi Staley and all, I have a few hacksaws for the same reason too Stanley, I hate changing grinder disks as all the grinders seem to need various different pin spanners etc to change disks so it lessens how many time I need to do it having so many grinders Yes thats all that can have been stopping that ram from sliding on the mill, amazing what a bit of oil can do
I am glad to report the mower is all done and been tested and is now nice and quiet steers better and cuts nice, not to mention the owner being very happy with her 'new' mower, I tested it to make sure all was well but she is now itching for the grass to grown even a touch so its a good enough excuse to get her revamped mower out lol.
Here is the rest of the job.
First all the top plates were tacked in place.
Then a new skirt , clamped and tacked into position .
Due to the old repair having a bar welded along the front with too much old snotty weld to grind off there ended up a section to be patched with a strip as the old skirt was about half an inch deeper than the new strip of metal I had to hand so this front area was patched in to replace the cut out section. The underside where the rot had been cut out was tacked to the new top and the areas filled with car body filler to seal them so grass would not pack between the two layers of plate.
The tacked seam between the top plates and the skirt was welded leaving alternate gaps then worked back around filling in the gaps to try to stop too much distorsion, this seemed to work as the whole thing stayed nice and flat to the floor.
Next I marked around the skirt with chalk on the floor and made a new bar to beef up the bottom of the skirt. I only has some 14mm black bar but in three short bits so by trial and error bent these bits in the vice to follow the chalk line then welded them together. Then welded them to the bottom of the new skirt.
The underside was undersealed then the blades , pulleys etc all built back up and the top side seam sealered around the welded areas.
One last hitch I noticed just in time to alter before painting , the return spring for the deck lowering lever was not a very good design so I managed to find a better spring in my scrap box and welded a strong washer for it to hook on to, this was a better spring and more secure way of fixing it than the original.

Next a coat of etch primer.
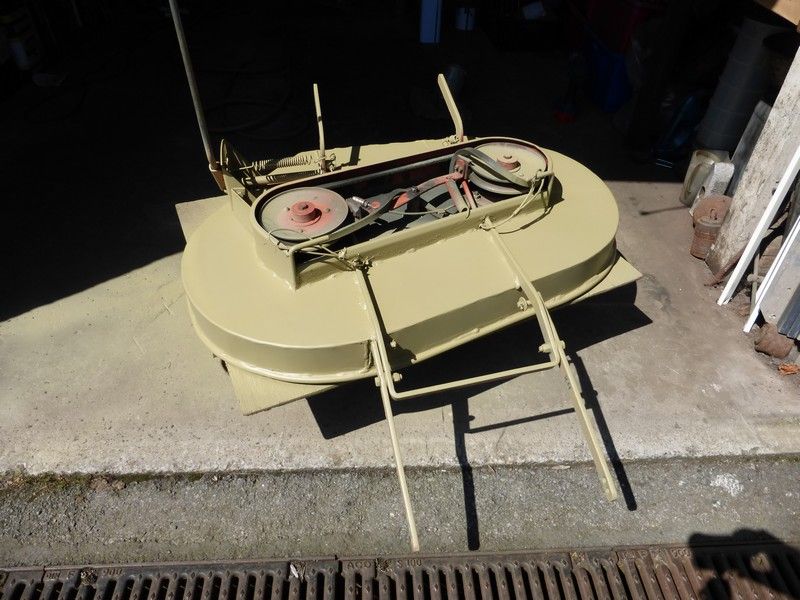
Then a few coats of a very dark grey satin finish that matched the rest of the dark bits on the tractor as I had no orange paint and would not have got a match for the original anyway as faded with age. The grey was darker than it looks here , it was hot sunny day so baked it dry in no time.
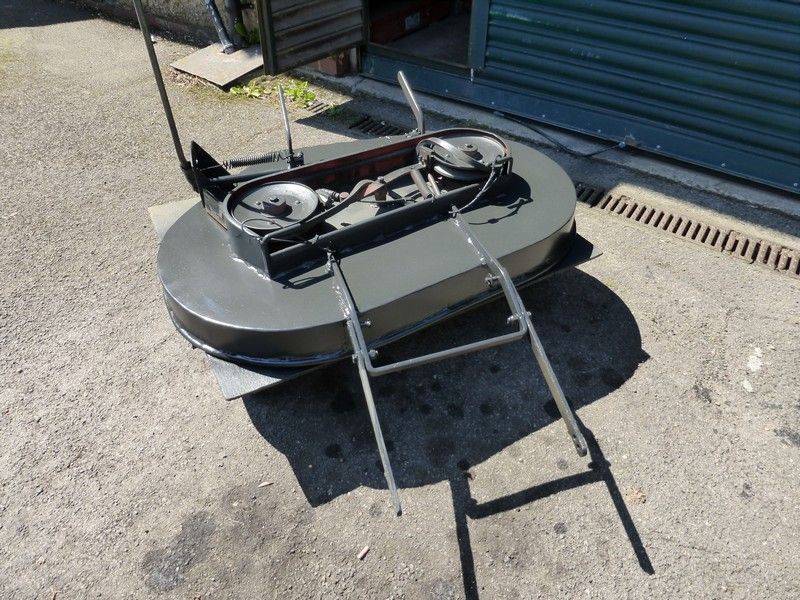
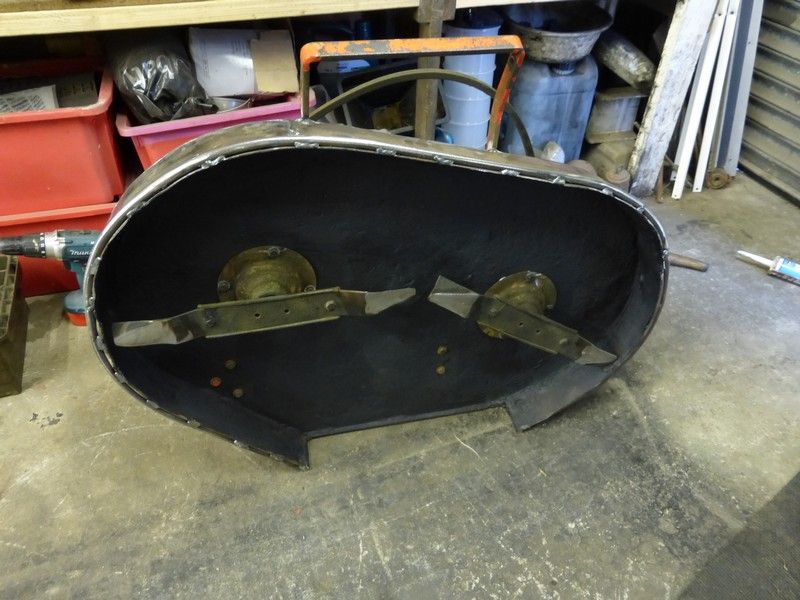
This it the finished job all back together, looking quite smart if I say so myself.
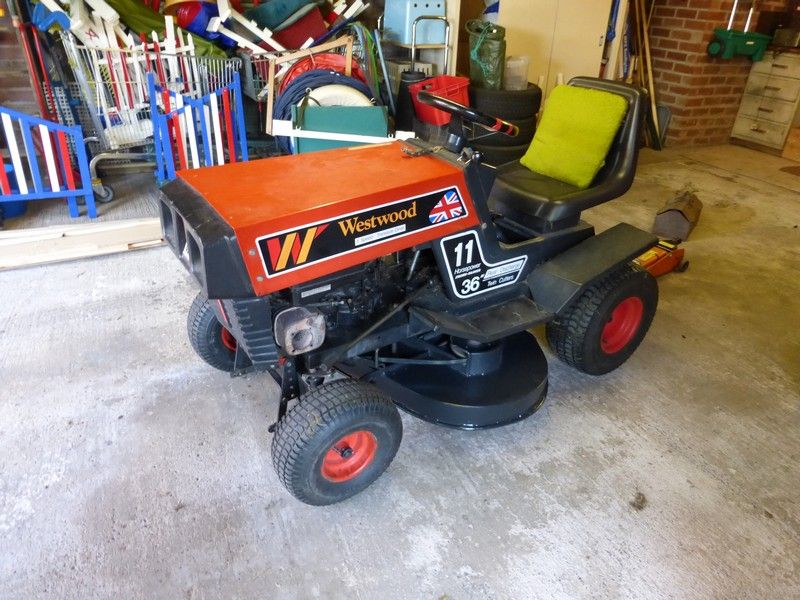
It should last a good few more years now and continue to give good service, my old friend is delighted , was nice to see her face when she saw it was not just a few horrible patches clagged on with sealer and snot weld like the last time the lawn mower dealer 'fixed' it lol.
Cheers Mick
I am glad to report the mower is all done and been tested and is now nice and quiet steers better and cuts nice, not to mention the owner being very happy with her 'new' mower, I tested it to make sure all was well but she is now itching for the grass to grown even a touch so its a good enough excuse to get her revamped mower out lol.
Here is the rest of the job.
First all the top plates were tacked in place.

Then a new skirt , clamped and tacked into position .

Due to the old repair having a bar welded along the front with too much old snotty weld to grind off there ended up a section to be patched with a strip as the old skirt was about half an inch deeper than the new strip of metal I had to hand so this front area was patched in to replace the cut out section. The underside where the rot had been cut out was tacked to the new top and the areas filled with car body filler to seal them so grass would not pack between the two layers of plate.

The tacked seam between the top plates and the skirt was welded leaving alternate gaps then worked back around filling in the gaps to try to stop too much distorsion, this seemed to work as the whole thing stayed nice and flat to the floor.

Next I marked around the skirt with chalk on the floor and made a new bar to beef up the bottom of the skirt. I only has some 14mm black bar but in three short bits so by trial and error bent these bits in the vice to follow the chalk line then welded them together. Then welded them to the bottom of the new skirt.


The underside was undersealed then the blades , pulleys etc all built back up and the top side seam sealered around the welded areas.


One last hitch I noticed just in time to alter before painting , the return spring for the deck lowering lever was not a very good design so I managed to find a better spring in my scrap box and welded a strong washer for it to hook on to, this was a better spring and more secure way of fixing it than the original.

Next a coat of etch primer.

Then a few coats of a very dark grey satin finish that matched the rest of the dark bits on the tractor as I had no orange paint and would not have got a match for the original anyway as faded with age. The grey was darker than it looks here , it was hot sunny day so baked it dry in no time.

This it the finished job all back together, looking quite smart if I say so myself.


It should last a good few more years now and continue to give good service, my old friend is delighted , was nice to see her face when she saw it was not just a few horrible patches clagged on with sealer and snot weld like the last time the lawn mower dealer 'fixed' it lol.
Cheers Mick
-
David Whipp
- Senior Member
- Posts: 2874
- Joined: 19 Oct 2012, 18:26
Re: SHED MATTERS 2
Mick, you're a marvel!
PS I'm intrigued by the shopping trolleys in the last photo and what look to be part of miniature horse jumps in front of them?
PS I'm intrigued by the shopping trolleys in the last photo and what look to be part of miniature horse jumps in front of them?
-
Stanley
- Global Moderator
- Posts: 106457
- Joined: 23 Jan 2012, 12:01
- Location: Barnoldswick. Nearer to Heaven than Gloria.
Re: SHED MATTERS 2
Nice job Mick. Nothing like a good rescue job.....
Stanley Challenger Graham
Stanley's View
scg1936 at talktalk.net
"Beware of certitude" (Jimmy Reid)
The floggings will continue until morale improves!
Old age isn't for cissies!
Stanley's View
scg1936 at talktalk.net
"Beware of certitude" (Jimmy Reid)
The floggings will continue until morale improves!
Old age isn't for cissies!
Re: SHED MATTERS 2
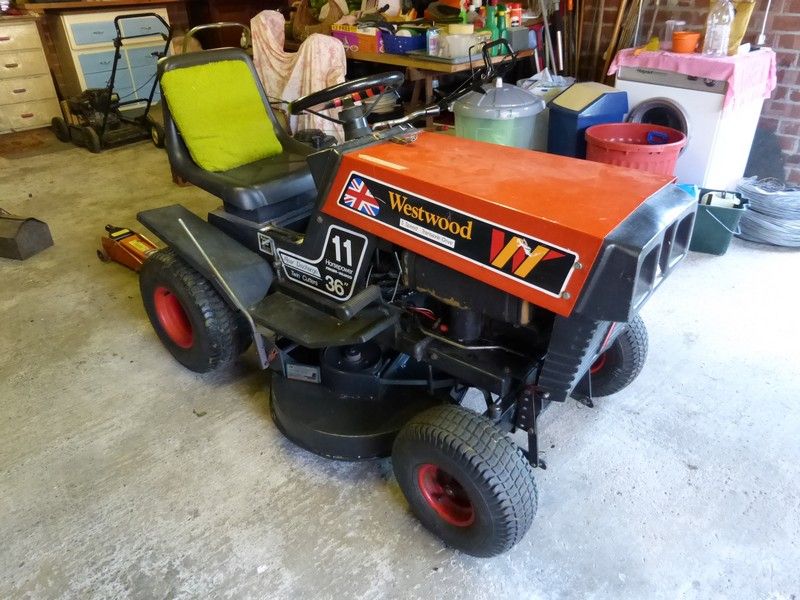
Sorry for the late reply David, the shopping trollies and the small 'horse jumps' are actually for a dog agillity gathering the old lady with the mower has in the area she needs the ride on mower for, she made all the jumps etc herself and they are a cracking job too, also they have lasted about 40 years I think so have stood the test of time
Yes Stanley , its nice to see something that was almost going to be scrapped back up and running doing a good job, there is years and years left in that mower yet with a few repairs here and there when needed. ....................... when you going to get back into that shed again anyway ? the LTP is finished now and you will be saying its too cold as its winter again soon I am off to Pickering steam rally tomorrow so keeping my fingers crossed for goos weather , it looks like it could be good or cold be lashing down !
Cheers Mick
Yes Stanley , its nice to see something that was almost going to be scrapped back up and running doing a good job, there is years and years left in that mower yet with a few repairs here and there when needed. ....................... when you going to get back into that shed again anyway ? the LTP is finished now and you will be saying its too cold as its winter again soon
Cheers Mick
-
Stanley
- Global Moderator
- Posts: 106457
- Joined: 23 Jan 2012, 12:01
- Location: Barnoldswick. Nearer to Heaven than Gloria.
Re: SHED MATTERS 2
Stop nattering. At the moment I'm seeing double.... I'd be chopping my fingers off! Old age isn't for cissies.
Stanley Challenger Graham
Stanley's View
scg1936 at talktalk.net
"Beware of certitude" (Jimmy Reid)
The floggings will continue until morale improves!
Old age isn't for cissies!
Stanley's View
scg1936 at talktalk.net
"Beware of certitude" (Jimmy Reid)
The floggings will continue until morale improves!
Old age isn't for cissies!