SHED MATTERS 2

Locked
User avatar
Stanley
Global Moderator
Global Moderator
Posts: 99371
Joined: 23 Jan 2012, 12:01
Location: Barnoldswick. Nearer to Heaven than Gloria.

Re: SHED MATTERS 2

Post by Stanley »

Image

First thing to do was determine the depth of the valve ports. I had .930 wall thickness so I went for about 480. It's not critical but an adventage to have them all somewhere near when we get to drilling the steam passages out. 3/16" is a delicate little cutter so small bites, much peering through a magnifying glass and I cut both steam ports fairly close to my 1" tramlines.

Image

Tidy job and no dramas, I took them very quietly. Now for the biggie!

Image

The 3/8" cutter for the exhaust looked massive after the 3/16" for the steam ports. I remembered what the watchmaker's apprentice is reported to have said when he saw a 1/4" drill.... "I didn't know they made them that big!". I slowed the mill down to about 250rpm and cut the port. Only thing I slipped up with is that I overshot my tram-line at one end by about ten thou, no problem it will be covered by the wall of the slide valve. None of these sizes are super-critical, the aim is to get them somewhere near a match.

Image

Close of play. I've blued the sides of the valve face and scribed a mark about 20 thou less than the average bottom of the ports. This will be my target for the next lot of marking, the direction and angles of the steam passages and the location of the opening to the outside where the exhaust will connect. That's the first job tomorrow, get them masked up and set the cylinder up again for some high risk drilling! (Everything is high risk when you can't see properly. At one point when I was cutting the exhaust port I was convinced I had strayed off course. Couldn't understand it. When I blew the cast iron dust off it was just a pile of cuttings....)
Stanley Challenger Graham
Stanley's View
scg1936 at talktalk.net

"Beware of certitude" (Jimmy Reid)
The floggings will continue until morale improves!
Old age isn't for cissies!
micktoon
Regular User
Posts: 366
Joined: 05 Feb 2012, 21:23
Location: Newcastle upon Tyne

Re: SHED MATTERS 2

Post by micktoon »

Hi Stanley , another session clocked up in the shed :grin: . The angle gadget looks interesting but to be honest the more you read about sharpening , then compare to what people who actually do great things do to sharpen their tools , it would appear by eye the old way with no jigs seems to do the job.
Just think the way you thought you had went off the line and then blew and it was just chippings is a lot better than being sure you are on the line then blowing chippings away to find out you were off the line :laugh5: , I have done that while jig sawing wood a few times lol.
Cheers Mick.
User avatar
Stanley
Global Moderator
Global Moderator
Posts: 99371
Joined: 23 Jan 2012, 12:01
Location: Barnoldswick. Nearer to Heaven than Gloria.

Re: SHED MATTERS 2

Post by Stanley »

To be fair to Holtzappfel, The Goniostat was for sharpening very small Ivory turning cutters. I've always said it took me forty years to crack sharpening. Such a simple thing but so complicated.... The kids always laugh at my kitchen knoves, three of them are ordinary table knives but they are old ones and like razors!
Stanley Challenger Graham
Stanley's View
scg1936 at talktalk.net

"Beware of certitude" (Jimmy Reid)
The floggings will continue until morale improves!
Old age isn't for cissies!
User avatar
Stanley
Global Moderator
Global Moderator
Posts: 99371
Joined: 23 Jan 2012, 12:01
Location: Barnoldswick. Nearer to Heaven than Gloria.

Re: SHED MATTERS 2

Post by Stanley »

Image

Bringing the small surface plate in from the front room was such a good decision. Just the thing for setting the cylinder up and doing some careful marking out to find the angle for the steam passages between the valve ports and the cylinder.

Image

Relatively easy to set the cylinder up at the right angle. No heavy cutting so the minimal hold is OK. First job was to mill a flat on the edge of the cylinder using the 3/8" cutter I cut the exhaust port with. Then a centre drill and finally poke a 1/4" drill through until you see cast iron dust falling out of the steam port on the face. Turn it over and repeat the operation on the other end.

Image

Looking pretty good for a bloke who is almost blind! I know I'm slow but everything has to be checked and re-checked, amazing how my eyes play tricks on me. Even though I had the quill set over the centre line I could swear it was out of centre, that means checking twice again!

Image

The next job is to drill for the exhaust out of the middle port. I tend to use brass thread (26tpi) for all my drillings into the cylinder apart from the studs as what you are attaching is usually made of brass and 26tpi is ideal for that metal. The exhaust will be drilled to tap 1/2" brass, sounds big I know but a piece of 3/8" bore copper tubing (the same size as the port) is 1/2" OD and having an exhaust passage that lets the engine breath easily is just as important here as with the steam passages. You want the steam to get in and out easily! I've fond my tap and tapping drill so this will be a pretty quick job tomorrow.
Stanley Challenger Graham
Stanley's View
scg1936 at talktalk.net

"Beware of certitude" (Jimmy Reid)
The floggings will continue until morale improves!
Old age isn't for cissies!
User avatar
Stanley
Global Moderator
Global Moderator
Posts: 99371
Joined: 23 Jan 2012, 12:01
Location: Barnoldswick. Nearer to Heaven than Gloria.

Re: SHED MATTERS 2

Post by Stanley »

I hit a problem yesterday that with hindsight I've come across before, a gap in my HSS metric drill collections. There are four missing including the recommended tapping drill for 1/2" Brass thread (11.5mm). Funny how there can be that gap, I have full sets of every drill series you can think of including the old letter and number drills. I shall call in at Briggs and Duxbury's on my morning dog walk, I think they will have them. Just out of curiosity I looked up drill sets on the web and was amazed by how expensive they are now! As I have said before, looking in the drawers in the shed there is no doubt I am a wealthy man! This justifies all the time Mick and Doublejohn spend at car boot sales.....
If B&D don't have the drill, I'll do what I have always done before, Use a 29/64" drill!
Stanley Challenger Graham
Stanley's View
scg1936 at talktalk.net

"Beware of certitude" (Jimmy Reid)
The floggings will continue until morale improves!
Old age isn't for cissies!
User avatar
Stanley
Global Moderator
Global Moderator
Posts: 99371
Joined: 23 Jan 2012, 12:01
Location: Barnoldswick. Nearer to Heaven than Gloria.

Re: SHED MATTERS 2

Post by Stanley »

Image

Once I got in the shed I soon had the exhaust port drilled out, tapped and counter-bored to give a nice face on the outside. But before I got to this stage I went through a frustrating 30 minutes trying to find individual metric jobber's drills on the web. Plenty of sets but I gave up on individual drills in the end and emailed Mick for a bit of help. He's going to sort me out and what's more refuses to accept any money. Isn't the site wonderful! Mick understands how these things can bug you.

Image

Then I fished out the dummy ends of one of my crankshafts, squared them up and turned a register on them that fits the bore of the cylinder.

Image

Now I'm ready for the next stage.... If you haven't guessed you'll find out tomorrow!
Stanley Challenger Graham
Stanley's View
scg1936 at talktalk.net

"Beware of certitude" (Jimmy Reid)
The floggings will continue until morale improves!
Old age isn't for cissies!
User avatar
Stanley
Global Moderator
Global Moderator
Posts: 99371
Joined: 23 Jan 2012, 12:01
Location: Barnoldswick. Nearer to Heaven than Gloria.

Re: SHED MATTERS 2

Post by Stanley »

Word this morning that Mick has found my drills and they will soon be in the mail for me. Wonderful! I shall sleep better now.... (Thanks to his mate Bob as well for finding the one that was missing)

Image

Now you know why I was turning those dummy ends for the cylinder. The problem is of course that the valve chest gets in the way of a cut on the lathe. It wouldn't matter if I left them as cast but the cylinder will look so much better with a good edge concentric to the bore.

Image

The cut round the rim had cut into the bosses for the drain taps so I cut them back to a plain flat surface. Plenty of meat so no problems with a good skim.

Image

That looks a bit better doesn't it.... I haven't done anything about a finish on the valve face, that will come later. Next thing was to take the rotary table off, have a good clean up and put the machine vice back on. Squared it up with the ball bearing centre finder.

Image

Next job is to make the valve chest. No need for any fancy measuring at this stage apart from making sure there is enough meat to stand the cuts. The aim is to get two square and parallel faces. Once you have them, all the other decisions follow.

Image

Close of play. The next thing to do is find the centre of the boss and get another true face at right angles to the two we have already. We have a little trick up our sleeve....
Stanley Challenger Graham
Stanley's View
scg1936 at talktalk.net

"Beware of certitude" (Jimmy Reid)
The floggings will continue until morale improves!
Old age isn't for cissies!
micktoon
Regular User
Posts: 366
Joined: 05 Feb 2012, 21:23
Location: Newcastle upon Tyne

Re: SHED MATTERS 2

Post by micktoon »

By God Stanley , there is no stopping you now :grin: good to see you making progress and enjoying it too. I will pass on the thanks to Bob too Stanley.
Cheers Mick.
User avatar
Stanley
Global Moderator
Global Moderator
Posts: 99371
Joined: 23 Jan 2012, 12:01
Location: Barnoldswick. Nearer to Heaven than Gloria.

Re: SHED MATTERS 2

Post by Stanley »

What pleases me is that despite being slow, there have been no mistakes and it's probably the best cylinder I have ever made. Left eye is probably worse now than when the cataract was at its worst so it's a bit of a triumph actually.....
Stanley Challenger Graham
Stanley's View
scg1936 at talktalk.net

"Beware of certitude" (Jimmy Reid)
The floggings will continue until morale improves!
Old age isn't for cissies!
doubleboost
Newbie
Posts: 16
Joined: 08 May 2013, 18:18
Location: North East England

Re: SHED MATTERS 2

Post by doubleboost »

I am watching with great interest
John
User avatar
Stanley
Global Moderator
Global Moderator
Posts: 99371
Joined: 23 Jan 2012, 12:01
Location: Barnoldswick. Nearer to Heaven than Gloria.

Re: SHED MATTERS 2

Post by Stanley »

Now then, there's pressure for you! Nice to know you're there John, I've just sat down to chronicle this morning's work.

Image

I said last night that I had a trick up my slee3ve. I was being a bit previous and decided to go down another route. I was going to swank with his Cushman two jaw chuck, a rare little beast. It came with Johnny's 1956 lathe but I put a new back on it so it fitted the Harrison because in some situations it's brilliant. But, on second thoughts, thinking about safety and accuracy I decided to use the VM. It's interesting how being half blind makes me do things in ways where I can guarantee accurate refer4ncing to my registered surfaces.....

Image

First job was to identify and mark an accurate centre line. I must have measured it three times and checked it even more! But, Having found it I used it as a reference point for mounting the valve chest in the machine vice before milling the sides off. I don't have a lot of metal to play with as my valve face is a bit over the specified size but that's no problem. I took the minimum off both sides and it's pretty good.

Image

Everything is square up to now so I want some marks for the ends. Once again they're tight but I soon had them marked up. I've lost a picture here but what I did was find a good cutter with enough length on it to side mill the end of the chest when it was set square in the bottom of the vice. That way I am sure that the cut will be dead square with the faces and the sides as they all refer to each other

Image

Close of play. I took off the bare minimum and got a good clean face which no matter how you check it is dead square with the other faces and is going to be sized just right. Next job tomorrow is to get the inside of the chest cleaned up to size. I'm pleased with this morning, using the mill in this way ensures I am square, eyeballing is a thing of the past! They tell lies....
Stanley Challenger Graham
Stanley's View
scg1936 at talktalk.net

"Beware of certitude" (Jimmy Reid)
The floggings will continue until morale improves!
Old age isn't for cissies!
doubleboost
Newbie
Posts: 16
Joined: 08 May 2013, 18:18
Location: North East England

Re: SHED MATTERS 2

Post by doubleboost »

Looking very nice
That pipe looks tempting
I have been off the tabs for nearly 3 years
User avatar
Stanley
Global Moderator
Global Moderator
Posts: 99371
Joined: 23 Jan 2012, 12:01
Location: Barnoldswick. Nearer to Heaven than Gloria.

Re: SHED MATTERS 2

Post by Stanley »

I know the feeling John, I once gave e up for three years and it was hell. I stopped one night and got an Ounce of Erinmore on my way back home from Ayr market and when I walked in a chucked it on the table Vera went straight upstairs and brought my pipes down from where she had hidden them. I think that was the best smoke of my life and I have never regretted it. Have been mulling over the next move, it's going to be finishing the inside of the chest..... All my cylinders in the past have been tight on the end to end measurement, it's down to the Stuart design, they don't give you a lot of clearance. I shall make sure this one doesn't have that fault. Probably due to the fact I make my valves different than them, I use to Newton Method which means you can adjust the valve simply by turning the valve rod..... No need to take the lid off and start fiddling. Big advantage when you are timing them.
Stanley Challenger Graham
Stanley's View
scg1936 at talktalk.net

"Beware of certitude" (Jimmy Reid)
The floggings will continue until morale improves!
Old age isn't for cissies!
User avatar
Stanley
Global Moderator
Global Moderator
Posts: 99371
Joined: 23 Jan 2012, 12:01
Location: Barnoldswick. Nearer to Heaven than Gloria.

Re: SHED MATTERS 2

Post by Stanley »

Image

First job was to blue up and mark the dimensions I was aiming for.. I found a small diameter mill cutter deep enough to cut the full depth in one pass. Not the sharpest cutter in the world but a bit of patience and careful attention got me out to my marks. Just a little bit of cleaning in the corners. I shall leave the radius how it is and only attack it if that's what is needed to get the slide in and give it the correct travel.

Image

The next thing to address is the finishing of the last surface on the chest, the one with the boss.

Image

This is the precarious set up for cleaning the end up. In theory it should work because I'm only using the chuck as a driving dog, the live centre will absorb most of the pressure. But that's for tomorrow, I need my sleep!
Stanley Challenger Graham
Stanley's View
scg1936 at talktalk.net

"Beware of certitude" (Jimmy Reid)
The floggings will continue until morale improves!
Old age isn't for cissies!
User avatar
Stanley
Global Moderator
Global Moderator
Posts: 99371
Joined: 23 Jan 2012, 12:01
Location: Barnoldswick. Nearer to Heaven than Gloria.

Re: SHED MATTERS 2

Post by Stanley »

I'm not too optimistic about that set-up but I'll give it a go. If it fails I'll just have to get the four jaw out again.... I suspect I'm just showing the Cushman two jaw off!
Stanley Challenger Graham
Stanley's View
scg1936 at talktalk.net

"Beware of certitude" (Jimmy Reid)
The floggings will continue until morale improves!
Old age isn't for cissies!
User avatar
Stanley
Global Moderator
Global Moderator
Posts: 99371
Joined: 23 Jan 2012, 12:01
Location: Barnoldswick. Nearer to Heaven than Gloria.

Re: SHED MATTERS 2

Post by Stanley »

Well! That went OK....

Image

I sharpened the little carbide cutter and got stuck in with very light cuts and slow speeds. Plenty of time, we aren't on production!

Image

As you can see it cleaned up all right, the small amount of marking ink will vanish as we move forward. While it was on the same settings I carefully poked a long series 1/4" drill through both ends, this is the diameter of the valve rod that will eventually be passing through. The Stuart design has no support for the end of the valve rod but Newton's version has a support for it and it ensures that no matter how bad the adjustment of the rod is it will always run true. I recommend it.

Image

Here's the finished article. The semi circular finish to the boss is a Johnny trademark and if it was good enough for him, it's good enough for me. This is as good a place as any to point out that Johnny never fitted the usual type of gland but had his own design which is far better. You'll see that when we get round to it. The bit of the face on the boss that hasn't been turned will vanish when it is drilled and tapped for the gland.

Image

The next logical item of business is the lid for the valve chest. I decided to use the fly cutter I made to face it in one pass.

Image

Here's the result of one pass cutting about 1/16" deep to get under the skin and get a true face. Newton was always trying to persuade me to use fly cutters, he swore by them but I always resisted. I was wrong, it was a brilliant single pass and something I hadn't realised was that as the back stroke of the cutter moves across the face it acts like a spring cut and gives a lovely final finish. The other thing I learned was that the cutter likes a decent cut, it ran better if pushed a little. Very pleased with this and the other face will get the same treatment tomorrow.
So, a good morning and the snooker is on at 13:00.... Things could be worse!
Stanley Challenger Graham
Stanley's View
scg1936 at talktalk.net

"Beware of certitude" (Jimmy Reid)
The floggings will continue until morale improves!
Old age isn't for cissies!
micktoon
Regular User
Posts: 366
Joined: 05 Feb 2012, 21:23
Location: Newcastle upon Tyne

Re: SHED MATTERS 2

Post by micktoon »

Hi Stanley , looks very neat and tidy , the two jaw came up trumps again ! . The new flycutter seems to have done a fine job there too.
I have the drills collected and all wrapped ready to post tomorrow morning, so you should have them in a day or two as long as Post Man Pat does his job :grin: . Its forecast for snow this week I think so wrap up in the shed .

Cheers Mick.
User avatar
Stanley
Global Moderator
Global Moderator
Posts: 99371
Joined: 23 Jan 2012, 12:01
Location: Barnoldswick. Nearer to Heaven than Gloria.

Re: SHED MATTERS 2

Post by Stanley »

I was pleased with yesterday... particularly the surface I got on the lid. Good news about the drills, thanks lads! Lighting the stove in the front room has cut down on the heat in the shed but I am managing so far....
Stanley Challenger Graham
Stanley's View
scg1936 at talktalk.net

"Beware of certitude" (Jimmy Reid)
The floggings will continue until morale improves!
Old age isn't for cissies!
User avatar
Stanley
Global Moderator
Global Moderator
Posts: 99371
Joined: 23 Jan 2012, 12:01
Location: Barnoldswick. Nearer to Heaven than Gloria.

Re: SHED MATTERS 2

Post by Stanley »

Image

First job was to take the second cut on the lid with the big fly-cutter. Once that was done, bang it in the vice and get a straight edge. Before I did this I touched the milling cutter up on the T&C grinder. I'm refining my technique and took a bit of rake off the edge. I think I'm down to about two degrees now and it's another improvement. Getting two paralle3l sides is easy, just reverse it after the first cut and let the squareness of the machine vice take care of it.

Image

I wanted the first cut on the end of the lid to be square with the long side. I took the easy way out and lined the finished edge up with the end of the jaw of the vice which I know is square.

Image

Once I was sure it was square I blued two edges and clamped the lid on the face of the cylinder. One firm stroke of the scriber for each edge and we have an accurate mark. I used to be a beggar for doing multiple scriber marks and often finished up with tram lines! If you have it right, one line will do!

Image

I crept up on the marks and soon had the lid to a perfect fit.

Image

Here's the stack, ready for more marking out.....

Image

I want to finish with the casting dust so the next job is the cylinder covers. Here's the first one set up in the three jaw ready for tomorrow.....
Another good morning, now I want my dinner and a sleep!
Stanley Challenger Graham
Stanley's View
scg1936 at talktalk.net

"Beware of certitude" (Jimmy Reid)
The floggings will continue until morale improves!
Old age isn't for cissies!
micktoon
Regular User
Posts: 366
Joined: 05 Feb 2012, 21:23
Location: Newcastle upon Tyne

Re: SHED MATTERS 2

Post by micktoon »

Evening Stanley, another good days progress and very well written and shown too. I hope the shed does not get too cold to stop the job.
The drills were posted first class this morning so fingers crossed you might get them tomorrow but more likely Wednesday. I have been to a funeral today but will be in the garage tomorrow so will take the camera with me.
Cheers Mick.
User avatar
Stanley
Global Moderator
Global Moderator
Posts: 99371
Joined: 23 Jan 2012, 12:01
Location: Barnoldswick. Nearer to Heaven than Gloria.

Re: SHED MATTERS 2

Post by Stanley »

Thanks for that Mick. I like to state the bleeding obvious because I know a lot of less experienced people look in to see what I'm doing. The cold won't stop me.....

Later at 11:30. We've had our walk, the chip pan is on and we've had a nice morning in the shed. I started by cleaning up and choosing the carbide cutter I wanted for this morning's work. A bit of a touch up of the edges and an adjustment of the relief angle because I knew I would be wanting to cut very close to the chuck jaws. I knew that although this lid casting is plenty thick enough, it's just a touch short on diameter so I wanted to take as little off as possible.

Image

On the Stuart drawings they specify 1/4" thick for the lid but I've always thought the cylinders look better with a bit more thickness. The old engine makers never skimped on the thickness of the covers, no need to because there is plenty of room so I went for 5/16". The casting has a domed top and this will look OK when it has a coat of paint in the centre so I turned it to an acceptable finish with the minimum of metal taken off. I managed to get 5/16" depth on the circumference before I touched the jaws...

Image

I bought this 3 jaw off a dealer in Todmorden who bought quite a lot of stuff direct from Poland. As he bought a lot of stuff face to face he got some good bargains. If the chuck makers were short of normal quality chucks for his order they made up the numbers with the ones which had passed the higher end checks. This chuck came with a test card and it's as near dead accurate as you can get. Certainly better than the well-used 9" Pratt SC chuck that was original equipment with the lathe. I think it was the only chuck they ever used at the technical college and it shows it.
Anyway, back to the lid. When I had the top finished to my satisfaction I reversed the casting grabbed it on the freshly turned diameter so I know this next set of cuts will be concentric. I'd managed to get my 5/16" depth on the first side so what I was after now was good finish and a 2 1/4" register for the cylinder bore. By the way, this metal is cutting beautifully!

Image

This is close of play. I've left the register as thick as possible because I want to use it as a boss the grab the lid while I put the register on for the PCD of the holding down bolts. Looks perfect doesn't it But I have a confession to make! On the last cut I got careless and took 10 thou too much off the register. No problem, when I need it to centre the lid for putting the stud holes in I'll just wrap a piece of string round it. But I have to admit, I wasn't pleased!

Image

Later in the day. The postman came and now, thanks to Mick, John and Bob my 1-13 X.5mm drill set is complete! The thing that still puzzles me is why there were some missing.... But never mind, thanks to the lads I am now complete....
Stanley Challenger Graham
Stanley's View
scg1936 at talktalk.net

"Beware of certitude" (Jimmy Reid)
The floggings will continue until morale improves!
Old age isn't for cissies!
micktoon
Regular User
Posts: 366
Joined: 05 Feb 2012, 21:23
Location: Newcastle upon Tyne

Re: SHED MATTERS 2

Post by micktoon »

Hi Stanley, good to hear the cold will not stop you. Looks like the post office came good too , they get some bad press but I find they normally deliver ....pardon the pun :grin:
More good progress , I have been machining plastic all day took some photos but will post when the job is finished.
Cheers Mick.
User avatar
Stanley
Global Moderator
Global Moderator
Posts: 99371
Joined: 23 Jan 2012, 12:01
Location: Barnoldswick. Nearer to Heaven than Gloria.

Re: SHED MATTERS 2

Post by Stanley »

I went online this morning and bought some countersinks and a de-burring tool. Two items that have been nagging me for a while.... I've got the lights on and the shed door open to warm it up a bit in the shed. The stove is very efficient and stops the CH kicking in for long... It will be 55F before long and I can support that. Have you noticed how long it takes fluorescent lights to warm up and get to temperature? Just finishing off my web work and then I shall be in there.....
Stanley Challenger Graham
Stanley's View
scg1936 at talktalk.net

"Beware of certitude" (Jimmy Reid)
The floggings will continue until morale improves!
Old age isn't for cissies!
User avatar
Stanley
Global Moderator
Global Moderator
Posts: 99371
Joined: 23 Jan 2012, 12:01
Location: Barnoldswick. Nearer to Heaven than Gloria.

Re: SHED MATTERS 2

Post by Stanley »

Image

First job after a clean up was to change jaws, turn the lid round and mark the PCD of the stud holes on it. 2.8".

Image

Then change jaws again and turn the boss off that I left to hold it.

Image

Then chuck the bottom lid, turn the boss down to the size I need for mounting the gland (bottom lid of course) and scribe my PCD on it and break the edges because this side is finished.

Image

Last job, change jaws yet again and mount the lid up ready for finishing. All I want is 5/16" thickness and a 2 1/4" register on it for the bore.
I'm a bit chesty and it struck me this morning that I'd forgotten how bad cast iron dust is for me... Never mind, I am getting there!
Stanley Challenger Graham
Stanley's View
scg1936 at talktalk.net

"Beware of certitude" (Jimmy Reid)
The floggings will continue until morale improves!
Old age isn't for cissies!
micktoon
Regular User
Posts: 366
Joined: 05 Feb 2012, 21:23
Location: Newcastle upon Tyne

Re: SHED MATTERS 2

Post by micktoon »

Hi All , just some photos of a job I have just been doing , a friend needed some PVC collars making that fit on a driven shaft to mix paint or some type of job like that. Anyway he gave me one to copy and this is what it involved. There is probably lots of ways it could have been done other than this but it is partly working around what gear is able to be reached and what gear is actually working and not needing fixed lol.
Its 100mm solid PVC bar , so first job is to cut into decent sized bits for the lathe, I did this on the big bandsaw.

Image

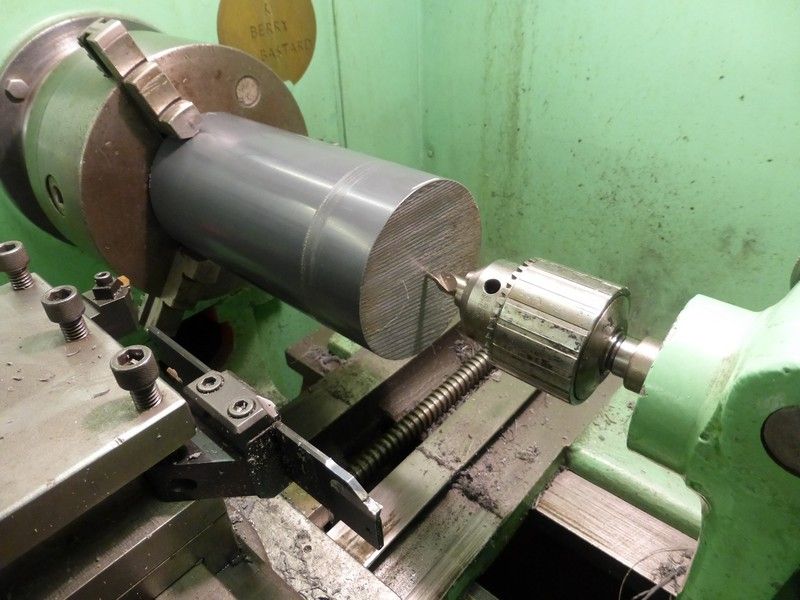
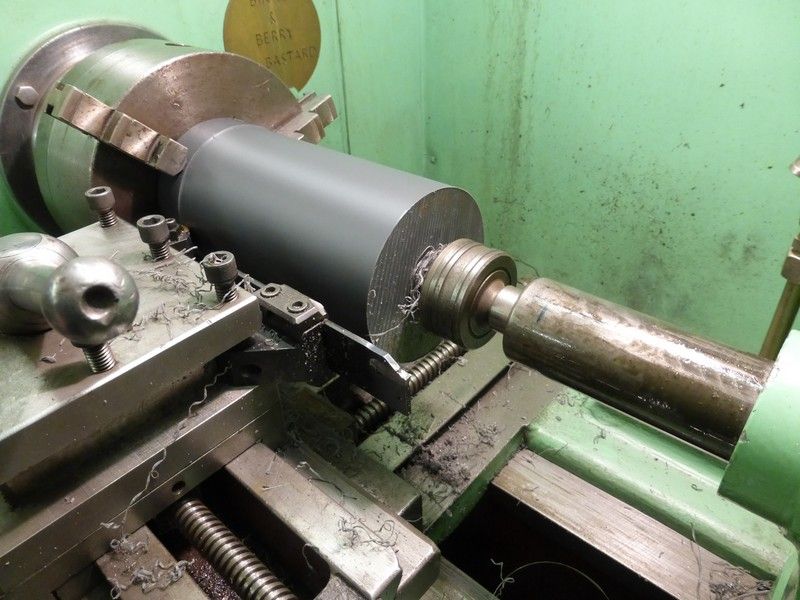
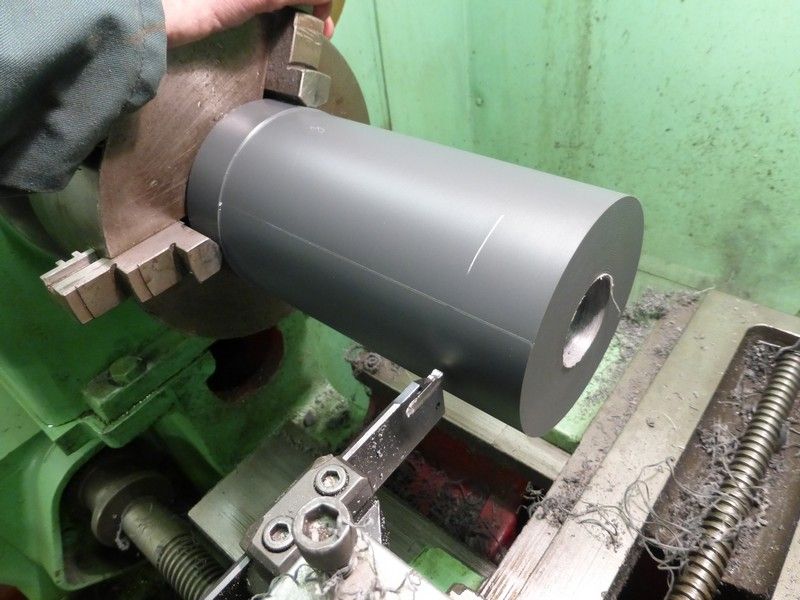
Then mounted this bit into the Binns and Berry lathe, center drilled the end, supported with revolving centre, and skimmed the outer surface until true and round. Its extruded bar so not that perfect to start with. I then draw the tool along the length so it has a scribed center height line for use later.

Image

Image

Image

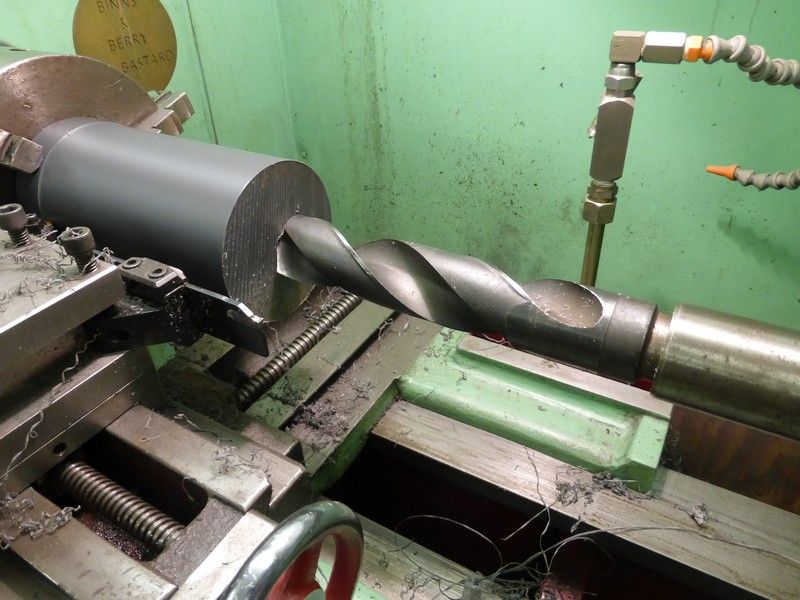
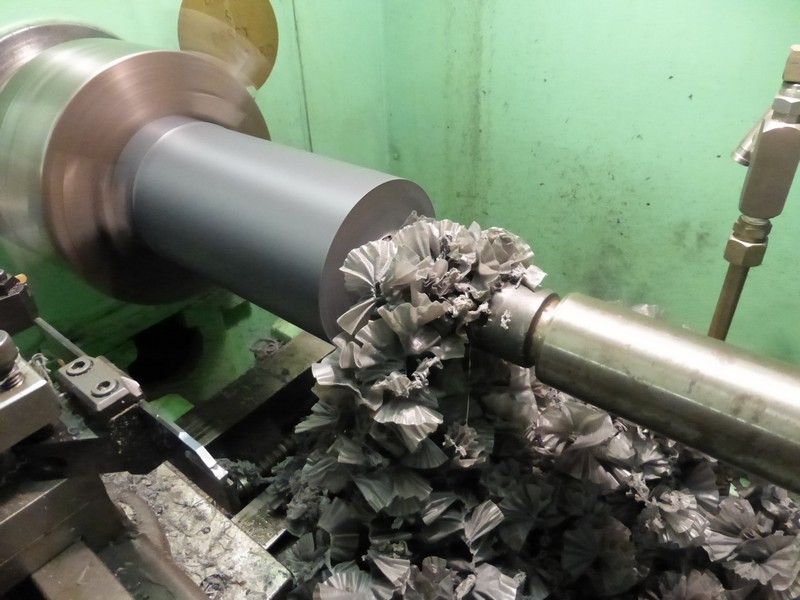
It was then drilled out with large drill a couple of mm under the final bore size, makes plenty shavings !

Image

Image

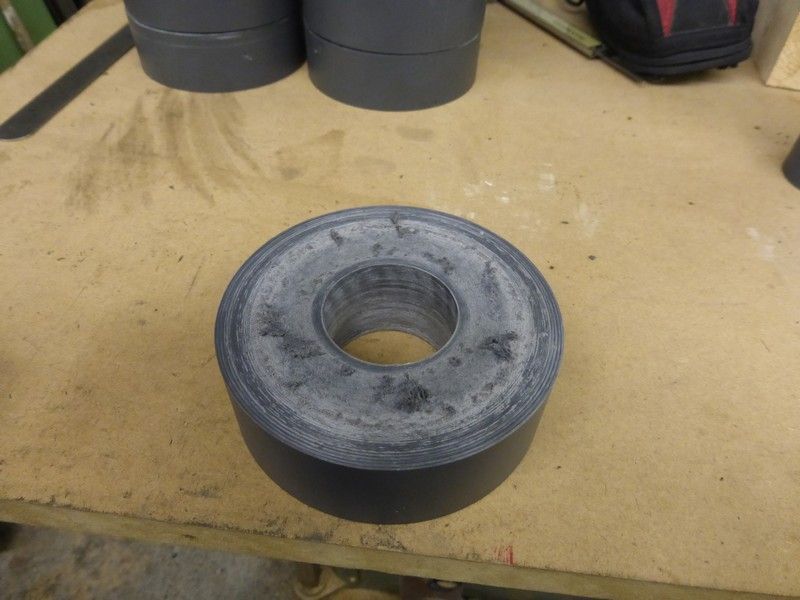
Next stage is to part off slightly too long as the parting tool leaves rough finish on both the part and the bar left in the chuck, so each part needs skimmed to size which will leave decent finish too.

Image

Image

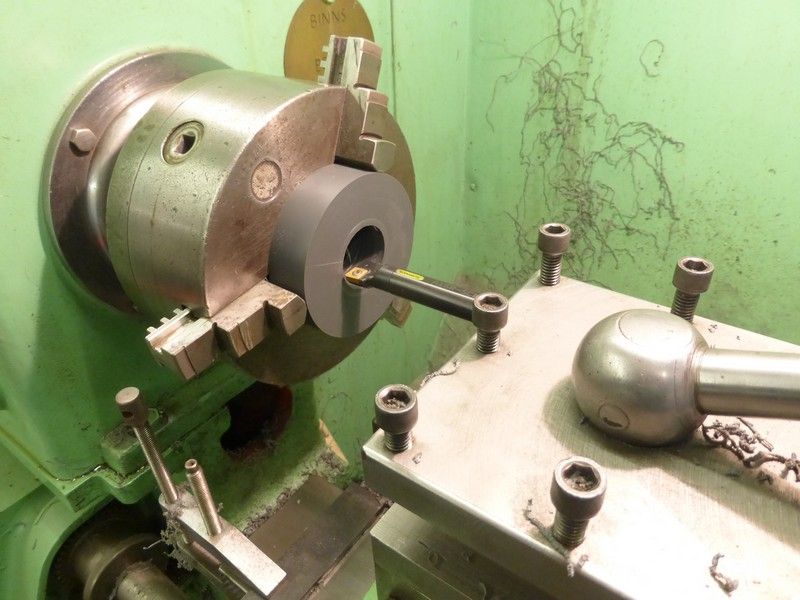
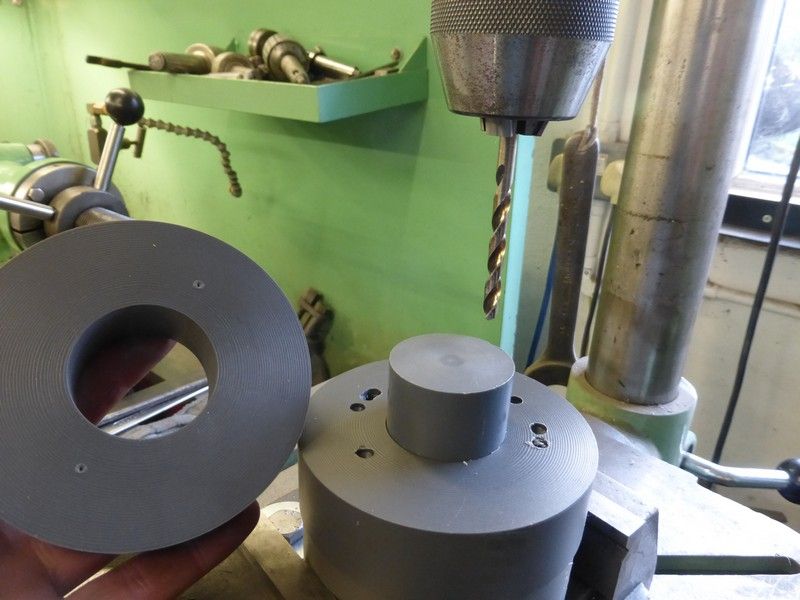
I then did one test bore to get the right size for the sample shaft to fit then do each collar without touching the setting for the boring bar so they al match, then do the same with them all length wise too, by doing one , leaving the tool setting, then doing the rest without moving the settings.

Image

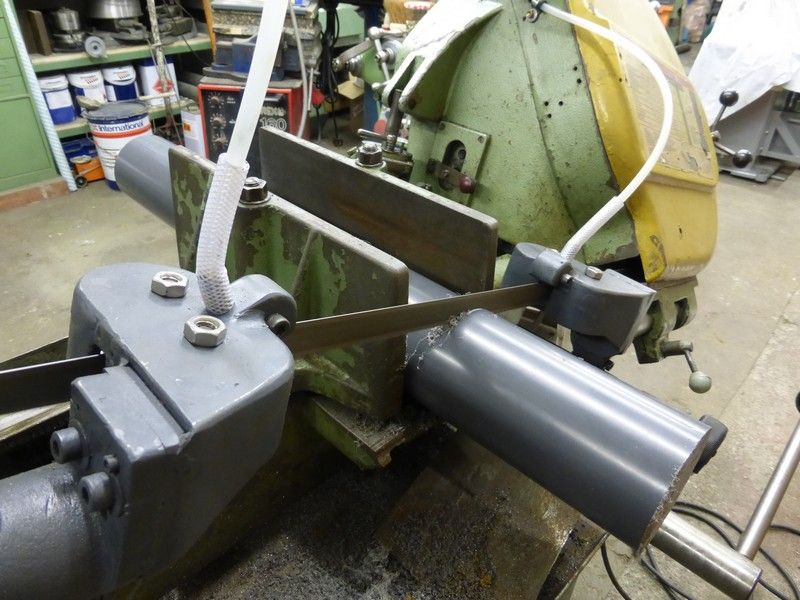
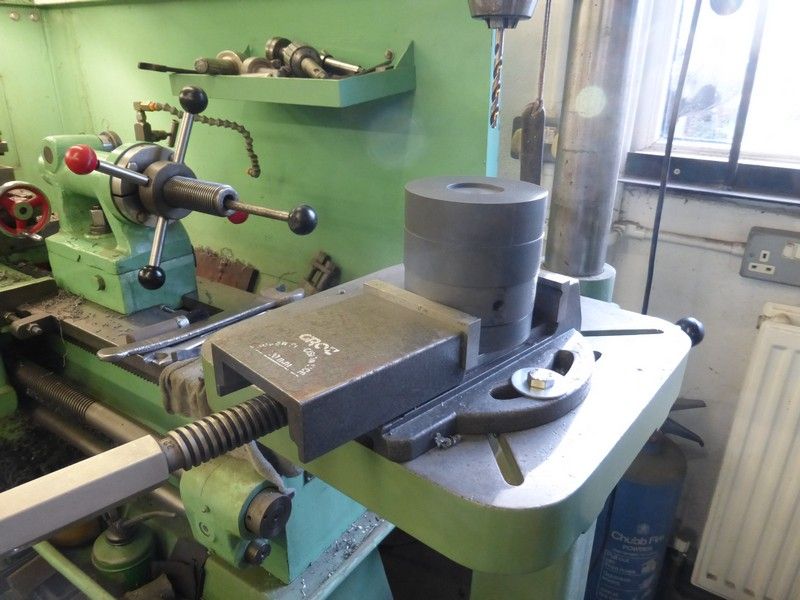
Next there are two 6mm holes drilled through from flat side to flat side, these are 90 degrees out from a 8.5mm hole that goes straight through the collar from one side to the opther. I used the original sample collar to center punch through to mark the two spots by using a section of shaft mouted into a base plate as a jig also lining it up with the center line that was scribed when still on the lathe. The same jig is then used then used to set up on the drill press to drill the holes. The collar can be rotated around the shaft in the jig so the holes are both same radius from centre point, then drilled in line with dotted marks.

Image

Image

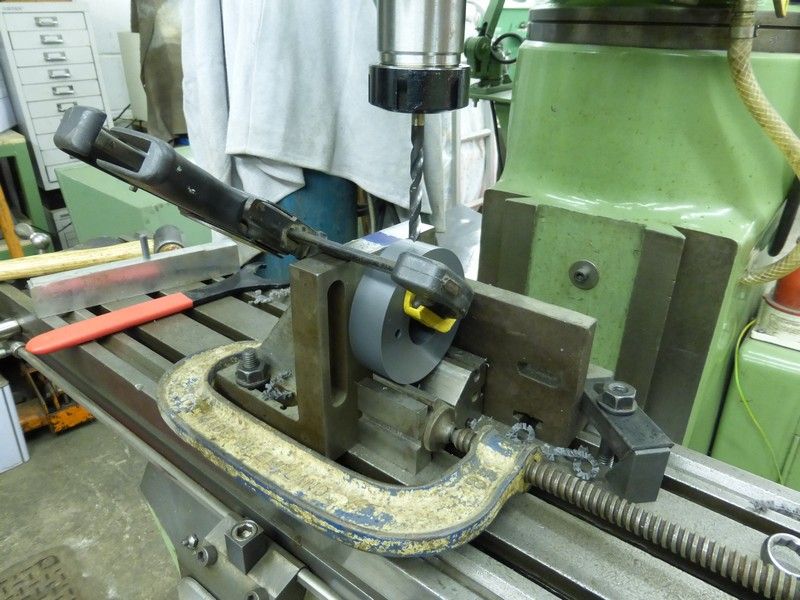
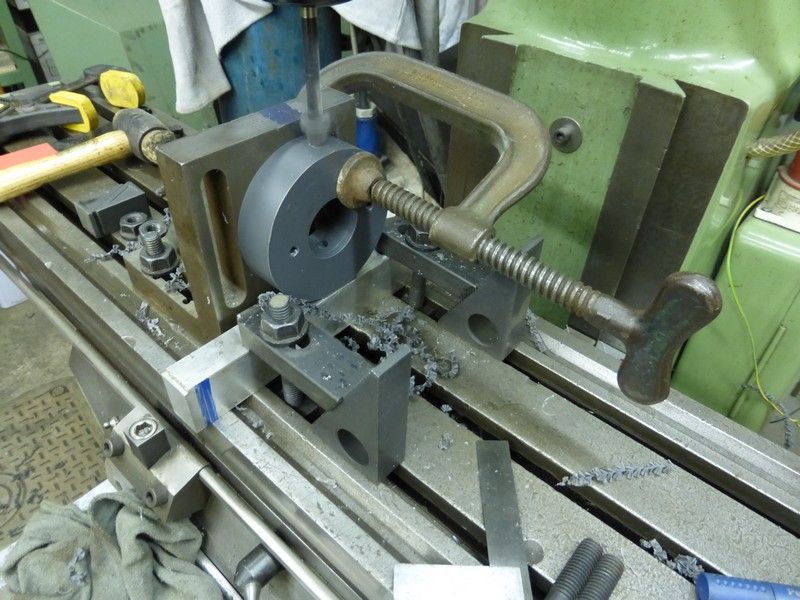
Next its the straight through hole of 8.5mm , I have experimented before with this and drilling straight through seems to wonder off so I go from each side into the center using a jig type set up on the bridgeport. First the angle plate is set so it puts the drill center line on the collar, then the V block and stop black make the collar locate, the scribed center line is then lined up with the line scribed on the angle plate at tool center line and each collar clamped and drilled.

Image

Image


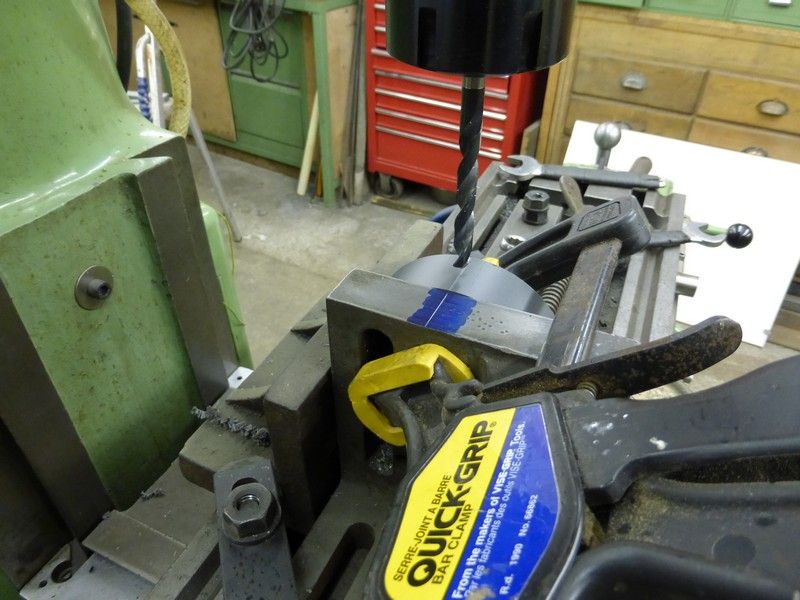
Then to do the matching hole on the other side I set a plastic 8.5mm pin in a scrap bit of alloy and located it the set distance from the angle plate and again on the center line scribed to the drill center. using the hole already drilled , this locates over the plastic peg, the collar clamped then drilled, as I did them just tested with a pin that reached right through the collar.

Image

Image

Image

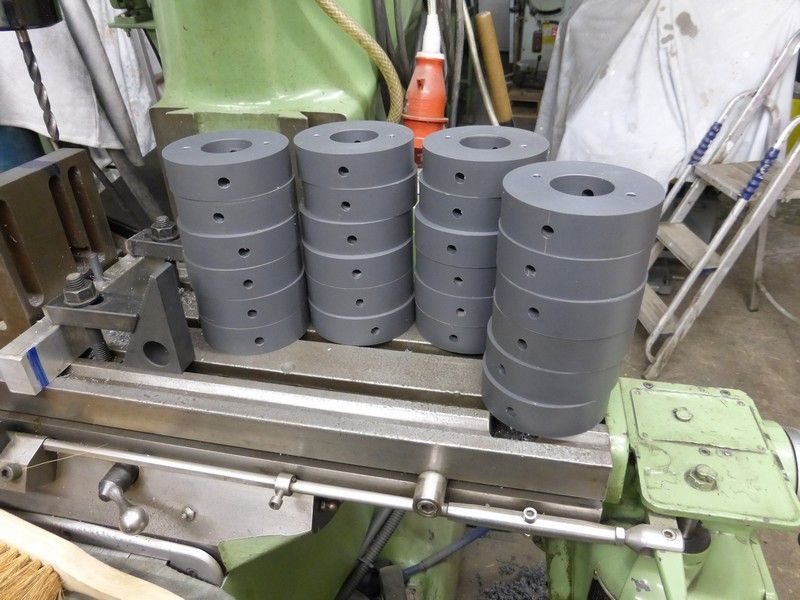
Thats it job done, I know things could have been done more precise with rotary tables etc but these are just rough and ready items to attach discs that spin in paint to so , if they do the job , its mission accumplished.

Looks like more good progress today Stanley , keep up the good work :grin:
Cheers Mick.
Locked

Return to “Crafts”