SHED MATTERS 2

Locked
User avatar
Stanley
Global Moderator
Global Moderator
Posts: 99393
Joined: 23 Jan 2012, 12:01
Location: Barnoldswick. Nearer to Heaven than Gloria.

Re: SHED MATTERS 2

Post by Stanley »

Image

I started the day by making sure that the valve rod was free in the chest. I did some tweaking and eventually I was satisfied.

Image

First face the end of the square stock

Image

Pop the centre drill in after turning the end round.

Image

Drill the centre out and tap 1/4"Whitworth to suit the end of the valve rod.

Image

Belt and brace4s, check you have a nice fitting thread.

Image

Cut the clevi8s off the stock under the saw, no point keeping a dog and barking yourself!

Image

Drill the clevis pin hole 1/4" and mark the end up for the slot.

Image

Three saw cuts got the meat out of the jaw of the clevis

Image

Getting close now.

Image

I finished the slot to depth with the file, you only need about 1/8" clearance below the clevis pin hole.

Image

Polish the faces and round the end of the jaws on the grinding wheel by hand and check fit it on the rod to make sure you haven't got any burrs in the thread.

Image

Fit it all up with a backing nut to lock the clevis. This allows you to make finer adjustments than half a turn on the rod if you are being really particular. Not a bad 90 minutes work....
Stanley Challenger Graham
Stanley's View
scg1936 at talktalk.net

"Beware of certitude" (Jimmy Reid)
The floggings will continue until morale improves!
Old age isn't for cissies!
micktoon
Regular User
Posts: 366
Joined: 05 Feb 2012, 21:23
Location: Newcastle upon Tyne

Re: SHED MATTERS 2

Post by micktoon »

Hi Stanley , another fine shift put in :grin: The horizontal mill sure does save some elbow grease rather than the hacksaw ! looking forward to the next step.
Cheers Mick.
User avatar
Stanley
Global Moderator
Global Moderator
Posts: 99393
Joined: 23 Jan 2012, 12:01
Location: Barnoldswick. Nearer to Heaven than Gloria.

Re: SHED MATTERS 2

Post by Stanley »

The next stage is studding the valve face and after that grind the face of the brass valve and assemble. At that point it is finished as regards the cylinder but one small task remains which I have never mastered. Making tiny drain cocks for it. Newton could turn these out like toffee but I have never made a good one. They are tiny but I feel I have to have a crack at them.... It will be interesting!
Did you pick up my request to the NE Mafia to have a look to see if any of you has a spare 3/8" Whitworth die?
Stanley Challenger Graham
Stanley's View
scg1936 at talktalk.net

"Beware of certitude" (Jimmy Reid)
The floggings will continue until morale improves!
Old age isn't for cissies!
User avatar
Stanley
Global Moderator
Global Moderator
Posts: 99393
Joined: 23 Jan 2012, 12:01
Location: Barnoldswick. Nearer to Heaven than Gloria.

Re: SHED MATTERS 2

Post by Stanley »

Not a lot to report today. Household tasks got in the way so only an hour in the shed and boring work at that....

Image

Can't put it off any longer. I need to stud the valve face on the cylinder. All my good resolutions about making studs out of the window, I'm using 2BA threaded rod. First of all I ran a nut down the threads to make sure they were all clean. Then put some nuts on the rod. The trick is to lock two nuts together so I have a spanner hold on it then screw the rod in tight to the bottom of the threaded hole. Then nut the lid down and cut the rod off leaving enough sticking up to round off when I have finished. The threads are very well fitted and so they take a bit of starting but I quietly made progress.

Image

At close of play I had 6 of the eight studs in place. The two that are left are being a bit awkward so I'll have to lift the castings off and re-tap the holes to get them better aligned, they are only a fraction out but at this depth that's enough to stop you getting a start. I have to run the tap through the threaded hole for the valve guide as well, that's the one where after warning everybody against it I caught the side of the hole with the stud.... So I know exactly where I am at tomorrow.....
Stanley Challenger Graham
Stanley's View
scg1936 at talktalk.net

"Beware of certitude" (Jimmy Reid)
The floggings will continue until morale improves!
Old age isn't for cissies!
micktoon
Regular User
Posts: 366
Joined: 05 Feb 2012, 21:23
Location: Newcastle upon Tyne

Re: SHED MATTERS 2

Post by micktoon »

Hi Stanley I shall check tomorrow , I might have one ? but if not will see if there is a spare one anywhere up North :grin: I have been trying to have a go at the backplate for the harrison today but decided whatever steel the scrapyard item I had is just not playing so will have to come up with plan B tomorrow. I have taken photos but not got them on the computer yet.
More good progress today even though you said you were doing household tasks.

Cheers Mick.
User avatar
Stanley
Global Moderator
Global Moderator
Posts: 99393
Joined: 23 Jan 2012, 12:01
Location: Barnoldswick. Nearer to Heaven than Gloria.

Re: SHED MATTERS 2

Post by Stanley »

Probably best to bite the bullet and get a slug of MS from a steel stockist.... It won't cost a fortune.... Biggest I have is 5" but that won't be big enough... One thought, if what you have is too hard, try putting it in a hot fire and soaking it for an hour or two at red heat and leave it in the ashes to cool down as the fire goes out. That usually works with cast steel that's been hardened.
Stanley Challenger Graham
Stanley's View
scg1936 at talktalk.net

"Beware of certitude" (Jimmy Reid)
The floggings will continue until morale improves!
Old age isn't for cissies!
User avatar
Stanley
Global Moderator
Global Moderator
Posts: 99393
Joined: 23 Jan 2012, 12:01
Location: Barnoldswick. Nearer to Heaven than Gloria.

Re: SHED MATTERS 2

Post by Stanley »

Image

This is where we started this morning, two studs are being recalcitrant,,,

Image

The first job was to pop the 1/2" 26tpi tap through the hole for the valve road guide to put a thread on the part of the stud interfering with the bore. No problem and soon cured.

Image

The two awkward studs were soon sorted. The problem is that I have fitted the holes so accurately that they only need to be a thou out to stop the thread starting. I lifted the lid and the chest off, ran the 2BA tap down the holes and fitted the studs. Than I replaced the chest. It was a perfect fit but very tight and I had to drive it down with a block of wood. This is OK because the parts line up perfectly.

Image

I refitted the lid just to check it was a good fit then took it off again.

Image

Then I rubbed the face of the valve down on very fine emery paper.

Image

The valve fitted in place in the chest and checked for free movement. All OK.

Image

The next job was to get a bit of finish on the outside of the valve chest lid. Not looking for exhibition finish, just clean and tidy.

Image

Last job was to refit the lid and file the ends of the studs down until they were all the same height. Nothing fancy but a good workmanlike finish.
No packings in yet, I still have to drill for the drain cocks and make them. When they are fitted I'll do the packings in the glands and on the piston and we have a cylinder!
PS. The eagle eyed ones amongst you will have noticed that I haven't drilled and tapped the valve chest for the steam connection. This is deliberate because I might make this cylinder part of an engine and it will be an advantage to be able to choose which side of the chest to drill for the steam supply. (That's my excuse for leaving it out and I'm sticking to it because it's a bloody good idea!)
Stanley Challenger Graham
Stanley's View
scg1936 at talktalk.net

"Beware of certitude" (Jimmy Reid)
The floggings will continue until morale improves!
Old age isn't for cissies!
User avatar
Stanley
Global Moderator
Global Moderator
Posts: 99393
Joined: 23 Jan 2012, 12:01
Location: Barnoldswick. Nearer to Heaven than Gloria.

Re: SHED MATTERS 2

Post by Stanley »

Shed will take a back seat today, I have to write some articles for the paper. (Work, the curse of the shed-addicted classes....)
Stanley Challenger Graham
Stanley's View
scg1936 at talktalk.net

"Beware of certitude" (Jimmy Reid)
The floggings will continue until morale improves!
Old age isn't for cissies!
micktoon
Regular User
Posts: 366
Joined: 05 Feb 2012, 21:23
Location: Newcastle upon Tyne

Re: SHED MATTERS 2

Post by micktoon »

Hi Stanley , not found a die yet but another place where there could be one but will have to dig box out I will be seeing John over weekend too so will see if he has one if I do not. Looks like no shed work today , you don't want to sicken yourself anyway :grin:

I have been having all the usual stuff go wrong doing the backplate but slowly getting there and not messed it up yet , I am taking photos on the way too so will post them soon.

Cheers Mick.
micktoon
Regular User
Posts: 366
Joined: 05 Feb 2012, 21:23
Location: Newcastle upon Tyne

Re: SHED MATTERS 2

Post by micktoon »

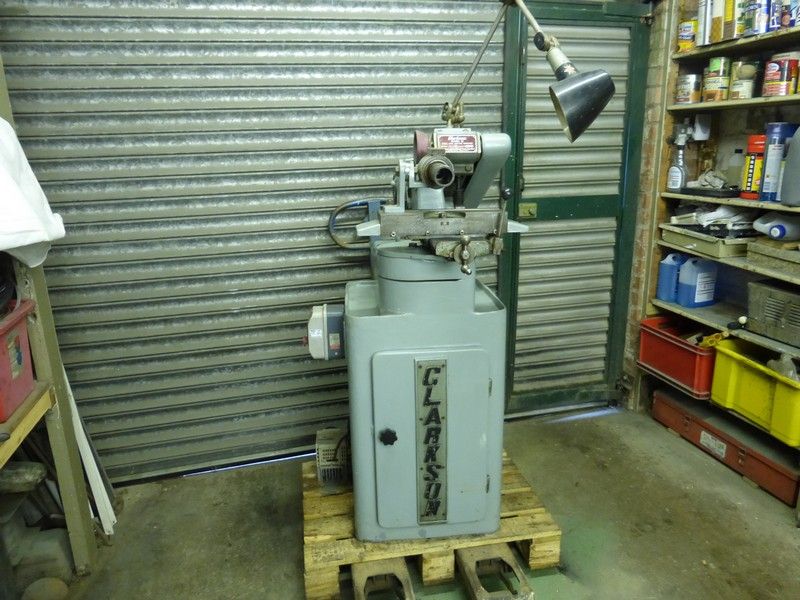
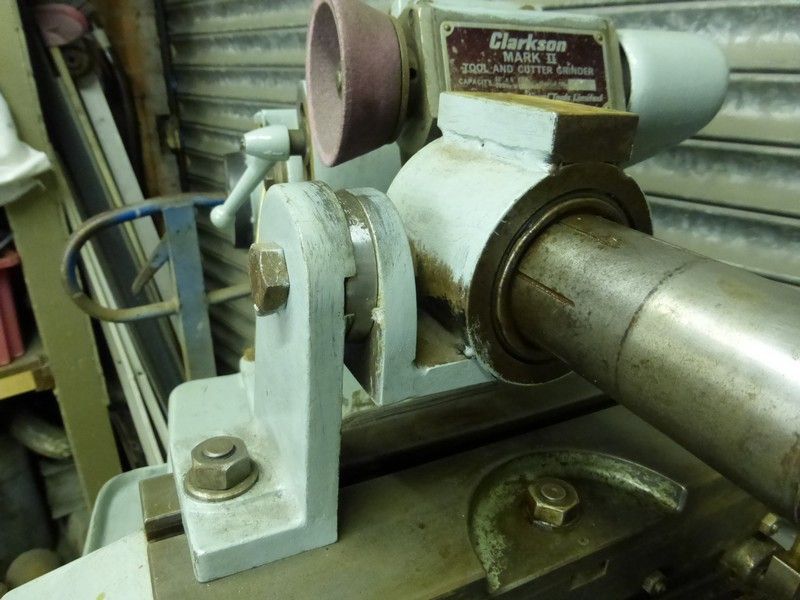
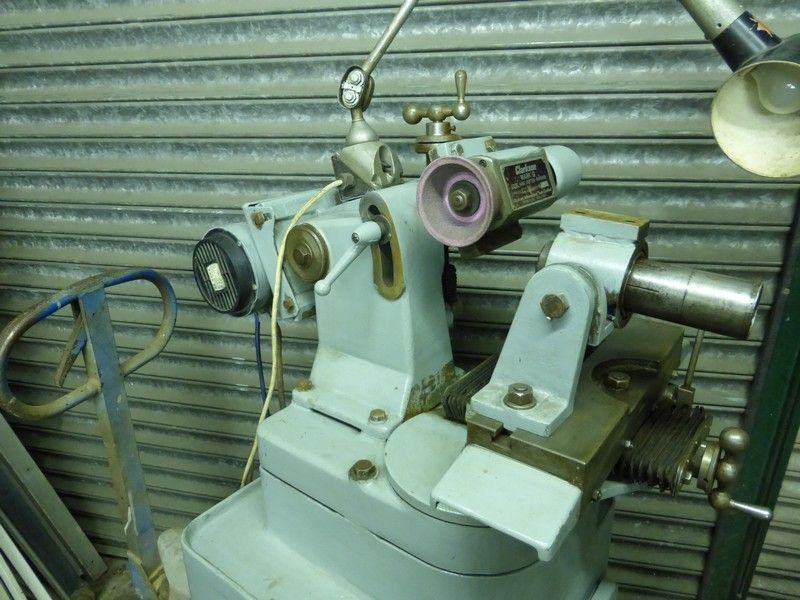
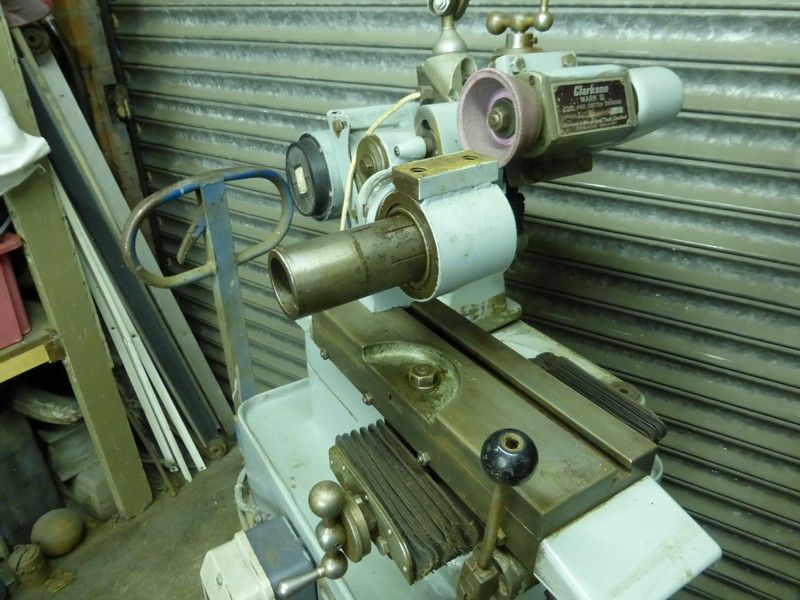
Hi All, I got this new addition to the workshop tools the other week off E bay. Mark 2 Clarkson with a few bits and bobs, I was pleased as the photos were not too good on Ebay and also it just said some attachments other than the universal head which was shown in the photo.

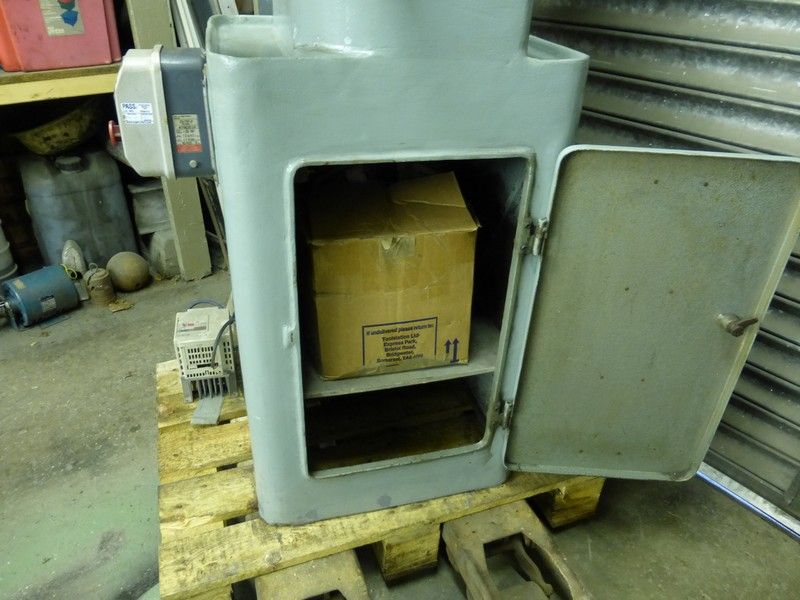
This is the machine, not bad overall condition and the motor was star or delta so I rigged up an old inverter I had and it goes fine too. When I opened the cabinet there was the cardboard box with the bits inside.

Image

Image

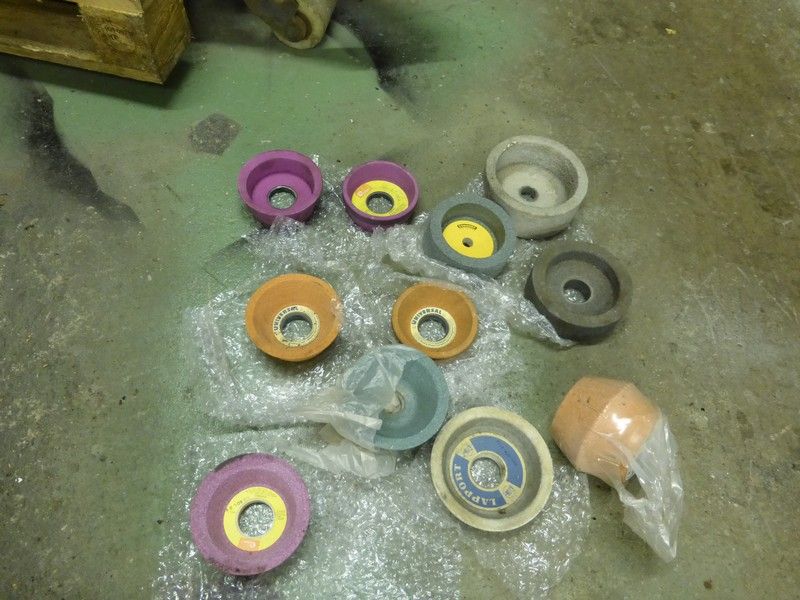
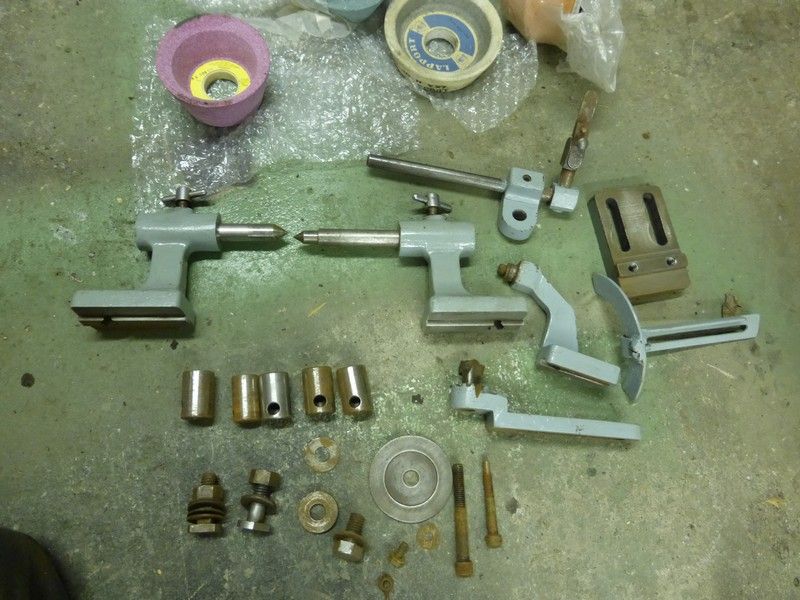
This is what the box contained, not bad as all were not listed in the ad , so just goes to show there are some decent folk still out there as they packed this lot up nicely and included it in the sale. I got it for £200 + it was £57 for a courier to pick it up from the other end of the country, which I thought was a good deal.

Image

Image

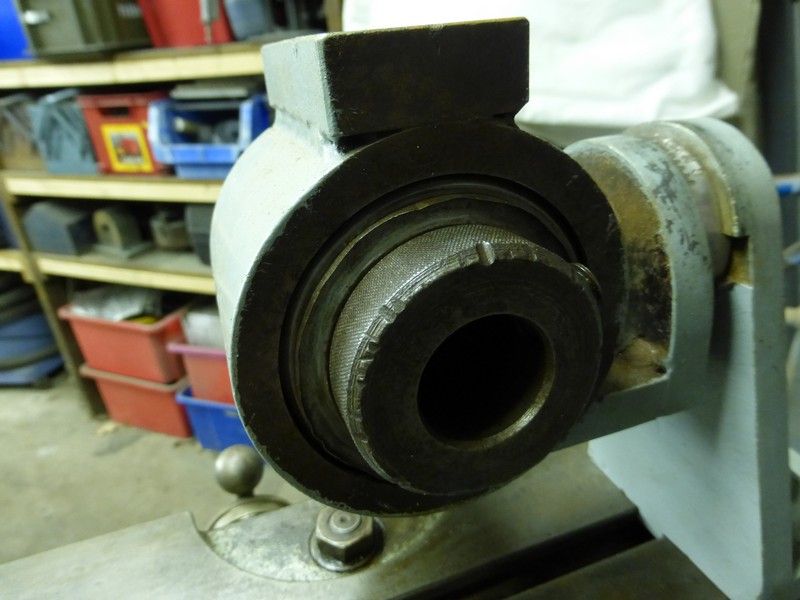
The universal head looks to be modified ? , it has bearing races fitted with metal dust covers, has anyone seen this before ? I presume its just so the sleeve will rotate more freely.

Image

Image

The light even works ! I will be giving it a strip down and paint at some point but at least its ot too bad to start with overall. I will just have to look out for other fittments or make them as needed.

Image

Image

Cheers Mick.
User avatar
Stanley
Global Moderator
Global Moderator
Posts: 99393
Joined: 23 Jan 2012, 12:01
Location: Barnoldswick. Nearer to Heaven than Gloria.

Re: SHED MATTERS 2

Post by Stanley »

Later model than mine Mick but essentially the same. The firm that owns the brand will send you a PDF of the parts list and manual which has all the cutting angles in it. The only thing I can't see are the spring detent blades which are handier for the universal head than the solid ones, you can rotate the cutter to the next flute just by turning it. I don't understand why the ball races in the universal head, mine is a simple close fitting sleeve but no doubt there is a reason and you'll find it. Here are two pics of mine, click to enlarge.

Image

Image

Wrote three articles yesterday so I am OK for the shed today. I shall astound you.....
Stanley Challenger Graham
Stanley's View
scg1936 at talktalk.net

"Beware of certitude" (Jimmy Reid)
The floggings will continue until morale improves!
Old age isn't for cissies!
User avatar
Stanley
Global Moderator
Global Moderator
Posts: 99393
Joined: 23 Jan 2012, 12:01
Location: Barnoldswick. Nearer to Heaven than Gloria.

Re: SHED MATTERS 2

Post by Stanley »

Image

The first job was to pop the drain holes in the cylinder, 1/4" bore and opened up to 8.4mm for part of the depth to take a 3/8" 26tpi tap.

Image

I started the tap under the mill to make sure it was vertical and dead straight.

Image

Finished the tapping with a bottom tap to get to the bottom of the hole. I made sure I had all the cast iron dust out of the bore, injected some oil down the steam passages into the valve chest, oiled the bore ready for building up and put the top lid on nutted down tight.

Image

Image

I'm ready now to pack the grooves in the piston and the glands but I called it close of play, that will come tomorrow.
I put the drawings away... I have the design of the cocks in my head I think....
One thing that's been mentioned is gaskets. You see a lot of discussion about this amongst model makers. My answer is forget them! If you think about the scale, a gasket in full size practice would be as thin as tinfoil. In addition, Newton once told me that after a number of very bad scaldings on the footplate due to gaskets blowing, most of the companies went on to a perfect finish and a packing consisting of a thin coat of red lead. If your faces are anywhere near decent that's ll you need, a thin smear of a proprietary jointing compound. I haven't put any in up to now because if I use this cylinder for an engine I'll want to take the valve chest down again and it would be very hard if the joints had compo in them!
So tomorrow is graphited asbestos day.....
Stanley Challenger Graham
Stanley's View
scg1936 at talktalk.net

"Beware of certitude" (Jimmy Reid)
The floggings will continue until morale improves!
Old age isn't for cissies!
User avatar
Stanley
Global Moderator
Global Moderator
Posts: 99393
Joined: 23 Jan 2012, 12:01
Location: Barnoldswick. Nearer to Heaven than Gloria.

Re: SHED MATTERS 2

Post by Stanley »

It's been a good morning and as I said yesterday, largely concerning graphited asbestos packing so the first job was to dig out the treasure chest that has the packing materials in it....

Image

In case you're wondering why the inkwells, its an old cash box that arrived in a workshop clear out. Probably worth a bob or to in its own right as an antique! This top tray has the sheet brass in it. My mate John Clayton makes clocks and he once told me something surprising about old clock faces which are of course a sheet of stout brass. He told me that a surprising number in old clocks are made out of coffin plates, the brass plate screwed to the lid of a coffin. It's anybody's guess how they came to be recycled as clock faces, perhaps the sexton's perk when he was opening an old grave for an additional internment?

Image

It's the section below that we are interested in, I wanted the bobbin of 1/4" graphited asbestos yarn.... As you can see I have various sizes and could still pack a 6" steam valve if necessary! Never throw anything useful away....

Image

Ready for a start on the finishing straight!

Image

The first job was to get packings in the piston ring grooves. I cut them large enough to almost take the 1/4" yarn. Cut two pieces slightly shorter than the diameter and the trick is to compress them with a Jubilee clip, exactly the same as a spring steel ring compressor. (I have one of them as well....) Screw the clip up as tight as you can to compress the packing in the grooves and then start the piston in the bore. Slacken the clip off a touch and drive the piston into the well oiled cylinder. If you've got everything right you'll find that the sharp edge of the bore will cut off any excess. You'll find that the piston is so tight in the bore that it feels solid. Don't worry about this because that's just how it should be. If this cylinder was going on an engine you would find that the piston could be moved once the flywheel and con rod were attached and it would soon free up. A piston packed like this is surprisingly long lived and the packings easily replaced. The old lads using brass cylinders on their locos used these packings and they lasted for years before needing any attention. As Johnny used to say, we aren't driving 500 looms!

Image

Pop the lids on the cylinder and snug the holding down bolts down and then it's the gland nuts. Not much room in these so unravel a short length of the same packing and use single strands. Don't over-pack the gland, all you are doing is getting a snug core of packing with a hole through it for the rod. Put enough in to be able to follow the packing up when it beds in under working conditions. Two things about graphited asbestos packed glands, if you over-tighten they will wear the rod and lead to leakage. If and when you get to the stage where you have bottomed on the packing repack the gland completely taking the old packing out. The most common mistake and one made by many 'engineers' was to simply add a layer of new packing on top of the old. This appeared to work because it stopped the leakage but the hard worn out packing in the bottom was doing a good job of wearing the rod. So always repack completely.

Image

Close of play. All the packings in, the only rod I can move is the valve rod but as I said above that's OK, just how it should be. Just for a laugh I weighed it, 12lbs of honest endeavour. As I said yesterday I'm going to bite the bullet and make two tiny drain cocks. The only thing I can remember about the ones that Newton made is that when he made the tapered plug the handle was concentric with the bore and he bent them after they were in place.... I have an idea he used bronze welding rod because it was soft enough to bend. We will see.....
Stanley Challenger Graham
Stanley's View
scg1936 at talktalk.net

"Beware of certitude" (Jimmy Reid)
The floggings will continue until morale improves!
Old age isn't for cissies!
User avatar
Stanley
Global Moderator
Global Moderator
Posts: 99393
Joined: 23 Jan 2012, 12:01
Location: Barnoldswick. Nearer to Heaven than Gloria.

Re: SHED MATTERS 2

Post by Stanley »

I forgot to say that the last job yesterday was to clean the lathe off as the last turning job was steel and the next is brass and I am keeping the scrap clean for Doubleboost's scrap bucket....
I've been looking at that cylinder and I have a fancy to make it into a horizontal engine.... First decision is what do I make the bed out of? Ideal is to make a pattern and get one cast, the other alternative is to chop it out of solid. I have a couple of billets of black bar that could be big enough but perhaps it would be best to get my mate Terry to order me a slug of square black bar. I'm allowing my mind to wander and measure up what I have.....
No shed today because I have to be at the optician's at 9AM. That will knock the morning in the shed out..... I am still thinking about those bloody cocks!
Stanley Challenger Graham
Stanley's View
scg1936 at talktalk.net

"Beware of certitude" (Jimmy Reid)
The floggings will continue until morale improves!
Old age isn't for cissies!
User avatar
Stanley
Global Moderator
Global Moderator
Posts: 99393
Joined: 23 Jan 2012, 12:01
Location: Barnoldswick. Nearer to Heaven than Gloria.

Re: SHED MATTERS 2

Post by Stanley »

Image

The first job w2as to make some decisions about design and size, draw it out and find the material. A quick trip into the treasure box found this lump of n1" diameter bronze... But then, as so often happens I got diverted. The for jaw SC was still on the lathe and I had noticed when I mounted it that it was a bit tight on the nose. Not as clean in the threads as it should have been. Now, as I watch these well equipped machinists on Youtube I often envy them a compressed air supply so they can blow chucks and bores out. I have a small compressor cluttering up the floor in the shed and it dawned on me that it was time it did something for a living. I soon found the jet unit but it took a bit of digging to find the right union to connect it to the hose. The compressor has no storage tank, it is primarily designed for tyre inflation but I found that it built enough pressure in the pipe to give a very satisfactory 120psi blast and soon recovered. It fitted neatly behind the gearbox of the lathe and there was a spare plug on the wall near it.

Image

I popped a screw in the front of the shelf to hang the nozzle on and we are fit up! I blew the 4 jaw out before I put it away and blew the three jaw out before I popped it on. Well pleased! Now to get on with the job in hand.

Image

I started off turning down a length long enough to make one cock (5/8" diameter) but soon realised that it would be better to do enough for two

Image

Here's a finishing cut going on the 5/8" blank.

Image

Then a quarter of an inch turned down to 3/8" ready for threading to fit in the cylinder and the end chamfered. Close of play for today....
Stanley Challenger Graham
Stanley's View
scg1936 at talktalk.net

"Beware of certitude" (Jimmy Reid)
The floggings will continue until morale improves!
Old age isn't for cissies!
User avatar
Stanley
Global Moderator
Global Moderator
Posts: 99393
Joined: 23 Jan 2012, 12:01
Location: Barnoldswick. Nearer to Heaven than Gloria.

Re: SHED MATTERS 2

Post by Stanley »

As you may have noted elsewhere I cracked yesterday and put the refurbished 2X35watt light back up in the kitchen. Not sensible because being up a ladder holding the lamp up and finding the screw holes while looking up and reaching is dodgy at the best of times. I've been puzzling about why I did it and I think I have an answer. As you get older some things become very difficult, if not impossible, my inability to read for pleasure is a good example. I reckon that the reason I stayed out of the shed for so long was because I was frightened in case I found out I was no longer capable. Now I'm back in there I'm doing better work than ever. Same thing applies to the lamp, I had persuaded myself I couldn't do it and was relying on Mo. Yesterday I proved to myself that this wasn't true. I think the lesson is don't assume you are worse than you are, get in there and find out! I suppose it's a way of fighting against the otherwise inevitable effects of ageing.... Onward and Upward!
Stanley Challenger Graham
Stanley's View
scg1936 at talktalk.net

"Beware of certitude" (Jimmy Reid)
The floggings will continue until morale improves!
Old age isn't for cissies!
User avatar
plaques
Donor
Posts: 8094
Joined: 23 May 2013, 22:09

Re: SHED MATTERS 2

Post by plaques »

Gumption trap Stanley. Giving up before you even get started. Glad you've seen the light !!
User avatar
Stanley
Global Moderator
Global Moderator
Posts: 99393
Joined: 23 Jan 2012, 12:01
Location: Barnoldswick. Nearer to Heaven than Gloria.

Re: SHED MATTERS 2

Post by Stanley »

Indeed! Don't worry P, I shall keep fighting!
Back to the drain cocks.... First job this morning was good tidy up.

Image

First job was to pop the centre drill in the end of the stock.

Image

Then drill the bore 5/32" to the full depth of the drill. A word about deep drilling with fine drills. Be patient! Peck and withdraw, peck and withdraw. If you don't you'll break a drill off in the hole!

Image

Then thread the end 3/8" 26tpi.

Image

Part the slug off, reverse it in the chuck and bore, reduce and thread the other end. By the way I took this opportunity to pull the jaws out of the chuck and give them and the scroll a good blast out. Freeest that chuck has been for a long time, brilliant!

Image

I tried the threaded ends in the cylinder body, both a good fit. Then I set up a much thinner parting tool and split the slug in two.

Image

We have two blanks, one for each cock. They aren't quite identical but that can be addressed tomorrow. I think we may have to go into Johnny's 1927 lathe in the front room. This is getting a bit too small for the Harrison.
Drilling those deep holes with a small drill reminded me of a cautionary tale... While I was working for John Ingoe at REW we got a big job, building a combustion chamber to go on the front of a normal tubed boiler so that a mixture of pelleted household waste and coal could be burned. It was big and the walls of the combustion chamber had to have two inch thick stays welded in at close intervals. I spent days on the big radial drill boring 2" holes and countersinking them to 45 degrees for the weld on each side. John ordered the stays from a contractor and when they came they all had to be bored ri8ght through as a 'tell-tale'. The idea is that when a stay corrodes it leaks steam into the tell-tale and gives a warning. These stays were about 6" long and the specification called for a 1/8" bore. I got on to John and asked him to have a word with the designer, 1/4" would be much faster and easier and just as efficient. John came back and said that would be OK so I got some long series drills and go going in the lathe.
It was a long-winded boring job because they all had to be done by pecking and withdrawing. I had almost finished the 200 stays when it dawned on me that there were more stay holes than stays. I counted up and went to have a word with John. He agreed and got the original order out. I forget the exact numbers but it was something like we had ordered 300 stays 200mm long and they had supplied 200 at 300mm long! John's order was correct, it was the contractor who had got it wrong. So, all the stays had to go back and be rep[laced with the right size. I suggested to John that seeing as how they had cost me my time drilling all the holes they should put the tell tales in the new batch. That's what happened and I was glad! Just goes to show how a simple mistake can cause no end of bother.
By the way, we had so many problems with building the walls of the chamber that half way through John decided to chuck the contract up as he could see it was no good and we would be blamed for any failure. He came in early one morning and told me to load all the parts we had done on a wagon that would co9me from the scrapyard. I admired his decision. It cost him money but I have no doubt he was right....
Stanley Challenger Graham
Stanley's View
scg1936 at talktalk.net

"Beware of certitude" (Jimmy Reid)
The floggings will continue until morale improves!
Old age isn't for cissies!
User avatar
Stanley
Global Moderator
Global Moderator
Posts: 99393
Joined: 23 Jan 2012, 12:01
Location: Barnoldswick. Nearer to Heaven than Gloria.

Re: SHED MATTERS 2

Post by Stanley »

Image

In an idle moment yesterday evening I popped one of the cock bodies in the chuck of Johnny's 1927 copy of the Birch lathe in the front room and took a couple of cuts. I was reminded yet again what a lovely little lathe it is to use. I shall be using it today and following on Johnny and Newton's footsteps. This was the lathe they both used for small parts for their projects. When I got hold of it I refurbished it completely and it is now as tight as when Johnny made it in 1927, he couldn't afford to buy one so he made his own. Here's an excerpt form my book on Brown and Pickles (get it from Lulu.com!) in which I briefly describe how the building of the lathe happened. Later in the book I give a full account of them.

"I’ve made the mistake of mentioning ornamental turning. If you want to learn more about this esoteric art there are two books you must seek out. Tom Walshaw (He wrote in the ME under the name ‘Tubal Cain’) published Ornamental Turning which is a good introduction but the classic source is John Jacob Holzapffel’s Volume 5 of his massive work on ‘Turning and Mechanical Manipulation on the Lathe’; ‘The Principles and Practice of Ornamental or Complex Turning’ There is a health warning with this recommendation, OT as the aficionados call it is incredibly complicated and highly addictive. Think three-dimensional chess, lets put it this way, you can put something round in the lathe and turn it flat!

Johnny, not surprisingly, had a lifetime fascination with OT. I don’t want to start a full description of his involvement here, there will be a chapter on this later but I want to flag up his dedication to the skill as part of our description of the man and how he approached problems. Remember that Johnny was interested in horology? Sometime after the Great War he began to feel the need for a specialised lathe to cut the teeth of his clock gearing. He knew what he wanted, a firm called Birch in Manchester made a very well-designed ornamental turning lathe which incorporated a sophisticated dividing gear which is essential for equally spacing any number of teeth round the periphery of a gear. There was a problem, he couldn’t afford to buy one so in 1925 he started to build his own copy of a small Birch lathe and finished it in 1927. It is a beautiful machine, wonderfully made to a very high standard and speaks volumes about his skill and craftsmanship. He cut many gears on this lathe but by 1950 he was heavily into making turret clocks and the 1927 lathe wasn’t big enough so he made another, larger and more complex ornamental turning lathe. This too is a master work. That’s all I want to say at the moment, we’ll come to the lathes later on. In case you are wondering why I know so much about these two machines… I have both of them in my care and have completely refurbished them, that’s why there will be a chapter later devoted to them.
"

Image

Here's the later, larger lathe. As good as the day Johnny made it.....
Stanley Challenger Graham
Stanley's View
scg1936 at talktalk.net

"Beware of certitude" (Jimmy Reid)
The floggings will continue until morale improves!
Old age isn't for cissies!
User avatar
Stanley
Global Moderator
Global Moderator
Posts: 99393
Joined: 23 Jan 2012, 12:01
Location: Barnoldswick. Nearer to Heaven than Gloria.

Re: SHED MATTERS 2

Post by Stanley »

Image

The day started a bit differently... First thing I had to do was move the sofa so I could comfortably stand in front of the lathe.

Image

I thought I'd give you a good look at the lathe. Here's the headstock end. Leather belt drive, the bull gear has a built in brass division plate with the mo0st common divisions on it. On the end is a tangential dividing gear which can be connected to the mandrel by engaging the worm gear with a 180 tooth worm wheel. Johnny favoured the 180 degree basis because it made it easier to divide scales into degrees for his microscopes and telescopes. The mandrel is hardened steel running in plain holes bored in the headstock casting with no adjustment. It's 88 years old and there is no discernible play in the bearings. This was common 100 years ago and if you put a couple of drops in each bearing once a day when using it the two surfaces never touch. The 3" SC chuck is Polish and dead accurate. I fitted that when I refurbished the lathe because Newtons old 3 jaw was a bit battered!

Image

This deserves a bit of close inspection. The Birch design is unusual because the saddle is mounted on the front face of the bed. This allows a flat top on the bed which can be very useful. The saddle is mounted on a rise and fall mechanism and there is an adjustable stop which means the cross slide can easily by put into the 90degree position. The rise and fall is useful because if you use standard tooling, in this case 1/4" HSS cutters, as long as you sharpen them in such a way that the cutting edge is always level with the top face of the stock you can swap tools as often as you like once set for one of the tools. You might be able to see a dovetail on the near side of the slide. This is for mounting a back tool post if you need it. Another gadget is the bracket you can see on the pic of the headstock which is for mounting form plates which can be followed by an attachment on the back of the topslide. Remember that this lathe was originally designed for treadle drive. The small Horace Green motor is a third of a horsepower, quite adequate for the drive and the weight of cut. By the way, one of the great advantages of a belt drive lathe like this is that there are no gears in the drive train and so the drive is silky smooth. You'd be surprised how this improves finish....

Image

The first thing I did after a round with the tiny oil can (including the overhead gear shaft bearings) was to check the settings. I found the cross slide was a touch out so I adjusted the stop.

Image

The next job was to select and sharpen some 1/4" HSS stock and sharpen for brass cutting, hardly any rake. Then I checked the cutting height and adjusted it with the rise and fall gear. I was ready for today's small task.

Image

Here's the end result! Not a lot of work done but I now have two cock bodies exactly the same and fitting the cylinder nicely.

Image

Then I had a bit of a think about taper sizes and how to make the cock itself... It won't surprise you to hear that I decided to cheat a little. Among my treasures is a box of assorted steel taper pins. So I sorted out two that are the right size, found the taper reamer that matches them and the drill for making the initial bore in the body. I'll give some thought to the handle....

Image

The last job was to Hoover all the brass chips up, they get everywhere! Newton used to get in terrible trouble with his mother when he had this lathe in the attic at home. She said he trod brass chips all over the house.....
Stanley Challenger Graham
Stanley's View
scg1936 at talktalk.net

"Beware of certitude" (Jimmy Reid)
The floggings will continue until morale improves!
Old age isn't for cissies!
User avatar
Stanley
Global Moderator
Global Moderator
Posts: 99393
Joined: 23 Jan 2012, 12:01
Location: Barnoldswick. Nearer to Heaven than Gloria.

Re: SHED MATTERS 2

Post by Stanley »

Image

I forgot to mention this clever feature of the lathe yesterday. The classic method of threading on a geared SC lathe like this is to leave the feed nut engaged all the time, retract the tool and reverse the lathe, then re-advance the toll and put the next cut on. To save time Johnny fitted a mechanism which automatically retracts the tool a fixed amount to allow it to clear the cut without altering the cutting setting. If you look to the right you'll see an extra polished steel handle in line with the main saddle handle. This is connected to a quick start double thread on the cross slide feed screw. Half a turn counter clockwise retracts the tool while you reverse and the opposite motion puts it back where it was after the reverse. I still have the original reversing switch for the motor but have never fitted it. I need a Sparks who understands motor connections!

Image

Does anyone out there know how to do it?
Stanley Challenger Graham
Stanley's View
scg1936 at talktalk.net

"Beware of certitude" (Jimmy Reid)
The floggings will continue until morale improves!
Old age isn't for cissies!
User avatar
Stanley
Global Moderator
Global Moderator
Posts: 99393
Joined: 23 Jan 2012, 12:01
Location: Barnoldswick. Nearer to Heaven than Gloria.

Re: SHED MATTERS 2

Post by Stanley »

Image

I think the kindest way to describe this morning is 'challenging'! And it all started so well. I got my jar of non ferocious ends out and found a bit that was near the size of the cocks. The idea was to drill and taper ream it and try one of my taper wedges in it. All went well and it seemed to work. It was useful doing the trial run because it reminded me to relieve the cutting edges on the drill to stop it grabbing.

Image

Image

I put the drill on low speed and reamed the hole under power.

Image

Here's the test piece, perfect.... So I cracked on with the cocks. Here's how I used the callipers to get the hole central, made it easier for my bum eyes.

Image

I soon had both cocks bored, reamed and test fitted with the taper wedges. Just to make certain I had a clean bore I ran the reamer in by hand and found out something that of course I couldn't feel doing it under power. The bloody reamer dropped straight through! My eyes had deceived me, it wasn't a taper reamer, it was parallel! I found a taper reamer that suited and reamed both cocks by hand.

Image

The problem now was that my taper wedges dropped right through. I was going to have to go back to plan 'A' and make the cocks myself by taper turning. The question was, what's the angle?

Image

Image

I got Machinery Handbook out and the magnifying glass. Then it dawned on me that British standard taper was different so I had to switch to Kemp. I soon found that the taper is 0.25" per foot. I found a table in Kemp that translated this to an angle, 0 degrees, 35 minutes and 49 seconds. Great! How the hell am I going to be able to set that? So I've decided that the only way is to set up my largest taper wedge in the lathe and use the dial indicator to get the top slide feeding parallel to the taper. That's for tomorrow.......
One thing about bum eyesight, it teaches you to be patient and persistent!
Stanley Challenger Graham
Stanley's View
scg1936 at talktalk.net

"Beware of certitude" (Jimmy Reid)
The floggings will continue until morale improves!
Old age isn't for cissies!
User avatar
Stanley
Global Moderator
Global Moderator
Posts: 99393
Joined: 23 Jan 2012, 12:01
Location: Barnoldswick. Nearer to Heaven than Gloria.

Re: SHED MATTERS 2

Post by Stanley »

Image

Not a lot to report this morning because it has been too busy to get into the shed for any serious work. I had run all sorts of scenarios in my mind from high precision measuring or using an indicator to set the top slide angle but in the end decided to go for simplicity.
I made sure I had a tool set in the toolpost that had a sharp tip and was dead on centre height. Then I chucked the reamer I used for the cocks in the three jaw. Then I simply adjusted the top slide in small increments until the tool tip was running parallel to the reamer. I can't see any reason why this won't work, we can soon test it tomorrow.....
Stanley Challenger Graham
Stanley's View
scg1936 at talktalk.net

"Beware of certitude" (Jimmy Reid)
The floggings will continue until morale improves!
Old age isn't for cissies!
User avatar
Stanley
Global Moderator
Global Moderator
Posts: 99393
Joined: 23 Jan 2012, 12:01
Location: Barnoldswick. Nearer to Heaven than Gloria.

Re: SHED MATTERS 2

Post by Stanley »

Image

I'm happy to report that it was a successful morning! The first job was do decide on some sizes and do a rough drawing.

Image

Having decided I wanted a 3/8" bar of non ferocious I had a furtle in some of the treasure chests....

Image

#They didn't let me down, I would have preferred bronze but I can put up with this 1/2" brass bar. I can tell by the muck on it where it came from and I suspect this first saw the light of day almost 100 years ago....

Image

Image

I faced the end off, popped a little centre in and reduced it to 3/8"

Image

I've jumped a few steps here. I re-chucked the bar to give as little overhang as possible because the centre would be in the way of the taper turning. I measured the minor diameter of the hole in the body and turned the taper until I had got down to that. I knew the taper would finish just below the head leaving a shoulder so I marked where that would be. When I got somewhere near I forgot the measurements and used the body of the cock to tell me when I had taken enough off. The last cuts were less than a thou...

Image

I've missed a stage here but we'll come back to it. While the cock was still in the chuck I threaded the end to take an 0BA nut. As it happened the fag end was just right for the tap.

Image

Then I made a small mistake. I jibbed at parting off and used the Junior hacksaw, not perfectly square of course and I had to do some fancy filing to rectify this.

Image

I cracked on with the second one, exactly the same method but this time I remembered a pic of the threading. This is where you are glad you spent all that time making sure you have complete sets of taps and dies....

Image

Then I did what I should have done the first time, parted it off cleanly.

Image

Here's where we are up to now. The game plan is to drill the tops and fit a small handle. Once the handle is fitted, orient the handle so it is in line with the bore through the body and poke a drill the same size through the plug. It's worth mentioning that the use of cocks, rather than valves, is standard practice on all full sized engine on the drains. There is a very good reason for this. You can't tell just by glancing at it whether a valve is open or closed. With the cock the handle is the tell-tale and you can see immediately whether it's open or closed. When I was asked to go down and comment on the Siberia engine at the Science Museum (Finsley Gate engine from Briercliffe) this was one point I pulled them up on, I don't know whether they took notice and changed the screw valves for cocks...

Image

You know how I like straight edges.... I put all the tools away and tidied the bench. Then I cleaned all Doubleboost's brass chippings off the lathe and put them in the correct box outside. Nice tidy shed and a clear programme for tomorrow.... It's been a good morning.
The nice thing is that my rule of thumb method for setting the top slide to cut the taper was spot on. I think Newton would have approved.....
Stanley Challenger Graham
Stanley's View
scg1936 at talktalk.net

"Beware of certitude" (Jimmy Reid)
The floggings will continue until morale improves!
Old age isn't for cissies!
User avatar
Stanley
Global Moderator
Global Moderator
Posts: 99393
Joined: 23 Jan 2012, 12:01
Location: Barnoldswick. Nearer to Heaven than Gloria.

Re: SHED MATTERS 2

Post by Stanley »

Image

I had decided to make the handles for the cocks the easiest way I knew, Taper ins driven into them. So first job was to decide the size, find the drill and the taper reamer to fit and then have a practice.

Image

Out with the jar containing the brass ends and I found a small piece of bronze bar.

Image

I popped it into the lathe and reduced the end to 3/8" and then tried out the drill, reamer and taper pin. Just the job so I cracked on with the cocks themselves.

Image

It didn't take long to get to the stage where I had to admit I'd finished all I wanted to do on the cylinder. This is serious because now I have to find something else to do! I have little doubt that sooner or later I shall put this on a bed and make a horizontal engine but for the time being it goes in the front room with the rest of the clutter!

Image

Last job was to tidy up, all tools put away, lathe cleaned and leave a straight edge for tomorrow.

Image

One last thing. In case you're wondering about the coloured mat on the surface plate... It's a plastic chopping board I have never4 used and it was cluttering up a cupboard in the kitchen so I've brought it into the shed... It will have a use sooner or later....
Stanley Challenger Graham
Stanley's View
scg1936 at talktalk.net

"Beware of certitude" (Jimmy Reid)
The floggings will continue until morale improves!
Old age isn't for cissies!
Locked

Return to “Crafts”