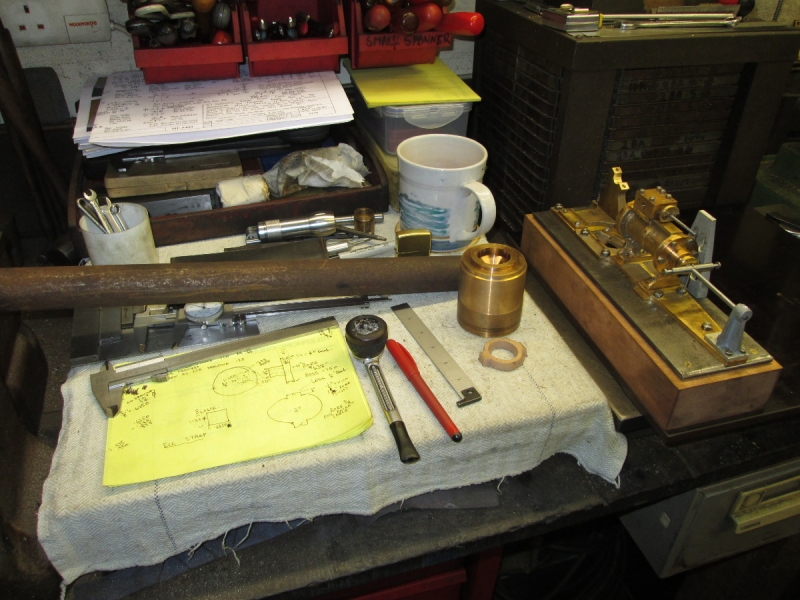
It has been a morning of honest endeavour, mainly in the shed but not all connected with engines.... It all started last night when we had the power outage and I had to do a deep clean on my Vapalux lamp before I could light it. I promised myself I would do the same for the two Tilleys as well. It all took time and included cleaning the top of the cupboard where they live, it was filthy! But eventually I got all this done and dusted and got round to the engine.
I woke this morning convinced that I had to do a re-design, make my own bearing pedestal and mount it just off the engine baseplate. To do this accurately I needed to make a baseboard that carries both the engine and the winch. I knew I was going to have to do this at some time but have been putting it off because it would mean that I had an artefact 14" square to deal with and I don't have a lot of room. I did my measurements and was on the verge of ringing B&D and getting them to cut me some good marine ply when a thought struck me.
Just after the war ended my mother wanted a dinner wagon but nothing like that was available so my dad got the blokes at work to make him one out of Copper pipe and Yorkshire fittings, chrome plated and with 1/4" compressed bonded linen for the two shelves. It was getting thrown out years ago and I rescued the shelves. I still had one left.... I got it out of the treasure chest and it's perfect as it's an early version of the modern Tufnol and can be drilled and tapped. So I cleaned it up, marked it very carefully and cut my 14" square out with the Metabo cut off saw which lives in the shed in the yard. Luckily it wasn't raining!
So, that's the height of it this morning, I am ready to proceed. I'm not quite sure how this will go yet, I suspect it's mounting the pedestal and bearing in the correct place and then permanently fixing the engine and winch on the base and going forwards from there. We'll see, but that's for tomorrow!
SHED MATTERS 2
-
Stanley

- Global Moderator

- Posts: 106423
- Joined: 23 Jan 2012, 12:01
- Location: Barnoldswick. Nearer to Heaven than Gloria.
Re: SHED MATTERS 2
Stanley Challenger Graham
Stanley's View
scg1936 at talktalk.net
"Beware of certitude" (Jimmy Reid)
The floggings will continue until morale improves!
Old age isn't for cissies!
Stanley's View
scg1936 at talktalk.net
"Beware of certitude" (Jimmy Reid)
The floggings will continue until morale improves!
Old age isn't for cissies!
-
Stanley
- Global Moderator
- Posts: 106423
- Joined: 23 Jan 2012, 12:01
- Location: Barnoldswick. Nearer to Heaven than Gloria.
Re: SHED MATTERS 2
I broke a rule and did some overtime at teatime. I got the angle grinder and the orbital sander out and made as good job of making the edges of the base board pretty. I think even Mick would give me a high mark!
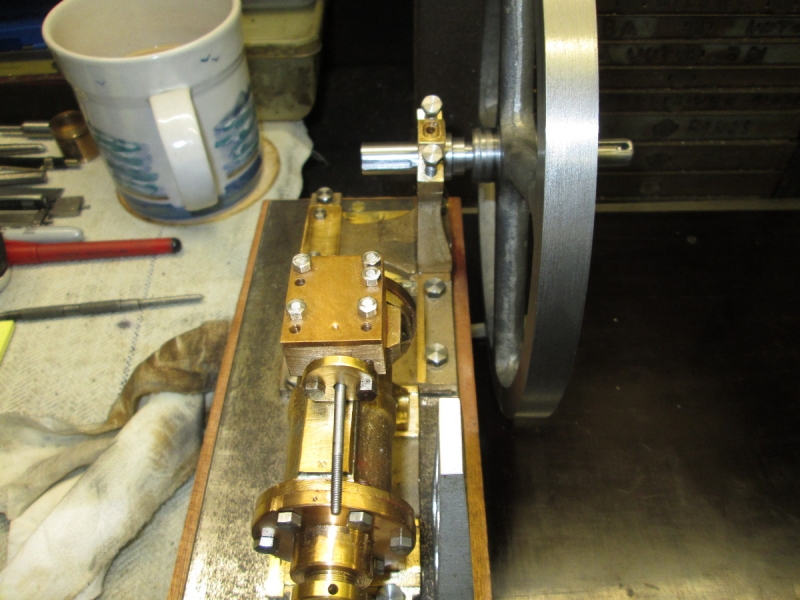
The design committee came up with their findings when I woke this morning. I need to have the engine and winch accurately fixed in their positions on the baseboard in order to install the pedestal and the outrigger bearing. That raises the problem of how to make sure the relative positions are accurate. I often find that the longest way round saves time in the end so what I decided to do was fix the winch temporarily in its correct position. I decided that the best way to do this is to mount two dowels on the base board to locate it. I chose 4mm because that is the tapping size for the 2BA bolts that will eventually fix it permanently, remember that the compressed resin bonded linen board can be tapped.
So my first job was to drill two 4mm holes in the bedplate of the winch, then locate the winch where I wanted it on the base board and mark the holes for the dowels. I took a lot of care over this! So I was soon at the stage where the winch is sat on the board located by the silver steel dowels and very firm.
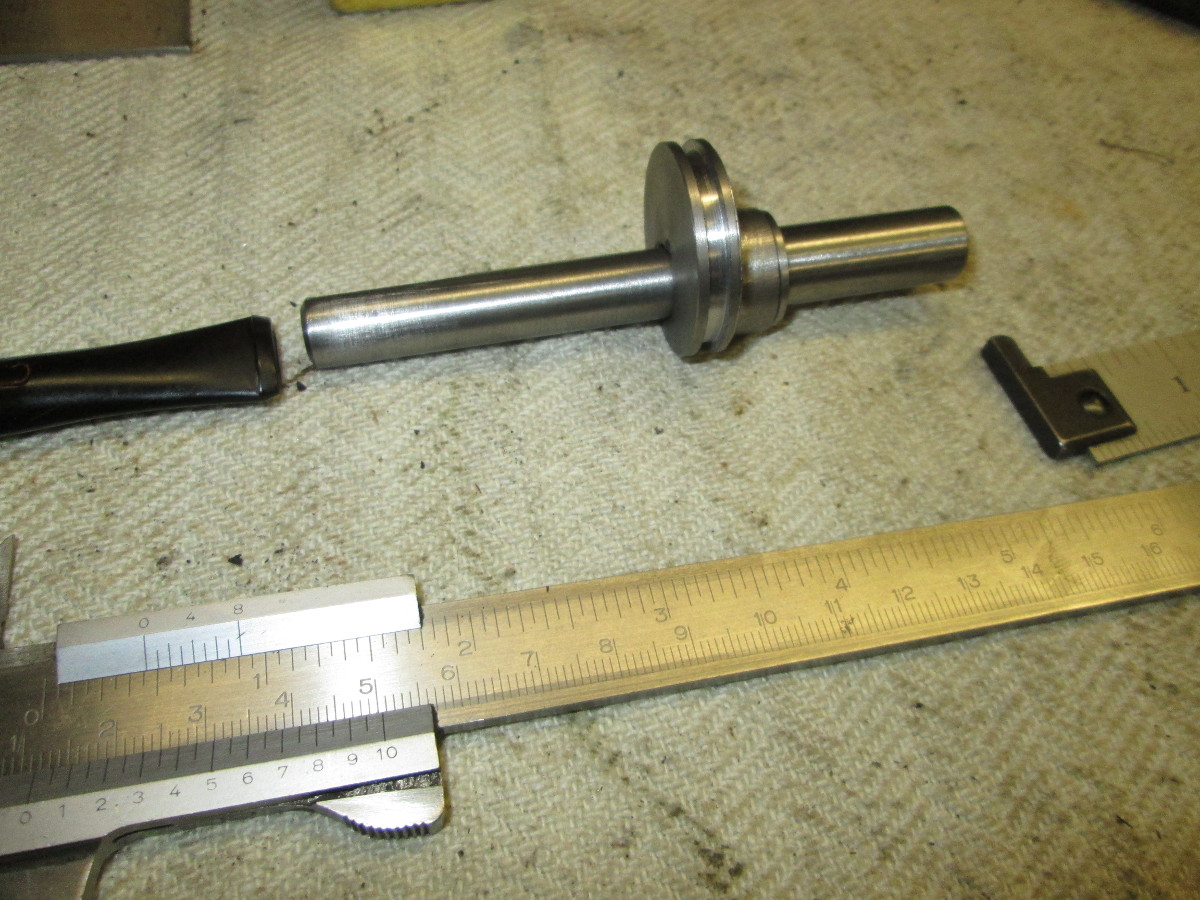
Dead easy now isn't it..... But hold on a minute, it's crucial that the pinion bearing on the winch and the crank bearing on the engine are absolutely dead in line. I could do this by eye and measurement but I decided I'd be a lot happier if I had a shaft I could install between the two. As it happens I can make a shaft that fits both bearings and have enough meat in it to be able to make the final shaft out of it. So I found a piece of stock and set to on Mrs Harrison. The stage I am at is that I have turned the crank end to a nice fit in the pedestal on the engine with a flange behind it on the outboard side to locate the shaft when the crank itself is fitted and am near a final cut on the winch end to fit the pinion bearing. I've left it like that and I'll finish turn it tomorrow more accurately because it will be cooled down and I want a good fit. When I have that done I can use it to ensure correct alignment and mark the engine bed up for three dowels. Eventually they will be countersunk woodscrews inserted from the bottom of the base board but for the time being they will be 4mm steel dowels same as the winch. Once I have that done I can go forward with the pedestal for the outrigger bearing knowing I have it in the right place. The beauty of the temporary fixing with the dowels is that once I have it ready for installation I can lift both the winch and the engine off the baseboard without losing alignment. The same applies to all the other fitting that remains to be done. I think this is the right plan and I'm quite pleased with the way it's working out!
The design committee came up with their findings when I woke this morning. I need to have the engine and winch accurately fixed in their positions on the baseboard in order to install the pedestal and the outrigger bearing. That raises the problem of how to make sure the relative positions are accurate. I often find that the longest way round saves time in the end so what I decided to do was fix the winch temporarily in its correct position. I decided that the best way to do this is to mount two dowels on the base board to locate it. I chose 4mm because that is the tapping size for the 2BA bolts that will eventually fix it permanently, remember that the compressed resin bonded linen board can be tapped.
So my first job was to drill two 4mm holes in the bedplate of the winch, then locate the winch where I wanted it on the base board and mark the holes for the dowels. I took a lot of care over this! So I was soon at the stage where the winch is sat on the board located by the silver steel dowels and very firm.
Dead easy now isn't it..... But hold on a minute, it's crucial that the pinion bearing on the winch and the crank bearing on the engine are absolutely dead in line. I could do this by eye and measurement but I decided I'd be a lot happier if I had a shaft I could install between the two. As it happens I can make a shaft that fits both bearings and have enough meat in it to be able to make the final shaft out of it. So I found a piece of stock and set to on Mrs Harrison. The stage I am at is that I have turned the crank end to a nice fit in the pedestal on the engine with a flange behind it on the outboard side to locate the shaft when the crank itself is fitted and am near a final cut on the winch end to fit the pinion bearing. I've left it like that and I'll finish turn it tomorrow more accurately because it will be cooled down and I want a good fit. When I have that done I can use it to ensure correct alignment and mark the engine bed up for three dowels. Eventually they will be countersunk woodscrews inserted from the bottom of the base board but for the time being they will be 4mm steel dowels same as the winch. Once I have that done I can go forward with the pedestal for the outrigger bearing knowing I have it in the right place. The beauty of the temporary fixing with the dowels is that once I have it ready for installation I can lift both the winch and the engine off the baseboard without losing alignment. The same applies to all the other fitting that remains to be done. I think this is the right plan and I'm quite pleased with the way it's working out!
Stanley Challenger Graham
Stanley's View
scg1936 at talktalk.net
"Beware of certitude" (Jimmy Reid)
The floggings will continue until morale improves!
Old age isn't for cissies!
Stanley's View
scg1936 at talktalk.net
"Beware of certitude" (Jimmy Reid)
The floggings will continue until morale improves!
Old age isn't for cissies!
-
Stanley
- Global Moderator
- Posts: 106423
- Joined: 23 Jan 2012, 12:01
- Location: Barnoldswick. Nearer to Heaven than Gloria.
Re: SHED MATTERS 2
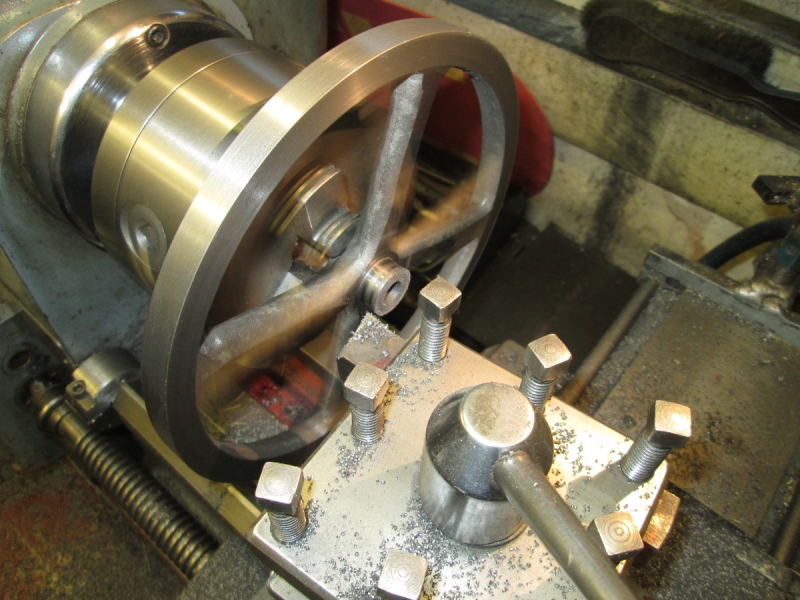
I went in the shed this morning and turned the shaft down to a good fit in the pinion bearing. Good plan leaving it to cool down, it had lost a couple of thou during the night and I want it to be a good fit even though it is sacrificial as it will have to be shortened and reduced to fit the crank end of the pinion carrier and selector which is, by the way, the same size as the plug fit for the flywheel. As I mentioned before I am not going to be messing about with staking it on, plug fit and shaft grade Loctite gives all the grip we need especially since the flywheel drives nothing, it's only there to give momentum and a plug fit means it will turn nicely with no eccentricity which looks so bad in an engine.
Once I was satisfied with the shaft I mounted the engine on the bed with the shaft in place and I am certain now of the relationship between the engine and the winch. I clamped the engine to the base board, did a final check on the relationship and then turned the whole base board and assembly on its side and drilled four holes for the 4mm dowels through the board and into the wooden bed.
While I had the shaft in situ I measured the length it will need to be when married with the selector remembering that the selector has to be able to move out on the shaft in order to disengage from the bull gear on the winch and marked it with a saw cut.
Then I knocked the shaft back though the pinion bearing until the crank end cleared the pedestal and lifted the engine off the dowels. This method of locating the elements while I am fitting is a good idea and is working well.
Back in the lathe with the shaft and I cut it to length and turned it down to the plug fit for the flywheel and the selector. I'm giving the flywheel 1/8" clearance from the side of the engine bed and have left a step on the shaft for it to butt up against at that point. Remember the shaft has a flange on it outboard of the crank pedestal to locate it. (I wish I could show you a picture!)
That done I installed the shaft again with the engine on it's dowels on the base board and had a look at the rabbit. It's all a bit tight at the moment and the end of the shaft needs to be an easier fit in the selector but I still have to fit the feather key in it and that will all fall into place, it definitely doesn't want to be too loose!
It's all looking good and I was congratulating myself that all my re-designing is working out when I had a couple of wobbler's. I noticed that the crank end of the shaft didn't reach the centre line of the engine! Then of course I realised that it didn't have to because it is the crank pin that has to be fitted to the crank that has to be on centre. Then I puzzled over what was missing and realised I had paid no attention at all to the eccentric which of course has to go between the crank pedestal and the flywheel. A moment's panic before I realised I had 1/2" for it which will be ample. It'll take some tiddly fitting but I can handle it. By the way, as the engine is now I can get an exact location and height for the outrigger bearing. One last thing and this was expected, I an going to have to cut a slot in the baseboard for the flywheel which at the moment fouls it by about 1/8". That's going to lead to fun and games when doing my final fitting! But that's for another day. I've had a good morning, nice fitting and no cock-ups!
Stanley Challenger Graham
Stanley's View
scg1936 at talktalk.net
"Beware of certitude" (Jimmy Reid)
The floggings will continue until morale improves!
Old age isn't for cissies!
Stanley's View
scg1936 at talktalk.net
"Beware of certitude" (Jimmy Reid)
The floggings will continue until morale improves!
Old age isn't for cissies!
-
Stanley
- Global Moderator
- Posts: 106423
- Joined: 23 Jan 2012, 12:01
- Location: Barnoldswick. Nearer to Heaven than Gloria.
Re: SHED MATTERS 2
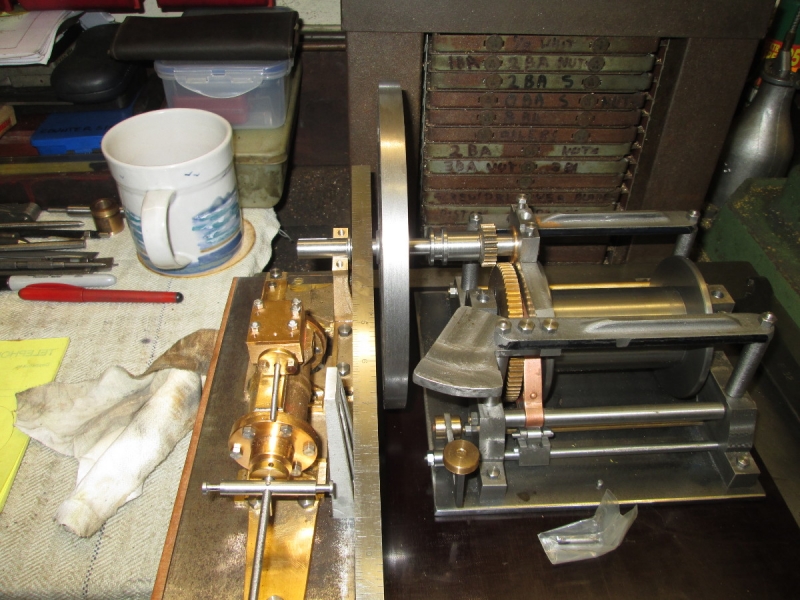
I don't know whether I have found a solution or not. Hopefully you can see a pic of the winder so far. Click to enlarge....
You do not have the required permissions to view the files attached to this post.
Stanley Challenger Graham
Stanley's View
scg1936 at talktalk.net
"Beware of certitude" (Jimmy Reid)
The floggings will continue until morale improves!
Old age isn't for cissies!
Stanley's View
scg1936 at talktalk.net
"Beware of certitude" (Jimmy Reid)
The floggings will continue until morale improves!
Old age isn't for cissies!


Re: SHED MATTERS 2
I can see that picture - very nice. 
However if I'm not logged in I get the message -
"You do not have the required permissions to view the files attached to this post."
I guess that means that guests cannot see it. Are you going to tell us how you did it?
I never liked the idea of external links into this site- but that was in the days when (naively) I thought it was an important historical record so should be backed up, stand alone and not be dependent upon the existence of other sites for information.
A lot has happened since then, and we have to be realistic about it all.
Born to be mild
Sapere Aude
Ego Lego
Preferred pronouns - Thou, Thee, Thy, Thine
My non-working days are Monday - Sunday
Sapere Aude
Ego Lego
Preferred pronouns - Thou, Thee, Thy, Thine
My non-working days are Monday - Sunday
-
Stanley
- Global Moderator
- Posts: 106423
- Joined: 23 Jan 2012, 12:01
- Location: Barnoldswick. Nearer to Heaven than Gloria.
Re: SHED MATTERS 2
I agree David but that's an important point about guests......
Stanley Challenger Graham
Stanley's View
scg1936 at talktalk.net
"Beware of certitude" (Jimmy Reid)
The floggings will continue until morale improves!
Old age isn't for cissies!
Stanley's View
scg1936 at talktalk.net
"Beware of certitude" (Jimmy Reid)
The floggings will continue until morale improves!
Old age isn't for cissies!
Re: SHED MATTERS 2
Greater incentive for more people to join up perhaps.
Born to be mild
Sapere Aude
Ego Lego
Preferred pronouns - Thou, Thee, Thy, Thine
My non-working days are Monday - Sunday
Sapere Aude
Ego Lego
Preferred pronouns - Thou, Thee, Thy, Thine
My non-working days are Monday - Sunday
-
Stanley
- Global Moderator
- Posts: 106423
- Joined: 23 Jan 2012, 12:01
- Location: Barnoldswick. Nearer to Heaven than Gloria.
Re: SHED MATTERS 2
No immediate answer to the guest problem but Ian's looking at it. I can post pics now at least!
Later on Thursday. Click on images to enlarge.
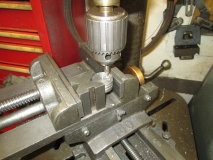
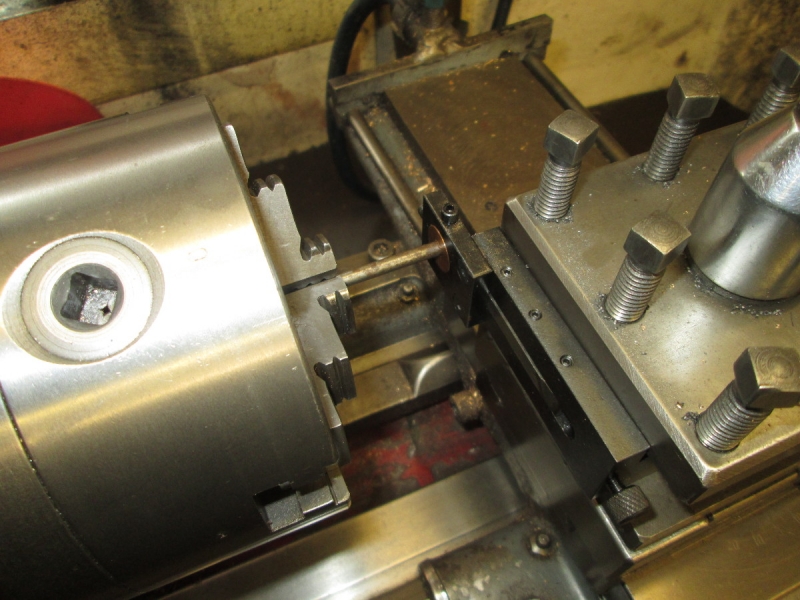
My aim today is to get the flyshaft fitted perfectly and install the feather key that drives the pinion but allows it to be drawn out of gear. I decided to leave the engine and the winch located on the base board by the dowels and to dismantle the shaft and its bearings because I want to do the final fitting on them as well. So the first hour was spent carefully fitting the bearings and housings properly.
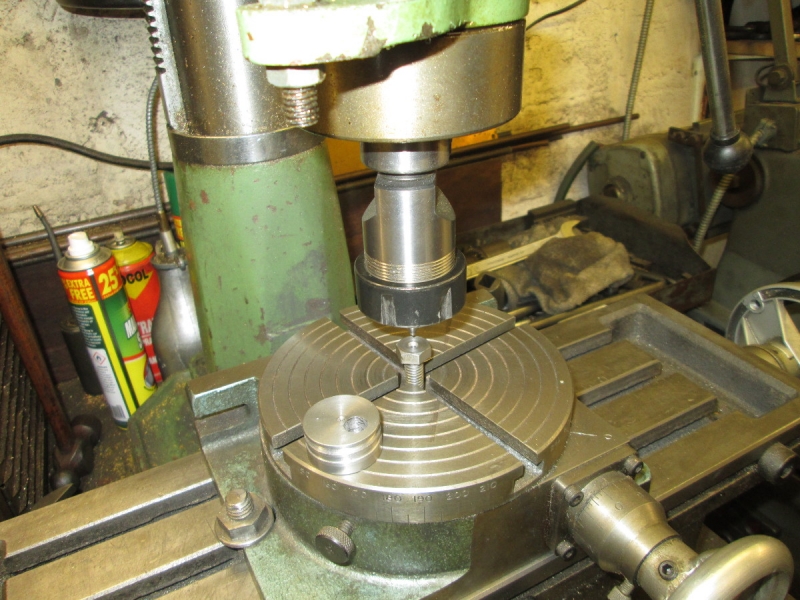
This may not look much but milling out an 1/8" keyway with my eyesight is high risk. Now all I have to do is find some steel and make a key. I had to do a bit of hunting, plenty of big ones but small key steel is thin on the ground. Once I had found some I set to to do some very delicate fitting!
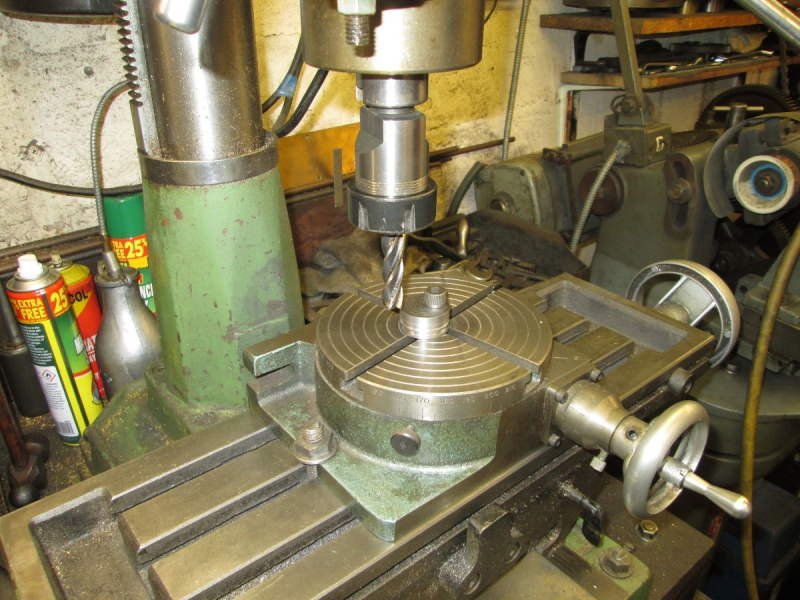
Here's where I was at closing time. The key is a press fit in the keyway and now I am reducing it slowly until it is a good sliding fit in the pinion carrier. I'm at the stage where I am reducing it and shaping the top with a coarse diamond hone. I don't care if it takes longer, it will be a better fit. The drawing goes to great lengths about incredibly small BA screws holding the key in. I can't see there is any need for them, there is no way it can escape even if it comes loose in the keyway. I shall finish it carefully tomorrow.
I did this pic as I came out. It makes you wonder where all this tackle came from! I've had a nice morning even though I haven't torn any trees up. Carefully away and good work.....
Later on Thursday. Click on images to enlarge.
My aim today is to get the flyshaft fitted perfectly and install the feather key that drives the pinion but allows it to be drawn out of gear. I decided to leave the engine and the winch located on the base board by the dowels and to dismantle the shaft and its bearings because I want to do the final fitting on them as well. So the first hour was spent carefully fitting the bearings and housings properly.
This may not look much but milling out an 1/8" keyway with my eyesight is high risk. Now all I have to do is find some steel and make a key. I had to do a bit of hunting, plenty of big ones but small key steel is thin on the ground. Once I had found some I set to to do some very delicate fitting!
Here's where I was at closing time. The key is a press fit in the keyway and now I am reducing it slowly until it is a good sliding fit in the pinion carrier. I'm at the stage where I am reducing it and shaping the top with a coarse diamond hone. I don't care if it takes longer, it will be a better fit. The drawing goes to great lengths about incredibly small BA screws holding the key in. I can't see there is any need for them, there is no way it can escape even if it comes loose in the keyway. I shall finish it carefully tomorrow.
I did this pic as I came out. It makes you wonder where all this tackle came from! I've had a nice morning even though I haven't torn any trees up. Carefully away and good work.....
You do not have the required permissions to view the files attached to this post.
Stanley Challenger Graham
Stanley's View
scg1936 at talktalk.net
"Beware of certitude" (Jimmy Reid)
The floggings will continue until morale improves!
Old age isn't for cissies!
Stanley's View
scg1936 at talktalk.net
"Beware of certitude" (Jimmy Reid)
The floggings will continue until morale improves!
Old age isn't for cissies!
-
Stanley
- Global Moderator
- Posts: 106423
- Joined: 23 Jan 2012, 12:01
- Location: Barnoldswick. Nearer to Heaven than Gloria.
Re: SHED MATTERS 2
Sorry to have to report that the shed is going to miss out today Lads! It's a very busy morning and there are more important fish to fry! I shall be on parade tomorrow.
Stanley Challenger Graham
Stanley's View
scg1936 at talktalk.net
"Beware of certitude" (Jimmy Reid)
The floggings will continue until morale improves!
Old age isn't for cissies!
Stanley's View
scg1936 at talktalk.net
"Beware of certitude" (Jimmy Reid)
The floggings will continue until morale improves!
Old age isn't for cissies!
-
Stanley
- Global Moderator
- Posts: 106423
- Joined: 23 Jan 2012, 12:01
- Location: Barnoldswick. Nearer to Heaven than Gloria.
Re: SHED MATTERS 2
Despite all my good intentions I only got half an hour in the shed, but it was well spent! (click to enlarge)
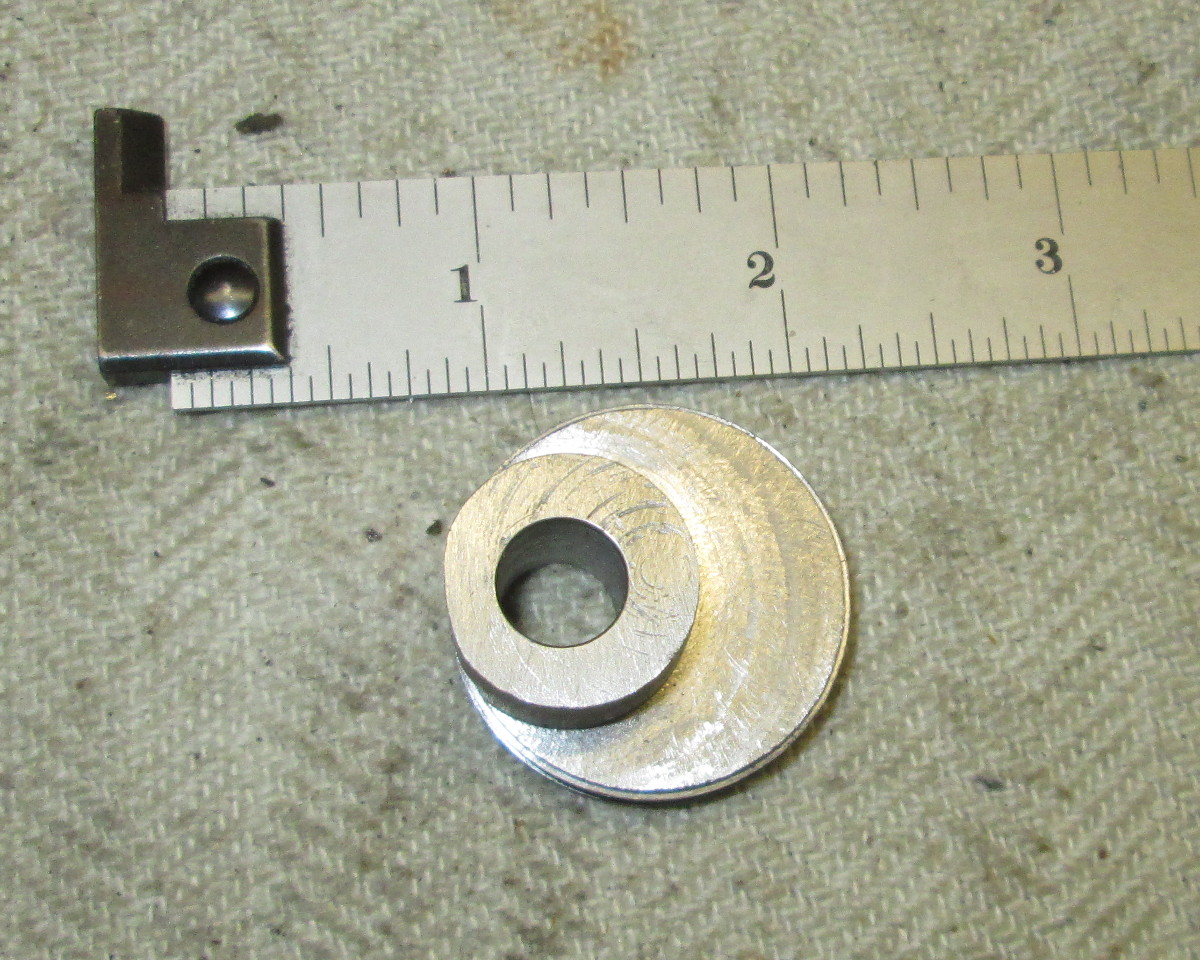
I finished fitting the pinion and selector on the feather key which allows it to be slid out of gear when necessary.
Here it is in its place, nothing tightened up but it works just fine, a nice easy sliding fit on the key and I am pleased, hardly any side play.
The hold up getting into the shed was that Kev came round to get his Vapalux lamp. However he took away something more..... He made a very good suggestion that the engine would look a lot better if the baseboard was mounted on a nice polished wooden base with a fancy moulding round it. I like that idea so I gave him the job of making it! What a good lad.......
You do not have the required permissions to view the files attached to this post.
Stanley Challenger Graham
Stanley's View
scg1936 at talktalk.net
"Beware of certitude" (Jimmy Reid)
The floggings will continue until morale improves!
Old age isn't for cissies!
Stanley's View
scg1936 at talktalk.net
"Beware of certitude" (Jimmy Reid)
The floggings will continue until morale improves!
Old age isn't for cissies!
Re: SHED MATTERS 2
I have located a piece, I'll get the saw and router out next weekend 
Kev
Stylish Fashion Icon.

Stylish Fashion Icon.

-
Stanley
- Global Moderator
- Posts: 106423
- Joined: 23 Jan 2012, 12:01
- Location: Barnoldswick. Nearer to Heaven than Gloria.
Re: SHED MATTERS 2
As a friend of mine commented, 'classic delegation!' Good lad Kev....... Don't forget the high polish and deep brown stain.......
Stanley Challenger Graham
Stanley's View
scg1936 at talktalk.net
"Beware of certitude" (Jimmy Reid)
The floggings will continue until morale improves!
Old age isn't for cissies!
Stanley's View
scg1936 at talktalk.net
"Beware of certitude" (Jimmy Reid)
The floggings will continue until morale improves!
Old age isn't for cissies!
-
Stanley
- Global Moderator
- Posts: 106423
- Joined: 23 Jan 2012, 12:01
- Location: Barnoldswick. Nearer to Heaven than Gloria.
Re: SHED MATTERS 2
While Kev and I were looking at the winder it dawned on me that I can avoid cutting a slot in the base for the flywheel by turning some off the rim, it's heavy enough/ This will simplify fitting.
Just after he had gone I realised something else, I will have to take the feather key out to get the flywheel and eccentric boss on to the shaft. Bugger!! Not a biggie but it would have been better left alone..... Ah well.....
Just after he had gone I realised something else, I will have to take the feather key out to get the flywheel and eccentric boss on to the shaft. Bugger!! Not a biggie but it would have been better left alone..... Ah well.....
Stanley Challenger Graham
Stanley's View
scg1936 at talktalk.net
"Beware of certitude" (Jimmy Reid)
The floggings will continue until morale improves!
Old age isn't for cissies!
Stanley's View
scg1936 at talktalk.net
"Beware of certitude" (Jimmy Reid)
The floggings will continue until morale improves!
Old age isn't for cissies!
-
Stanley
- Global Moderator
- Posts: 106423
- Joined: 23 Jan 2012, 12:01
- Location: Barnoldswick. Nearer to Heaven than Gloria.
Re: SHED MATTERS 2
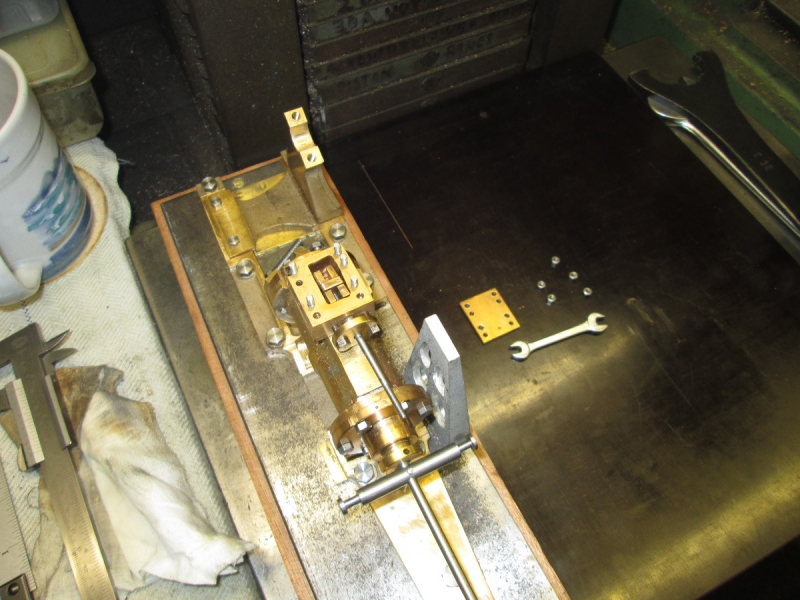
It's been a productive morning.... When I went in I was clear in my mind about the way forwards. I've decided that I need to get the eccentric, the flywheel and the crank sorted. I can manage the fitting by virtue of the split bearing on the crank pedestal and the fact I can lift the pinion bearing. So, off I went! (click on the images for a full size view)
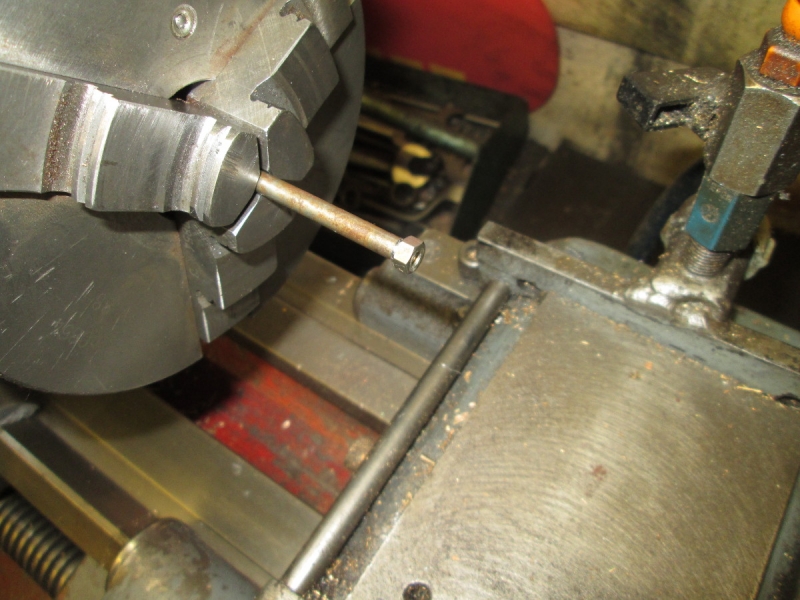
My first job of course was the get the feather key out and it was a bugger, I made far too good a job of fitting it. In the end I had to drill a hole up into the key bed from the centre in the end of the shaft and knock it out from below. I've marked it so I can replicate the fitting and put it in a plastic bag safely stowed in the end of the selector. On with the next phase!
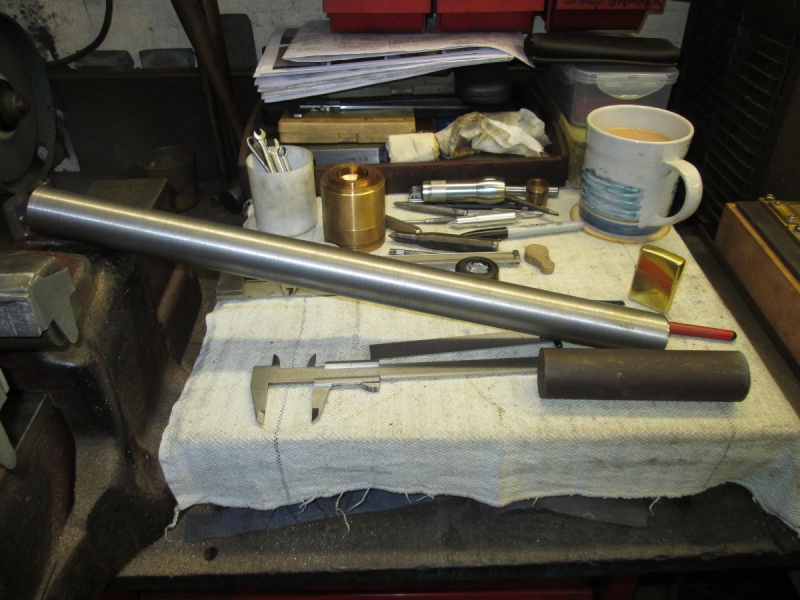
I work best when I am somewhere near tidy and looking at the bench I decided that a bit of a tidy up was needed! It's amazing how much tackle you need when you're fitting!
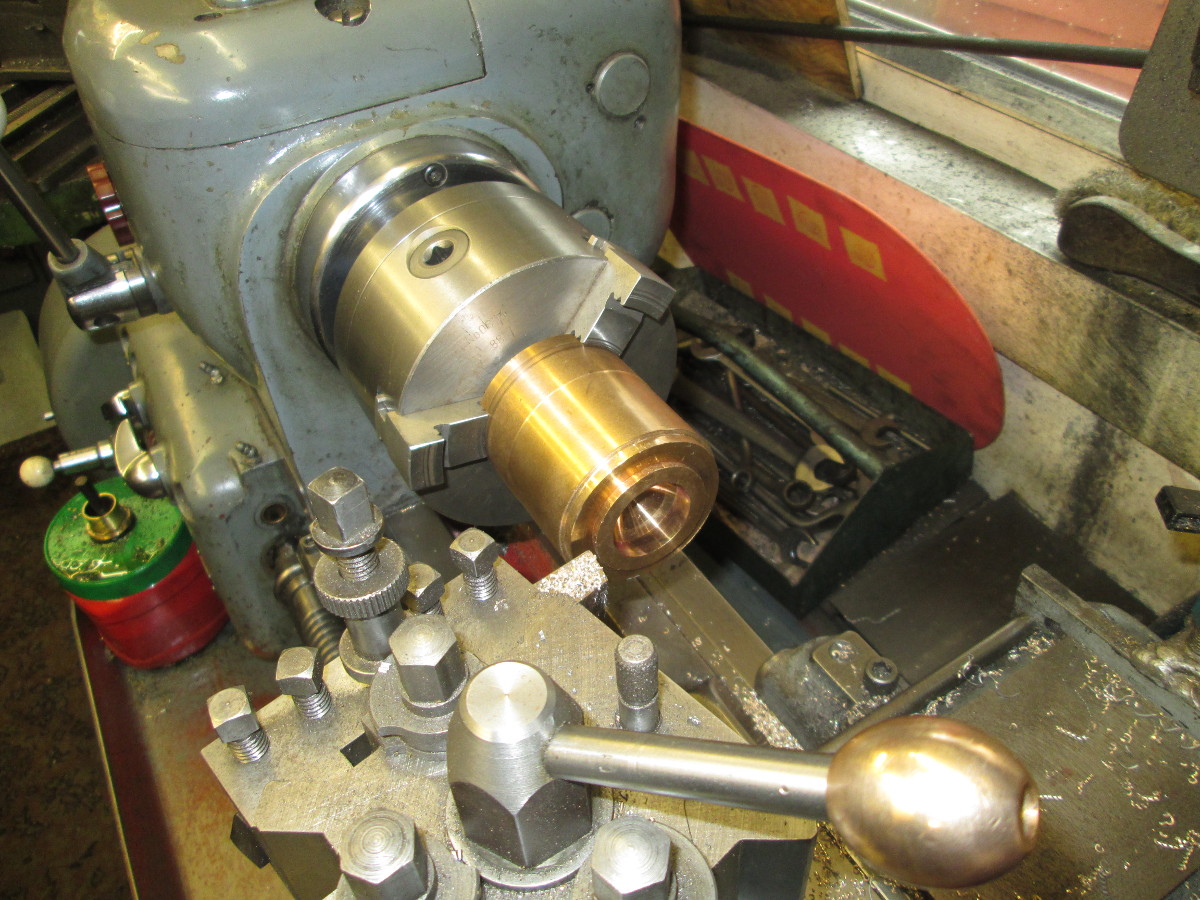
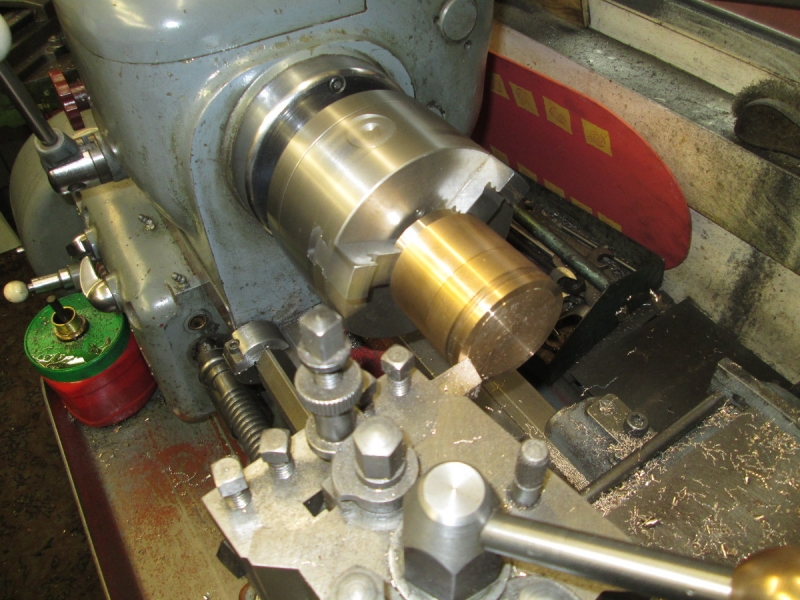
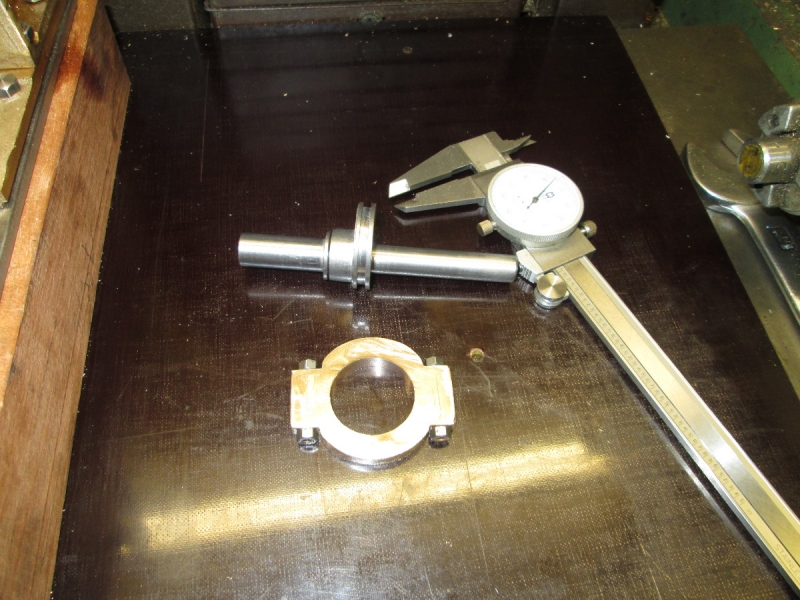
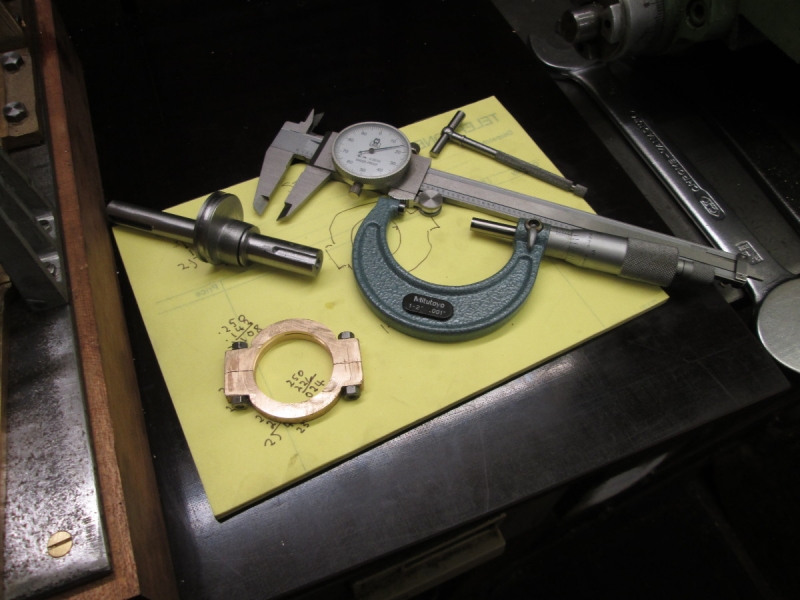
I took the winch off the baseboard and using the dummy I made earlier I measured the height of the crank bearing above the base, 4 1/8". Then I used the 9" dial calliper to measure the flywheel.It's 8.5" so if I take it down to 8" I'll have an eighth of an inch clearance. There is plenty of meat in the rim so it won't look flimsy.
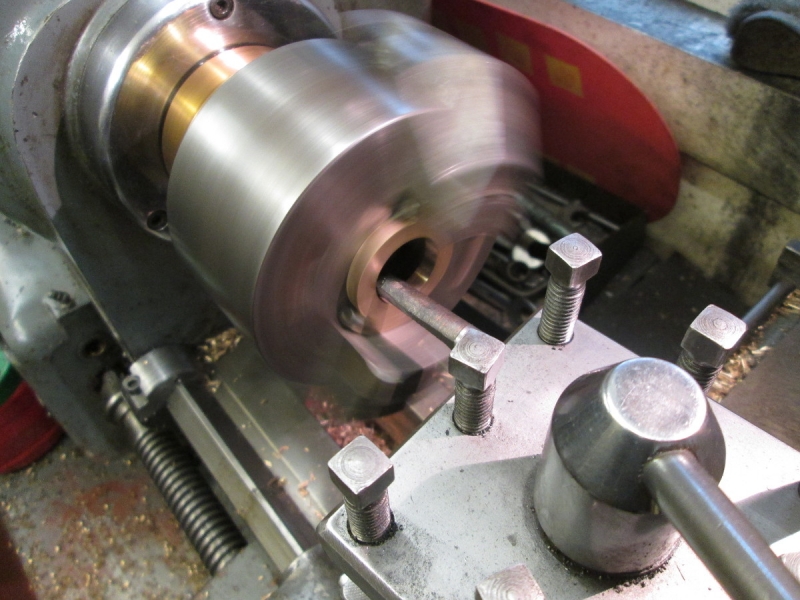
I set the flywheel up after giving Mrs Harrison a good clean and started taking off 250 thou 20 thou at a time and on the next to slowest speed with a very fine feed. This isn't the time for heroics!
Slow speed and fine cuts gave me time to multi-task. I'd already decided to to fit the crank with a key so I cut the keyway at the same time as turning the flywheel down.....
I had time to swap the 1/8" slot drill out of the mill and before I re-fitted the 3/4" cutter I backed it off and resharpened it. Impressive eh?
Here's where I was at knocking off time. The shaft is ready for further progress, the flywheel is the right size to clear the base board. Tomorrow I'll look at the eccentric, the outrigger bearing will have to wait until I see how much room I have for it.
My first job of course was the get the feather key out and it was a bugger, I made far too good a job of fitting it. In the end I had to drill a hole up into the key bed from the centre in the end of the shaft and knock it out from below. I've marked it so I can replicate the fitting and put it in a plastic bag safely stowed in the end of the selector. On with the next phase!
I work best when I am somewhere near tidy and looking at the bench I decided that a bit of a tidy up was needed! It's amazing how much tackle you need when you're fitting!
I took the winch off the baseboard and using the dummy I made earlier I measured the height of the crank bearing above the base, 4 1/8". Then I used the 9" dial calliper to measure the flywheel.It's 8.5" so if I take it down to 8" I'll have an eighth of an inch clearance. There is plenty of meat in the rim so it won't look flimsy.
I set the flywheel up after giving Mrs Harrison a good clean and started taking off 250 thou 20 thou at a time and on the next to slowest speed with a very fine feed. This isn't the time for heroics!
Slow speed and fine cuts gave me time to multi-task. I'd already decided to to fit the crank with a key so I cut the keyway at the same time as turning the flywheel down.....
I had time to swap the 1/8" slot drill out of the mill and before I re-fitted the 3/4" cutter I backed it off and resharpened it. Impressive eh?
Here's where I was at knocking off time. The shaft is ready for further progress, the flywheel is the right size to clear the base board. Tomorrow I'll look at the eccentric, the outrigger bearing will have to wait until I see how much room I have for it.
You do not have the required permissions to view the files attached to this post.
Stanley Challenger Graham
Stanley's View
scg1936 at talktalk.net
"Beware of certitude" (Jimmy Reid)
The floggings will continue until morale improves!
Old age isn't for cissies!
Stanley's View
scg1936 at talktalk.net
"Beware of certitude" (Jimmy Reid)
The floggings will continue until morale improves!
Old age isn't for cissies!
-
Stanley
- Global Moderator
- Posts: 106423
- Joined: 23 Jan 2012, 12:01
- Location: Barnoldswick. Nearer to Heaven than Gloria.
Re: SHED MATTERS 2
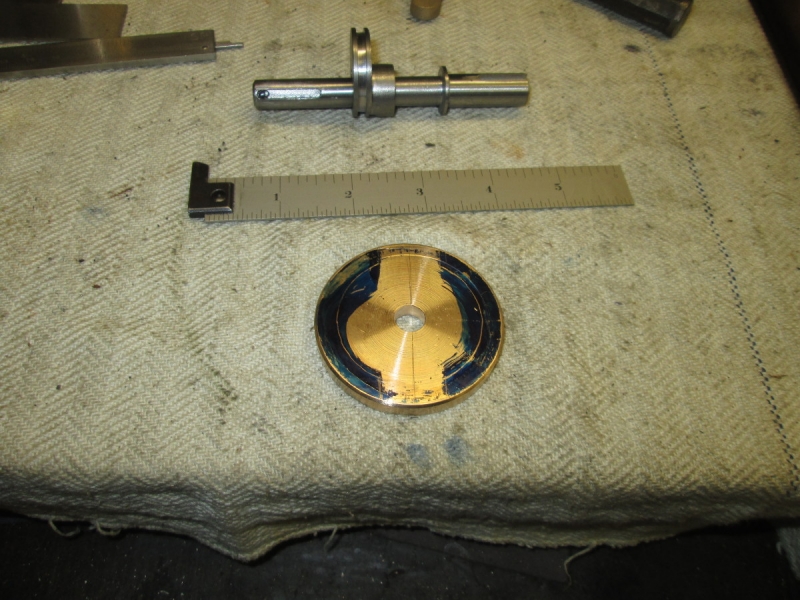
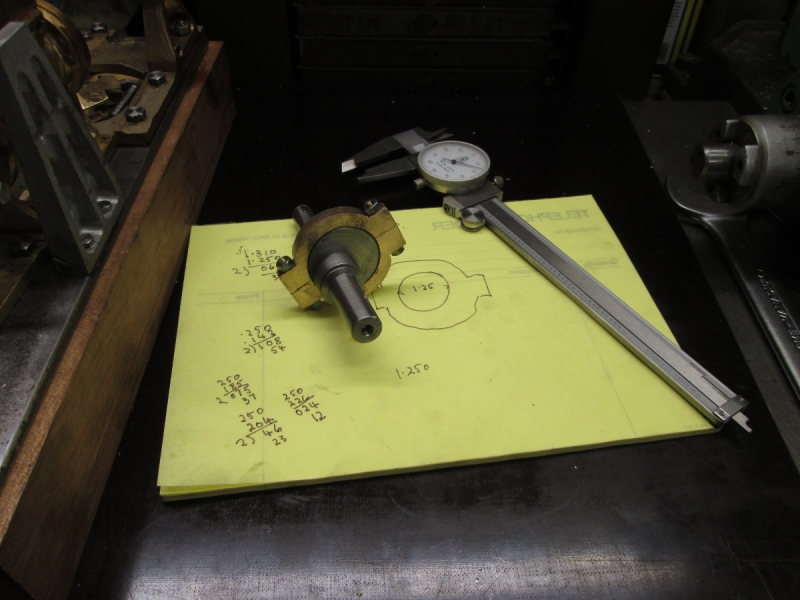
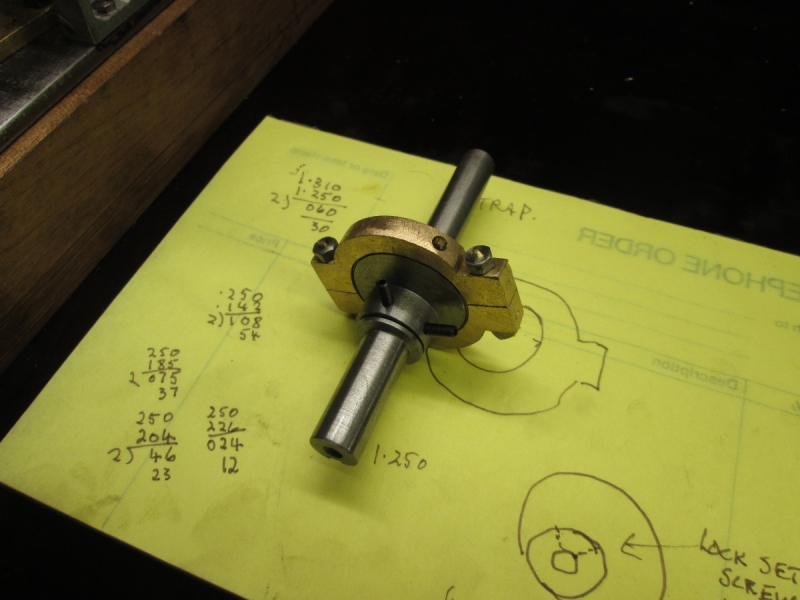
This morning I started by doing some accurate measurements on the flywheel shaft to determine exactly how much room I have for the eccentric and the outrigger bearing. That of course gives me the position of the flywheel. I'm so glad I reduced it yesterday, it looks fine and makes this morning's course much easier. I came up with 5/8" for the eccentric and 1/2" for the bearing if I modify the flywheel and shaft slightly.
First the flywheel. I turned the larger of the two bosses off at one side. Then I took out the excess on the shaft leaving a smaller flange on the flywheel side of the pedestal bearing.
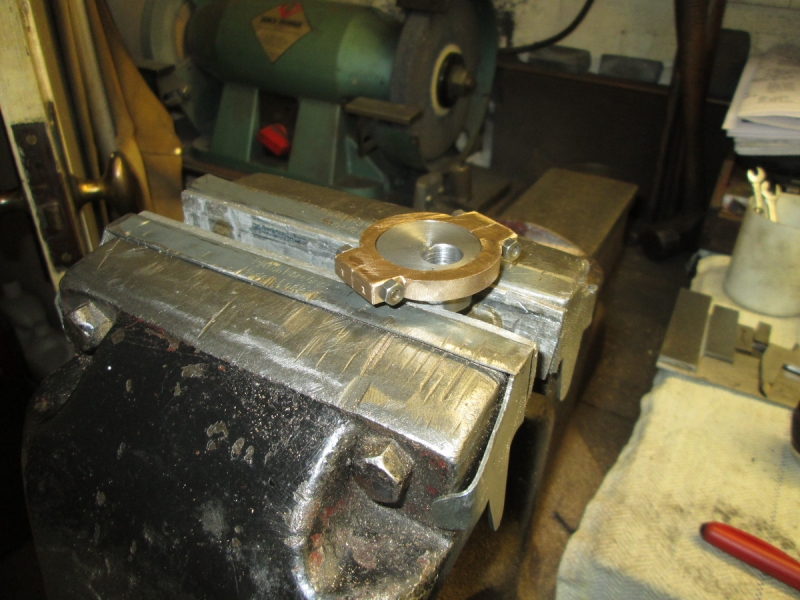
A quick check on the measurements and also to verify the width and location of the outrigger bearing. If I put the pedestal butting up against the winch base I can get a 3/8" bearing in, ample.
Next job was to lift the lid off the valve chest and accurately measure the throw I need on the valve. It's tiny and thinking about the eccentric I couldn't get my head round it at first but then I realised that the eccentric throw is larger because the rocker arm it is driving is longer than the one that transfers the movement to the valve, gearing it down in effect.
Here's where I ended up at knocking off time but not until I had done almost an hour of anti-dementia mental exercises as I redesigned the eccentric. Once again the drawing is of the original and I don't like it.... I am going to make it my way and that meant starting from basics and doing a complete fag packet re-design. I think I have got there now and I've found two pieces of stock, some 1 1/4" MS for the eccentric and a lump of 2 1/2" bronze for the strap because the casting supplied is piss poor, it should never have been allowed to come out of the foundry..... All I have to do now is alter the shape of them!
Stanley Challenger Graham
Stanley's View
scg1936 at talktalk.net
"Beware of certitude" (Jimmy Reid)
The floggings will continue until morale improves!
Old age isn't for cissies!
Stanley's View
scg1936 at talktalk.net
"Beware of certitude" (Jimmy Reid)
The floggings will continue until morale improves!
Old age isn't for cissies!
-
Stanley
- Global Moderator
- Posts: 106423
- Joined: 23 Jan 2012, 12:01
- Location: Barnoldswick. Nearer to Heaven than Gloria.
Re: SHED MATTERS 2
I usually re-read shed matters and realised this morning that when I was talking about the throw on the eccentric I had said the primary rocker arm was shorter when of course it should have been longer so I have corrected it.
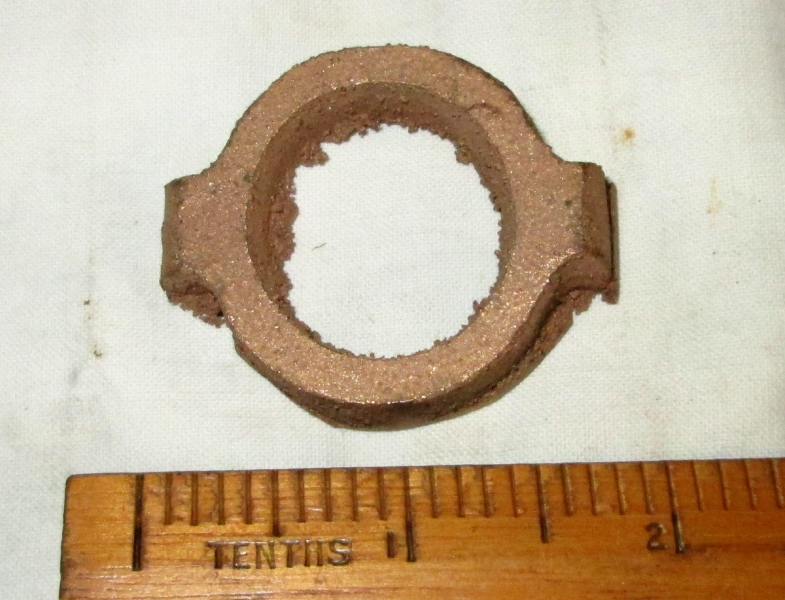
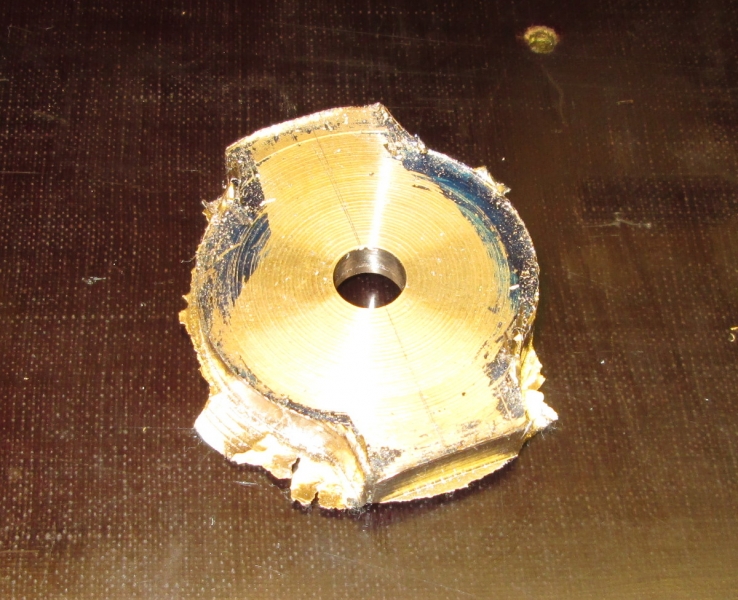
Here's a pic of the eccentric casting I was complaining about. It is rough, misshapen and barely big enough to get their version out of it. I know my lump of bronze stock looks enormous in comparison but I have plenty and my solution will be a lot easier to work with and with decent sized nuts and bolts!
The Design Committee has been hard at work and come up with a different way of machining the eccentric using the rotary table on the mill. I think I shall try it as it solves a few machining problems.
Stanley Challenger Graham
Stanley's View
scg1936 at talktalk.net
"Beware of certitude" (Jimmy Reid)
The floggings will continue until morale improves!
Old age isn't for cissies!
Stanley's View
scg1936 at talktalk.net
"Beware of certitude" (Jimmy Reid)
The floggings will continue until morale improves!
Old age isn't for cissies!
-
Stanley
- Global Moderator
- Posts: 106423
- Joined: 23 Jan 2012, 12:01
- Location: Barnoldswick. Nearer to Heaven than Gloria.
Re: SHED MATTERS 2
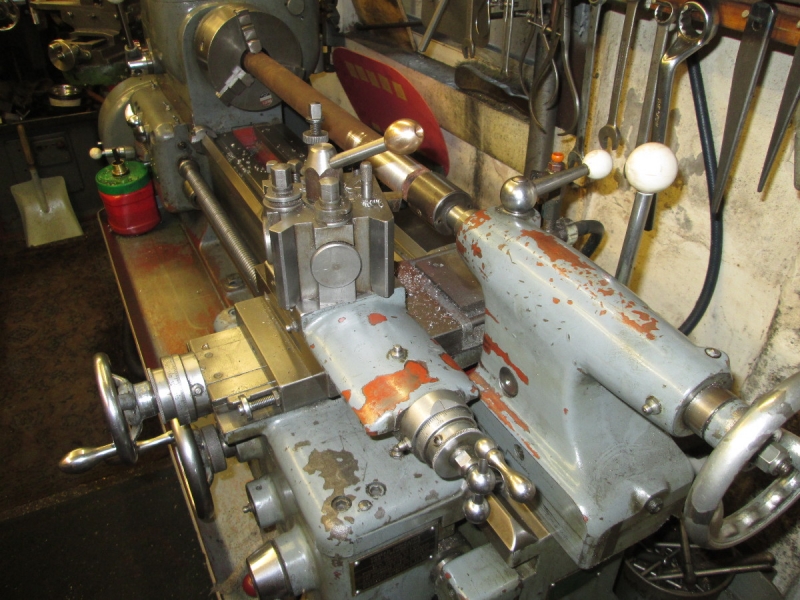
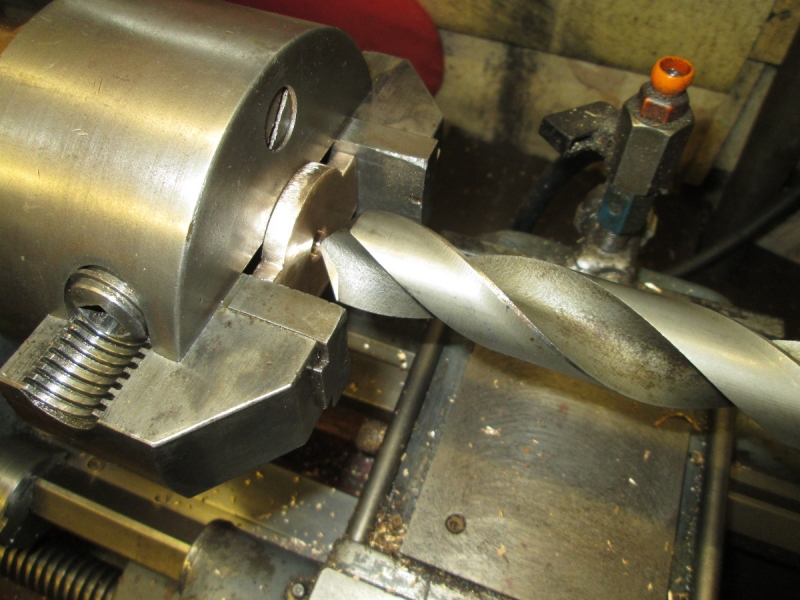
The piece of steel stock I dragged out of the treasure chest yesterday came from a scrapyard and was pitted with rust so my first task was to convert it to a useful piece of bright bar. As you can see here I am at very limit of Mrs Harrison's capabilities. The tail stock is hanging over the end of the bed.
It took a while but well worth it. Here I have a good length of clean bar and a rusty slug to get my eccentric out of. Mrs McMaster did the cutting of course. A wonderful tool!
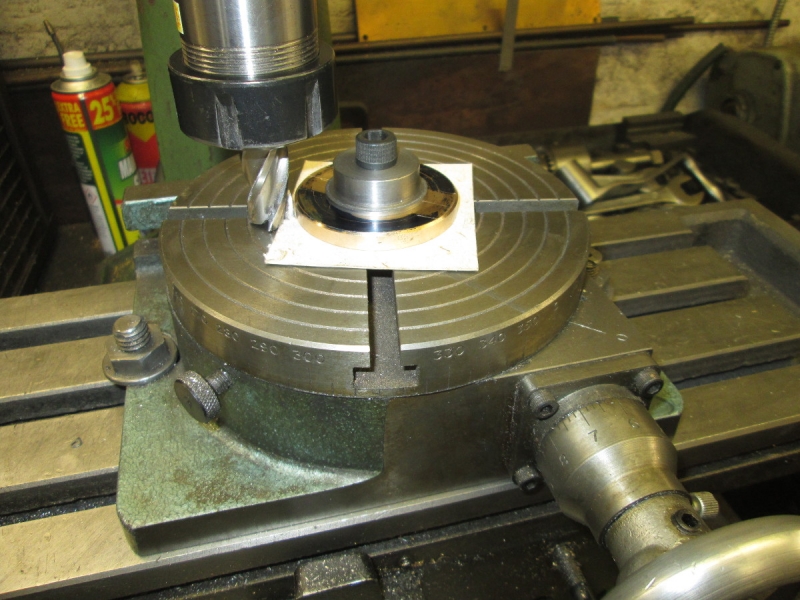
I've cut the eccentric to length, turned the sheave in it and marked the offset centre of the bore. Here we are drilling it out to 3/8" which is just right for the holding down bolts on the rotary table but just short of the finished bore.
The most important thing about setting the rotary table up is to get the centre dead on the centre line of the X axis on the bed.
Here's where I was at closing time. The mill has been slowed down, the cutter installed and the eccentric is ready for milling.The boss will be off centre, it has to be because it's based on the bore. Ready for tomorrow and by the way, I have a clean lathe.
Stanley Challenger Graham
Stanley's View
scg1936 at talktalk.net
"Beware of certitude" (Jimmy Reid)
The floggings will continue until morale improves!
Old age isn't for cissies!
Stanley's View
scg1936 at talktalk.net
"Beware of certitude" (Jimmy Reid)
The floggings will continue until morale improves!
Old age isn't for cissies!
-
Stanley
- Global Moderator
- Posts: 106423
- Joined: 23 Jan 2012, 12:01
- Location: Barnoldswick. Nearer to Heaven than Gloria.
Re: SHED MATTERS 2

I was held up a bit this morning, washing cooking and writing an article but I eventually got to the bench and got stuck into milling the eccentric. I soon decided that the cutter I was using was making hard work of it so I put another in which performed better but I didn't push it. Quietly away.
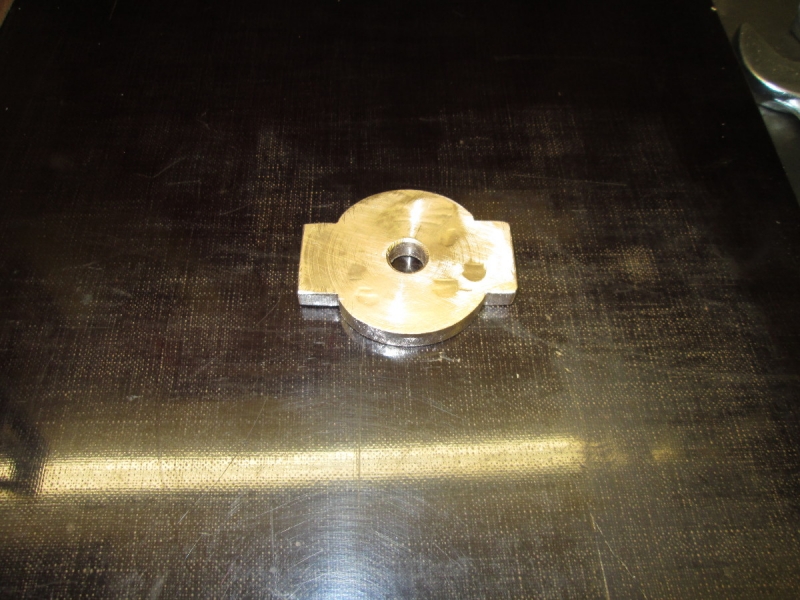
Here's where we ended up.....
It fits and has avoided all the common pitfalls like the bore breaking out into the groove for the strap. I must have been lucky.......
Now I need an eccentric strap. I've drawn it and know the sizes but haven't yet decided how I am going to machine it. It will have jelled in my mind by tomorrow! First thing is to cut a blank 1/4" thick and then I can make my decisions....
Stanley Challenger Graham
Stanley's View
scg1936 at talktalk.net
"Beware of certitude" (Jimmy Reid)
The floggings will continue until morale improves!
Old age isn't for cissies!
Stanley's View
scg1936 at talktalk.net
"Beware of certitude" (Jimmy Reid)
The floggings will continue until morale improves!
Old age isn't for cissies!
-
Stanley
- Global Moderator
- Posts: 106423
- Joined: 23 Jan 2012, 12:01
- Location: Barnoldswick. Nearer to Heaven than Gloria.
Re: SHED MATTERS 2
The design committee did their thing as I slept last night and I awoke knowing how to proceed with making the eccentric strap. This involves giving up on my first idea for a modified eccentric and going back partly to the design suggested on the drawing. More about that when I come to it. First thing I need is an accurate blank cutting and parting off from this slug after drilling a 3/8" hole dead centre.
Here we are with our blank and I have marked out the cutting lines for the periphery. The bore comes later.
The blank set up on the rotary table with a thick piece of card beneath it to allow me to get to full depth without any danger of marking the table. It helps with the grip as well.
Knocking off time. Looks a bit rough doesn't it but we can soon make it pretty. The main thing is that I have the shape I want before going any further. First job tomorrow will be to clean it up.....
Stanley Challenger Graham
Stanley's View
scg1936 at talktalk.net
"Beware of certitude" (Jimmy Reid)
The floggings will continue until morale improves!
Old age isn't for cissies!
Stanley's View
scg1936 at talktalk.net
"Beware of certitude" (Jimmy Reid)
The floggings will continue until morale improves!
Old age isn't for cissies!
Re: SHED MATTERS 2
Routered out the recess in the plinth this morning, I've not forgotten you
Kev
Stylish Fashion Icon.
Stylish Fashion Icon.
-
Stanley
- Global Moderator
- Posts: 106423
- Joined: 23 Jan 2012, 12:01
- Location: Barnoldswick. Nearer to Heaven than Gloria.
Re: SHED MATTERS 2
No rush Kev, lots to do before we get to that stage but thanks for the update.
First thing I did this morning was vacuum the carpet. I'm treading bronze chips all over the house!
Then I got to work on the strap with files and made it look a bit better.
The 2 jaw brass finisher's chuck is a handy tool for this job. Centered with the tailstock centre and then a 1 1/8" drill quietly poked through after making sure it was cutting even and had negative rake on the cutting edges. Easy peasy, cut dead on size, Eventually I want 1 1/4" so not a lot to take out.

Looking more like an eccentric strap now.
I decided 4BA was a good size for the clamp bolts.
Two temporary clamp bots made from 4BA studding. We are ready now to split the strap.
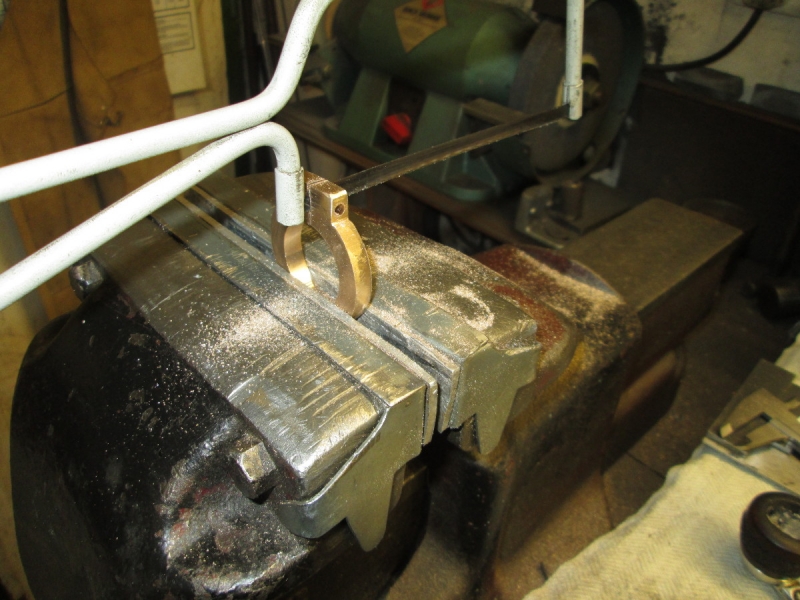
A sharp saw blade for bronze and some careful lining up and I soon had it split. It doesn't matter if you aren't quite accurate with these cuts because they are matching surfaces.

Knocking off time. The strap is split and the clamp bolts installed. The hole isn't round now of course but that doesn't matter as the next move is to bore it to finished size and relieve the outer edges so there is a 1/8" bearing surface inside the strap to engage in the groove in the eccentric. I've marked it with witness marks so that no mistakes are made fitting the two halves together.
First thing I did this morning was vacuum the carpet. I'm treading bronze chips all over the house!
Then I got to work on the strap with files and made it look a bit better.
The 2 jaw brass finisher's chuck is a handy tool for this job. Centered with the tailstock centre and then a 1 1/8" drill quietly poked through after making sure it was cutting even and had negative rake on the cutting edges. Easy peasy, cut dead on size, Eventually I want 1 1/4" so not a lot to take out.
Looking more like an eccentric strap now.
I decided 4BA was a good size for the clamp bolts.
Two temporary clamp bots made from 4BA studding. We are ready now to split the strap.
A sharp saw blade for bronze and some careful lining up and I soon had it split. It doesn't matter if you aren't quite accurate with these cuts because they are matching surfaces.
Knocking off time. The strap is split and the clamp bolts installed. The hole isn't round now of course but that doesn't matter as the next move is to bore it to finished size and relieve the outer edges so there is a 1/8" bearing surface inside the strap to engage in the groove in the eccentric. I've marked it with witness marks so that no mistakes are made fitting the two halves together.
Stanley Challenger Graham
Stanley's View
scg1936 at talktalk.net
"Beware of certitude" (Jimmy Reid)
The floggings will continue until morale improves!
Old age isn't for cissies!
Stanley's View
scg1936 at talktalk.net
"Beware of certitude" (Jimmy Reid)
The floggings will continue until morale improves!
Old age isn't for cissies!
-
Stanley
- Global Moderator
- Posts: 106423
- Joined: 23 Jan 2012, 12:01
- Location: Barnoldswick. Nearer to Heaven than Gloria.
Re: SHED MATTERS 2
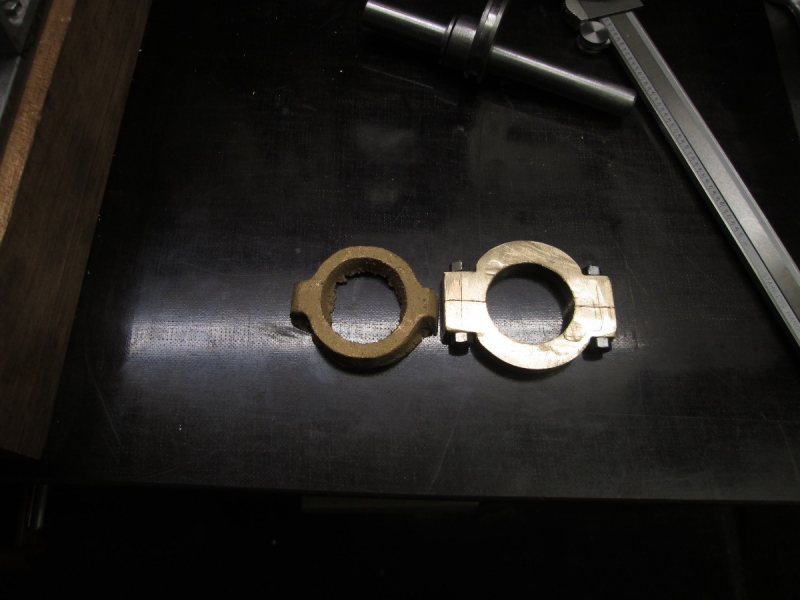
Just a reminder of how inadequate the original eccentric strap casting was...
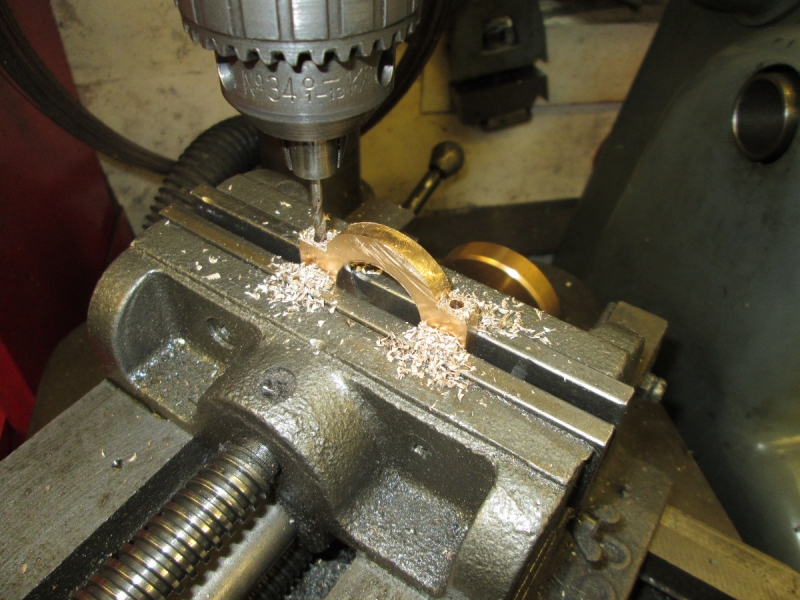
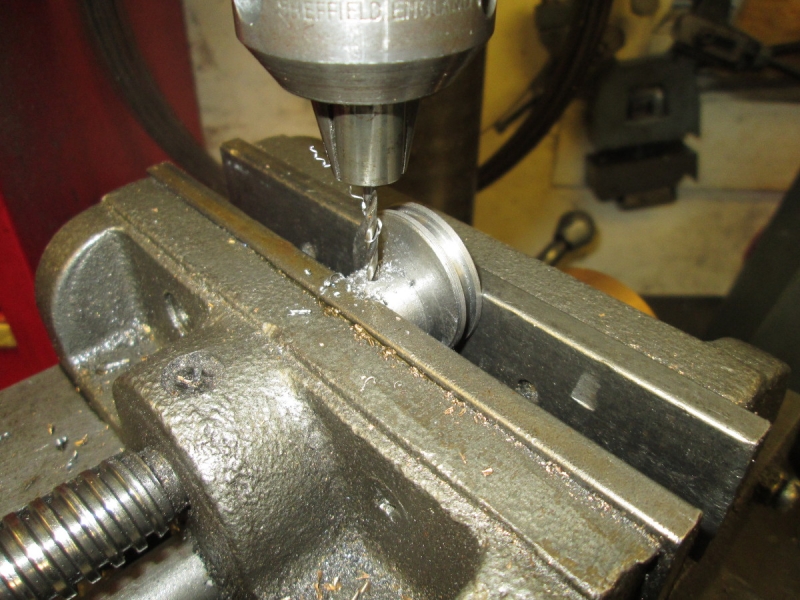
The job this morning is to finish making the eccentric strap. It needs boring out and recessing on each side so the smaller diameter fits in the groove and the larger fits the outside edge of the eccentric. So back into the 2 jaw chuck, get it centred and do some careful turning. A tip, don't grab the eccentric too tightly at this stage, I've made that mistake in the past and distorted the strap, there isn't a lot of metal in it.
The full range of tackle was on parade, I checked constantly and kept recalculating and guess what, I turned the bloody hole too big because I started with it firmly in my head that the target was 1.25" when it should actually have been 1.125"! I post this topic to try to help others do the same jobs and I hate these blokes on Youtube who are so condescending and never show us their mistakes..... Even with all my experience and a brain the size of a planet I sometimes do stupid things. What matters is how you climb out of the hole you've dug! The minor diameter in the middle of the strap is as much for locating the strap on the eccentric as anything else. I did a quick measure up and decided that 70thou interference would do that so I pressed on and then drilled the oil hole in the strap in the correct position.
I gave it a trial fitting and it is fine, just a bit tight so I popped some lapping paste in and eased it. I've cleaned and oiled it and it is still a tad tight but that will soon wear in. It's a good close fit.
Here we are at closing time. I can leave this alone now while I address the outrigger bearing tomorrow.
By the way, if you are wondering where the eccentric rod is going to fasten on, don't worry. All will become clear later. It isn't another bloody mistake!
Stanley Challenger Graham
Stanley's View
scg1936 at talktalk.net
"Beware of certitude" (Jimmy Reid)
The floggings will continue until morale improves!
Old age isn't for cissies!
Stanley's View
scg1936 at talktalk.net
"Beware of certitude" (Jimmy Reid)
The floggings will continue until morale improves!
Old age isn't for cissies!
-
Stanley
- Global Moderator
- Posts: 106423
- Joined: 23 Jan 2012, 12:01
- Location: Barnoldswick. Nearer to Heaven than Gloria.
Re: SHED MATTERS 2
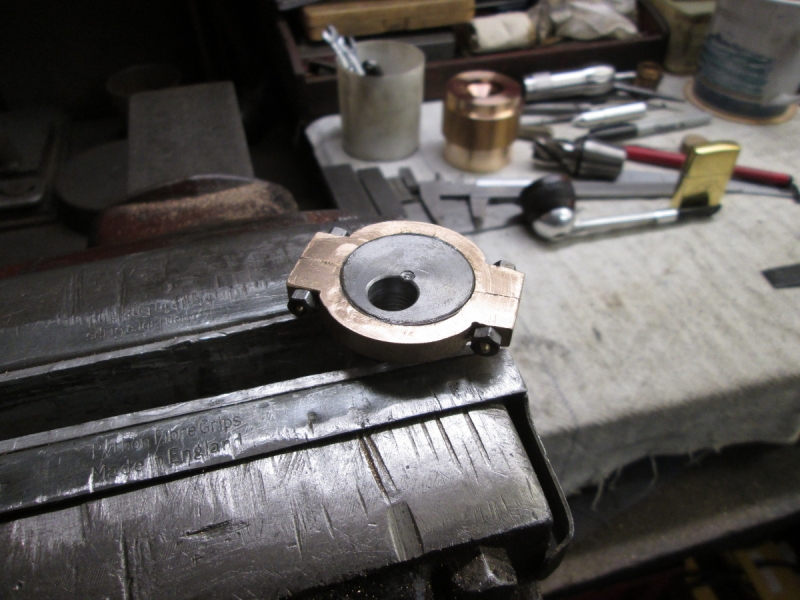
I was in the shed in good time this morning and was determined to get into the final stages of the eccentric but something was nagging me. I knew that the strap was still too tight on the sheave so I spent almost and hour doing some very careful fitting and finally got it just right. That's better! On we go.
The next stage is giving it two set screws at 90 degrees to lock the eccentric to the shaft. You have to be able to move it for valve setting. We're into watch making again. 1/8" whit grub screws. Nice to have a good stock in the treasure chest!
Both drilled and tapped..... No problems.
We're getting near. P has no need to worry, as part of the final fitting I shall polish it and shorten the set screws!
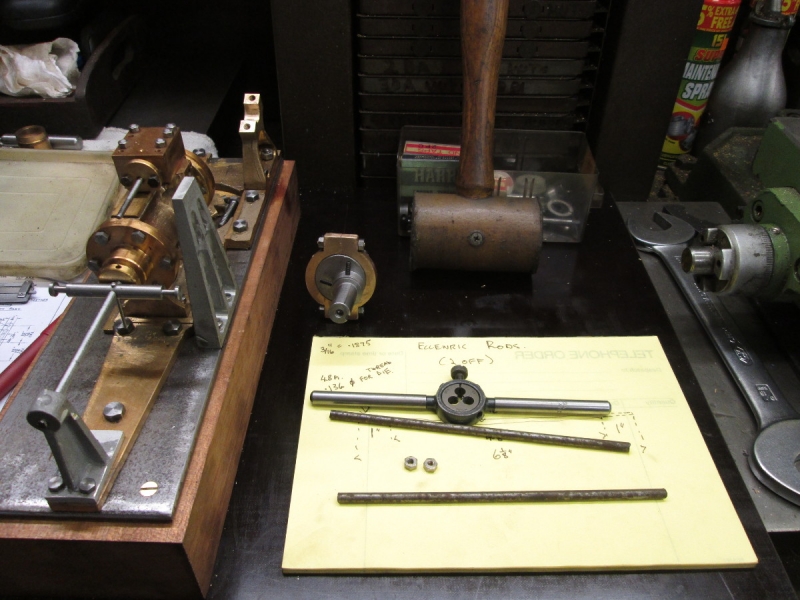
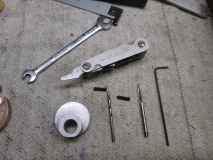
The last thing I said yesterday was not to worry about the temporary clamp bolts. The reason for that is that the clamp screws for the strap are integral with the eccentric rods. According to the drawings these are 3/32" thick and have 8BA threads at the end. Sod that for a game of soldiers. The purists will not like it but mine are going to be 3/16" and 4BA. So I needed some blanks and the threading tackle. If you're wondering about the hammer at the back I used that to square up the machine vise on the VM. It's an unusual hammer as it's very old fashioned. It's made of hide but the twist is that interleaved with the hide when they roll it for the head is sheet lead. Makes a lovely soft blow hammer.
I need to set up my little gizmo for turning very small diameters and the funny thing is that it wasn't on centre even though I have a raising block married to it which has always been all right before. That's why I was getting the vise ready on the VM, I needed to skim a bit off the block. I've got it right and so I turned a spare bit of rod down and threaded it.
This is the acid test, and it passed, the nut is a good fit on the thread. I cleaned Mrs Harrison as well so I am good to go tomorrow! So, a morning of very small things but all vital towards a good job. I like this morning's work!
Stanley Challenger Graham
Stanley's View
scg1936 at talktalk.net
"Beware of certitude" (Jimmy Reid)
The floggings will continue until morale improves!
Old age isn't for cissies!
Stanley's View
scg1936 at talktalk.net
"Beware of certitude" (Jimmy Reid)
The floggings will continue until morale improves!
Old age isn't for cissies!