
Hi Stanley,
On the latest video from David Richards (Old Steam Powered Machine Shop 21), he machines a length of wrought iron line shaft and he shows how poor the structure is compared to present mild steel shafting. Remined me of when you spoke about some wrought iron bar (old handrail?) you had that was made in Wortley.
He said it was like machining roast beef!
Later, he crowned a pulley with his taper turning attachment, tapering towards the centre from each edge. Is that how it was done in the old days, or did they crown with a radius of some sort?
BR
Hoyland Mick
SHED MATTERS 2
-
Stanley

- Global Moderator

- Posts: 106095
- Joined: 23 Jan 2012, 12:01
- Location: Barnoldswick. Nearer to Heaven than Gloria.
Re: SHED MATTERS 2
Morning Mick.... He's right about wrought iron, I reckon it's the contrast in behaviour between the very soft almost pure iron and the striations of included slag which are always present to a degree. Funny thing is the old turners could manage it,I think by slower speeds and very sharp high carbon tools with a lot of top rake and a rounded cutting edge, very similar to a gouge used for wood., it wasn't unusual for them to hone the edge several times during one job. Johnny told Newton that when they were turning big CI flywheels they used chilled CI tools cast from the same metal as the flywheel, some of them 4" square! It would never be contemplated now but worked for them.
As for the crown on a flywheel or pulley, they were turned with a slight radius. On small pulleys they almost certainly turned them square and put the radius on by hand just as you would on a wood-turning lathe. Johnny's 1927 lathe has a profile turning attachment and I suspect they were more common then. The tool was mounted so that it floated, the 1927 lathe has a dovetail down the side of the compound slide for a floating tool holder and I think they used manual pressure to follow the hardened template on the attachment. Turning two slight tapers would probably work as the belt always tries to follow the maximum radius on the face, something to do with peripheral speed I suspect but I don't fully understand it beyond the fact that it works!
As for the crown on a flywheel or pulley, they were turned with a slight radius. On small pulleys they almost certainly turned them square and put the radius on by hand just as you would on a wood-turning lathe. Johnny's 1927 lathe has a profile turning attachment and I suspect they were more common then. The tool was mounted so that it floated, the 1927 lathe has a dovetail down the side of the compound slide for a floating tool holder and I think they used manual pressure to follow the hardened template on the attachment. Turning two slight tapers would probably work as the belt always tries to follow the maximum radius on the face, something to do with peripheral speed I suspect but I don't fully understand it beyond the fact that it works!
Stanley Challenger Graham
Stanley's View
scg1936 at talktalk.net
"Beware of certitude" (Jimmy Reid)
The floggings will continue until morale improves!
Old age isn't for cissies!
Stanley's View
scg1936 at talktalk.net
"Beware of certitude" (Jimmy Reid)
The floggings will continue until morale improves!
Old age isn't for cissies!
-
Stanley
- Global Moderator
- Posts: 106095
- Joined: 23 Jan 2012, 12:01
- Location: Barnoldswick. Nearer to Heaven than Gloria.
Re: SHED MATTERS 2

The first job this morning was to tidy up my soldering. I sharpened one of my scrapers and it made a good job of both the cylinder and the standard. Then I got brave and put my clevis in the 4 jaw chuck and took a couple of light cuts to uniformly round the edges. Once I had that out of the way I checked all my measurements and did a fag packet drawing of the short lever, remembering that I have 1/2" centres to deal with. I went to the key steel again and found my 3/8" steel. I cut off a blank and squared the ends in the mill bringing it to the right length at the same time.

Once I'd cleaned the blank up I blued it and marked the positions of the holes.

I drilled the 1/8" and 3/32" holes and then used my trick with the drill to round the ends.

Here's the result of just over two hours in the shed. Doesn't look much but it's accurate and good progress. I am quite happy with the morning, this is no time for rushing and skimping!
Stanley Challenger Graham
Stanley's View
scg1936 at talktalk.net
"Beware of certitude" (Jimmy Reid)
The floggings will continue until morale improves!
Old age isn't for cissies!
Stanley's View
scg1936 at talktalk.net
"Beware of certitude" (Jimmy Reid)
The floggings will continue until morale improves!
Old age isn't for cissies!
-
Stanley
- Global Moderator
- Posts: 106095
- Joined: 23 Jan 2012, 12:01
- Location: Barnoldswick. Nearer to Heaven than Gloria.
Re: SHED MATTERS 2

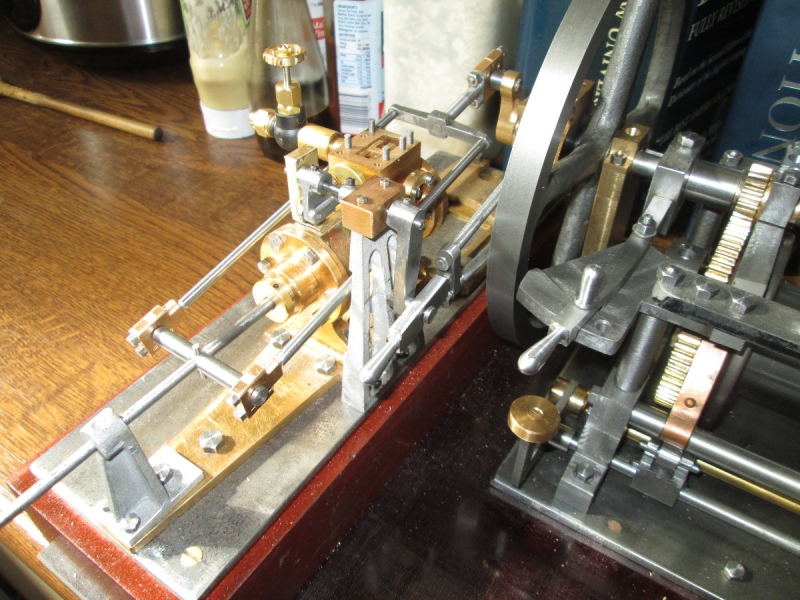
I need a 1/8" Whitworth grub screw to fasten the short lever on the shaft. So that was the first job, sam up all the necessary tackle and get a 2.5mm hole poked through in the right place and tap it.

Then I had a surprise when I was busy putting some shape and finish in the link. I hadn't finished it but this was worth stopping for. Big Kev brought the plinth round for a trial fit and it's perfect. He has taken away the stain that I used for the engine bed and so it will finish up the same colour. I like it!

I had a trial fit of the lever while Kev was here, it's not finished yet but its looking good.

This is the last bit of high risk milling to get some shape into the lever, I shall finish it off by hand with a file.

Knocking off time. I had spent a while improving the shape and finish and cutting the socket head screw for the fastening. I may be tempted to do a bit more but at the moment I am itching to get on with the long lever. No cock ups and more progress. The long lever is enormous compared to this one!
Stanley Challenger Graham
Stanley's View
scg1936 at talktalk.net
"Beware of certitude" (Jimmy Reid)
The floggings will continue until morale improves!
Old age isn't for cissies!
Stanley's View
scg1936 at talktalk.net
"Beware of certitude" (Jimmy Reid)
The floggings will continue until morale improves!
Old age isn't for cissies!


Re: SHED MATTERS 2
I'll get it stained up when I'm back from my 'jollies'. I'm glad it fitted first time 
Kev
Stylish Fashion Icon.

Stylish Fashion Icon.

-
Stanley
- Global Moderator
- Posts: 106095
- Joined: 23 Jan 2012, 12:01
- Location: Barnoldswick. Nearer to Heaven than Gloria.
Re: SHED MATTERS 2
When I did the bed the end grain sucked the stain in. Needed two coats.....
Stanley Challenger Graham
Stanley's View
scg1936 at talktalk.net
"Beware of certitude" (Jimmy Reid)
The floggings will continue until morale improves!
Old age isn't for cissies!
Stanley's View
scg1936 at talktalk.net
"Beware of certitude" (Jimmy Reid)
The floggings will continue until morale improves!
Old age isn't for cissies!
-
Stanley
- Global Moderator
- Posts: 106095
- Joined: 23 Jan 2012, 12:01
- Location: Barnoldswick. Nearer to Heaven than Gloria.
Re: SHED MATTERS 2

I decided I had to get the short lever finished and fitted so that later on I can get a proper measurement on the long lever. So my first move was to make the collar that helps locate the cross rod, complete with grub screw.

Then into Mrs Harrison to make the tiny clevis pin which attaches the short lever to the valve rod clevis.

The chuck on the Harrison couldn't grip 3/32" so I had to go to Johnny's 1927 lathe to turn the head down to size.


I made the pin a tight fit but just to make sure I popped a tiny drop of Shaftlock between the head and the clevis. It doesn't have to come out again.

I fitted the results but didn't tighten the grub screws. They look a bit rough close up like this but they'll never notice off the Ribble! Quite pleased actually, not bad for a bloke who's eyes play tricks on him!

It was getting close to knocking off time so I had a look at the enormous long lever, it's all of 1 5/8" long! The spare 3/8" key steel left over from the short lever is just right. The drawing calls for a slot in the middle for the pin for the gab end. I won't need that adjustment because when I have it made I'll fit it and find the position for the pin by matching it to the movement on the short lever.
I cleaned Mrs Harrison up and called it a day. When I was making the clevis pin I got to the stage where I was sawing it off and dropped it in the swarf. I had a hell of a job finding it because a lot of the swarf was bigger than the pin! Another thing that came to mind was what Johnny said when he was making his model of a mill engine. He said make it to a larger scale that a twelfth because at that size the valve gear is watchmaking, the scale of this is probably a sixteenth..... Never mind, we are getting there....
Stanley Challenger Graham
Stanley's View
scg1936 at talktalk.net
"Beware of certitude" (Jimmy Reid)
The floggings will continue until morale improves!
Old age isn't for cissies!
Stanley's View
scg1936 at talktalk.net
"Beware of certitude" (Jimmy Reid)
The floggings will continue until morale improves!
Old age isn't for cissies!
-
Stanley
- Global Moderator
- Posts: 106095
- Joined: 23 Jan 2012, 12:01
- Location: Barnoldswick. Nearer to Heaven than Gloria.
Re: SHED MATTERS 2

Today is long lever day. Before I started I touched the cutter up. When you are working with an El Cheapo mill the T&C grinder is absolutely essential. There are enough handicaps without adding cutters that are any less than perfect.

Next move was drilling the holes, 1/8" for the cross rod and tapping size for 5BA for the handle. Once I had the holes I used the rounding trick. Works like a charm.

Next move was to reduce the body of the lever. I'm making it slightly heavier than specified.

Then tap the small hole 5BA.

The next job is going to be fitting the grub screw so I have got my tackle together ready for tomorrow. No rush, there's all the time in the world.
Stanley Challenger Graham
Stanley's View
scg1936 at talktalk.net
"Beware of certitude" (Jimmy Reid)
The floggings will continue until morale improves!
Old age isn't for cissies!
Stanley's View
scg1936 at talktalk.net
"Beware of certitude" (Jimmy Reid)
The floggings will continue until morale improves!
Old age isn't for cissies!
-
Stanley
- Global Moderator
- Posts: 106095
- Joined: 23 Jan 2012, 12:01
- Location: Barnoldswick. Nearer to Heaven than Gloria.
Re: SHED MATTERS 2

It's been a morning of small things and much fiddling! First thing that happened was that I dressed my grinding wheel with my single diamond point and the diamond flipped out. Bugger. I went on the web and ordered another and at the same time pushed the boat out and ordered an 18V De Walt cordless drill.... No pockets in a shroud..... Then I got down to finding a good bottoming 1/8"Whitworth tap and re-cutting the tapped holes for the grub screws. The biggest hazard is dropping one and losing it! I managed to lose one and had to re-make it. I was going to mill the taper on the lever but just in time remembered that it would be much easier to hold it for drilling the hole for the gab stud if I had two parallel sides so I postponed that operation, blued it and marked a centre line. I'm ready now to make some decisions about the position of the stud.

More to this than meets the eye. I had to mill two clean square edges on the piece of alloy I'm using for a register. Then adjust the valve rod so it slid freely for the full length. I have reached what I think is the right measurement but as it was close to closing time I stopped because it would be far better if I had the valve chest open. I shall do that tomorrow. I can't see any big problems, everything seems to be falling into place. I'll make my decisions tomorrow and drill and fit a gab stud and the bottom handle. Everything is going to plan, not the time for rushing!
Stanley Challenger Graham
Stanley's View
scg1936 at talktalk.net
"Beware of certitude" (Jimmy Reid)
The floggings will continue until morale improves!
Old age isn't for cissies!
Stanley's View
scg1936 at talktalk.net
"Beware of certitude" (Jimmy Reid)
The floggings will continue until morale improves!
Old age isn't for cissies!
-
Stanley
- Global Moderator
- Posts: 106095
- Joined: 23 Jan 2012, 12:01
- Location: Barnoldswick. Nearer to Heaven than Gloria.
Re: SHED MATTERS 2

Off with the valve chest lid and final measurements made for the position of the gab stud on the long lever.

Marked and ready for drilling and tapping. Nowt to it.....

Until you do it again and break the tap in the hole..... Bugger!!

I thought I stood a chance so spent 45 minutes getting the broken end out and drilling the hole out to 1/8". I shall redesign the stud.....

Getting there......
Knocking off time. The stud finished and installed and valve throw tested, it's dead on target. The engine is ready for valve timing and running! I've done away with the bottom handle on the long lever, no need for it and too close to the gab stud anyway. Frustrating morning in parts but an excellent ending.....
Stanley Challenger Graham
Stanley's View
scg1936 at talktalk.net
"Beware of certitude" (Jimmy Reid)
The floggings will continue until morale improves!
Old age isn't for cissies!
Stanley's View
scg1936 at talktalk.net
"Beware of certitude" (Jimmy Reid)
The floggings will continue until morale improves!
Old age isn't for cissies!
-
Stanley
- Global Moderator
- Posts: 106095
- Joined: 23 Jan 2012, 12:01
- Location: Barnoldswick. Nearer to Heaven than Gloria.
Re: SHED MATTERS 2

I was a bit previous yesterday when I said the throw of the valve was perfect, what I realised that the valve itself was a bit too long.

I was going to file some off it but then decided I wouldn't break the rule of a lifetime. I popped it in the VM and reduced it. Then I re-polished all the surfaces and refitted it.

When I started to address the matter of setting the valve I found that the 8BA stud that connects the gab link to the eccentric rods was stripped. I've always thought 8BA was a bit light so I replaced it with a 6BA stud and re-drilled the clearance in the eccentric rod end.

That's better and it looks right now!

Then some serious valve setting. Lots of tiny adjustments but I got there in the end. I'm satisfied it will run so I laced it up, replacing the valve chest lid with sealant and fitting the missing studs in the chest.

Knocking off time. Mechanically the winder is finished and I am sure it will run. My problem is that I know that if you ran this engine every day it would give no end of trouble. This is so unlike my other engines, they are a better basic design and are bullet proof. It's been good as an exercise and I'm glad I did it but I've had enough of it now. I shall do a few cosmetic bits, there are one or two bits of finish that need attention but I won't be doing too much! I think I am ready for something else, a bit bigger this time and certainly a better basic design. This one will make a splendid conversation piece for Susan. We are almost ready for the plinth now Kev!
Stanley Challenger Graham
Stanley's View
scg1936 at talktalk.net
"Beware of certitude" (Jimmy Reid)
The floggings will continue until morale improves!
Old age isn't for cissies!
Stanley's View
scg1936 at talktalk.net
"Beware of certitude" (Jimmy Reid)
The floggings will continue until morale improves!
Old age isn't for cissies!
Re: SHED MATTERS 2
First coat of stain is done, second coat on this evening. I'll bob it round on Saturday morning.
Kev
Stylish Fashion Icon.
Stylish Fashion Icon.
-
Stanley
- Global Moderator
- Posts: 106095
- Joined: 23 Jan 2012, 12:01
- Location: Barnoldswick. Nearer to Heaven than Gloria.
Re: SHED MATTERS 2
Just about spot on time!
The postman called in.....

I am now tooled up and the dresser came as well. Far bigger diamond than my old one. 1karat. Well pleased!
The postman called in.....
I am now tooled up and the dresser came as well. Far bigger diamond than my old one. 1karat. Well pleased!
Stanley Challenger Graham
Stanley's View
scg1936 at talktalk.net
"Beware of certitude" (Jimmy Reid)
The floggings will continue until morale improves!
Old age isn't for cissies!
Stanley's View
scg1936 at talktalk.net
"Beware of certitude" (Jimmy Reid)
The floggings will continue until morale improves!
Old age isn't for cissies!
-
Stanley
- Global Moderator
- Posts: 106095
- Joined: 23 Jan 2012, 12:01
- Location: Barnoldswick. Nearer to Heaven than Gloria.
Re: SHED MATTERS 2

I have never had a hand drill readily available, they have always been stowed away in their boxes to save space but that's a bit like having a food processor in the kitchen but because it's in a cupboard you never use it. I decided this had to change. The charging system for the DeWalt is very clever. There is nothing to stop you leaving the battery on the charger which switches off until the battery is changed, I checked this last night by leaving the battery on and the charger was stone cold. So I have mounted it on the wall and the spare battery can sit on it ready for use. There's an added advantage here because for safety I can switch the plug off. I suspect that I will be using this drill far more.
The first job for the drill was drilling the holes for the rawlplugs, it has a hammer function. What surprised me was that the Bosch drills and bits supplied with the drill includes three common masonry bits. They were all blunt and needed sharpening before use!

Then I turned my attention to the winder.... I coupled it up and it ran the first time, it goes like hell but if I was serious about it I would adjust the valve setting as it isn't quite right. It's just as I set it when I laced it up yesterday. As it is I decided not to bother, I've proved it's a runner, that's all that matters. If anyone else in the future wants to have a go good luck to them! I gave it a good clean up, polished two castings on the entablature that needed finishing, and moved it into the kitchen to wait for the plinth.

I completed the morning by putting tools away, cleaning up and putting a new table cloth on. I vacuumed Mrs Harrison and the VM at the same time so we now have a clean and tidy shed!
I got the castings in October last year so it's almost eight months, not bad progress for a part time geriatric! The main thing I will always remember about building it is that it kept me sane through Janet's illness and death. Sheds are very useful things at times! So now I have to decide what next.....
Stanley Challenger Graham
Stanley's View
scg1936 at talktalk.net
"Beware of certitude" (Jimmy Reid)
The floggings will continue until morale improves!
Old age isn't for cissies!
Stanley's View
scg1936 at talktalk.net
"Beware of certitude" (Jimmy Reid)
The floggings will continue until morale improves!
Old age isn't for cissies!
-
Stanley
- Global Moderator
- Posts: 106095
- Joined: 23 Jan 2012, 12:01
- Location: Barnoldswick. Nearer to Heaven than Gloria.
Re: SHED MATTERS 2
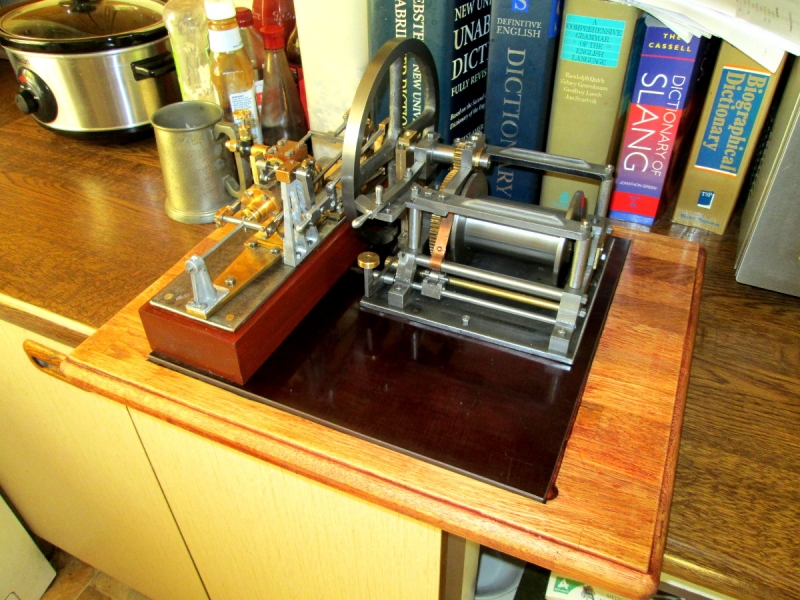
Update..... Kev has delivered the plinth. So here is the finished article....
Stanley Challenger Graham
Stanley's View
scg1936 at talktalk.net
"Beware of certitude" (Jimmy Reid)
The floggings will continue until morale improves!
Old age isn't for cissies!
Stanley's View
scg1936 at talktalk.net
"Beware of certitude" (Jimmy Reid)
The floggings will continue until morale improves!
Old age isn't for cissies!

Re: SHED MATTERS 2
Well done. That's a major achievement I'd say. I stand in awe of your skill and determination. By contrast - I am Private Allthumbs, from the Sgt Bilko training film. I did however just repair Mrs T's watch strap last week which involved bending metal, and changing the spring pin. 
The background to these photos is as interesting as the subject. Good to see the Slang Dictionary in a prominent place, and if you like HP sauce- try this Stokes Brown Sauce. It's hellish expensive - in fact my son refused to try it "in case he liked it " , but it's delicious - must be the traycle.
Thanks for the ride - looking forward to the next venture.
Born to be mild
Sapere Aude
Ego Lego
Preferred pronouns - Thou, Thee, Thy, Thine
My non-working days are Monday - Sunday
Sapere Aude
Ego Lego
Preferred pronouns - Thou, Thee, Thy, Thine
My non-working days are Monday - Sunday
-
Stanley
- Global Moderator
- Posts: 106095
- Joined: 23 Jan 2012, 12:01
- Location: Barnoldswick. Nearer to Heaven than Gloria.
Re: SHED MATTERS 2
Don't be too awestruck David! But thanks. Now I have to get over the post natal depression..... Kev's plinth is the finishing touch, Susan is delighted with it and is clearing a space!
Later. I am having a dxay off shed duties.... Cooking and reading, I deserve a day off!
Later. I am having a dxay off shed duties.... Cooking and reading, I deserve a day off!
Stanley Challenger Graham
Stanley's View
scg1936 at talktalk.net
"Beware of certitude" (Jimmy Reid)
The floggings will continue until morale improves!
Old age isn't for cissies!
Stanley's View
scg1936 at talktalk.net
"Beware of certitude" (Jimmy Reid)
The floggings will continue until morale improves!
Old age isn't for cissies!

Re: SHED MATTERS 2
Lovely Stanley! Nicely set off by the plinths and contrast between the brass and castings. Well done. Shouldn't it have a brass plate Made in Barlick?
-
Stanley
- Global Moderator
- Posts: 106095
- Joined: 23 Jan 2012, 12:01
- Location: Barnoldswick. Nearer to Heaven than Gloria.
Re: SHED MATTERS 2
Thanks. I was going to do that China but all I want now is to get it out the door and start on something else. I think the thing this morning is a good coat of maintenance for Mrs Harrison.
Later..... Maintenance won!

First job was a good wipe down of the lathe and then I got my spirit levels out. Not the everyday ones but the very sensitive ones that live in the kitchen. Here you'll see one on the tail end of the ways checking crossways for wind. I put the level on two Matrix slips because U didn't trust the peaks of the ways but when I checked it didn't matter, the peaks are as accurate as the ways. The biggest level is just in front of the chuck. The small one nearest the camera is the most sensitive one and I spent half an hour checking and re-checking as I used the levelling screws. This was not time wasted, both attitudes, lengthways and across were slightly out and this makes a big difference to accuracy as the bed is slightly twisted despite its massive build.

Next I got the test bar out that John gave me. I have suspected that the 4 jaw SC chuck has been running out a bit for a long time. I was right, it was almost 6thou out, not acceptable. So I took the body of the chuck off and skimmed a couple of thou off the register on the back plate. I checked the measurements and it was fitted a bit too tight. I popped it back on, tightened the backing plate screws and the run out is less than 2thou. Near enough for me!

The next job was to adjust all the gibs to make sure I had no play but free movement. They weren't bad but all stood a touch of tightening up. Then I filled the Wanner oil gun and lubricated every nipple on the lathe.

The next job was to skim the shank of my new single point dresser down a few thou so it would fit in the 1/2" bit holder on the T&C grinder. I have no doubt it was 1/2" but then they chrome plated it....

That's better! I dressed the grinding wheel and then turned my attention to the 5/8" holder. I have a lot of 16mm shank cutters that won't fit properly in the holder. I had two goes at opening it up before realising that the reason I wasn't getting anywhere is because the holders are hardened! It's going to be easier to make a special bush to hold 16MM cutters.
None of this was time wasted. Tomorrow I'll make that bush and see what other mischief I can get up to!
Later..... Maintenance won!
First job was a good wipe down of the lathe and then I got my spirit levels out. Not the everyday ones but the very sensitive ones that live in the kitchen. Here you'll see one on the tail end of the ways checking crossways for wind. I put the level on two Matrix slips because U didn't trust the peaks of the ways but when I checked it didn't matter, the peaks are as accurate as the ways. The biggest level is just in front of the chuck. The small one nearest the camera is the most sensitive one and I spent half an hour checking and re-checking as I used the levelling screws. This was not time wasted, both attitudes, lengthways and across were slightly out and this makes a big difference to accuracy as the bed is slightly twisted despite its massive build.
Next I got the test bar out that John gave me. I have suspected that the 4 jaw SC chuck has been running out a bit for a long time. I was right, it was almost 6thou out, not acceptable. So I took the body of the chuck off and skimmed a couple of thou off the register on the back plate. I checked the measurements and it was fitted a bit too tight. I popped it back on, tightened the backing plate screws and the run out is less than 2thou. Near enough for me!
The next job was to adjust all the gibs to make sure I had no play but free movement. They weren't bad but all stood a touch of tightening up. Then I filled the Wanner oil gun and lubricated every nipple on the lathe.
The next job was to skim the shank of my new single point dresser down a few thou so it would fit in the 1/2" bit holder on the T&C grinder. I have no doubt it was 1/2" but then they chrome plated it....
That's better! I dressed the grinding wheel and then turned my attention to the 5/8" holder. I have a lot of 16mm shank cutters that won't fit properly in the holder. I had two goes at opening it up before realising that the reason I wasn't getting anywhere is because the holders are hardened! It's going to be easier to make a special bush to hold 16MM cutters.
None of this was time wasted. Tomorrow I'll make that bush and see what other mischief I can get up to!
Stanley Challenger Graham
Stanley's View
scg1936 at talktalk.net
"Beware of certitude" (Jimmy Reid)
The floggings will continue until morale improves!
Old age isn't for cissies!
Stanley's View
scg1936 at talktalk.net
"Beware of certitude" (Jimmy Reid)
The floggings will continue until morale improves!
Old age isn't for cissies!
-
Stanley
- Global Moderator
- Posts: 106095
- Joined: 23 Jan 2012, 12:01
- Location: Barnoldswick. Nearer to Heaven than Gloria.
Re: SHED MATTERS 2
As well as making the 16mm bush and scratching that itch, I shall turn a test bar in the chuck with no support to check how good my levelling was yesterday and then do a long test piece between centres to check on the tailstock alignment.
Stanley Challenger Graham
Stanley's View
scg1936 at talktalk.net
"Beware of certitude" (Jimmy Reid)
The floggings will continue until morale improves!
Old age isn't for cissies!
Stanley's View
scg1936 at talktalk.net
"Beware of certitude" (Jimmy Reid)
The floggings will continue until morale improves!
Old age isn't for cissies!
-
Stanley
- Global Moderator
- Posts: 106095
- Joined: 23 Jan 2012, 12:01
- Location: Barnoldswick. Nearer to Heaven than Gloria.
Re: SHED MATTERS 2

I started with a significant task! For the last twenty years I have been catching my sleeve on the HS cutters that are now in the second box in on the second shelf down. I have swapped it with a box that has nothing sticking out of it! Wonderful improvement.

Then I found some 1" stock and started making the new bush for the 16mm cutters.

Next I set to to test the alignment of the lathe. I Made things difficult difficult for myself by using the bar of wrought iron! First I made an unsupported cut and then checked it for taper, zero I'm pleased to say, notice that I have forced myself to use tipped tools, I have avoided them for far too long.

I pushed the rest of the bar through the mandrel and did a long cut. The taper over 14" is less than .0005" Very pleased, that's good enough for me!

I finished the morning off by using the new 16mm bush and sharpening the cutter. Exactly right. That was it, I have cooking and washing to do on the free leccy. Good progress and I have enjoyed the morning.
Stanley Challenger Graham
Stanley's View
scg1936 at talktalk.net
"Beware of certitude" (Jimmy Reid)
The floggings will continue until morale improves!
Old age isn't for cissies!
Stanley's View
scg1936 at talktalk.net
"Beware of certitude" (Jimmy Reid)
The floggings will continue until morale improves!
Old age isn't for cissies!
-
Stanley
- Global Moderator
- Posts: 106095
- Joined: 23 Jan 2012, 12:01
- Location: Barnoldswick. Nearer to Heaven than Gloria.
Re: SHED MATTERS 2

Here's another long term itch..... In the past I have used a jury rig on the HM to gullet slitting saws and thin cutters but this isn't the right way to sharpen them, they should be ground back on the periphery with a ten degree clearance angle.I gathered my cutters together and surveyed the piste. It's quite obvious I should be using the Clarkson T&C grinder but I can't find any information anywhere about their method of doing it. So I shall invent my own...... Easier than any more searching on the web! By the way, the blade with the pocket level on is one of the new ones that Mick and John found for me, I shall check the relief angle from that.

After a bit of thought I decided that I can do the job using the same holder that I use for the end mills. The first thing to do was set it vertical and level it.

Then I sat a saw on top and tried to visualise the process and get a clue about the detent spring that will register in the teeth, automatically indexing the cut of course for any number of teeth. It struck me that this orientation would be good for gulleting a saw for chip clearance after a lot of sharpening had reduced the height of the teeth but that isn't my bag this morning!

Luckily the bore of the fixture that holds the bushes for the end mills is an accurate 1", the same as the mandrel size on the Horizontal Mill so the mandrel will be an exact fit for both the fixture and the saws. I found a piece of 1 1/2" bar so I could have a head on the mandrel just the right size for locating the cutter. Mrs McMaster came to the rescue as usual, thanks again to Mick and John!

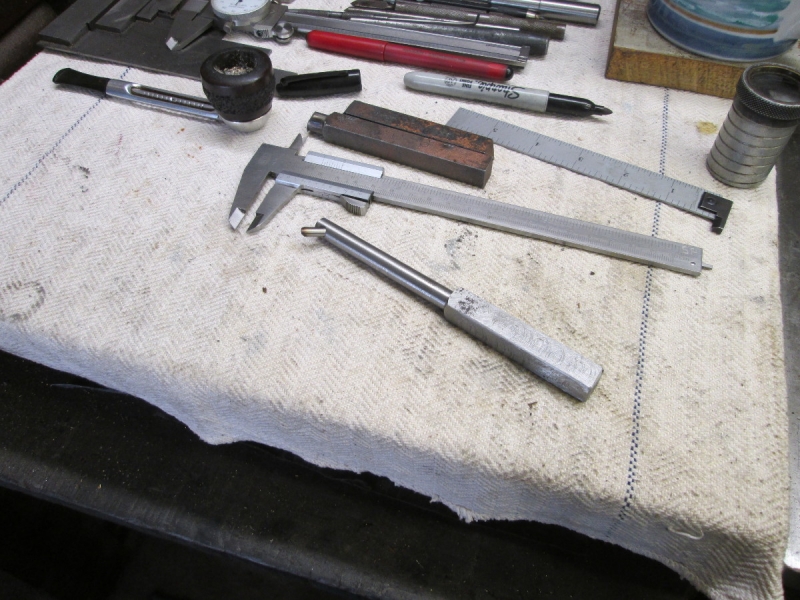
Then into the known accuracy of Mrs Harrison after yesterday's efforts. I used the carbide tools.... Heroic cuts and blue chips but I suspect I have the wrong inserts for a really good finish, I know so little about them. (Any advice welcomed!) However, I soon had the mandrel the right size for the fixture and the saws....

Drill and tap the end for a 3/8" Whitworth set screw for the disc that will hold the saw solid on the mandrel.

Here's the result, all the edges broken and a cunning little radius under the head that ensures that the cutter will be automatically centred even if there is a small variation in the bore size.

Here's this morning's result. It looks as though I am on the right track. Now I need to sort out the details like the detent spring and relief angle. That's for tomorrow! I think I like this morning's work, I suspect that when I have the set up right it will be very easy to use and will also suit much thicker cutters. I can see a lot of cutter sharpening happening! Must wear a face mask this time......
A few minute later after checking this post. It has dawned on me that the Clarkson has got the facility built into it to set the relief angle. This has a scale and can be set after the saw is mounted dead square to the grinding wheel. I think I have this right and will look at it tomorrow in more depth. These angles take a bit of effort to get your head round them! I'll be able to test it by actually making the adjustment. Another interesting day tomorrow.....
Stanley Challenger Graham
Stanley's View
scg1936 at talktalk.net
"Beware of certitude" (Jimmy Reid)
The floggings will continue until morale improves!
Old age isn't for cissies!
Stanley's View
scg1936 at talktalk.net
"Beware of certitude" (Jimmy Reid)
The floggings will continue until morale improves!
Old age isn't for cissies!
-
Stanley
- Global Moderator
- Posts: 106095
- Joined: 23 Jan 2012, 12:01
- Location: Barnoldswick. Nearer to Heaven than Gloria.
Re: SHED MATTERS 2
I think I have thought it through. Looking forward to getting in the shed and seeing if the plan works! I love these little problems.....
Stanley Challenger Graham
Stanley's View
scg1936 at talktalk.net
"Beware of certitude" (Jimmy Reid)
The floggings will continue until morale improves!
Old age isn't for cissies!
Stanley's View
scg1936 at talktalk.net
"Beware of certitude" (Jimmy Reid)
The floggings will continue until morale improves!
Old age isn't for cissies!
-
Stanley
- Global Moderator
- Posts: 106095
- Joined: 23 Jan 2012, 12:01
- Location: Barnoldswick. Nearer to Heaven than Gloria.
Re: SHED MATTERS 2

I started the day by cleaning yesterday's chips off the floor and the lathe. Then I went for a dig in the treasure chest and found a bunch if small slitting saws and thin cutters. Next I set up the Clarkson according to the ideas I had worked out. I did a bit of fiddling before I found the right relief angle, got my detent spring sorted out and started sharpening. I had got half way through the first saw when I found the dust was making me cough! Time to get the mask on. They are good quality and worked fine, no problems at all. On with the saw!

Only one way to find out whether I had it right so I took my new slitting saw out of the HM and put the one in I had just breathed on. I was surprised to find that it was only cutting on one tooth so I identified which one it was and took the saw out so I could have a look. I soon found that the problem was I'd been careless at that point and only half sharpened it. I knocked the ledge off on the ordinary grinder and put it back in the mill to try again. It was fine and cut well so I decided my set up was OK and spent the next two and a half hours had got a range of saws done from 4" upwards and varying thicknesses. That was enough for the day and I had a good clean up to get rid of the dust, put the set up back to the one for sharpening the end mills. I'm satisfied, that's that itch scratched and I now have a good range of sharp thin cutters! I'm glad I have it out of the way because basically once you have got the set up right it is repetitious and boring. The set up works, will accept any size from 3" diameter up to at least 9" and does a good job. The same setup will do for gulleting the saws as well to prolong their life. All good stuff and a successful morning. What next I ask myself......
Stanley Challenger Graham
Stanley's View
scg1936 at talktalk.net
"Beware of certitude" (Jimmy Reid)
The floggings will continue until morale improves!
Old age isn't for cissies!
Stanley's View
scg1936 at talktalk.net
"Beware of certitude" (Jimmy Reid)
The floggings will continue until morale improves!
Old age isn't for cissies!
-
Stanley
- Global Moderator
- Posts: 106095
- Joined: 23 Jan 2012, 12:01
- Location: Barnoldswick. Nearer to Heaven than Gloria.
Re: SHED MATTERS 2
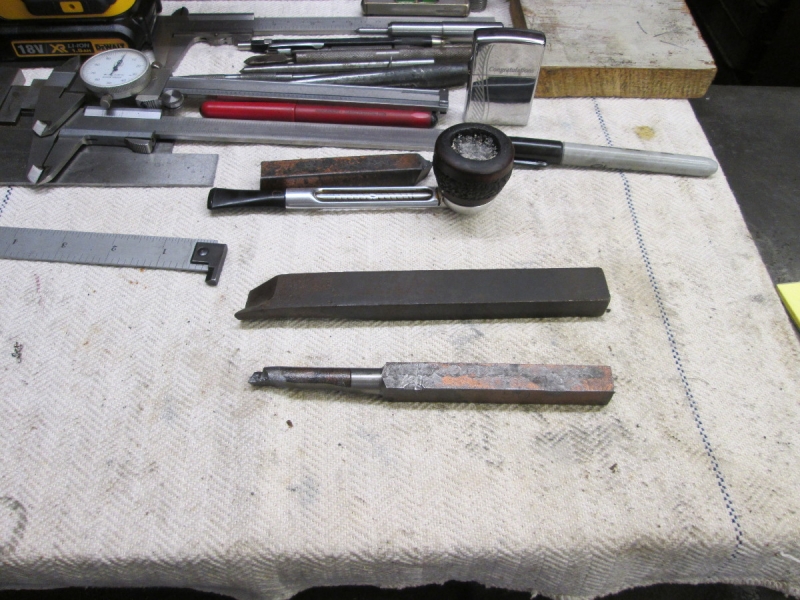
I went in the shed with a clear object in view. My trusty Stag tipped small boring bar has reached the end of its li9fe and I wanted to make another. The more rigid a bar is the better it cuts and it just so happens I have a lot of old-fashioned high carbon steel tools, still good for some low speed jobs but not so precious I can't sacrifice one as raw material. Johnny bought good steel stock so it will be just the job.
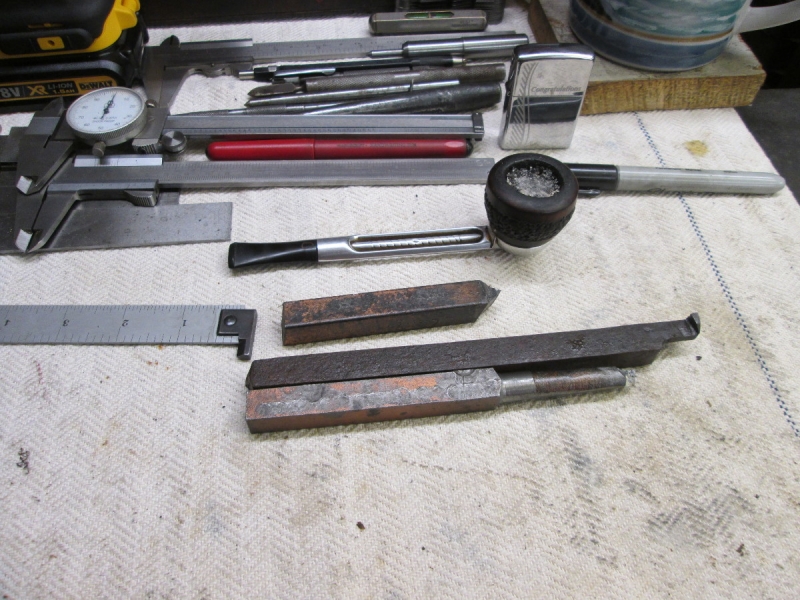
Then I realised I'd get on a lot better with square stock! So a quick swap for another tool.
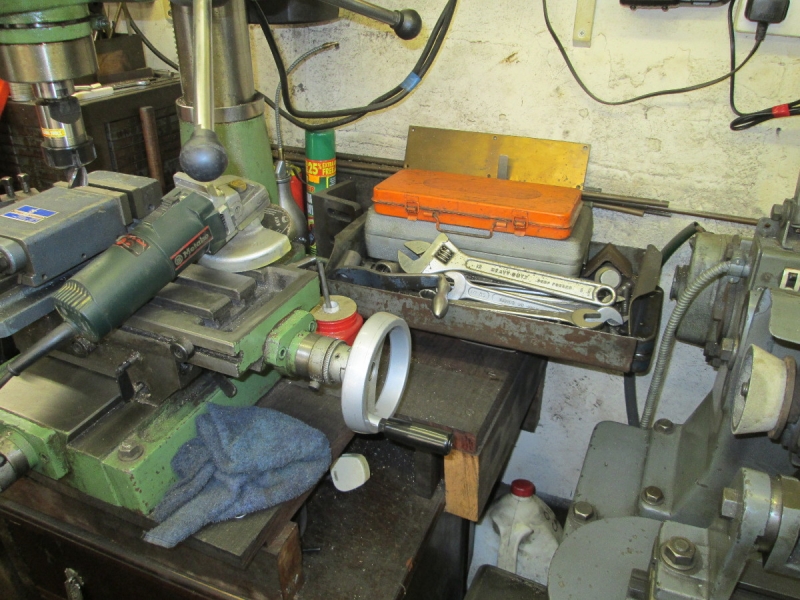
Rather than cutting the tool with a hacksaw and blunting it I decided to get the angle grinder out and thereby hangs a tale. Amazing how you can get side tracked! Getting the grinder out is a pain because it's under a stack of boxes that live under Johnny's big lathe. I decided it was time for a rethink so I redistributed the boxes under the lathe. The socket sets now live here and are not in the way!

Taking the grinder out of its box meant that it could be used to hold a selection of discs, polishing tackle and wire brushes. They never get used because it's such a faff getting them out.
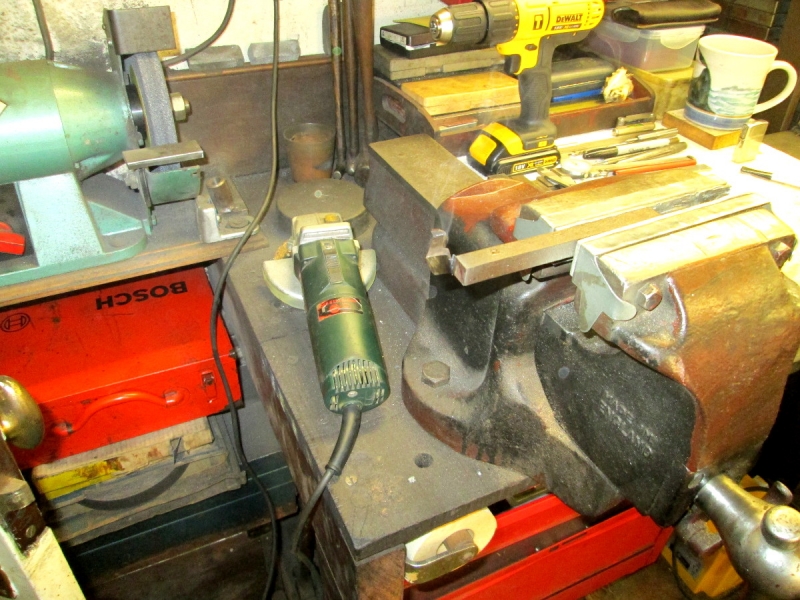
The box now lives out of the way under the grinder. I cut the end of the tool off with a slitting disc and I can tell you it's tough stuff! Good choice....

Then into the lathe to make it the right shape. Note that I am forcing myself to use the carbide tips. I looked through my stock of cutters and realised I have some new TNMG inserts that are too big for the two tool-holders I have and knowing how much they cost I went on the web and invested in a now left hand toolholder that will accept them. The cutters handled the high carbon steel OK but not the best finish in the world, plenty good enough for a boring bar though.
Here we are at closing time. I have fitted the bar with 3/16" HS steel and there is a socket head grub screw in the end to hold it. The tip needs sharpening but I'll do that tomorrow..... I haven't been wasting my time!
Stanley Challenger Graham
Stanley's View
scg1936 at talktalk.net
"Beware of certitude" (Jimmy Reid)
The floggings will continue until morale improves!
Old age isn't for cissies!
Stanley's View
scg1936 at talktalk.net
"Beware of certitude" (Jimmy Reid)
The floggings will continue until morale improves!
Old age isn't for cissies!