Page 81 of 125
Re: Shed Matters 3
Posted: 13 Apr 2023, 03:35
by Stanley
Room for packing twine Bob. It will get some before final build.....
Re: Shed Matters 3
Posted: 13 Apr 2023, 06:21
by Stanley

Only one pic needed this morning. I cleaned up and made the steam and exhaust pipes for the engine.
Re: Shed Matters 3
Posted: 14 Apr 2023, 05:52
by Stanley


This morning I started by giving Mrs Harrison a good clean and then lubricating it. I did this because we are moving over to the vertical mill and working on the crosshead slide guides. So, not a lot of actual progress, just cutting both guides to size and setting them up for cutting.
Re: Shed Matters 3
Posted: 15 Apr 2023, 06:04
by Stanley


I carried on cutting the guides for the cross head slide. Some very fine and careful milling of the long slot and I finished up ready for the final cut which will be relatively easy. That will be a nice starter tomorrow.
Re: Shed Matters 3
Posted: 16 Apr 2023, 06:01
by Stanley
Re: Shed Matters 3
Posted: 17 Apr 2023, 06:04
by Stanley
Re: Shed Matters 3
Posted: 17 Apr 2023, 11:23
by Super_7b
Hi Stanley,
A couple of random questions for you. Maybe I'm not in the right sub-forum, but this is the one I watch daily for your updates...

The first relates to mill engines. When you are running them in compound, the inlet to the HP cylinder is basically boiler pressure and the outlet from the LP cylinder should be near a vacuum. What would be the pressure at the outlet of the HP cylinder? If there is an IP cylinder, what would the inlet and outlet pressures be?
The second is something which popped into my mind this morning for no apparent reason. Back in about 1975/76 I remember reading a photo article in Amateur Photographer (or one of the other photographic magazines) and the article was about a Mill Engine still in use and included some photos of the Engineman. Was that you?
Regards
Mick
Re: Shed Matters 3
Posted: 17 Apr 2023, 14:10
by Stanley
Morning Mick. One of the three main gauges the tenter relied on was the compound gauge which read the pressure in the pressure vessel between the HP and LP cylinders. This was a large pipe at least 12" ID. The aim was to get as near an equal amount of work from each cylinder as possible, though in practice the LP was always lagging. In normal running that was 5 to 10psi. It was possible by altering the valves on the LP to raise this to 25 to 30psi but nobody did this. What was more common was to raise the pressure in the pipe by injecting live steam using the warmer. This was done if the engine wasn't in the correct position to start on the HP cylinder. In this circumstance there is always one valve on the lp that is in the right place. If you raised the pressure to about 35psi and then manually opened the appropriate steam valve with a key that you had for that purpose you could shove the engine over centre without bothering with the barring engine and then of course, you had the steam valve open and as soon as you were over centre the HP took over and away you went.
And yes, that was me. Daniel Meadows was the snapper and if you look up his photobus website you'll find the images there.....
Re: Shed Matters 3
Posted: 17 Apr 2023, 16:18
by Super_7b
Hi Stanley,
Thanks for the swift reply.
I'm a bit surprised how low the LP inlet pressure was, but evidently enough to do the job.
I will have a look for the photos, but before I do I seem to recall that there was a picture of you dozing in an armchair and the snapper being surprised at that. I know from the engineman, George Taylor, at Syke Ing Mill in Dewsbury and the site engineer, my uncle Jack Riley, that after an early start it was possible to have a doze once everything was up and running smoothly and the "spider sense" of years of hearing the regular noise of the engine would snap you into consciousness if anything went amiss. No need for sophisticated computer monitoring, just sharp senses and experience
Trying to avoid using the barring engine? Luxury! At Syke Ing Mill, all that was available was a heavy steel bar on a rising hinge mechanism to poke into holes in the flywheel periphery. Literally barring the engine. Maybe they did use the same trcik of using the LP cylinder and a warming feed. I can't say, as I was too young (about 10) to seriously understand what they did to start up. I do remeber them keying open the Corliss valves and wedging them with little blocks of hardwood then cracking the stop valve to trickle steam through to warm up the cylinders first thing in the morning.
Best regards
Mick
Re: Shed Matters 3
Posted: 18 Apr 2023, 01:57
by Stanley
Remember that the effective pressure is the differential between the inlet and exhaust so 10psi on the inlet and over 25" of vacuum on the outlet gives almost 25psi on a piston much bigger than the HP.
Re: Shed Matters 3
Posted: 18 Apr 2023, 05:49
by Stanley


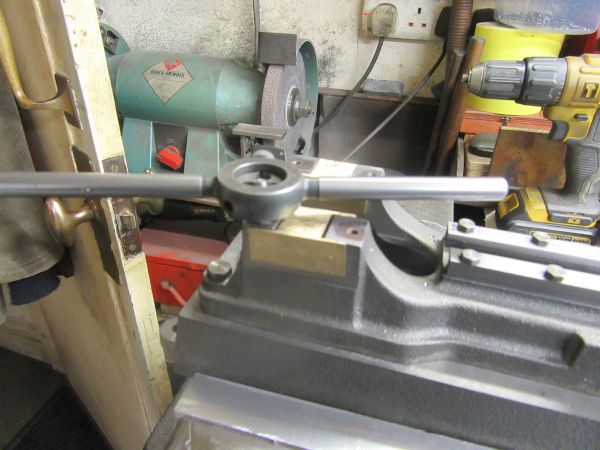
Only three quarters of an hour in the shed this morning but it was 45 minutes of careful accurate work. First marking the position of the 4 remaining bolt holes by touching the casting using the 3.3mm clearance drill through the existing holes in the guides. Then drilling and tapping and as you can see the guides are fitted with every 5BA bolt exactly lined up. I shall look at the pedestal bearings tomorrow.....
Re: Shed Matters 3
Posted: 19 Apr 2023, 06:01
by Stanley


As you can see I changed my mind and started on the crosshead. I have measured up and marked from the actual guide, not the drawing. I have all my measurements and two dimensions done in the lathe. I shall go further with it tomorrow.
Re: Shed Matters 3
Posted: 20 Apr 2023, 06:17
by Stanley
Re: Shed Matters 3
Posted: 21 Apr 2023, 06:54
by Stanley
Re: Shed Matters 3
Posted: 22 Apr 2023, 06:51
by Stanley
Re: Shed Matters 3
Posted: 23 Apr 2023, 06:34
by Stanley
Re: Shed Matters 3
Posted: 24 Apr 2023, 06:12
by Stanley


Fitting is a slow and careful job so don't expect a mountain of work! I started by ensuring that the bottom parts of the bearings are properly bedded in the casting and marked with witness marks identifying their place and orientation. Then I turned to the caps and did the same job. I have got one side fitted and will finish the other side tomorrow before drilling the bolt holes and oil passages.
Re: Shed Matters 3
Posted: 25 Apr 2023, 06:06
by Stanley
Re: Shed Matters 3
Posted: 26 Apr 2023, 06:17
by Stanley
Re: Shed Matters 3
Posted: 27 Apr 2023, 06:39
by Stanley
Re: Shed Matters 3
Posted: 28 Apr 2023, 06:56
by Stanley


The job this morning was to bore the bearings for the crankshaft. I made sure the brasses were correct and re-installed them using the studs I adjusted yesterday. All went OK and it's worth looking carefully how I set the castings up under the drill in such a way that it made being perpendicular automatic..... I had to slightly modify the journals on the crankshaft by polishing them as they were a couple of thou strong, That's done and the shaft will be a good fit. I shall of course fit it and check tomorrow....
Re: Shed Matters 3
Posted: 29 Apr 2023, 06:22
by Stanley
Re: Shed Matters 3
Posted: 30 Apr 2023, 05:54
by Stanley

Only one image needed. The smaller items have been brush painted and I brushed over the base and bed that I sprayed yesterday. Not my favourite pastime!
Re: Shed Matters 3
Posted: 01 May 2023, 06:14
by Stanley


Tidying up jobs. First clean up the back cylinder lid in the lathe than clean the lathe and the vertical milling machine. Then clean the surfaces of the steam chest lid, the cylinder and the unpainted surfaces of the base and bed. Then sand the plinth, cut a rubber base for it and stick it on. Put that in the vice to set overnight. Finish by using the orbital sander to polish some scratches out of the small surface plate and then oil it. I shall be ready in the morning to oil the plinth, fix the base to it and mount the bed. Then I can start rebuilding the engine. A productive hour and a quarter.
Re: Shed Matters 3
Posted: 02 May 2023, 06:13
by Stanley

Again, only one pic needed. This morning I oiled the plinth and started building the engine up on it. Here I've reached the stage where the crankshaft has to be run in as it is a very close fit. This is as it should be, it will loosen off as the engine runs in.