SHED MATTERS 2

Locked
User avatar
Stanley
Global Moderator
Global Moderator
Posts: 99371
Joined: 23 Jan 2012, 12:01
Location: Barnoldswick. Nearer to Heaven than Gloria.

Re: SHED MATTERS 2

Post by Stanley »

Image

All right, I'm doing the same thing as yesterday but this is because I am paranoid about my ability to get mirror images wrong. I realised this morning that I wasn't sure whether I had turned the right boss off the template so I popped it back in the lathe and modified the other side as well and then did my checks all over again.

Image

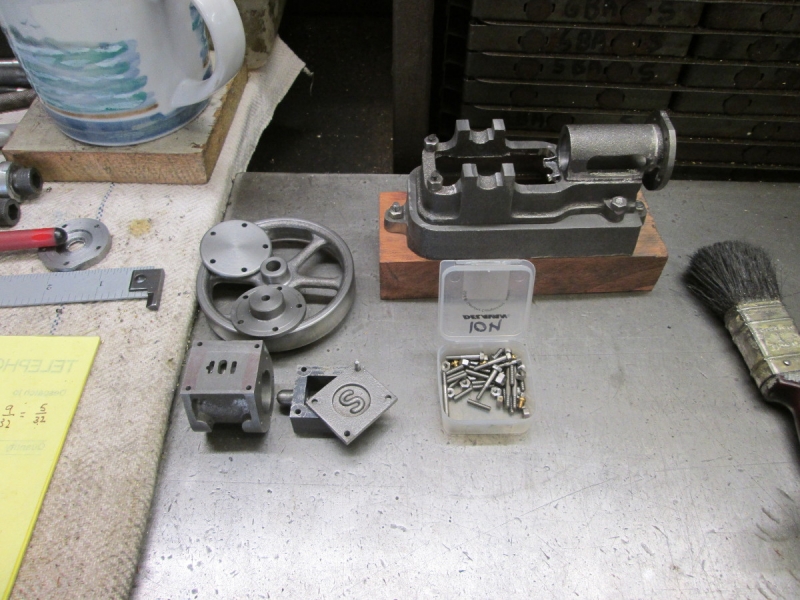
I'm not going to bore you with all the steps, all I can say is that the new DeWalt drill is a godsend, just the thing for popping little holes through hard to clamp work pieces. Here's where I finished up, both lids drilled for clearance and on (hopefully!) the right register. Notice I have put witness marks on them.

Image

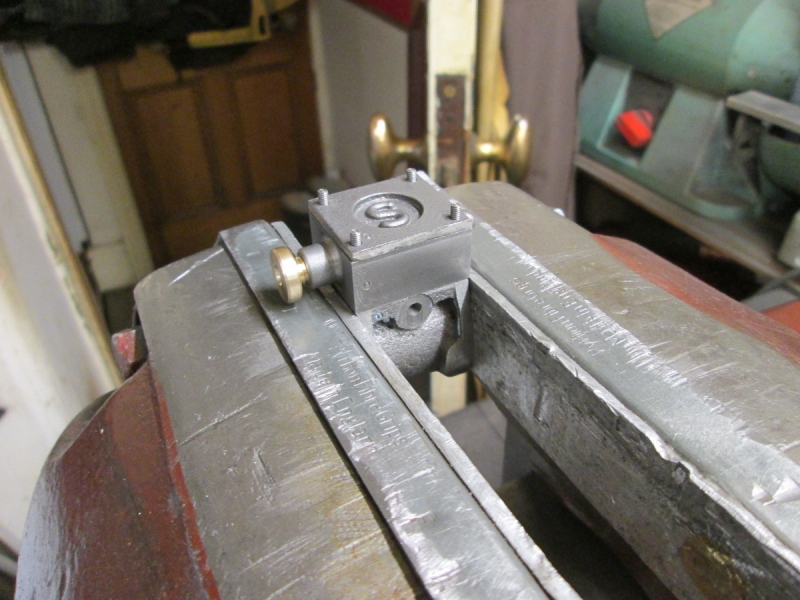
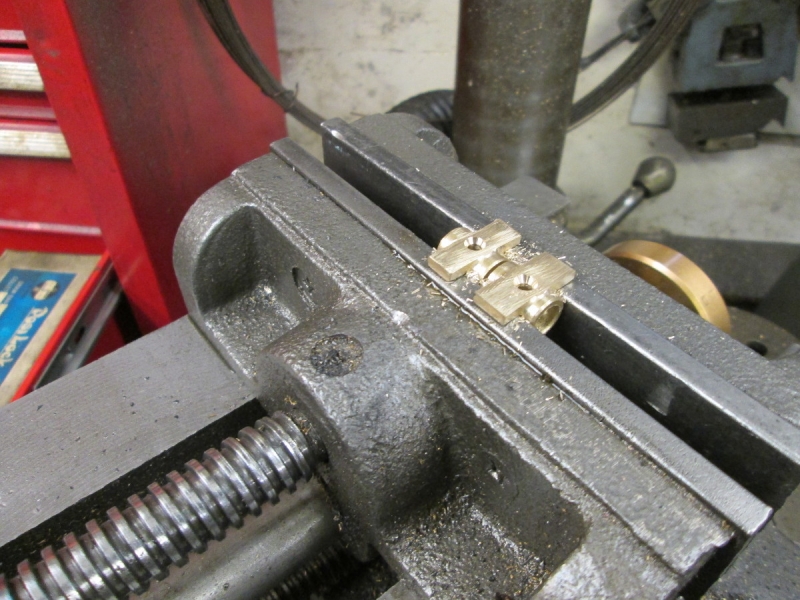
The next thing I addressed was the ports in the valve face because I have to screw myself up to doing something I hate, drilling the steam passages. Before I do this I have to get the 'as cast' ports cleaned up and the correct depth. So the first job was the exhaust port and I had to make sure I was accurately lined up.

Image

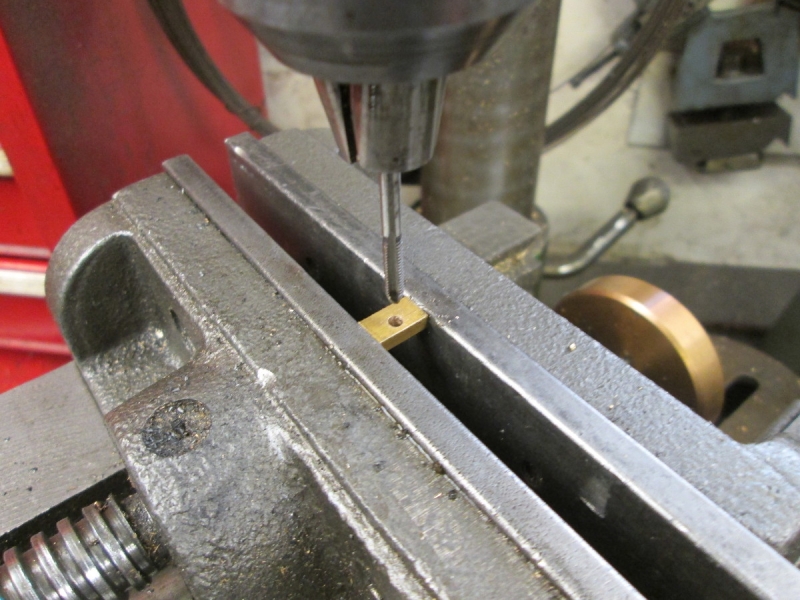
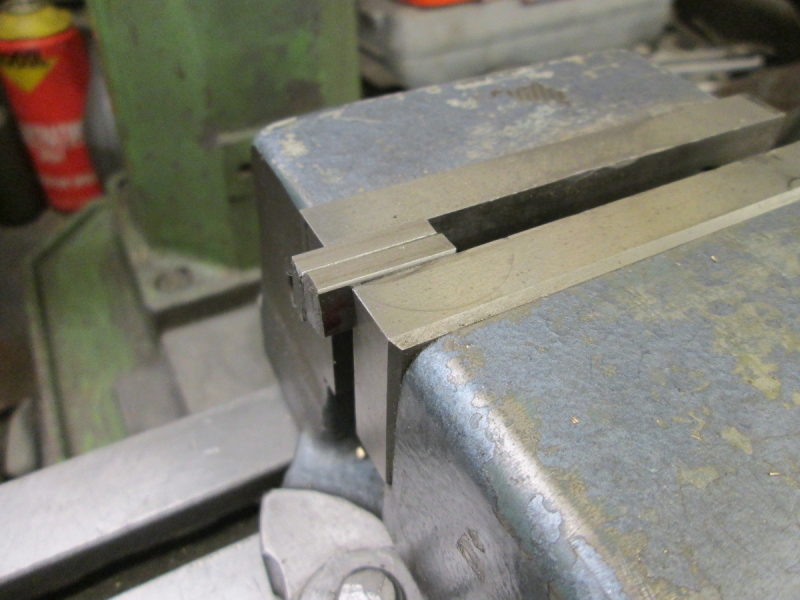
The 1/8" slot drill chucked up, the mill put on top speed and after some careful cutting a check with the depth gauge. That's one port out of the way! The steam ports were a bit of a problem. They are 5/64" wide and I haven't got a mill that size so I improvised with a 5/64" drill in the DeWalt drill and I cleaned those up by hand. God knows how the old lads with far less equipment did this!

Image

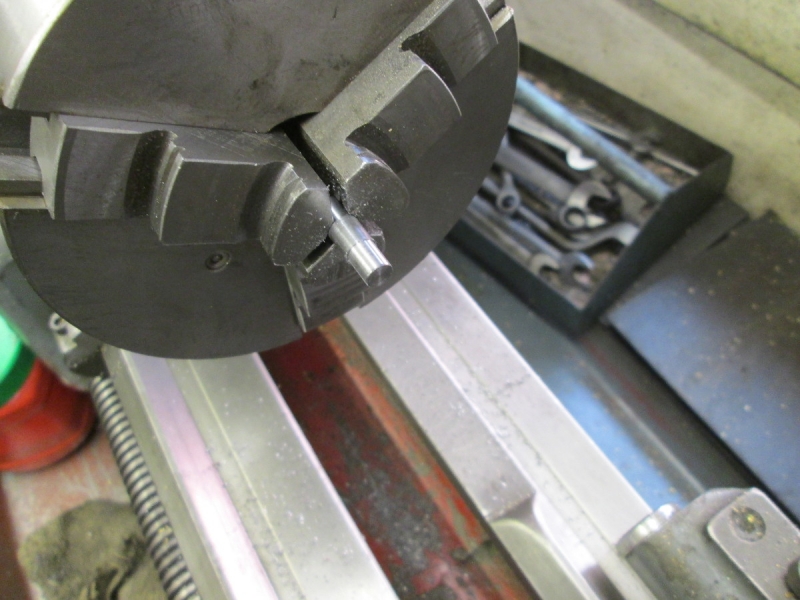
For my next trick I needed a 3/8" slot drill and when I got it out it was dull so the first thing to do was sharpen it. No short cuts!

Image

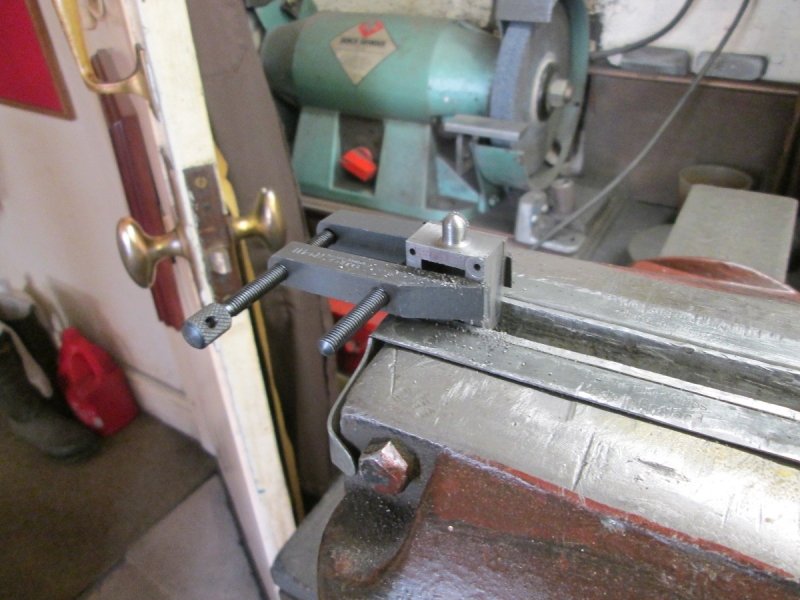
I wanted to drill the exhaust port and before I did this I wanted a clean face on the boss where it emerges.

Image

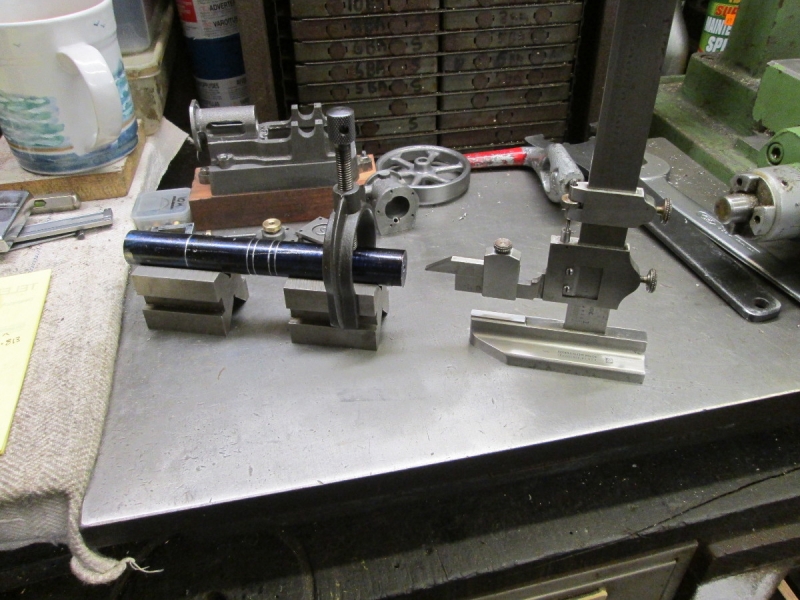
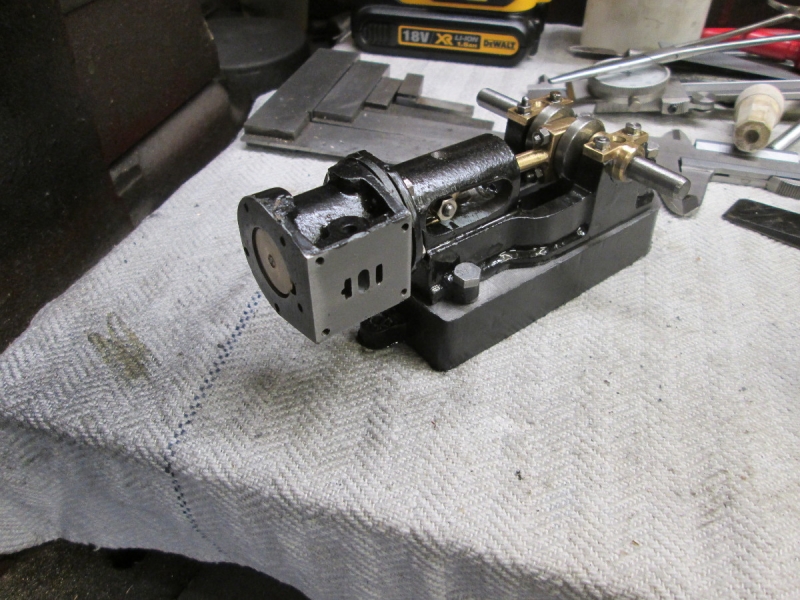
Here we are with an 1/8" hole drilled in just the right place and breaking into the exhaust port satisfactorily. I'm ready to attack the steam passages now but this needs some careful measuring and setting up. As it was coming up to closing time I knocked off early. I'll come to my bete noire fresh in the morning!
Stanley Challenger Graham
Stanley's View
scg1936 at talktalk.net

"Beware of certitude" (Jimmy Reid)
The floggings will continue until morale improves!
Old age isn't for cissies!
User avatar
Stanley
Global Moderator
Global Moderator
Posts: 99371
Joined: 23 Jan 2012, 12:01
Location: Barnoldswick. Nearer to Heaven than Gloria.

Re: SHED MATTERS 2

Post by Stanley »

Image

First job today is to drill the steam passages in the cylinder casting. Not my favourite pastime. I started by marking the side of the cylinder casting with the path of the drill.

Image

The vise had to come off the VM bed and be replaced with the angle vise. Here I've mounted the cylinder and set it as near as I can by eye to the right angle. I need to mill a flat entry face in the bore and then drill 9/64", the drawing says 1/8" but you can't beat having good breathing space!

Image

A bit out of focus but here's a good tip. Put a piece of clean white paper under the steam port. You will see immediately when you have broken through as CI dust will spill out of the port.

Image

Job done. If you look at the left hand steam port you'll see a tiny cock up, I have nibbled a small segment out of the lip of the port. This isn't as bad as it looks, in fact on Petrie engines they always cut a notch out of the rim of the circular slide valve to give a small amount of pre-admission to cushion the piston. I took the angle vice off the mill, trammed the normal vise in and re-sharpened the 3/4" end mill before I went any further.

Image

Here's a close up of the steam passage. That will breathe all right!

Image

Now I had to address finishing the tapping holes in the cylinder casting. I measured the valve chest, marked it and drilled it tapping size for 7BA studs. Then I used the valve chest to transfer those drillings to the cylinder face and the steam chest lid.

Image

Once they were all done I opened out the drillings on the steam chest and the lid to 7BA clearance which is a number 39 drill. That's it for today. Tomorrow is tapping the 14 holes in the cylinder and finishing the making and fitting of the glands to the cylinder and steam chest. Good job I got those new 7BA taps......
Stanley Challenger Graham
Stanley's View
scg1936 at talktalk.net

"Beware of certitude" (Jimmy Reid)
The floggings will continue until morale improves!
Old age isn't for cissies!
User avatar
Stanley
Global Moderator
Global Moderator
Posts: 99371
Joined: 23 Jan 2012, 12:01
Location: Barnoldswick. Nearer to Heaven than Gloria.

Re: SHED MATTERS 2

Post by Stanley »

Image

I decided to make the tiny little glands first for the valve chest and front cylinder cover. Here I'm using the ball bearing trick to chuck the front lid accurately for boring and tapping. It's only got less than 1/8" for the chuck to grab so it was a light hold and very light cutting. I'm not going to bore you with every stage, you know them well enough.

Image

A while later after careful accurate work we have two tidy little gland nuts fitted. You might have noted that I haven't made any provision as yet for adjusting them. I'm going to decide on that when I have my first trial fit up of the complete engine. I don't like the methods the drawings suggest.

Image

By 09:30 I was here and rather than start on tapping the 14 holes in the cylinder and fitting the studs I decided to have a good clean up and put tools away. I want a clean start tomorrow......
Stanley Challenger Graham
Stanley's View
scg1936 at talktalk.net

"Beware of certitude" (Jimmy Reid)
The floggings will continue until morale improves!
Old age isn't for cissies!
User avatar
Stanley
Global Moderator
Global Moderator
Posts: 99371
Joined: 23 Jan 2012, 12:01
Location: Barnoldswick. Nearer to Heaven than Gloria.

Re: SHED MATTERS 2

Post by Stanley »

Image

I'm there at last! I set up and tapped all the 14 holes in the cylinder. Very carefully!

Image

I temporarily fitted the studs and here's what the steam chest looks like, it fits perfectly on the studs.

Image

I decided to drill holes in the periphery of the two gland nuts so I made a small fixture from some brass hexagon bar I have and used that and a stop to drill all the holes in the VM. I did the 1/4" gland from the steam chest first and then re-tapped the hole 5/16" X 26 for the front cylinder gland.

Image

I had two hours in the shed this morning and here's the result, all the cylinder holes tapped and checked and the gland nuts now have a way of adjusting them. It's progress!

Later at 14:30. No I haven't been doing overtime! I woke up after my afternoon sleep wondering if the gland nut in the trunk slide was accessible when screwed right home. So I tried it and it's OK!

Image
Stanley Challenger Graham
Stanley's View
scg1936 at talktalk.net

"Beware of certitude" (Jimmy Reid)
The floggings will continue until morale improves!
Old age isn't for cissies!
User avatar
Stanley
Global Moderator
Global Moderator
Posts: 99371
Joined: 23 Jan 2012, 12:01
Location: Barnoldswick. Nearer to Heaven than Gloria.

Re: SHED MATTERS 2

Post by Stanley »

Image

First job was to address the steam connection to the valve chest. Drilled and tapped 1/4" X 26tpi.

Image

Then make a steam pipe.... I drilled it 9/64" instead of 1/8" to let it breath better!

Image

The small brass casting for the valve is very good and didn't need a lot doing to it. I had to make sure that I had 1/8" both ways for the valve rod and the driving bar. Warding files can be so handy!

Image

Mark, drill and tap the driver bar 5BA. Tiddly work.....

Image

Then thread the valve rod 5BA at each end. I made it plenty long enough as I can't size it properly until I get to fitting the motion.

Image

Here we have the finished valve chest ready for fitting. I have ground the bottom of the valve and the valve face to make sure of a good seal and cleaned out the inside of the chest with a good square file.

Image

I can't do any more fitting until I have the crankshaft made and installed so I can measure accurately. The first job is to file out the horns on the bed and find a good seat for the casting that the bearings will come out of.

Image

Half an hour of careful filing and fitting and we have a good fit. Next job is to split the casting and make the two bearings. That will be the first job tomorrow!
Stanley Challenger Graham
Stanley's View
scg1936 at talktalk.net

"Beware of certitude" (Jimmy Reid)
The floggings will continue until morale improves!
Old age isn't for cissies!
User avatar
Stanley
Global Moderator
Global Moderator
Posts: 99371
Joined: 23 Jan 2012, 12:01
Location: Barnoldswick. Nearer to Heaven than Gloria.

Re: SHED MATTERS 2

Post by Stanley »

Image

Today's job is to make progress on the crankshaft bearings.

Image

You might think this is overkill, using the HM but it means I can cut them tidily and square leaves less to do to actually make them.

Image

Here we are, ready for some accurate marking.

Image

Drilling the bores is perfectly adequate for this engine but I hit a problem. I got myself thoroughly confused about the size of the bore, the drawing says 9/32" and I was convinced it was 5/32" even after check measuring. It was a while until I got myself sorted. The problem was two-fold, I had got it firmly into my head that it was 5/32" and that and my eyes let me down when I checked. I didn't see what was there but what I believed. I finally got in gear and bored the bearings with a 7.1mm drill which gave me a lovely fit that will only need a bit of lapping to be perfect.

Image

Edges broken and ready for the next problem; how to chuck the bearings to finish the ends off.

Image

Close of play at 9AM when free leccy kicked in and I had to give some attention to washing and cooking. Doesn't look like a lot of progress but it's quite a nice step forwards.... A good morning.
Stanley Challenger Graham
Stanley's View
scg1936 at talktalk.net

"Beware of certitude" (Jimmy Reid)
The floggings will continue until morale improves!
Old age isn't for cissies!
User avatar
Stanley
Global Moderator
Global Moderator
Posts: 99371
Joined: 23 Jan 2012, 12:01
Location: Barnoldswick. Nearer to Heaven than Gloria.

Re: SHED MATTERS 2

Post by Stanley »

Image

Today I want to finish the crankshaft bearings. I started with a cunning plan. I turned the end of one of my silver steel centres down until it was a close fit in both of the bearings.

Image

The plan was to put the 4 jaw on Johnny's 1927 lathe and use the point in conjunction with the tailstock centre to set up the bearings so that I could turn the ends down concentric with the bore. I spent half an hour struggling with the set up before I finally had to admit that this was the wrong way and it wasn't going to work. We need a plan 'B'!

Image

When I bored the bearings I tried to get them as near as I could in the centre. I used the centre to line the bearing up and then put the point in to support the bearing when I nipped it up. I found later that this wasn't necessary. So plan 'B' was Mrs Harrison and the 2 jaw brass finishing chuck. It worked fine.

Image

It didn't take long to get to this stage.

Image

I had bored the bearings on the tight side so the next job after breaking all the edges and putting some finish on the bearings was to lap them with valve grinding paste until I had them both a running fit on the shaft. The turned down end of the point was just right.

Image

Both a nice fit on the shaft.

Image

I tried the fit on the horns and the shaft turns easily with both bearings snug in the horns. I finished the prettification off and put a witness mark on both and the bed.

Image

Oil holes poked in both of them and then I measured and marked both bearings for the studs.

Image

I then set the bearings up with a clamp and here we are under the VM ready to drill both tapping size for 7BA. Once I have that done I shall open the top holes for clearance. But that's for tomorrow..... Once more, a morning of fiddly work and problem solving but that's what makes the job so enjoyable. A good morning.....
Stanley Challenger Graham
Stanley's View
scg1936 at talktalk.net

"Beware of certitude" (Jimmy Reid)
The floggings will continue until morale improves!
Old age isn't for cissies!
User avatar
Stanley
Global Moderator
Global Moderator
Posts: 99371
Joined: 23 Jan 2012, 12:01
Location: Barnoldswick. Nearer to Heaven than Gloria.

Re: SHED MATTERS 2

Post by Stanley »

Image

I was already set up to drill for tapping the stud holes for the bearings. All I did before I started was to mark the drill with a spot of yellow paint to give me a guide for the depth.

Image

I tapped the holes and tried the studs. The more eagle-eyed will note that the back right hand tapping is too near the bearing and has broken through the wall. No point crying over spilt milk, I drilled it deeper and put a good thread in the bottom. I've found a 7BA set screw that's long enough for a fastening and take it from me it will be OK! I drilled the holes in the bearing 39 number drill, the clearance for 7BA.

Image

Time to have a close look at the crankshaft because I have to have that fitted to measure accurately for the motion. I'll say it now, I don't like the idea of building up the shaft but I will do it their way and see how I like it. I can always knock one out of the solid if I'm not satisfied. One thing that cropped up when I was checking all the measurements before cutting the 9/32" stock is that their drawing doesn't agree with the reality of the material. The webs are 3/16" stock and if you add that to the 5/16" of the crank pin you get 11/16" and not 5/8" as per the drawing. Of course they may be expecting me to reduce the thickness of the webs. I've cut the stock on the generous side and I'll address that problem when I come to it.
It was getting close to knocking off time and another separate matter cropped up so I stopped. I shall come to the shaft fresh tomorrow. I want to do some thinking about how I tackle it anyway.
Stanley Challenger Graham
Stanley's View
scg1936 at talktalk.net

"Beware of certitude" (Jimmy Reid)
The floggings will continue until morale improves!
Old age isn't for cissies!
User avatar
Stanley
Global Moderator
Global Moderator
Posts: 99371
Joined: 23 Jan 2012, 12:01
Location: Barnoldswick. Nearer to Heaven than Gloria.

Re: SHED MATTERS 2

Post by Stanley »

I'll start by admitting that I haven't enjoyed this morning beyond the natural delight in working in the shed with my hands. The problem is that I know deep down I could do a better job of the crankshaft by making it my way, chopping it out of the solid but there you are, I promised I'd give it a go, largely because I have never made one this way before.

Image

I started by Loctiting the two webs together and leaving them in the vice while I sorted my tackle out. I failed miserably because they fell apart when I started to work on them. That's a good start!

Image

Never mind, crash on. I marked them both and drilled them. The crankpin hole is smaller because I am going to make the pin an interference fit in the 1/4" reamed hole.

Image

Turning the ends of the pin down leaving exactly 5/16" in the centre.

Image

Nice fit, the pin is a good interference fit in each web, the shaft is a tight sliding fit.

Image

The plan is to pin all the joints using hardened parallel pins with Loctite. Wasn't it lucky that I just happened to have a drawerful of pins.....

Image

I marked the webs (a bugger when you can't see properly.....) and picked a metric drill the right size to give me a nice interference fit.

Image

Unfortunately the drill made an oversize hole and so I had to go to Plan 'B', taper pins. So, out with a different box!

Image

Here we are at knocking off time. The pins are driven tight and Loctited, we need a bit of hand work now to cut off the excess and the bit of the shaft that's bridging the webs. That's for tomorrow and we'll find out how near we are.....
Stanley Challenger Graham
Stanley's View
scg1936 at talktalk.net

"Beware of certitude" (Jimmy Reid)
The floggings will continue until morale improves!
Old age isn't for cissies!
User avatar
Stanley
Global Moderator
Global Moderator
Posts: 99371
Joined: 23 Jan 2012, 12:01
Location: Barnoldswick. Nearer to Heaven than Gloria.

Re: SHED MATTERS 2

Post by Stanley »

Image

I'm much happier this morning..... I started by trimming all the excess of the pins, the ends of the crankpin and the middle of the crankshaft and then spent almost half an hour with a big file tidying the assembly up.

Image

Looking a bit better!

Image

Then I put it under the mill and took some very light cuts to square everything up. Big mistake.....

Image

Here's the dénouement. The assembly was so weak it couldn't stand the mill. This is what has made it such a happy morning, I knew it was all wrong and now I know exactly what to do!

Image

I found some 1" stock and knocked off a piece plenty long enough. I am going to do what I should have done two days ago.... chop the shaft out of the solid.

Image

I cleaned the ends up and centred them and turned it down to 13/16". Then I marked the pitch circle of the pin and the shaft on each end.

Image

Here we are at knocking off time, ready for a coat of blue and some marking up. This is much better than pissing about the Stuart way and in the end I'll have a far better shaft.....
Stanley Challenger Graham
Stanley's View
scg1936 at talktalk.net

"Beware of certitude" (Jimmy Reid)
The floggings will continue until morale improves!
Old age isn't for cissies!
User avatar
Stanley
Global Moderator
Global Moderator
Posts: 99371
Joined: 23 Jan 2012, 12:01
Location: Barnoldswick. Nearer to Heaven than Gloria.

Re: SHED MATTERS 2

Post by Stanley »

The bad news is that I am declining the shed today. This morning's news has drained me and old blokes like me have to look after themselves, I shall eat something and go back to bed for a good sleep! I promise I will be on parade tomorrow morning!
Stanley Challenger Graham
Stanley's View
scg1936 at talktalk.net

"Beware of certitude" (Jimmy Reid)
The floggings will continue until morale improves!
Old age isn't for cissies!
User avatar
Stanley
Global Moderator
Global Moderator
Posts: 99371
Joined: 23 Jan 2012, 12:01
Location: Barnoldswick. Nearer to Heaven than Gloria.

Re: SHED MATTERS 2

Post by Stanley »

Image

Back to the crankshaft! Not quite like a giant refreshed after my day off yesterday, more like an old bloke struggling to get his head back in gear! I started the day by cleaning Mrs Harrison and then the first job was to finish turning the blank down to the same size full length as this makes it easier to do quick swap rounds end to end because the setup is identical.

Image

The first job was to mark the position of the junctions of the different sections. Once marked I popped the billet in the lathe and marked the junctions with proper cuts with a 90 degree chamfering tool. This took longer than you'd think because I had a strange problem. I had difficulty getting my head round the markings. But I got there in the end.

Image

Once I had the lengths marked I set the shaft up on the surface plate and marked the line that the two centres I shall be using lie on. Doing it this way meant that I could be certain the marks were oriented correctly, parallel to each other.

Image

I marked the centres of the eccentrics with a punch mark, drilled them deeper than the original centre hole with q 1/8" drill and then turned the ends down to get rid of the original centre. Once I had done this I drilled these holes with a centre drill giving me my eccentric centres. The new DeWalt drill makes everything so much easier as it is sat there permanently ready for use and is such a good tool to use.

Image

Next thing was to turn up a silver steel centre making sure that it is dead centre at the chuck end.

Image

I sharpened a tool for turning the shaft, bit like a 1/4" wide parting tool. Found a dog and worked out a way of driving the shaft securely. I got the tool mounted on dead centre but when I tried the setup out I realised that the thick packing piece I was using was too wide and was fouling the dog at the chuck end of the cut. It's a useful packing piece and I have hit this problem before. I decided I didn't want to start the actual cutting in the time I had left and so did the right thing. Cut the packing down to the width of the bed in the tool post.

Image

Here's where I ended up. The dog clears the packing, the tool is set and we are ready to go. But that's for tomorrow, there is no rush!
Stanley Challenger Graham
Stanley's View
scg1936 at talktalk.net

"Beware of certitude" (Jimmy Reid)
The floggings will continue until morale improves!
Old age isn't for cissies!
User avatar
Stanley
Global Moderator
Global Moderator
Posts: 99371
Joined: 23 Jan 2012, 12:01
Location: Barnoldswick. Nearer to Heaven than Gloria.

Re: SHED MATTERS 2

Post by Stanley »

The Design Committee have been busy overnight and this morning have informed me that I must revise my tool shape! A lot of water has passed under the bridge since I chopped my last shafts out and I tend to forget what I have learned in the past. That will be my first job this morning.
I'll be knocking off early for housework with free leccy at 9AM so don't expect any trees to be torn up!
Stanley Challenger Graham
Stanley's View
scg1936 at talktalk.net

"Beware of certitude" (Jimmy Reid)
The floggings will continue until morale improves!
Old age isn't for cissies!
User avatar
Stanley
Global Moderator
Global Moderator
Posts: 99371
Joined: 23 Jan 2012, 12:01
Location: Barnoldswick. Nearer to Heaven than Gloria.

Re: SHED MATTERS 2

Post by Stanley »

It's nice to sit down after a morning of honest endeavour. I managed an hour in the shed and an hour and a half of cleaning and cooking taking advantage of the free leccy after 9AM.
As I think you know, my policy when I am showing what I am doing is to always be perfectly honest. I know many newbies to the delights of the shed look in. They need to see my cock-ups, no matter how bad they are. So following in that noble tradition here's this morning's star image!

Image

There's a sad sight for you and it was all going so well. I modified the cutter and did a good job, it cut splendidly and I was getting on well until I was getting down to the final cuts. That's when the workpiece failed. No excuses about bad metal and no slip up in the feed or the method. I was puzzled at first but I think I have the answer. This is the smallest shaft I have ever chopped out and I never thought about the natural stresses of interrupted cutting. Quite simply my cutter was too big and asking too much of the setup. I shall use a 1/8" parting tool instead of the 3/16" cutter. Lessen the stress on the setup and perhaps a slower speed as well. All my own fault but nothing for it but to start again.

Image

Here's a close up of the damage. Look and learn!

Image

Image

No need to get into a lot of detail. I knocked another lump of the same bar with Mrs McMaster and turned it down to the right diameter. Tomorrow is a bit of marking up prior to another attempt! Onwards and upwards.
Stanley Challenger Graham
Stanley's View
scg1936 at talktalk.net

"Beware of certitude" (Jimmy Reid)
The floggings will continue until morale improves!
Old age isn't for cissies!
User avatar
Stanley
Global Moderator
Global Moderator
Posts: 99371
Joined: 23 Jan 2012, 12:01
Location: Barnoldswick. Nearer to Heaven than Gloria.

Re: SHED MATTERS 2

Post by Stanley »

Image

I was in the shed by 7AM and started by cleaning up, putting some marking blue in a different smaller bottle and re-sharpening a narrow HS tool I intend to use (perhaps.....). I got that in the four way toolpost packed up to centre height.

Image

Next job was to blue the billet and mark it up accurately in the lathe. I'd already scribed the 3/8" diameter pitch circle on the end in the lathe. Here I'm using the height gauge to mark the ends parallel. Then I drilled the punch marks deeper than the original centre and turned the centre mark out. Then back into the vice and drill the two centres in each end with the hand drill.

Image

I've been thinking about the smash-up yesterday, I couldn't get shut of the feeling I had missed something. When I offered the set up to the fixed centre in the lathe I realised that I could only get the dog to engage properly in the chuck if I used the centre with the shortest throw which was not the centre I was turning on. So I did a quick mod on the dog so that it engaged when set on the furthest centre. The way I had it, any movement of the dog on the billet threw it off centre and I'm beginning to think that's what happened. Now, if the dog slips a touch it doesn't matter because it will still drive on the correct centre. Not sure if this is what actually happened but I just have a feeling.

Image

I got it set up and ready for cutting. You'll no doubt notice I am not using the parting tool but this narrow round nose cutter which is what I normally use for this job. I can cut the shoulders out if necessary using the parting tool. This should work! It was close to knocking off time so I walked away from it. I know exactly what I am doing tomorrow!
Stanley Challenger Graham
Stanley's View
scg1936 at talktalk.net

"Beware of certitude" (Jimmy Reid)
The floggings will continue until morale improves!
Old age isn't for cissies!
User avatar
Stanley
Global Moderator
Global Moderator
Posts: 99371
Joined: 23 Jan 2012, 12:01
Location: Barnoldswick. Nearer to Heaven than Gloria.

Re: SHED MATTERS 2

Post by Stanley »

Image

Rest easy, it's been a far better morning! Mind you, if at any time you get the idea I have been super cautious you're right! I had another thought about the driving dog last night because I am now convinced that this is where I went wrong and caused the smash. Have you ever noticed how many cast steel dogs are totally unfinished in the bore? I started by filing this part out so that it was a better fit with the workpiece.

Image

The next thing I did was mill a flat on each location where the set screw that locks the dog will sit.

Image

I set it up between the centres and it's a lot better, to the point where the tail of the dog is loose in the slot on the chuck. I am satisfied with it now.

Image

I decided no pissing about and set the speed at 216rpm, not super fast but respectable. I started with the round nose cutter but soon decided this was too big for the confined space of the crank pin and swapped to the ceramic parting tool. No problems at all, some careful work and I had the webs chopped out and the crankpin finished at .280" spot on!

Image

The next job took longest! I had to make a spacer exactly the right size to be a tight fit between the webs so that when I chuck it for the next stage the weak point is supported. I just kept grinding a bit off until it fitted.

Image

Then I cut it down until it was a rough fit. I pushed it into place and taped it with insulting tape to make sure it stays in place.

Image

I marked the junctions of the cuts while I had the parting tool in and then swapped to the the round nose tool and set into the main shaft.

Image

I used it in auto feed and found I could take some good cuts. I soon got down to .280". At the moment it has rounded junctions and the first job tomorrow is to swap to the parting tool and square the ends of the cut up. Then I shall reverse it and cut the other end. All the thought and planning paid off! One last thing, I had a look at some crankshafts I made earlier and reflected that if I could do them, there should be no problem with this tiddler!

Image
Stanley Challenger Graham
Stanley's View
scg1936 at talktalk.net

"Beware of certitude" (Jimmy Reid)
The floggings will continue until morale improves!
Old age isn't for cissies!
User avatar
Stanley
Global Moderator
Global Moderator
Posts: 99371
Joined: 23 Jan 2012, 12:01
Location: Barnoldswick. Nearer to Heaven than Gloria.

Re: SHED MATTERS 2

Post by Stanley »

Image

First job this morning was to clean the corners out square with the parting tool.

Image

Then turn it round and set into turning the other end of the shaft. This way the new shaft isn't carrying much stress.

Image

Getting on well but I had a nasty moment as I got close to size. There was a loud crack and at first I thought the shaft had cracked. It hadn't thank god and I think it was the dog shifting on the shaft. Whatever, crack on!

Image

This is a good stage, most of the risky work is done. I can go back into the chuck now.

Image

I started by turning the end down to get rid of the eccentric centres and then put a new centre in so I could chuck it securely. Then I turned a good surface on the webs and broke all the edges. Than I sawed the ends off and put a chamfer on each end with the grinding wheel. Then a bit of fitting of the bearings to the shaft.

Image

Here's the end result, thank god I can put the shaft behind me! Little ones are far more stressful than big ones!
Stanley Challenger Graham
Stanley's View
scg1936 at talktalk.net

"Beware of certitude" (Jimmy Reid)
The floggings will continue until morale improves!
Old age isn't for cissies!
User avatar
Stanley
Global Moderator
Global Moderator
Posts: 99371
Joined: 23 Jan 2012, 12:01
Location: Barnoldswick. Nearer to Heaven than Gloria.

Re: SHED MATTERS 2

Post by Stanley »

Image

I started today with a good clean up! The aim this morning is governed by the fact that I have to do some writing before weekend so I thought it would be a good chance to paint the castings. I want to give them a good coat of primer and then black gloss. I have two cans of spray paint on stand-by!

Image

The first stage, after separating the two parts of the bed castings, was to mask off the areas I don't want to paint. Fiddly and took longer than I expected.

Image

Luckily it's a nice morning so outside into the yard and get the first coat on. It was good drying conditions so the plan is to get as many thin coats on as possible and fill in with other useful tasks in the shed.

Image

The first job was to do a deep sharpen on the current cutter. I made sure it was gulleted, ground the back off at 12 degrees and after dressing the wheel did a nice job on the cutting edge at 6 degrees. I know you think I'm always sharpening cutters but when you have a light El Cheapo mill like mine you need sharp cutters to get good work out of it. The Clarkson T&C grinder is one of the best investments I have ever made.

Image

Another fill in job was to attend to the big surface plate, make sure it was clean and oiled and put a clean tablecloth on. I work much better when I am clean and tidy!

Image

Here we are at knocking off time. Very pleased. All the castings have had five thin coats of primer and now they have 24 hours to cure and dry properly ready for the finish coat. I don't normally go to this trouble but this engine is special and I wanted to make it look as good as possible.
Stanley Challenger Graham
Stanley's View
scg1936 at talktalk.net

"Beware of certitude" (Jimmy Reid)
The floggings will continue until morale improves!
Old age isn't for cissies!
User avatar
Stanley
Global Moderator
Global Moderator
Posts: 99371
Joined: 23 Jan 2012, 12:01
Location: Barnoldswick. Nearer to Heaven than Gloria.

Re: SHED MATTERS 2

Post by Stanley »

Not a lot to report this morning beyond the fact that I have written three articles and given the castings two coats of black gloss.

Image
Stanley Challenger Graham
Stanley's View
scg1936 at talktalk.net

"Beware of certitude" (Jimmy Reid)
The floggings will continue until morale improves!
Old age isn't for cissies!
User avatar
Stanley
Global Moderator
Global Moderator
Posts: 99371
Joined: 23 Jan 2012, 12:01
Location: Barnoldswick. Nearer to Heaven than Gloria.

Re: SHED MATTERS 2

Post by Stanley »

Image

First thing this morning was to strip the masking tape off the parts and clean up any bits where the paint had gone where it wasn't wanted. The more alert may have noticed that instead of my usual Zippo I am using an el cheapo gas lighter. I am a sucker for machinery in distress and I found it in the car park having been run over. A good dry out, a fill of gas, a flint and a bit of straightening up and it is in fine fettle so I'll use it for a while.

Image

Then I set to to make the permanent fixings of the engine casting to the base. I put taper pins in three holes while I did the first one and then quietly attended to the other three. Slow careful work, you wouldn't believe how long it took!

Image

Here we are, permanently fixed.....

Image

Some paint got into the trunk slide so I polished it with my home made flapper. I did the cylinder bore as well. Wonderful how well a split pin and some Carborundum strip will do the job.

Image

Where to go next? I need the cylinder fitted to the bed to do the valve eccentric and before I can fix it in place I need to fit the piston, rod, crosshead and the connecting rod. So out with the drawings, a bit of planning and get the materials together. I'm ready for tomorrow and a start on this phase.
Stanley Challenger Graham
Stanley's View
scg1936 at talktalk.net

"Beware of certitude" (Jimmy Reid)
The floggings will continue until morale improves!
Old age isn't for cissies!
User avatar
Stanley
Global Moderator
Global Moderator
Posts: 99371
Joined: 23 Jan 2012, 12:01
Location: Barnoldswick. Nearer to Heaven than Gloria.

Re: SHED MATTERS 2

Post by Stanley »

Image

As I never tire of reminding you, this morning was free leccy and housework morning but I managed to get some useful work done. As you can see, the first thing was a fag packet drawing and get my tackle sorted out. It never fails to amaze me how much you need, thank god for my acquisitive instincts over the years.

Image

It didn't take long to knock the piston off, bored and threaded and one good groove put in it for the packing. Stuarts specify 'three oil grooves' but bugger that! I toyed with the idea of a neoprene 'O' ring but then decided to go with my usual graphite and asbestos packing. I don't think it's a health hazard! This is the best way to try the fit, just right, not too tight.

Image

The rod is the specified length and threaded 5BA at each end. Now we need to address the crosshead and connecting rod. I want to finish it all before I assemble the engine.

Image

The crosshead casting has a good boss on it and is accurately cast so it was no problem to pop it into the chuck. I've faced the end off and I'm ready to go forward tomorrow.

Image

Couldn't resist one of my 'look how busy I've been' pics. I know that this is enough to send the newbies into a decline but don't worry, if you keep at it you'll end up with even more tackle than me!
Stanley Challenger Graham
Stanley's View
scg1936 at talktalk.net

"Beware of certitude" (Jimmy Reid)
The floggings will continue until morale improves!
Old age isn't for cissies!
User avatar
Stanley
Global Moderator
Global Moderator
Posts: 99371
Joined: 23 Jan 2012, 12:01
Location: Barnoldswick. Nearer to Heaven than Gloria.

Re: SHED MATTERS 2

Post by Stanley »

Image

On with the motion work.... I'll tell you something for nothing, it's s lot easier dealing with 3,000hp engines than tiddlers like this! Enough complaining.... I started by drilling and tapping the crosshead for the 5BA rod....

Image

While it was in the chuck I turned the diameter down until it fitted the trunk slide. A Shade under 5/8".

Image

Then a bit of hand work. I cut the boss off the casting and filed the face down to the correct dimension. Notice that a big file is effective for even small parts! No point pissing about when you have 1/16" to take off!

Image

Then some careful marking and drill and ream the crosshead 5/32" for the wrist pin. I had two reamers and one was undersize so I tried the other and it was perfect.

Image

I had to ease the piston slightly because cutting the groove for the packing had raised the surface a bit but this was soon sorted. We have progress! Worth noting that it's no good thinking about fitting it yet. I need the con-rod finished then the whole of the motion can be fitted at once.

Image

That being the case we have to move on! You might wonder why, when I have a perfectly useable drawing I do my own fag packet version. I do it because drawing it out again and checking the sizes gets it into your head better. For instance I had no clear idea at this point where to start but after drawing it out I was very clear. That's worth a lot!

Image

As you can see I decided the width of the bearing was where I started. Dead easy if you have DRO but as I work manually I had to carefully reduce each side so I got it to the right measurement and centred. I got there in the end. Then I filed the boss down to get the flash off it so that I could chuck it somewhere close to accurate....

Image

Then I chucked it and turned the periphery down until it looked nice, no sizing needed, just take the minimum off and get a good finish. At the same time I face the front and filed the shaft down followed by emery to make it shiny. By this time I was ready for a sit down so I knocked off. A nice morning, demanding, but I have managed to avoid any cock-ups and am somewhere near right!
Stanley Challenger Graham
Stanley's View
scg1936 at talktalk.net

"Beware of certitude" (Jimmy Reid)
The floggings will continue until morale improves!
Old age isn't for cissies!
User avatar
Stanley
Global Moderator
Global Moderator
Posts: 99371
Joined: 23 Jan 2012, 12:01
Location: Barnoldswick. Nearer to Heaven than Gloria.

Re: SHED MATTERS 2

Post by Stanley »

Image

I started the morning doing a lot of hand work tidying up the con rod. I started by sawing the stub off and filing the end into shape and size then the same for the small end and some very careful marking out. Then I drilled and reamed the wrist pin end. Despite all my care my eyes let me down and it's slightly off centre but it won't damage the fit or the way the engine runs so it could have been worse!

Image

Here's what it looks like after drilling the crank pin hole as well. I drilled this the full 9/32 because it doesn't matter if it's a bit oversize as it will shrink when I split the casting in two.

Image

Then I drilled for the holding bolts sized at 7BA but when I came to look I hadn't got any 7BA threaded rod, no problem I have the nuts and can make the bolts but it was easier and better to move up to 6BA as I have the rod and the nuts and actually it's better. So I opened up the clearance holes for 6BA and here's the finished article with the bolts fitted.

Image

I've lost a pic here, for some reason it wouldn't load. The next thing I did was fit a new blade in my Junior hacksaw and split the end. I got the cut square but once again my eyes let me down and it was out of square vertically but again it doesn't harm the fit as they are matching surfaces. I put a witness mark on the two halves and then popped it back under the drill and opened the hole up to slightly undersize.

Image

Here's where I finished up. You can see how far out I was with the split but it won't show once it is tightened up after fitting. All I have to do now is open up the 1/4" slot in the clevis at the wrist pin end and fit the bearing to the crank pin. That will be the first job tomorrow.
Stanley Challenger Graham
Stanley's View
scg1936 at talktalk.net

"Beware of certitude" (Jimmy Reid)
The floggings will continue until morale improves!
Old age isn't for cissies!
User avatar
Stanley
Global Moderator
Global Moderator
Posts: 99371
Joined: 23 Jan 2012, 12:01
Location: Barnoldswick. Nearer to Heaven than Gloria.

Re: SHED MATTERS 2

Post by Stanley »

Image

I started the morning by making the bearing fit the crank pin to the point where with the bolts tight it was still a running fit. Then I addressed the small matter of the slot in the clevis. I decided to do it by drilling a 1/4" hole in it and opening it out with the saw and the files. The width of the clevis is 1/2" so I popped a 1/2" drill in the chuck and adjusted the back jaw until it just contacted the drill. Then take the drill out, pop the centre in and it had to be close to centre on the clevis. I drilled it and opened it up by hand.

Image

Here we are with the clevis fitted and a 5/32" pin proving the fit. This wasn't a quick process!

Image

I did a trial fit to see if there are any problems but it all looks OK.

Image

Next I did a little job I keep forgetting, drilling an oil hole in the trunk slide using a centre drill so I get a countersink just big enough to take a drop of thick oil. Then I looked at the wrist pin for the cross head and got a bit of a shock. I don't know why but I was convinced the drawing asked for a 5/32" pin and found I was mistaken, it was a smaller bolt that is provided. Never mind, I can sort it. So I spent the best part of half an hour trying to find a BA bolt that would do but in the end realised I would be better off making one so back to Mrs Harrison.

Image

Image

By knocking off time I had my wrist pin. I've slotted the head so it can be easily tightened. I'll give it a bit of thought but I think tomorrow I shall have to start the final build of the engine before making and fitting the eccentric. We are getting very close to an engine!
Stanley Challenger Graham
Stanley's View
scg1936 at talktalk.net

"Beware of certitude" (Jimmy Reid)
The floggings will continue until morale improves!
Old age isn't for cissies!
User avatar
Stanley
Global Moderator
Global Moderator
Posts: 99371
Joined: 23 Jan 2012, 12:01
Location: Barnoldswick. Nearer to Heaven than Gloria.

Re: SHED MATTERS 2

Post by Stanley »

Image

Today is building..... First job was to get all my ducks in a row so I sorted out the studs first. Then I put the studs in for the bearings and had a trial fit. The first problem I hit was that the wrist pin was fouling the end of the trunk slide so I filed the slots in the side out until I had enough room. I also reduced the length of the pin a bit. I also dressed the inside of the trunk slide again with my home made flapper.

Image

I was so busy fitting I forgot the pics.... Here's where I got to. I've fitted the studs to the front end of the cylinder. The front gland has been reduced slightly to give more clearance (everything is very close fitting) and then packed it. Then I eased the piston, gave it some packing and after screwing the piston rod in the crosshead fitted the cylinder on the face of the trunk slide. The studs were obstinate, again my fitting was too close but they looked OK so I gave it a thump with the hammer (I know!) and it slid into place. Then the fiddly job of fixing the 7BA nuts on the studs and tightening them down.

Image

I hit a bit of a problem. I don't know whether you can see but there's one stud right at the bottom and fitting the nut is hampered by the casting in front of it.

Image

The cure for access was to take the engine off the temporary base that has been so useful. Put the soft jaws in the vice and hold it upside down, more room to get in now but still no room!

Image

I gave the matter a bit of thought. There was just enough room to get the blade of my smallest kitchen knife in and the nut as well so I put a dab of grease on the blade, held it in place and after a bit of fiddling, got the nut to start. Patience is an advantage.....

Image

Here we are at knocking off time. I have run the engine with the DeWalt drill and though tight overall it runs OK and everything clears. It will slacken off more when it is run, you don't want it too slack at this stage. By the way, I had to change to the spare battery on the drill, first time since I got it. The next problem I have is that the piston is slightly too far back in the cylinder but clears so I shall reduce the register on the back lid and it will be OK. The worst fault I have observed to press is that the crankshaft has a slight bend in it. I'm thinking about that and will come up with something.....
Stanley Challenger Graham
Stanley's View
scg1936 at talktalk.net

"Beware of certitude" (Jimmy Reid)
The floggings will continue until morale improves!
Old age isn't for cissies!
Locked

Return to “Crafts”