Page 82 of 125
Re: Shed Matters 3
Posted: 03 May 2023, 06:12
by Stanley


Quiet careful work fitting again. First the front lid attached to the cylinder complete with piston rod gland and steam packing. Then studs fitted using Loctite and the cylinder installed on the bed casting. Then mark drill and tap the crosshead to receive the piston rod and fit the piston on the rod, cutting the slot with the Dremel that will be used for a screwdriver bite to tighten the rod in the crosshead when finally fitted. All slow and careful work. Very satisfying.
Re: Shed Matters 3
Posted: 04 May 2023, 06:20
by Stanley

Only one image needed. I started the day by refining the fit of the piston and rod in the crosshead and making sure all was correct. Then I measured and did a fag packet drawing of the crankpin brass as that's the next thing I have to make. Half an hour of measuring and milling produced one small piece of bronze. You can see it balanced on the crosshead slide. Slow yes, but accurate.... yes.
Re: Shed Matters 3
Posted: 05 May 2023, 06:43
by Stanley


I carried on with the second half of the crankpin brass. This is the most difficult because apart from some simple milling I have to set it up in the lathe to do some fiddly jobs putting the oil gallery in shaping the to and tomorrow drilling and tapping for the plug and making it. You can't rush jobs like this because nothing centres itself, everything has to be adjusted manually. Slow but sure, no errors. That makes it a nice morning.
Re: Shed Matters 3
Posted: 06 May 2023, 06:17
by Stanley
Re: Shed Matters 3
Posted: 06 May 2023, 11:07
by Tripps
Stanley wrote: ↑06 May 2023, 06:17
I include the knurling image for David..
And for that I'm grateful. I like a bit of knurling and look fondly each day at my perpetual calendar with it's craftsman made knurled pegs.
Thanks again.

Calendar.JPG
Re: Shed Matters 3
Posted: 07 May 2023, 03:13
by Stanley
Don't mention it David. I think of you every time I do any knurling......

Re: Shed Matters 3
Posted: 07 May 2023, 06:07
by Stanley

Would you believe it took me an hour to adjust the size of the two halves of the bearing, match them exactly and measure and mark the holes for the bolts that hold them together and attach them to the connecting rod? I shall check measure once more tomorrow before drilling the holes.
Re: Shed Matters 3
Posted: 08 May 2023, 06:10
by Stanley
Re: Shed Matters 3
Posted: 09 May 2023, 06:16
by Stanley
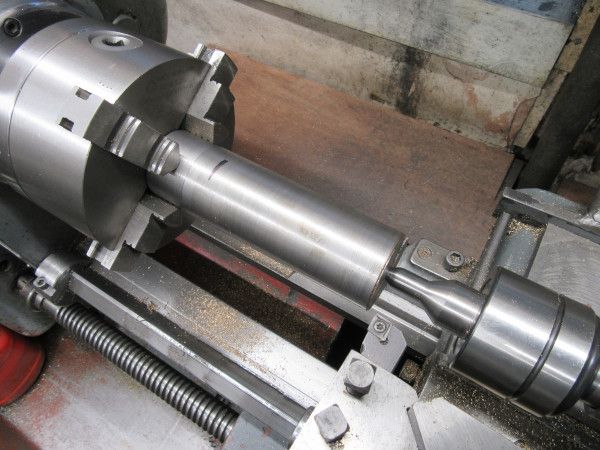

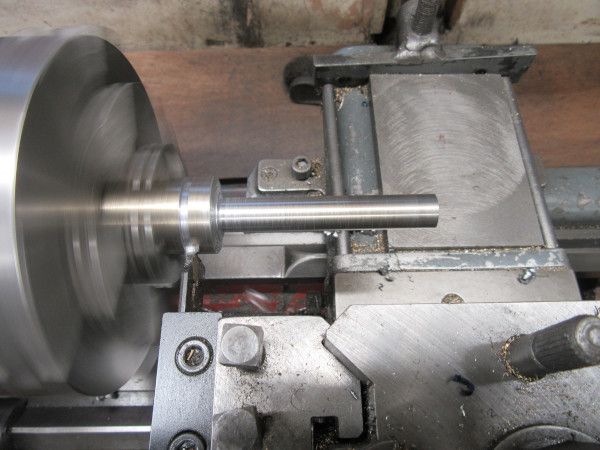
We are making the connecting rod and immediately run into the perennial problem facing us in the shed. We have to start with a piece of stock big enough to get the major diameter out of it. In this case it's 1.125" and the stock is a piece of scrap nearer 1.5" diameter. This means we are into muck-shifting and as you can see from the blue chips I have been doing my best with what is after all, a small lathe. I have got this end down to 1.125". Tomorrow I shall reverse the stock and shift even more muck to get the other end down to half an inch. Then I can start to actually make the connecting rod.
Re: Shed Matters 3
Posted: 10 May 2023, 06:14
by Stanley
Re: Shed Matters 3
Posted: 11 May 2023, 06:17
by Stanley

I have started on the delicate job of refining the connecting rod. I started this morning by grinding a new everyday HSS cutter. Then cleaning the blank up, cutting it to exact length and putting some shape in the end. I am now ready for actual cutting! (You can't just carry on forever with a cutter. It's funny how they change shape over the months as you use and re-sharpen them....)
Re: Shed Matters 3
Posted: 12 May 2023, 06:39
by Stanley


Straight into carefully refining the blank for my con rod. This is the stage where it is a disaster if anything goes wrong because you lose such a lot of work. No such problems. I am ready now for the final touches.....
Re: Shed Matters 3
Posted: 13 May 2023, 06:05
by Stanley
Re: Shed Matters 3
Posted: 14 May 2023, 06:08
by Stanley
Re: Shed Matters 3
Posted: 15 May 2023, 06:14
by Stanley
Re: Shed Matters 3
Posted: 16 May 2023, 06:11
by Stanley


The job today was to make and fit the tiny pin that is the pivot in the crosshead. Lots of measuring and checking to make sure I didn't scrap anything that I have invested time and effort in and then fitting and preparing for installing in the engine. A quiet hour and a quarter and good progress. A nice start to the day.
Re: Shed Matters 3
Posted: 17 May 2023, 06:17
by Stanley

This morning has been fitting the con rod and in effect building the power train from Crank Pin to cylinder. I have spent an hour and a quarter on that and have not got there yet. These things can't be rushed!
Re: Shed Matters 3
Posted: 18 May 2023, 06:32
by Stanley


More of the same this morning, fitting is lots of little jobs and adjustments. I started by refining the fit of the piston and rod in the crosshead. Then I installed the dealing packing in the groove in the piston. Then I set to to adjust all the studs that hold the back lid, rethreading them and some of the threads in the cylinder. Then I fitted it, tightened the nuts down and turned the engine over. The piston fouled on the locating profile on the inside of the lid. I shall have to take the lid off and reduce the depth of the locator. Then there will be something else!
Re: Shed Matters 3
Posted: 19 May 2023, 05:56
by Stanley


I started today by reducing the locating section of the Back lid and trying it with the lid fastened down. Job done the engine turns over and the piston clears the lid on the back stroke. Then switch to making the eccentric. I measured up and started on the job but have had to stop to go for my shopping.....
Re: Shed Matters 3
Posted: 20 May 2023, 06:09
by Stanley
Re: Shed Matters 3
Posted: 21 May 2023, 06:32
by Stanley
Re: Shed Matters 3
Posted: 22 May 2023, 06:23
by Stanley
Re: Shed Matters 3
Posted: 23 May 2023, 06:11
by Stanley

Very simply, this morning was started by making the blank stock square. Then a lot of careful measuring checking and marking before cutting to one dimension, over the two lugs that the bolts are mounted in. Tomorrow I shall do the same for the two ends. After that we attend to shape.
Re: Shed Matters 3
Posted: 24 May 2023, 06:06
by Stanley


First thing today was to establish the next two dimensions of the stock for the strap and cut to that length in the mill. Before I do any more on the strap I need to establish the fit of the valve rod so90 I had to set to and make it. I have the 3/32" thickness milled and the two 5BA clearance holes drilled. I shall finish making it tomorrow.
Re: Shed Matters 3
Posted: 25 May 2023, 06:02
by Stanley