Page 99 of 125
Re: Shed Matters 3
Posted: 29 May 2024, 06:08
by Stanley
Re: Shed Matters 3
Posted: 30 May 2024, 06:04
by Stanley
Re: Shed Matters 3
Posted: 31 May 2024, 06:10
by Stanley


This morning I started by facing both ends of the cylinder square with the valve face and giving me a stroke of 2 1/8". Then I marked out the 1/4" wide exhaust port and cut that. That was enough for this morning, now I shall treat myself to breakfast!
Re: Shed Matters 3
Posted: 01 Jun 2024, 06:04
by Stanley
Re: Shed Matters 3
Posted: 02 Jun 2024, 06:01
by Stanley

Only one image needed this morning. I set up for boring the cylinder and have almost reached my target but I hit a problem and that cost me some time. I haven't tried to make that up. Don't ask me what the problem was it was down to old age and stupidity! I have to factor that element in nowadays! Now for breakfast.
Re: Shed Matters 3
Posted: 03 Jun 2024, 05:42
by Stanley

Just one task in mind this morning, finish boring the cylinder and clean the mill, reverting to the normal cutter. That meant an early breakfast but that won't worry anyone. All done and I am ready for tomorrow.
Re: Shed Matters 3
Posted: 04 Jun 2024, 06:01
by Stanley


One task this morning. Prepare the front lid for fitting. That's all I aimed for and made a good job of it. Slow and careful is the quickest way in the end! Now for breakfast.
Re: Shed Matters 3
Posted: 06 Jun 2024, 05:58
by Stanley


This morning I had to decide on an ethical matter before I did anything. The question was whether to correct a fault I had identified in the parallelism of the bore or ignore it and carry on as though nothing was wrong. I could have easily got away with it by making the piston undersize and abandoning the idea it could ever be a runner. I decided it had to be right and so I set the cylinder up in the VM and adjusted the boring head. I took particular care over making sure I had the cylinder mounted correctly and then bored it again to correct the fault. This means that the piston will be oversize at 1.6" and the engine more powerful! It all turned out well and so it was the correct decision. Now for breakfast with a clear conscience.
Re: Shed Matters 3
Posted: 07 Jun 2024, 06:05
by Stanley


This morning the target was to make the packing gland for the piston rod. Slow and careful turning and I am ready to mark the cylinder cover and drill and tap for the 5BA studs that will attach it to the cover. The sharp eyed amongst you will have noted that I have marked for the two countersunk screws that holds the front cover on the cylinder. Now for breakfast.
Re: Shed Matters 3
Posted: 08 Jun 2024, 06:02
by Stanley

Just one image needed. An hour of careful work. I have marked and drilled the front cylinder lid for the studs and the two countersunk screws that are in the bottom. Then I marked, drilled and tapped for the 5BA studs that hold the piston rod gland in place. I marked the gland to show the correct orientation. That'll do nicely for this morning. I put the belly pork in before I went into the shed so it can have a slow roast while I have second sleep. Now for breakfast!
Re: Shed Matters 3
Posted: 09 Jun 2024, 06:08
by Stanley

Another gland this morning, this time the one for the valve rod on the steam chest. The gland has been refined from the rough casting, fitted and drilled for the 5BA studs that will hold it. I shall mark, drill and tap the steam chest for those tomorrow. The job now is breakfast!
Re: Shed Matters 3
Posted: 10 Jun 2024, 05:46
by Stanley


Just one task this morning. Finish fitting the valve rod gland to the steam chest, The gland marked and drilled clearance for the studs and then given a witness marl to endure correct orientation. Then the positions of the stud holes transferred to the steam chest, drilled and tapped and the gland test fitted. All is well so instead of starting on another task I have been kind to myself and stopped for breakfast. There are no prizes for speed!
Re: Shed Matters 3
Posted: 11 Jun 2024, 06:12
by Stanley


This morning the task was to drill, tap and fit the studs and CS screws in the cylinder and fit the lid. Quiet careful work and I have achieved that. Tomorrow I shall transfer the stud positions to the target end of the bed making sure the valve face is perpendicular to the base. But now the goal is breakfast!
Re: Shed Matters 3
Posted: 12 Jun 2024, 06:06
by Stanley


This morning's task was to fit the cylinder to the target face and ensure the valve face is perpendicular to the base. Once that was accomplished I sought out a piece of bronze big enough to make a piston. I never fit cast iron pistons these days because I am conscious that they can rust and seize in the bore if the engine is run on compressed air and moisture left in the cylinder. Much less chance of any problem if the piston is bronze. Now for breakfast!
Re: Shed Matters 3
Posted: 13 Jun 2024, 06:16
by Stanley


This morning I made the piston and drilled for fitting the piston rod. I threaded that hole 2BA and then moved on to make the rod. I cut it to length, reduced one end and threaded that 2BA. I fitted it to the piston and started the process of fitting the rod and piston in the cylinder. I finished my hour in the shed at that point and now it's time for breakfast!
Re: Shed Matters 3
Posted: 14 Jun 2024, 06:04
by Stanley


First thing this morning I Threaded the front end of the piston rod 2BA for the crosshead connection. Then I refined and adjusted the piston until it was a perfect fit in the bore and properly aligned with the crosshead guide.
Then I stripped the cylinder out of the bed and measured and marked it for the 4BA studs that will attach the back lid. My start tomorrow will be to tap these holes. Right now I want my breakfast.
Re: Shed Matters 3
Posted: 15 Jun 2024, 06:47
by Stanley
Re: Shed Matters 3
Posted: 16 Jun 2024, 05:52
by Stanley
Re: Shed Matters 3
Posted: 17 Jun 2024, 05:54
by Stanley
Re: Shed Matters 3
Posted: 18 Jun 2024, 06:22
by Stanley
Re: Shed Matters 3
Posted: 19 Jun 2024, 06:08
by Stanley


The first order of business this morning was to finish reducing the steam valve to size. Once that was done I cut the slot for the driver bar and fitted it. All that remains now is to cut the exhaust cavity in the base of the valve. I shall do that tomorrow. Now for breakfast.
Re: Shed Matters 3
Posted: 20 Jun 2024, 06:17
by Stanley
Re: Shed Matters 3
Posted: 21 Jun 2024, 05:51
by Stanley


My first job was to breathe on the everyday cutter to make sure it had a good edge and then re-install it in the VM. Then I stripped my engine build down into the individual castings, took them outside on to the welding bench and painted them. They are now back in the shed under cover drying and tomorrow I shall refine them where necessary and mount them on the plinth that is ready for them. I shall then be ready to continue the build. Now for breakfast!
Re: Shed Matters 3
Posted: 22 Jun 2024, 06:15
by Stanley
Re: Shed Matters 3
Posted: 23 Jun 2024, 05:53
by Stanley
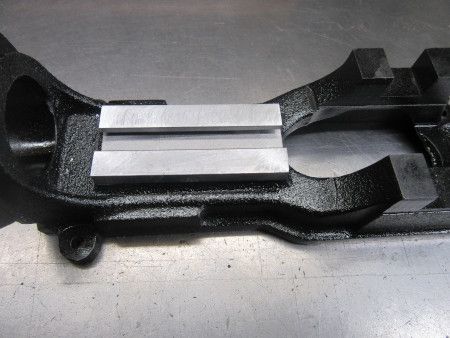
Only one image this morning. I spent 45 minutes carefully producing a replica of yesterday's crosshead guide and then cut them both to length to fit the casting. Some very fine and careful milling.... Tomorrow I shall fit them. Now for breakfast.


