Page 107 of 124
Re: Shed Matters 3
Posted: 24 Dec 2024, 06:29
by Stanley

This morning I finished fitting the top brasses and then spent half an hour very carefully refining the width of the crankshaft cheeks so that they fitted in between the brasses. I think you can guess what a tragedy it would be to make a mistake at this point so I took my time w3ith a newly sharpened cutter and very small cuts. As you can see from the image. it fits comfortably between the brasses now. I can start thinking of boring the bearings now. But the next job is breakfast!
Re: Shed Matters 3
Posted: 25 Dec 2024, 06:44
by Stanley
Re: Shed Matters 3
Posted: 26 Dec 2024, 06:37
by Stanley

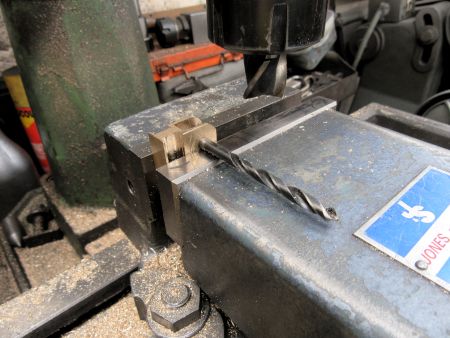
This morning was adjusting the crankshaft to a good fit in the bearings. I did it by adjusting the journals on the shaft as I could do that precisely in the lathe. It took me just over half an hour and I checked everything multiple times. A slip up at this stage would have been terrible. All went well and there is just one Image of me running the shaft into the bearings using my drill. It's a good fit and you'll notice that I have fitted lock nuts. I'm pleased with this and now I am going after my breakfast!
Re: Shed Matters 3
Posted: 28 Dec 2024, 06:37
by Stanley

My aim this morning was to start building the castings up on their final bed and installing the flywheel. However things did not go to plan. As you can see I built the engine up and made a spacer collar to fit on the shaft to ensure clearance of the flywheel on the bed. I then went to the flywheel to refine it before fitting it and realised that I had made a very bad job of painting it so I had to give it another coat and leave it to dry. Not a big disaster, it meant that I was only in the shed for half an hour but I shall not lose any sleep because of that! Now for breakfast!
Re: Shed Matters 3
Posted: 29 Dec 2024, 06:22
by Stanley

The flywheel was dry this morning so I spent half an hour refining the finish and then mounted it on the crankshaft using Loctite 638. I put tackle away and reinstated the chuck to normal outside jaws. That was a productive 45 minutes. Now for breakfast!
Re: Shed Matters 3
Posted: 30 Dec 2024, 06:43
by Stanley

This morning has been made up of small things.... I want to start the final build and first I cleaned up the lathe and the vertical mill. Then I cut the slot in the back side of the piston so I can screw the piston rod into the crosshead. I put the everyday cutter back in the mill and turned my attention to fitting the Cylinder to the target end. The flywheel is running dead true and is as smooth as silk, very pleased with it. I fitted the cylinder together with its gasket and made sure the valve face is perpendicular to the bed. Then I fitted the piston and rod and the back lid on the cylinder. That brought me to 45 minutes in the shed and rather than start on the steam chest and valve I knocked off and went looking for a shave and a breakfast!
Re: Shed Matters 3
Posted: 31 Dec 2024, 06:32
by Stanley

This morning I finished building the engine up so far by installing the steam chest and valve. I am ready now to start on making and installing the crosshead, the connecting rod and bearing and the valve train. I didn't feel like starting on that this morning and so came out of the shed after half an hour of honest endeavour. Now for breakfast!
Re: Shed Matters 3
Posted: 31 Dec 2024, 17:47
by BobH
Another nice engine coming along Stanley. I thought you might like to see my current project. I have moved the 2" traction engine from the bench whilst the coach enamel paint hardens It's strange stuff, I had forgotten how these good old paints behave but they can give a good finish even when brushed on. A recent acquisition is a part built Sanderson beam engine from the workshop clearance of the late Mr Wood of Leeds. A lot of the parts are there and fit nicely though I am trying to get to grips with his thinking on the water pump and governor mounting that are not to drawing. I have dismantled various parts and reassembled them. The governor was not even mounted in the correct place as per drawing but I can see that his intention was probably a simplified and more direct steam feed route. The problem was that the eccentric rod fouled it. A reduction in height of the governor stand has now cured that. One part of the parallelogram link between the beam and piston rod is missing and the drawings don't show these parts. I may copy the existing one of it's pair but have asked a friend to look up the construction series in Model Engineer.

Re: Shed Matters 3
Posted: 01 Jan 2025, 03:11
by Stanley
Always nice to see what you are doing Bob! Parallelogram linkages are always troublesome. I remember Newton telling me it was a pity that the Whitelees engine had been dismantled. He said his dad told him not to interfere with the linkage on the Victoria engine at Earby. He was right, I never got the Whitelees exactly right! I suppose we all have blind spots. The engine looks nice but slender and I can see the linkage problem, you are short of entablature anchor points...... Best of luck with it.
On another matter, I worry about that cough! Get it sorted!

Re: Shed Matters 3
Posted: 01 Jan 2025, 06:53
by Stanley

This morning I started by measuring and drawing the bearing for my crank pin and then started milling the casting to make it. Very careful cutting and frequent check measuring. After 45 minutes I have one half of the casting exactly the right dimensions.... Tomorrow I shall make the other half. Slow work but no mistakes! Now for breakfast....
Re: Shed Matters 3
Posted: 02 Jan 2025, 05:40
by Stanley
Sorry Lads! I am having to sit watching over the site, we are being attacked by spammers and it's more important I delete them as fast as they come in.
Re: Shed Matters 3
Posted: 03 Jan 2025, 06:48
by Stanley

Back to normal and 45 minutes slow and careful milling and finishing for the crank pin brass. Half way through I stopped and touched the cutter up on the T&C grinder, never time wasted.... I finished up with the two halves ready for further progress but that's for tomorrow, there's no rush. The project now is a shave and then breakfast!
Re: Shed Matters 3
Posted: 04 Jan 2025, 06:25
by Stanley

Do one thing and do it well. I spent half an hour drilling the holes for the bolts that will fasten the two halves of the crank bearing to each other and considering how bad my eyes are did quite a good job. Notice that I have put the witness marks in that guarantee correct matching of the halves. Now for breakfast.
Re: Shed Matters 3
Posted: 05 Jan 2025, 06:56
by Stanley


Sorry but I forgot to do a pic of how I cheated this morning. What I did was bring in the small 4 jaw from Johnny's 1927 lathe in the front room and mount it in the SC chuck already in place on Mrs Harrison. That meant I could mount half of the crank pin bearing and centre it, (it isn't square.), and then turn the head round and then drill and tap it for the 32tpi plug which I shall make tomorrow. That was 45minutes of careful progress. Now I want my breakfast!
Re: Shed Matters 3
Posted: 06 Jan 2025, 06:57
by Stanley

This was this morning's job, finish work on the crank pin brass and get it ready to be mounted on the connecting rod and fitted on the pin..... I can set it on one side for now and move onto other matters, most likely the making and fitting of the crosshead. But that's for tomorrow, now I want my breakfast!
Re: Shed Matters 3
Posted: 06 Jan 2025, 13:29
by Tripps
Nicely knurled. . . .

Re: Shed Matters 3
Posted: 07 Jan 2025, 03:27
by Stanley
Re: Shed Matters 3
Posted: 07 Jan 2025, 06:45
by Stanley

Today as I promised I have started on the crosshead. Stuarts are generous with the size of the stock for this so after some careful measuring and a fag packet drawing I started squaring and reducing it in the VM. No point in boring you with lots of pics so just one. I am making good progress and have knocked off for breakfast.
Re: Shed Matters 3
Posted: 09 Jan 2025, 05:22
by Stanley
Sorry to have to report that it's too cold to go in the shed this morning, less than 10C, so I shall prepare my chicken, get it in the oven and then have an early breakfast.....
(Tomorrow is looking just as cold!)
Re: Shed Matters 3
Posted: 12 Jan 2025, 05:26
by Stanley
No shed again today, it's warmer in there but still too cold. I shall have an early breakfast and go back to bed for second sleep.
Re: Shed Matters 3
Posted: 14 Jan 2025, 06:37
by Stanley

Back in the shed for the first time for a week. I spent 45 minutes working on the dimensions of the crosshead. This included stripping the flywheel and crankshaft out of the engine so I could get an accurate measurement of the crosshead slide bed. I am now at the stage where I have the major dimensions done and can start tomorrow on the smaller cuts and drillings that need to be done. We are making progress once more! Now I can have my breakfast.
Re: Shed Matters 3
Posted: 15 Jan 2025, 06:21
by Stanley
Re: Shed Matters 3
Posted: 15 Jan 2025, 06:24
by Stanley

This morning I spent 45 minutes cutting the channel in each side of the crosshead which allows it to engage in the crosshead guides. This invoved some very careful measuring and marking and we achieved a fit. Now for breakfast....
Re: Shed Matters 3
Posted: 16 Jan 2025, 06:50
by Stanley

45 minutes in the shed and one clear task. Measure and mark the crosshead and then mill out the slot to accept the small end of the connecting rod. Then find a nut and bolt the right size (3BA) and mark and drill the hole for it. Now I want my breakfast and second sleep!
Re: Shed Matters 3
Posted: 17 Jan 2025, 06:55
by Stanley

More work on the crosshead. First I used the bolt hole to position the crosshead under the mill so that I could cut the rounding of the end using the mill and ensuring it was perfectly circular and square. Next I Took the back lid off and used the piston to mark the end of the crosshead for the 2BA thread that is where the Piston rod joins the crosshead. As you can see I ended up with the crosshead running nicely in its guides. It might need refining later but I shan't know that until the connecting rod is made and fitted. Now for breakfast!


