SHED MATTERS 2

Locked
User avatar
Stanley
Global Moderator
Global Moderator
Posts: 99371
Joined: 23 Jan 2012, 12:01
Location: Barnoldswick. Nearer to Heaven than Gloria.

Re: SHED MATTERS 2

Post by Stanley »

Image

Image

I sorted out the dies and then got round to the first of the interesting jobs I have lined up.... Newton's crankshaft was too long and needed reducing at each end. It looked a lot better when I popped it back in its bearings.

Image

The next small task was to pop an eighth inch oilway in the pedestal bearings. Then clean the bore where it had broken through.

Image

Image

The next job was to drill the holes for the pedestal mounting bolts. I was going to make the two at the end where it is tight a smaller bolt but then decided it would look a lot better if they were all 1/4". I'm drilling tapping size here. On the flywheel bearing with the larger bore I broke through the wall of the bearing but I can deal with that later. Still plenty of bearing surface....

Image

Image

This was almost a big mistake. I had it in my head I wanted a gas engine type lubricator on the crank brass. I pop marked the location and was just going to drill it tapping size or the lubricator when I realised that if I did I'd cut the clamp bolt! So I had a rethink, popped it in the pillar drill and made twin lubricating holes down each side of the bolt.

Image

Then it started to get exciting! I installed the con rod and took the back lid off so I could see where the piston was when the crank was on the back centre. If I get this right I know the front is OK because it has slightly more clearance.

Image

Then a good clean up. Clear the bed of the VM and clamp the engine down tight on its wooden packing. I shall make the final checks on position and poke the drill through the holes I have already made in the pedestals to get an accurate mark for tapping the holding down bolt holes.

Image

Close of play. I shall leave the final adjustment of the pedestals till tomorrow. I did this pic of the bench, you can tell we are getting towards a conclusion, it isn't cluttered up with parts!
A good morning......
Stanley Challenger Graham
Stanley's View
scg1936 at talktalk.net

"Beware of certitude" (Jimmy Reid)
The floggings will continue until morale improves!
Old age isn't for cissies!
micktoon
Regular User
Posts: 366
Joined: 05 Feb 2012, 21:23
Location: Newcastle upon Tyne

Re: SHED MATTERS 2

Post by micktoon »

Hi Stanley, a good days progress again , I am glad the dies arrived ok , they were from John. I bet there would have been some swearing if you had of drilled through that bolt by mistake ! I have progressing quite well with the Bridgeport 'trolley' I have been doing some arc welding with those rods you gave me, I did some parts with arc then reverted back to MIG. I am trying to think ahead all the time to avoid anything that will cause problems down the line with fitting the splash gaurd back on etc and also trying to just use what I have lying about but its getting there. I have been taking photos so will post some when its done.

Not long until you will be machining that cast now :grin:
Cheers Mick.
User avatar
Stanley
Global Moderator
Global Moderator
Posts: 99371
Joined: 23 Jan 2012, 12:01
Location: Barnoldswick. Nearer to Heaven than Gloria.

Re: SHED MATTERS 2

Post by Stanley »

Sooner than you think! You talk about thinking ahead... The Design Committee does all this for me and this morning they called me in and pointed out that once I have bolted the pedestals down I won't be able to use the flyshaft as a plug gauge for getting the bores on the flywheel, Pulley wheel (yes, I'm going to have one of them as well) and the eccentric cam. They are quite right of course so those three items are next for shaving.....
On a different matter Mick asked me about gearbox oil for the Harrison lathe. I researched all this when I got mine, when you get a new machine or vehicle always make sure the gearboxes have no sediment and metal in them and then refill with fresh oil. Harrison are crap at recommending oils and I soon got fed up of trying to make sense of their specified oils. Searching the Web is no use either because everyone is too anal and can't agree. I used a normal vehicle gearbox oil, SAE 60 or modern equivalent on both the HM and the lathe and have never had any problems. John will have easy access to these as his day job is an automotive engineer.... If like me you are belt and braces, flush the box with diesel (better than paraffin because it doesn't carry water) refill and run for a while than drain again and refill with fresh oil. The oil you used isn't wasted, it goes into the oil-cans! It's a gearbox for God's sake and has nowhere near the duty on it than a wagon gearbox....
By the way, I'm a dinosaur when it comes to modern specifications of oil and steels, I know about SAE and MIL specs for oils and the old N system for steel. Beyond that I am still in Newton's era where steels were classified according to the ultimate breaking strain of an inch square section so good steel is 70 ton! The old blokes used to say there were only two types of oil, thick and thin. On 'normal' duties this is still the case!
Stanley Challenger Graham
Stanley's View
scg1936 at talktalk.net

"Beware of certitude" (Jimmy Reid)
The floggings will continue until morale improves!
Old age isn't for cissies!
User avatar
Stanley
Global Moderator
Global Moderator
Posts: 99371
Joined: 23 Jan 2012, 12:01
Location: Barnoldswick. Nearer to Heaven than Gloria.

Re: SHED MATTERS 2

Post by Stanley »

Image

The engine sits there and waits. Notice the driver dog used as a handle to turn the shaft... I've seen Newton pop a small three jaw chuck on a shaft for the same purpose or as a temporary flywheel...

Image

The first job was to make sure the lathe was clean and get the four jaw mounted. Grab hold of the casting whatever way you can....

Image

The casting won't be concentric or even round. Use a tool in the toolpost as a guide and get the casting mounted as close as you can to central. If the rim is really badly distorted, use the boss. Clout it with the rubber hammer while you are tightening the jaws, they love it!

Image

This was as close as I can get it.

Image

Use carbide tipped tools, the heaviest you have. Make sure they are sharp and mounted on centre. I favour the big round nose for rough cuts and getting under the skin.

Image

First cut. 80rpm is plenty fast enough. I was taking 30thou and not the slowest feed. You will be guided by what your lathe can manage comfortably.

Image

Then it's a matter of quietly forwards. Once you have found a comfortable speed and cut, stick to it. Many a time I have started pushing the envelope to see what I can get away with and too often ended up with a dig in... We're not on production, take your time.

Image

The target width for the rim and the boss is one inch. The casting was 1 1/2" so I took a quarter of an inch off the first side and cleaned the face of the spokes. I used to spend a lot of time filing castings and cleaning corners. I don't do it now, they look better as castings. The main thing I was after was a clean concentric inside of the rim....

Image

This why... The four jaw has come off and the big original 3 jaw SC that came with the lathe has gone on with the inside jaws fitted. I've grabbed the casting using the outside jaws inside the rim because I know that is concentric and I made sure the base on to the spokes was flat as well.. Notice the chalk mark on the casting, this means that even though I have reversed it and no 3 jaw is dead accurate, at least I have given it the best chance. Once you have it tight after belting it with the rubber hammer again, do exactly the same as the other side except that your target now is i" wide.

Image

Once you have finished that lot off, touch up the edge on the big round nose and put it in the toolpost with as little overhang as possible, you need to get to the outside of the rim and you want it as rigid as possible.

Image

Go steady when starting because the rim will be nowhere near concentric with the inside edge that is your register on the chuck jaws. Same speed, 80rpm and as soon as you can get a good deep cut on because there will be nasties to get rid of...

Image

This is what I mean. Those shiny shops are where the casting took a chill when the first hot metal ran in and froze as Martensite which is glass hard. Even a carbide tool will skate over it. They don't go very deep so the secret is to get into the soft metal under them, they'll peel off like butter.

Image

Close of play. I shall leave the casting in the chuck to relax because it's been warmed up and will move a bit during the night as the stresses come out of it. Tomorrow I shall start the day with a light cut at a higher speed and a slow feed to get a bit of finish on the rim. Then break the edges and then bore the boss for the shaft. By doing it this way, despite the 3 jaw not being dead accurate, I can be sure that the bore will be as near central to the rim as possible.
One little known fact for you. When Johnny Pickles was working at Burnley Ironworks around 1900 he was given the job of turning the flywheel for the Brook Shed engine. He told newton that it took him almost four weeks. The wheel dis one revolution every 90 seconds and the cutting tools he used were 4" square cast iron. They were cast from the same metal as the wheel and in the pattern there was a block of cast iron, what they used to call a 'chill'. This meant that the top face of the tool was Martensite and as hard as glass. The belief was that these tools gave a better finish than the normal high carbon steel that was used then.
Stanley Challenger Graham
Stanley's View
scg1936 at talktalk.net

"Beware of certitude" (Jimmy Reid)
The floggings will continue until morale improves!
Old age isn't for cissies!
User avatar
Stanley
Global Moderator
Global Moderator
Posts: 99371
Joined: 23 Jan 2012, 12:01
Location: Barnoldswick. Nearer to Heaven than Gloria.

Re: SHED MATTERS 2

Post by Stanley »

I realised last night that I told a lie when I said the big 3 jaw was the original that came with the lathe. That was a Pratt 6"" and well worn, I think it was the only chuck ever used on it. The one I used yesterday is a very old seven and a half inch Belco with only the outside jaws with it. Newton gave it to me because it was very heavily rust pitted. I cleaned it up and made a back for it so it fitted the Harrison and it's a good chuck.
Stanley Challenger Graham
Stanley's View
scg1936 at talktalk.net

"Beware of certitude" (Jimmy Reid)
The floggings will continue until morale improves!
Old age isn't for cissies!
User avatar
Stanley
Global Moderator
Global Moderator
Posts: 99371
Joined: 23 Jan 2012, 12:01
Location: Barnoldswick. Nearer to Heaven than Gloria.

Re: SHED MATTERS 2

Post by Stanley »

Image

My first move was to reposition the engine on the VM bed so that when I came to building the front end up the flywheel will overhang the side of the bed. Than on with today's job, finish turning and boring the flywheel and [perhaps even start on the pulley I intend to fix on the outboard end of the shaft.

Image

First thing to do was check that the wheel was still tight on the chuck before setting it on on high speed to put the finishing cut on. Remember what I said yesterday about castings distorting as you took metal off? The wheel was out of true. It took two passes with a fine cut and the slowest feed to get it true again with a good finish.

Image

Once I was satisfied with the face I broke both edges and took a fine cut over the face to get the same finish. I finished by using fine emery cloth to make sure I had all the edges off and a polish on the surfaces. I've got a finished wheel now and I know that if I bore the boss on this set up it will be as near central as possible.

Image

I centre drilled and poked a succession of drills through up to 11/16" before starting boring with a very sharp tool. I don't think you'd believe the number of measurements and checks I made.... I knew that I had a bit of a problem in that Newton's shaft isn't perfect. This isn't a criticism, it's a fact. Remember that 80 years ago when he made it it was on a treadle lathe with high carbon tools and no measuring tackle beyond a ruler and perhaps a Vernier calliper. So when I was within 20 thou I was taking very fine cuts and trying the shaft in the bore after every pass.

Image

It was a good job I did because it surprised me when I thought I had about 5 thou to go! A perfect plug fit that will perhaps need a bit of persuasion to go fully home. Just right!

Image

I was going to take a final cut over the back side but when I reversed it in the chuck it wasn't dead centre so I contented myself with polishing with emery. Here it is mounted but not pressed fully home...

Image

It was getting near close of play so instead of pressing on with the pulley I decided to give the wheel a coat of Hammerite black. It can have all night to set before I move it and then a few days more before I am building it up.

Image

This last pic is to show how relaxed I am with cast iron chippings on the lathe. This was good soft iron and the chips will do no harm to the induction hardened slides. I didn't vacuum up because that would have put dust in the air and not done my painting any good. Not a bad morning, very slow but I have done good accurate work.... Bit of a triumph really....
Stanley Challenger Graham
Stanley's View
scg1936 at talktalk.net

"Beware of certitude" (Jimmy Reid)
The floggings will continue until morale improves!
Old age isn't for cissies!
User avatar
Stanley
Global Moderator
Global Moderator
Posts: 99371
Joined: 23 Jan 2012, 12:01
Location: Barnoldswick. Nearer to Heaven than Gloria.

Re: SHED MATTERS 2

Post by Stanley »

Image

I brought the flywheel in out of the cold so the paint can set better..... I've seen worse....
Stanley Challenger Graham
Stanley's View
scg1936 at talktalk.net

"Beware of certitude" (Jimmy Reid)
The floggings will continue until morale improves!
Old age isn't for cissies!
User avatar
Bodger
Senior Member
Posts: 1285
Joined: 23 Jan 2012, 12:30
Location: Ireland

Re: SHED MATTERS 2

Post by Bodger »

Were flywheels ever used as drivers i.e. belts on them ?
User avatar
Stanley
Global Moderator
Global Moderator
Posts: 99371
Joined: 23 Jan 2012, 12:01
Location: Barnoldswick. Nearer to Heaven than Gloria.

Re: SHED MATTERS 2

Post by Stanley »

On big textile engines almost always unless they were gear drive and even then some like the Whitelees had a gear ring on the rim of the wheel. Later geared engines had jack gears on the side of the wheel. Rope or belt drive was taken direct from the face of the flywheel. Smaller engines like this almost always had a plain flywheel and a belt drive or gear pulley alongside the flywheel on the shaft. I was going to give this one a belt pulley but the design committee have opted for a gear drive....

Image

So the first job this morning was a trawl through the treasure chest. I still had the belt pulley in mind but couldn't find anything in CI that grabbed me. I also wanted a blank for making the eccentric centre. Luckily I have gear wheels coming out of my ears because Johnny was always picking them up when he visited mills. All the change wheels on the 1956 lathe are loom gears suitably modified. This gear is too big in the bore but that's no problem.

Image

First job was to skim the gear and clean it up.

Image

When cleaned up I found it was marked, 44 teeth, 12 DP which means it is pretty close to scale.

Image

It didn't take long to turn a plug for the bore. Interference fit, it had to be forced in with the vice. Then cut the excess off and turn down tidy.

Image

Close of play. I've centred the bore and drilled it to 1/2" which leaves some to bore out. I'm ready for setting up for boring to a plug fit.

Image
Stanley Challenger Graham
Stanley's View
scg1936 at talktalk.net

"Beware of certitude" (Jimmy Reid)
The floggings will continue until morale improves!
Old age isn't for cissies!
User avatar
Stanley
Global Moderator
Global Moderator
Posts: 99371
Joined: 23 Jan 2012, 12:01
Location: Barnoldswick. Nearer to Heaven than Gloria.

Re: SHED MATTERS 2

Post by Stanley »

Bodge, one thing I forgot to mention is that small engines like donkeys were built for stock to a standard design. They were provided with enough shaft to fit whatever driving arrangement the customer needed. Rather like a standard electric motor on which you fit whatever drive you want.
Stanley Challenger Graham
Stanley's View
scg1936 at talktalk.net

"Beware of certitude" (Jimmy Reid)
The floggings will continue until morale improves!
Old age isn't for cissies!
User avatar
Bodger
Senior Member
Posts: 1285
Joined: 23 Jan 2012, 12:30
Location: Ireland

Re: SHED MATTERS 2

Post by Bodger »

Stanley, thanks, re the bushed gear, not sure of your dimensions, but if i could i would have drilled and tapped a hole between gear and bush placing a grub screw in there as a security fixture
User avatar
Stanley
Global Moderator
Global Moderator
Posts: 99371
Joined: 23 Jan 2012, 12:01
Location: Barnoldswick. Nearer to Heaven than Gloria.

Re: SHED MATTERS 2

Post by Stanley »

I could have done that Bodge but no need, I gave it plenty of bite! Believe me, it's a permanent fixture! I'll finish the bore today. I need the VM clear to make the eccentric and strap so the next job is to finish bolting the pedestals down so the shaft can go back in on a final fit. I can make the eccentric and rod for the valve later.....
Stanley Challenger Graham
Stanley's View
scg1936 at talktalk.net

"Beware of certitude" (Jimmy Reid)
The floggings will continue until morale improves!
Old age isn't for cissies!
User avatar
Stanley
Global Moderator
Global Moderator
Posts: 99371
Joined: 23 Jan 2012, 12:01
Location: Barnoldswick. Nearer to Heaven than Gloria.

Re: SHED MATTERS 2

Post by Stanley »

Image

My first task was to finish boring the gear. I know you get fed up of hearing it but you wouldn't believe how careful I was doing this. I finished up using the offset tool slide to take cuts of a tenth of a thou....

Image

But, it was worth it. It's a tight push fit, in fact I had to tap it to get it off. When this gets pushed on with a coat of Loctite it will never move....

Image

Then I turned my attention to the pedestals... This was complicated. The design of the cylinder calls for a 2" throw on the crank. Newton's crank is slightly more than this so I had to allow for it. I know from bitter experience that it's a lot harder to adjust for interference at the blind end of the bore than the top lid so I erred a touch towards making sure the piston cleared at the front end. It took me a while to get the pedestal clamped in the correct position and aligned with the raising blocks but eventually I was satisfied and drilled the raising block for tapping. Once I had one done at the front end of the nearest block and got it bolted down it was easier to get the opposite pedestal right.

Image

Tapping the second front bolt. Once I had this right I could assemble the front end, Tighten the crank brasses down properly, pop the back lid on with a couple of bolts and turn the engine to check where I was. As expected the piston was just interfering at the end of the stroke at the back end. The front was perfect. No sweat, I popped the lid in the lathe and skimmed out a recess in it. I bolted it back on with all its bolts tightened down tight.

Image

Close of play. Everything turns nicely. The bearings are quite tight but a bit of running will soon free them up, they should be tight when brand new.
All told, a good result. Tomorrow I shall do the other two holding down bolts. The far one will get away at 1/4" but the near one which interferes with the bearing will need a bit of thought. At the moment I am favouring turning a 1/4" bolt down to a size I can get away with but you never know, the design committee may have something to say about this in the morning.... Very satisfied....
Stanley Challenger Graham
Stanley's View
scg1936 at talktalk.net

"Beware of certitude" (Jimmy Reid)
The floggings will continue until morale improves!
Old age isn't for cissies!
User avatar
Stanley
Global Moderator
Global Moderator
Posts: 99371
Joined: 23 Jan 2012, 12:01
Location: Barnoldswick. Nearer to Heaven than Gloria.

Re: SHED MATTERS 2

Post by Stanley »

The design committee have approved my reduced holding down bolt.....
Stanley Challenger Graham
Stanley's View
scg1936 at talktalk.net

"Beware of certitude" (Jimmy Reid)
The floggings will continue until morale improves!
Old age isn't for cissies!
User avatar
Stanley
Global Moderator
Global Moderator
Posts: 99371
Joined: 23 Jan 2012, 12:01
Location: Barnoldswick. Nearer to Heaven than Gloria.

Re: SHED MATTERS 2

Post by Stanley »

Image

The first and most important job this morning was to put a new hinge pin in my Zippo lighter!

Image

Today's tip. When you're tapping holes, particularly in very small sizes, the most usual cause of tap breakage is the tap jamming on swarf in the hole. A piece of soft iron wire with a powerful magnet touching it makes a good tool for fishing even fine swarf out of the hole. This and careful work without forcing the tap will generally keep you out of trouble.

Image

A small tap handle and plenty of Trefolex helps as well. This is a 5/32 whit thread, very fine. Incidentally my old book of thread sizes gives a No 31 drill as the tapping drill. How nice to have a set 1-60..... You can't have too many drills.

Image

Next job was to make my bolt. I wanted a 1/4" Whit head on it so that it matches the other holding down bolts so I had to turn it down to size. Smallest centre drill I have....

Image

Watchmaking.... I tickled the HS cutter with a hone and took 5 thou cuts. Plenty of measuring!

Image

Plenty of Trefolex and a sharp die.....

Image

This was what I wanted.... It clears the shaft even though the bore has broken through the bearing.

Image

I got away with 1/4" Whit on the other side. Ready for building up. I was thinking about some Loctite between the surfaces but settled for Stag compound to make sure the surfaces had good contact.

Image

After a bit of fiddling, all the bolts in and tight. The alignment of the shaft has moved slightly and the bearings are tighter but nothing that won't vanish with some running in. These bearings are fitted very close and so a degree of tightening was to be expected but it is even and as I say will run in to a lovely fit. I have kept my clearance with the back lid. A good result and this was close of play.

Image

There was one last matter. I need a base for the engine and so I called in at Briggs and Duxbury and Stephen the joiner found me this nice piece of oak and cut and finish planed it. £15. I've given it a good coat of rape oil... Otherwise it will pick up all the muck that's going!
Stanley Challenger Graham
Stanley's View
scg1936 at talktalk.net

"Beware of certitude" (Jimmy Reid)
The floggings will continue until morale improves!
Old age isn't for cissies!
micktoon
Regular User
Posts: 366
Joined: 05 Feb 2012, 21:23
Location: Newcastle upon Tyne

Re: SHED MATTERS 2

Post by micktoon »

Hi Stanley more fine work from the shed :grin: You are on the home stretch now for sure. That looks like a nice bit of wood for the base too.
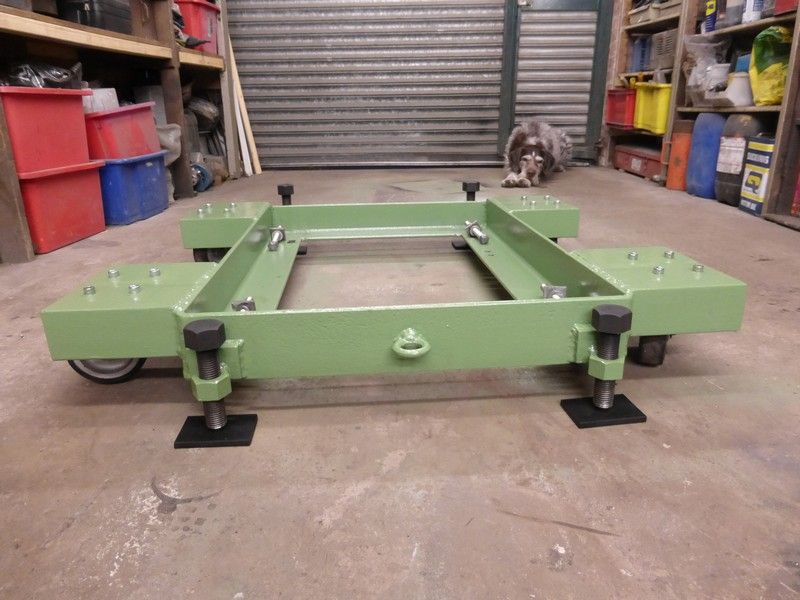
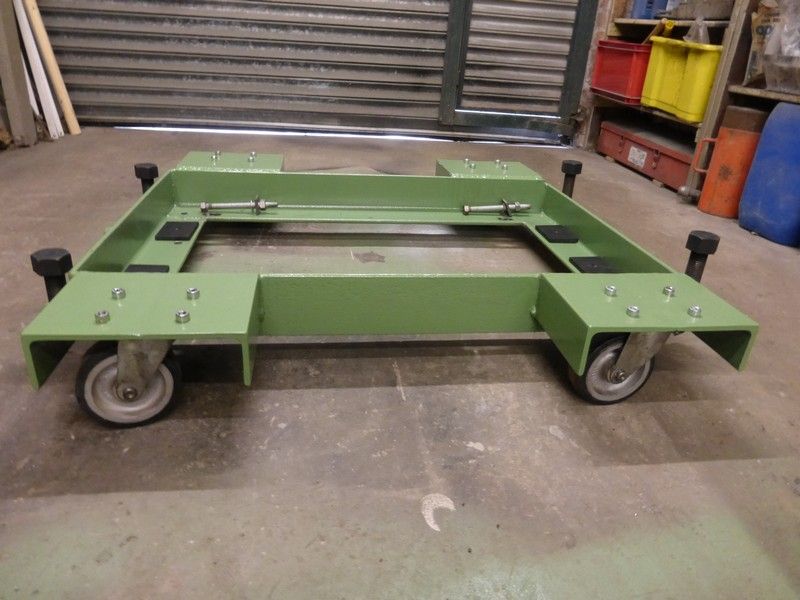
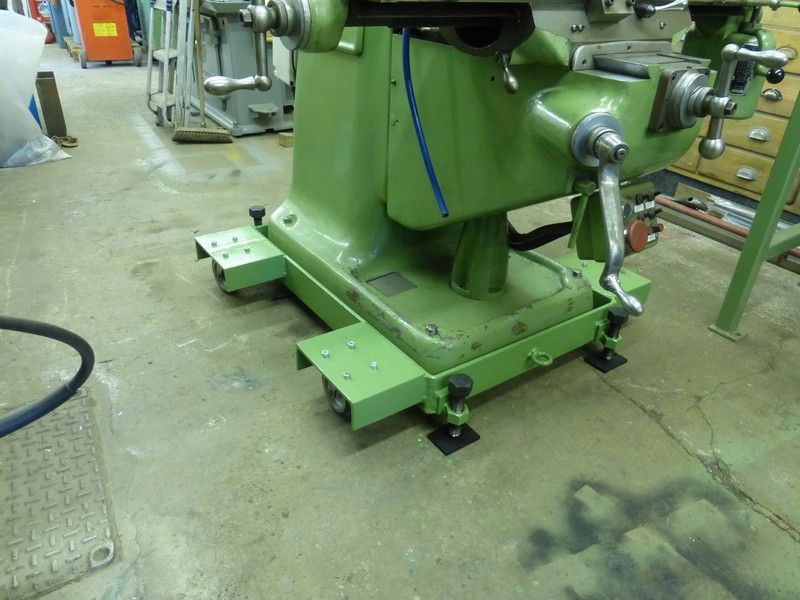
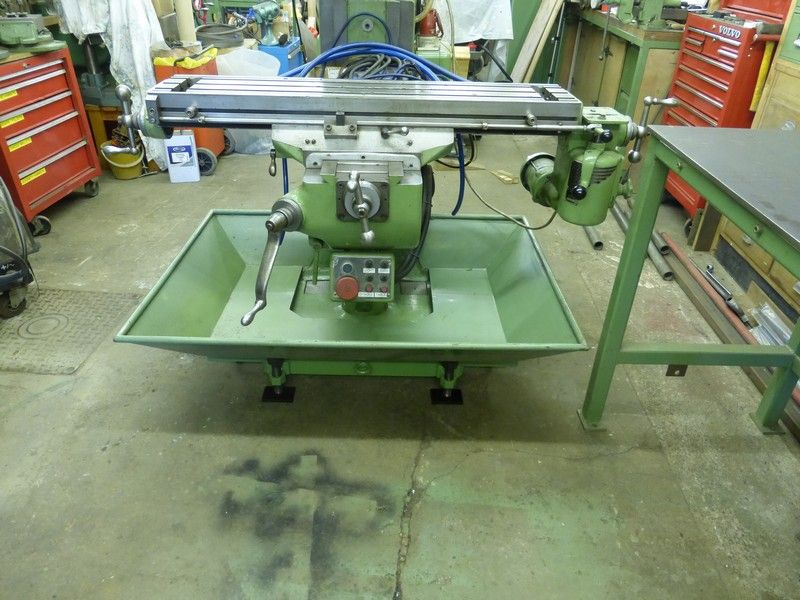
As you will see I have been busy myself too. This is thr wheeled frame I have made for the Bridgeport Milling machine, I am not planning on moving it too often but needed a good way of levelling it anyway so this solved both problems.

Hi Lads, After the ram jammed on my Bridgeport , the whole machine ended up having to be moved off the cemented in base situated in the corner of the workshop to gain access to work on the mill. As you can imagine this was a proper pain so I have decided to make a jackable frame with castors on it so the mill can be moved if needed. It will not be the sort of thing you can wheel in and out each time you want to use the machine but should make it easier to move if it needs worked on or if something large ever needs to be mounted on the table that would normally be hitting the wall or other machines.
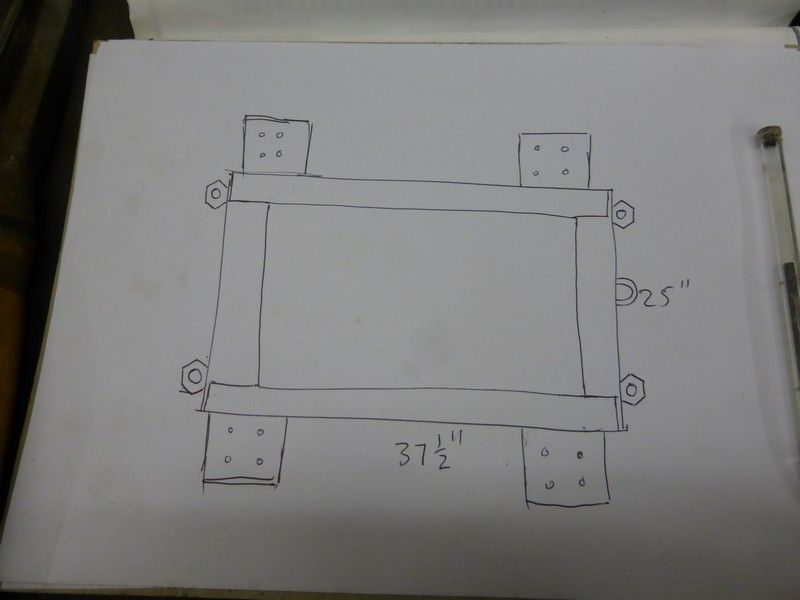
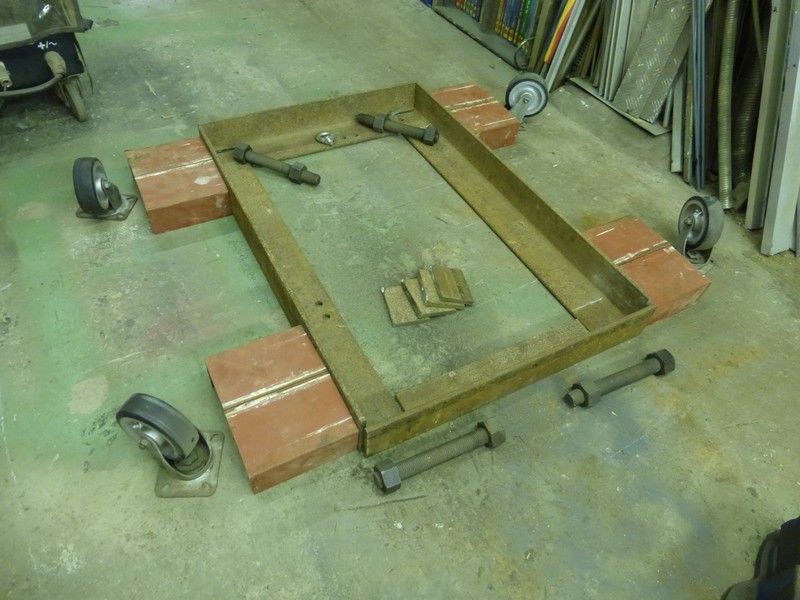
So after a Google search or two I had a rough plan and a pile of scrapyard related materials, as usual my build was to use what I had rather than build with what you would choose in an ideal world.

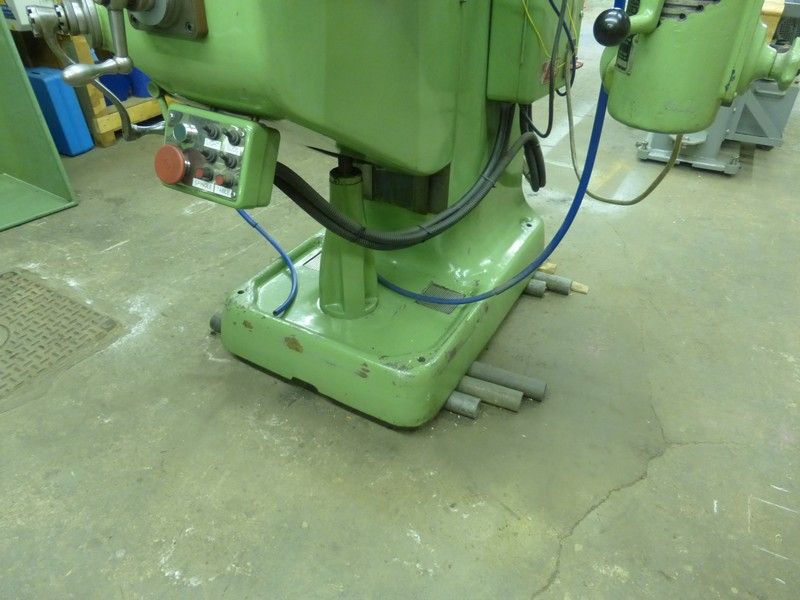
This is the mill as its been standing for months in the middle of the floor on rollers

Image

This is the plan

Image

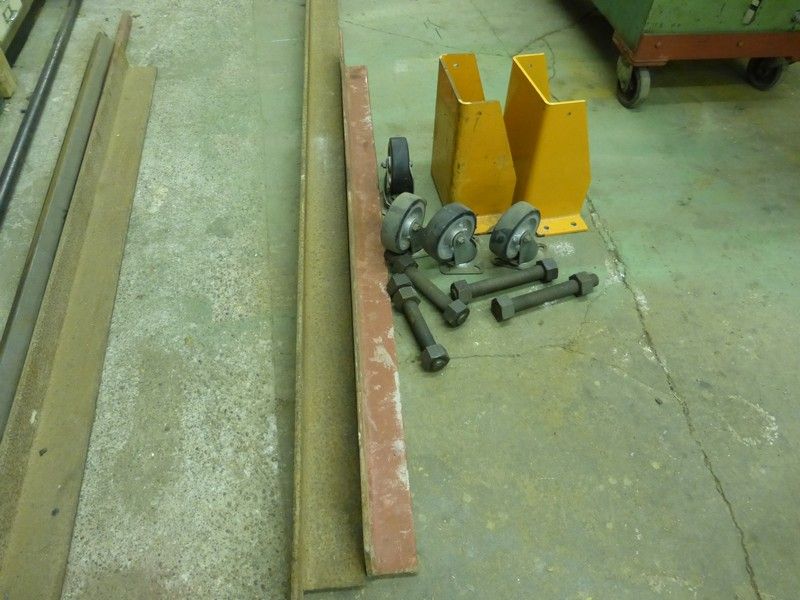
These are the raw materials to construct out of, I thought the orange formed plates might have been included but they were too narrow for the castors to fully rotate

Image

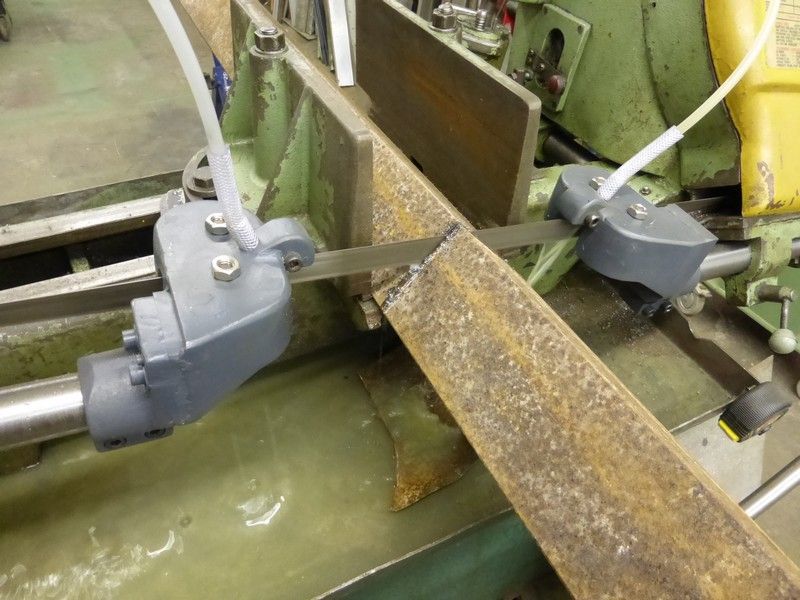
Cut up the large angle into lengths on the big bandsaw , its working nice now its been repaired

Image

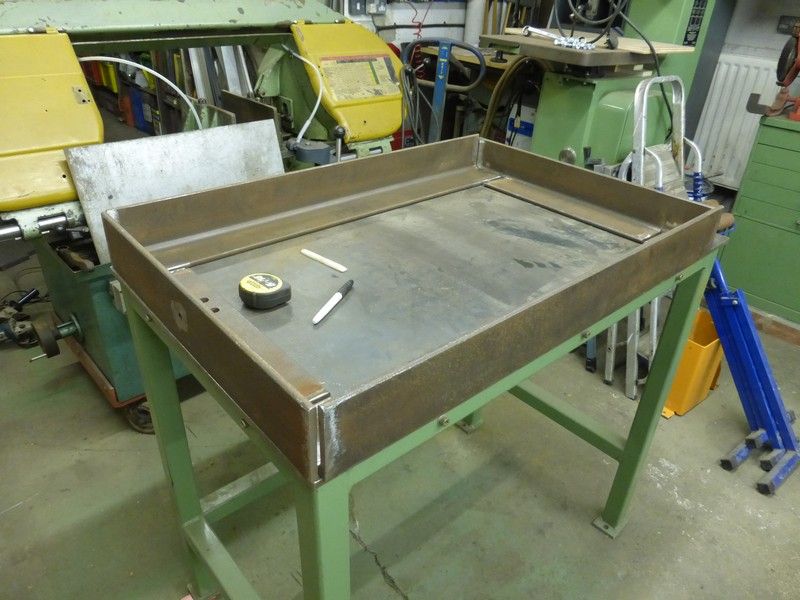
All the components cut out, the castor supports had to made from two bits of 5 x 3 inch angle welded together to make some channel , I notched the corners of the large 4 x 4 angle

Image

Draged the welding table over and cleaned up the angle with wire brush on a grinder, the angle is 100 years old or so, reclained from a fire escape, its been lying about for 20 years but I knew it would come on handy one day !

Image

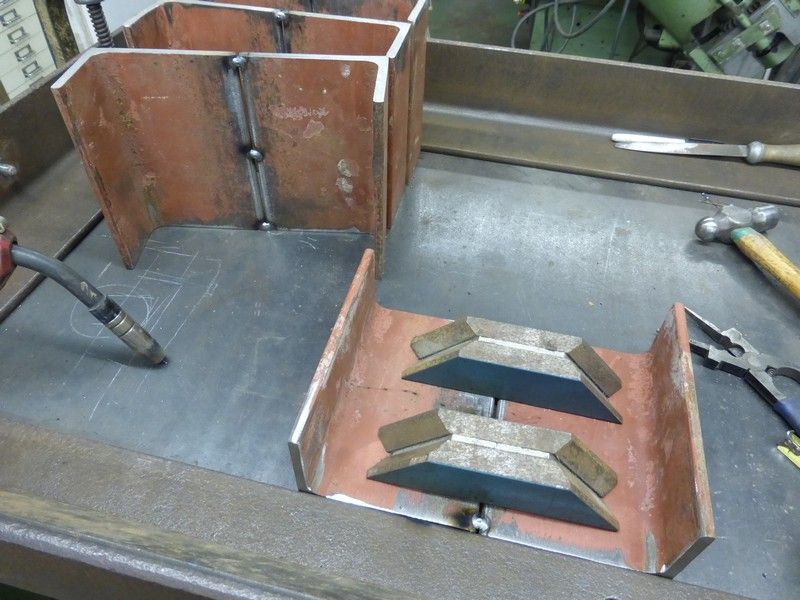
The castor supports were tacked then welded top and bottom

Image

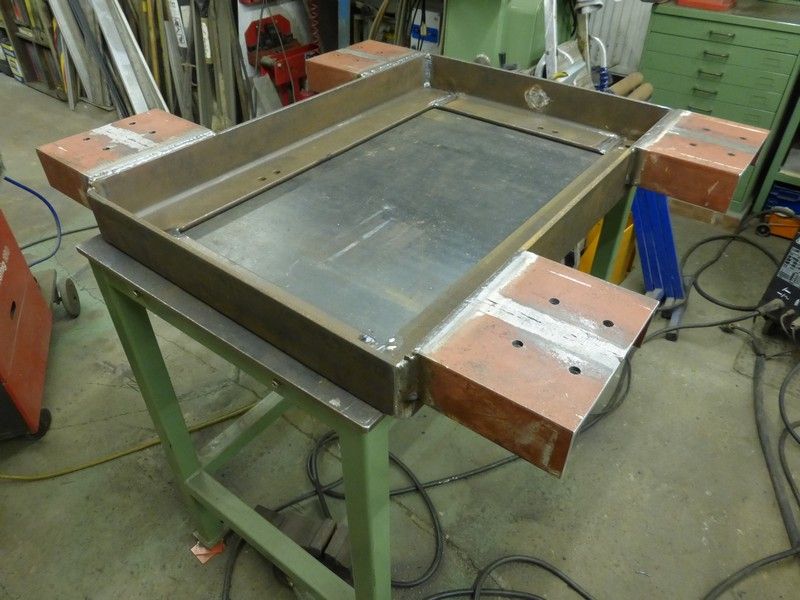
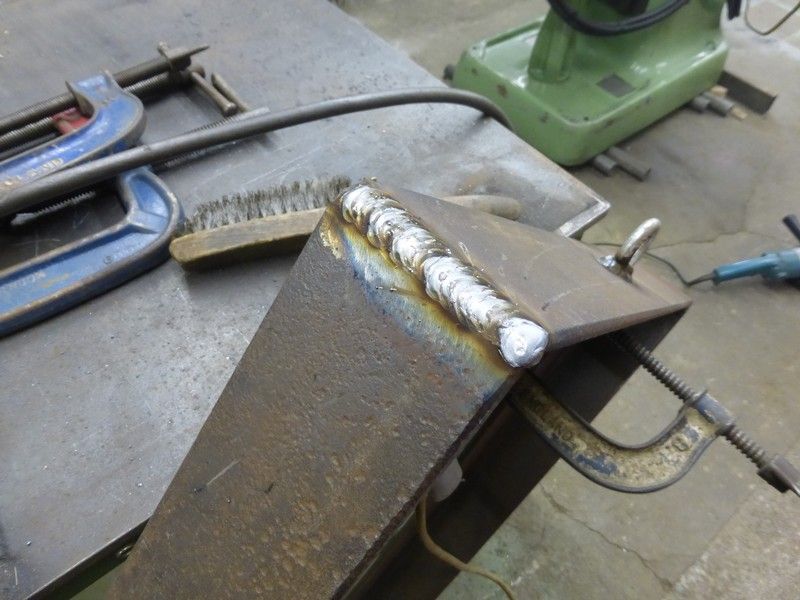
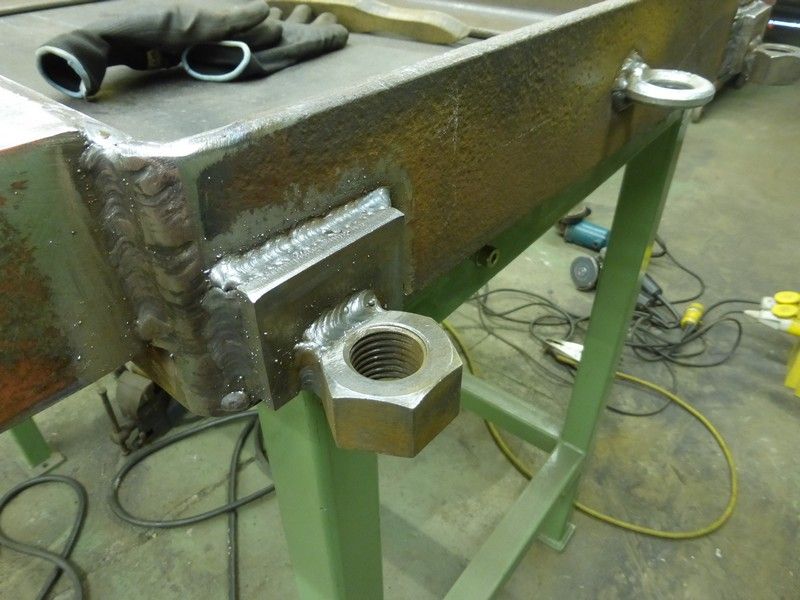
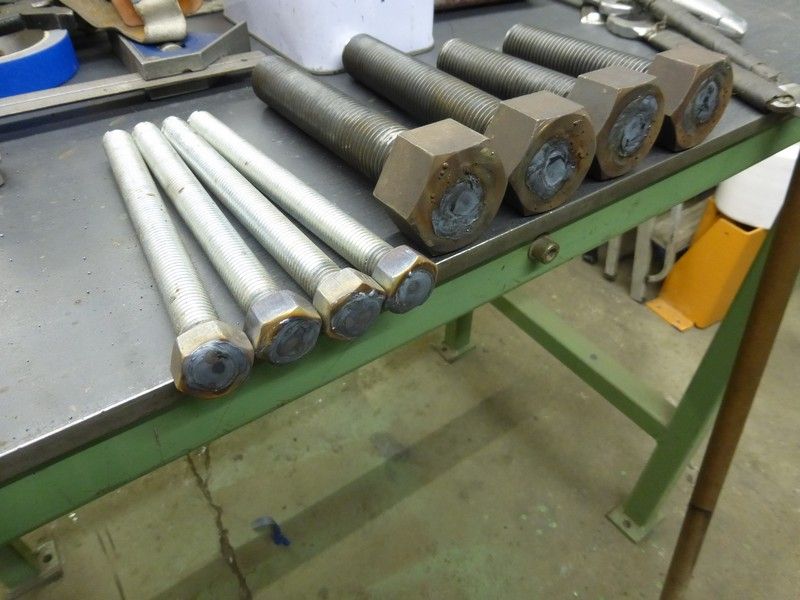
Then the frame all welded up some arc and mainly MIG , I don't think it will come apart anyway. The nuts are M28 or 1 1/18th ish, the plates welded behind the nuts are to give more clearance for the bolt head. I also added a towing eye that was lying about that might come in handy

Image

Image


Image

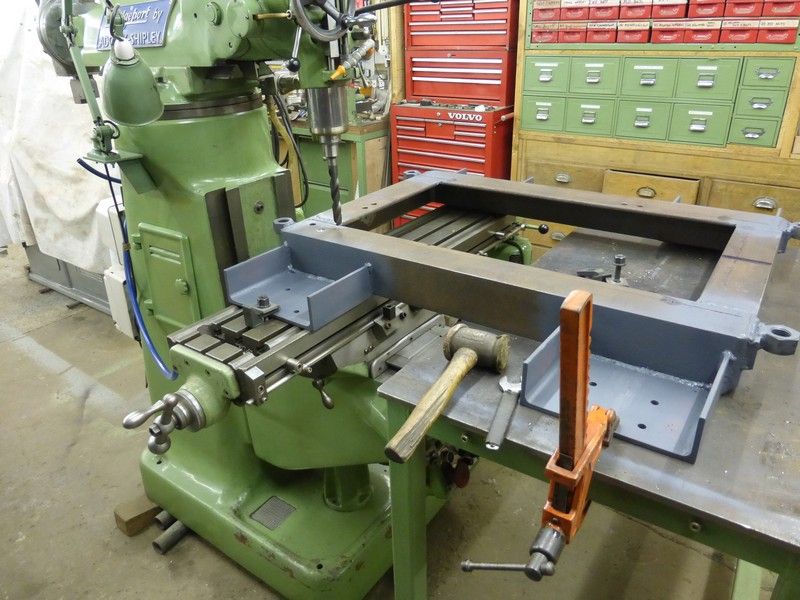
Next job was to drill four 20mm holes that the mill will bolt to the frame with, used the mill itself to do these with

Image

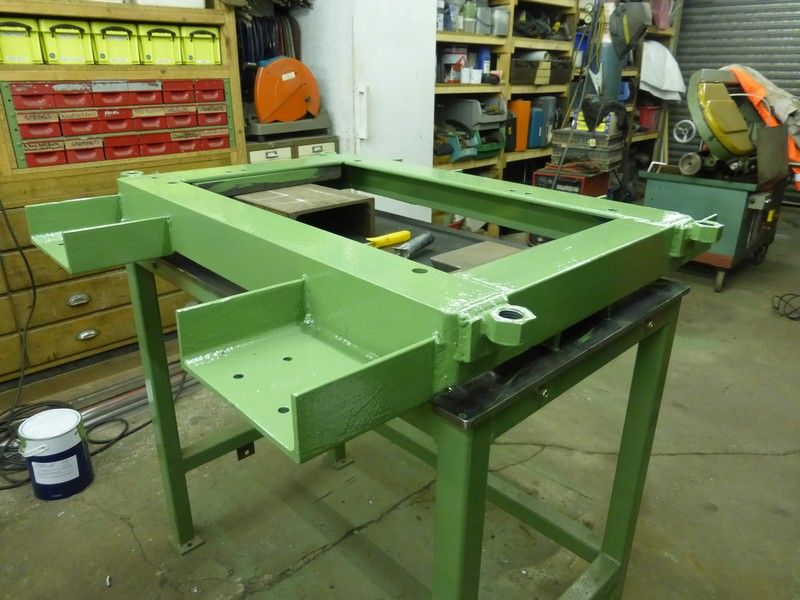
A coat of machine green paint to match the mill

Image

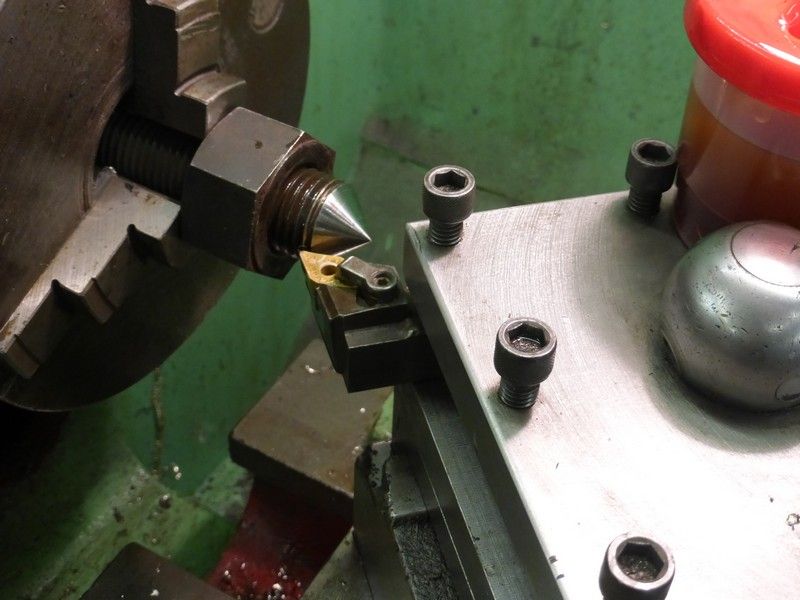
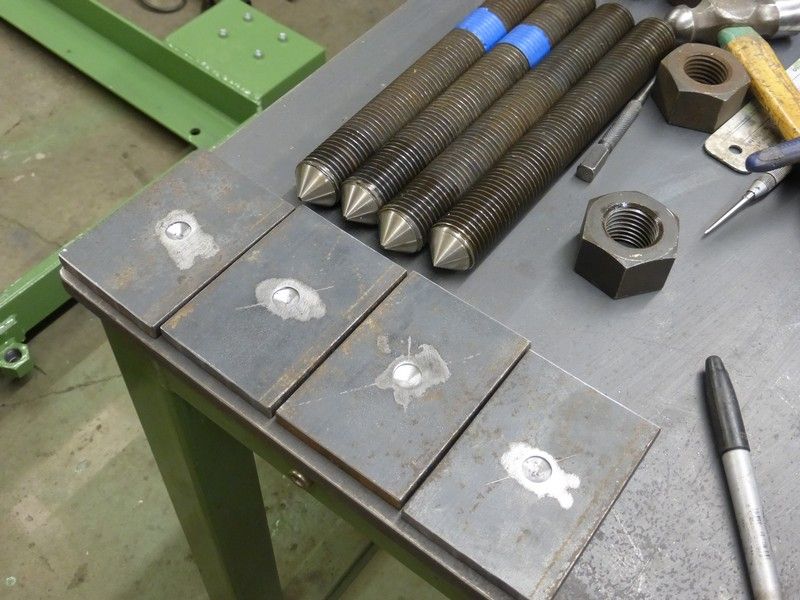
Then when that was drying it was time to do the bolts and plates for jacking. I turned points on the large studding , drilled recesses for these to locate into in the plates , then welded the nuts to the studs to make the large jack bolts and also the smaller M16 bolts to bolt the mill to the base, again these were made as I already had studding lying about

Image

Image

Image

The finished frame ready for the mill to be mounted, Otto my quality control hound looks bored as he found no defects ! The frame is a two man lift type weight now !

Image

Image

The mill mounted in the frame and bolted down, I used the chain hoist to winch it up and my mate Dave quickly rolled the frame under, it takes two people to push the mill, the castors I used were the hard rubber tyre type so maybe cast iron would roll with less effort ? Anyway it does the job and is movable with a bit of effort it jacks up level once in position using the jacking bolts, the splash guard fits ok too

Image

Image

I would say the basic idea is good for most size milling machines really, dual purpose as you get good jacking points to level the machine but also much easier to move when needed.

Cheers Mick.
User avatar
Stanley
Global Moderator
Global Moderator
Posts: 99371
Joined: 23 Jan 2012, 12:01
Location: Barnoldswick. Nearer to Heaven than Gloria.

Re: SHED MATTERS 2

Post by Stanley »

That's an improvement! It has a far larger footprint now than the original base. I envy that ,ill and the band saw.... also the space..... also the ability to weld.... This is bad for me, must pull myself back together. I'd like to see some overall shots of the shed......
The design committee have approached me this morning and pointed out that I am making my usual mistake, fitting too close and too tight. They are right. I am going to ease the pedestal bearings a shade.... It will never be run enough to naturally run them in. I shall ease them this morning before I go any further....
Stanley Challenger Graham
Stanley's View
scg1936 at talktalk.net

"Beware of certitude" (Jimmy Reid)
The floggings will continue until morale improves!
Old age isn't for cissies!
User avatar
Stanley
Global Moderator
Global Moderator
Posts: 99371
Joined: 23 Jan 2012, 12:01
Location: Barnoldswick. Nearer to Heaven than Gloria.

Re: SHED MATTERS 2

Post by Stanley »

Image

I'm following the de3sign committee's instructions. Easing the turning of the flyshaft.... First thing was to uncouple the crank brass so I could confirm that the tightness was indeed in the pedestal bearings. It was, so I experimented with the pedestals to find where the misalignment was. I opened out the clearance hole for the front bolt on the left side and got a slight improvement but not enough.

Image

I'm not a big fan of adjustable reamers but they have their place and this was exactly right on this occasion. (I have a full set from 1/2" up to about one and a half inches)

Image

The reamer did the trick, the tightness has gone but the shaft and crank are still a good close fit. I popped everything back together, tightened all the nuts and tried it again. Much better and I have preserved my clearance at the back lid. Doing well!

Image

I had already decided that I wasn't going to do full length holding down bots, no point. So drilled three quarter inch holes in the bed plate two near the target and one at the other end of the bed between the pedestals. Always an advantage to have a few long series drills about your person. They can save a lot of trouble!

Image

I popped the engine on its bed and marked the position of the bolts through the holes in the bed. Then I drilled and tapped them 1/4" whit, hard wood like this takes a good thread.... Then I put a bot of wood glue in each threaded hole and bolted the bed down with three 1/4" brass round-headed screws. They pulled up tight and when the glue goes off I wouldn't like to have to get them out!

Image

It was shaft lock and copper drift time. The flywheel and gear were tight but that was how they were supposed to be. One last check, the flywheel spins true and even against the resistance of the piston in the bore it turns easily. Bit of a result!

Image

I popped it on the sideboard where I can gloat over it.... I wanted it out of the way while I had a big clean up of the VM and the lathe. Then I mounted the milling vice square on the VM table, put the milling chuck back on with a sharp 3/4" cutter because the next job is making the eccentric and valve rod.

Image

I have some spare bronze castings for the eccentric, you might as well get more than you need when having castings done, they are always useful. The bronze strap needs to be made first before the eccentric itself so that's the next job.... No measuring of the engine needed for this. I'll make the strap to whatever size seems right and make the cam to suit.
Not a bad day, we are getting awfully close to having an engine!
Stanley Challenger Graham
Stanley's View
scg1936 at talktalk.net

"Beware of certitude" (Jimmy Reid)
The floggings will continue until morale improves!
Old age isn't for cissies!
doubleboost
Newbie
Posts: 16
Joined: 08 May 2013, 18:18
Location: North East England

Re: SHED MATTERS 2

Post by doubleboost »

Hi
Stanley
Just spent a couple of hours catching up
The engine is coming on very well
Regards
John
micktoon
Regular User
Posts: 366
Joined: 05 Feb 2012, 21:23
Location: Newcastle upon Tyne

Re: SHED MATTERS 2

Post by micktoon »

Looking good Stanley :grin: , I was wondering if you were going to cut the wood block down but I see why it had to be deeper now for the flywheel. Top class work , it will soon be another complete engine for your growing collection.
You will have to start thinking of your next project soon Stanley !

I have been doing a few bits and Bobs to the Harrison today , my mate Dave called in just at the right time so helped me , we adjusted the clutch its much better now , and also drained the gearbox and refilled with thicker Gear oil and its much smoother and quieter so I am well happy :laugh5:

Cheers Mick.
User avatar
Stanley
Global Moderator
Global Moderator
Posts: 99371
Joined: 23 Jan 2012, 12:01
Location: Barnoldswick. Nearer to Heaven than Gloria.

Re: SHED MATTERS 2

Post by Stanley »

John, thanks, the thing that pleases me is that Even though it's made out of my head with left over bits and scrap it looks right. I've been watching you with the Harrison. When you've put as much time in breathing on it as you have with the Boxford I think you'll be well pleased. Keep the Boxford, you've made that into probably the best one in the world! Thinking of Beth, I'm keeping tabs....
Mick, glad you like the engine. It might get a second motion wheel driving an underfloor shaft...... Glad you changed the oil, what grade did you use?
Today will be a bit more cleaning up and eccentric making...... Newton always laughed at the way I kept stopping to clean up but he was used to labourers cleaning up behind him! Things seem to go better when everything is clean... must be a state of mind.
Stanley Challenger Graham
Stanley's View
scg1936 at talktalk.net

"Beware of certitude" (Jimmy Reid)
The floggings will continue until morale improves!
Old age isn't for cissies!
User avatar
Stanley
Global Moderator
Global Moderator
Posts: 99371
Joined: 23 Jan 2012, 12:01
Location: Barnoldswick. Nearer to Heaven than Gloria.

Re: SHED MATTERS 2

Post by Stanley »

Image

First job was a small clean up and a fresh tablecloth... I always spray the surface plate with WD40 when I do this.

Image

The usual. Take the casting and get some surfaces on that are square and have a relationship with each other, taking off as little metal as possible.

Image

Here's the result.

Image

I don't want to do any more to the bronze strap until I get some answers from this casting. No two castings are alike and I need to know what the finished dimensions are. No good just guessing because there may be blow holes, inclusions or hard and soft shops. The best way to find out is get it in the lathe and start making some surfaces. No problem about using the three jaw when it is not perfectly round. The boss and the face I am chasing will be central and square.

Image

Image

Once I had a boss and a face I swapped jaws and set the casting up again.

Image

It didn't take long to get a result. Nice casting, no flaws and I didn't have to take much off it.

Image

This was the main comparison I was after. Normally, eccentrics are made as slim as possible because space is usually at a premium, not so in this case so I shall make the eccentric with as large a bearing surface as possible. The bore of the strap has to run i9n a recess turned in the outside diameter of the eccentric itself so I wanted to be sure I have enough metal. I have, so all is well.
We'll go back to the strap tomorrow....
Stanley Challenger Graham
Stanley's View
scg1936 at talktalk.net

"Beware of certitude" (Jimmy Reid)
The floggings will continue until morale improves!
Old age isn't for cissies!
User avatar
Stanley
Global Moderator
Global Moderator
Posts: 99371
Joined: 23 Jan 2012, 12:01
Location: Barnoldswick. Nearer to Heaven than Gloria.

Re: SHED MATTERS 2

Post by Stanley »

I popped i9n and blued the CI last night. I want to do some marking out for the eccentric before I take the 3 jaw off to deal with the strap. The CI is far too big, lots of meat to come off but it was the nearest thing I had to finished size without using mild steel. CI is a lot better bearing surface against bronze.
The design committee have checked progress and my method and approved.... No changes this morning for once!
Stanley Challenger Graham
Stanley's View
scg1936 at talktalk.net

"Beware of certitude" (Jimmy Reid)
The floggings will continue until morale improves!
Old age isn't for cissies!
User avatar
Stanley
Global Moderator
Global Moderator
Posts: 99371
Joined: 23 Jan 2012, 12:01
Location: Barnoldswick. Nearer to Heaven than Gloria.

Re: SHED MATTERS 2

Post by Stanley »

The day did not start well! When I was cleaning up yesterday I caught my Moore and Wright dial calliper with my sleeve and knocked it on t6o the floor. When I came to use it today I found that something was badly wrong, it crunched when I used it. I soon realised that it was buggered ao I ordered a new one straight away, £40. No point mucking about, my eyes aren't good enough to start instrument making. So, water under the bridge, I got my Mitutoyo digi calliper out and pressed on....

Image

I knew I was going to be popping the 2 jaw SC on the lathe so while the three jaw was on I reduced the size of the casting....

Image

And marked up for my centres for turning the eccentric. A bit of bleeding obvious here but you never know, someone might want to know how to do it. The first thing you have to know is how much travel you want on your valve, take the lid off the steam chest and measure it. I'd done this already and knew that the throw was .655", I called it .66", divided by 2 and got .330 as the offset I needed. Set a sharp pointed tool dead on the centre and zero the cross slide. Wind out .330" and lightly mark the casting. Without altering this setting turn the casting round and do the same on the other side.

Image

Drill one centre on the circle under the VM and then mount the casting in a vee block with those two centres perpendicular. Use your square on the surface plate to get a perpendicular on the other face and drill the centre where the lines intersect.

Image

Image

You now have two centres on each side, one for the boss and one for the eccentric.

Image

Now we need to make the strap because we don't know what size the bore will be until we have it finished and we need that measurement before we can make the eccentric. We need two holes for the clamp bots and two for the 2BA bolts that will hold the con rod to the strap.

Image

Ready for marking up and splitting in two.

Image

Set up ready to saw. No point massing about with fine scriber marks, the saw is going to take 1/16" out.

Image

Split, bores tidied up and clamp bolts fitted nutted up tight.

Image

Ready for boring. Set it so the tailstock centre is on the split. Then bore out to a clean bore and as large as you can get while leaving meat round it.

Image

Once you have a bore, face the strap by running the boring tool across it, do both sides.

Image

Close of play. We have a strap finished and all the edges broken. Tomorrow we can do a bit of eccentric turning.....
Stanley Challenger Graham
Stanley's View
scg1936 at talktalk.net

"Beware of certitude" (Jimmy Reid)
The floggings will continue until morale improves!
Old age isn't for cissies!
User avatar
Stanley
Global Moderator
Global Moderator
Posts: 99371
Joined: 23 Jan 2012, 12:01
Location: Barnoldswick. Nearer to Heaven than Gloria.

Re: SHED MATTERS 2

Post by Stanley »

Image

A nice tidy start to the day, I cleaned up John's brass turnings off the lathe and took the two jaw off. I decided to give it a good clean out, it gets neglected a bit. Then I put the 3 jaw back on and set about getting started on my eccentric.

Image

First thing was to true up this dead centre. I've had it clodding about for a long time but never used it. I was surprised to find it was hardened. Good job I had a tipped tool in!

Image

I hit a bit of a snag right away. I hadn't got a dog that was exactly right for driving the work piece. I had to file this one out to get it to fit and of course it's straight so I had to have a bit of a rethink.

Image

It's a steel forging so it was strong enough to drill and tap to take a 3/8" bolt.

Image

It took a while to get set up for turning but eventually I got there. The first cut was even across the face so that was encouraging, it means I must have got my centres aligned properly. Then it was just a case of steadily away with a sharp tool, no heavy cuts and a slow feed. No point rushing and spoiling the job.

Image

I had to do an hour overtime to get to this stage. I've got it concentric on this centre and it's 1.5" diameter which means I have plenty of meat for the 1.09" bore on the strap. That was quite enough for this morning. I need to do some measuring and take a view on how deep the gutter for the strap will be. I think I can get away with no more off the diameter of the eccentric....
Stanley Challenger Graham
Stanley's View
scg1936 at talktalk.net

"Beware of certitude" (Jimmy Reid)
The floggings will continue until morale improves!
Old age isn't for cissies!
Locked

Return to “Crafts”