Page 29 of 103
Re: SHED MATTERS 2
Posted: 14 May 2015, 21:43
by micktoon
Hi Stanley, glad to hear the chuck turned up ok and you are happy with it

, glad to be able to help you out. It would appear your cheque was for £10 too much

, I have had a word with John and instead of having coffee's on you we have decided it will be a more worthy cause for us to 'invest' it for you at forth coming boot sales then send you a mystery parcel of what ever we can get for your £10

So who knows what we might come across but if there is anything you are short of speak up

.
Dam fine work on the back plate too Stanley, looks like you almost have the job done already, keep up the good work.
Cheers Mick
Re: SHED MATTERS 2
Posted: 15 May 2015, 03:27
by Stanley
You do what you like with the tenner as long as you have a coffee on me. Tipped parting tool that will fit my quick change post? The slots are 1.25" deep.....
The chuck back is as near dammit perfectly right. I shall rough turn the register on the Harrison to get the meat off and finish it on the 1927 lathe. The chuck is good quality... It will complete the lathe.
Re: SHED MATTERS 2
Posted: 15 May 2015, 10:22
by Gadge
Stanley wrote: Lovely to see you re-using material others have thrown away. The affluent West has forgotten how to do this, a chip goes in a household machine and it's cheaper to buy a new one.
You might like my letterbox, then!

Front view
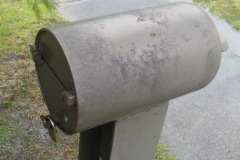
Rear view
The backstory: my house is opposite the 'stem' of a T-intersection, of a service road access.
In times past, the occasional car driver would plant the foot a bit too hard, and run wide across my nature strip. One ran wide enough to collect the original timber letterbox one night [before the local council decided to plant a tree in the nature strip]. So I hatched a scheme, that would leave any car that hit my new 'tough' letterbox looking a bit sad. My side of the footpath, so it doesn't come under 'road furniture' standards.
I scrounged a couple of scrap BOC high pressure gas bottles, and a piece of 6" RSJ, to create this one. I had an oxy/propane set operational at the time, so I used that for the major cutting tasks involved. Including cutting the slot - but I did get a surprise, to find how thick the base of a 'G' size steel oxygen bottle is!
The newspaper holder is a very recent addition; it was the first job through the molasses de-rust bath. Only easy way to de-rust the inside of a pipe!
I can relate to your filing of holes to square; I had to do the same on this item's mounting bolt holes, so I could use coach bolts to mount it.
Re: SHED MATTERS 2
Posted: 15 May 2015, 10:24
by Stanley

First job this morning was the one that always made Newton laugh at me, clean the lathe before I start. I do better work on a clean lathe! Then sort out the parting tool I broke and set it up at centre height.

Then sharpen my HS cutter and hone it. I want some clean cutting this morning.

This was the idea, measure up and decide how big the register was and then take the meat out of the chuck back , a lot easier on the Harrison than the 1927.

I sharpened a cutter, got all set up and trued the back casting as it runs slightly different on its own nose. Then, using the callipers, quietly reduce the register trying it against the chuck. No good measuring, I can't trust my eyes....

Close of play, ready for marking and drilling the four holes for the holding down bolts. But that can wait until tomorrow. If I tell the truth I took a thou too much off the register, you can just turn it on its seat, ideally it ought to be snug almost to the point of being tight but I've seen much worse! |We'll call that a reasonably well fitted chuck back.
Re: SHED MATTERS 2
Posted: 15 May 2015, 10:29
by Stanley
Doug, We posted at the same time almost... I like the thinking behind the post box! If anyone hits that they'll not drive away scot-free!
Re: SHED MATTERS 2
Posted: 16 May 2015, 10:25
by Stanley

Today's task was dead simple, drill four holes in the backplate to coincide with the 8mm tapped holes in the chuck body. I decided the best way was to put some blue round the holes, drop the back on, mark a register with my pen and then lift the back off. Theoretically I should have 4 well marked locations....

The marks weren't as clear as I would have hoped but I did my best to punch in the centre and set the back plate up in the VM for the initial drilling.

After centre drilling the pop marks I drilled half way through with an 8mm drill.

And then finished the holes on the drill press and countersunk them. My eyes had let me down, two holes were perfect, two were slightly out of line so I had to do some easing with a file. No big problem because the cap screws only hold the chuck back firmly in the register. They don't affect the centring of the body.

After I had the back firmly bolted on I put the chuck on the lathe and tried it with the clock. As far as I can see there is a lot less than 1 thou error in the run out. That's probably within the manufacturing tolerance of the chuck itself and it says a lot for the accuracy of Johnny's little lathe because the final fit was turned on it. I think the old lad may have been watching with approval. His lathe is now complete, it has a 4 jaw independent!
Re: SHED MATTERS 2
Posted: 16 May 2015, 12:48
by Gadge
Stanley wrote:It just goes to show how important the smith was in those days. Doug mentions that the pick is half way though being sharpened by re-forging. It was Jimmy Thompson, the smith at Marton, who first showed me that this was the only way to sharpen many tools. Until then I knew nothing about it. He told me that when he started his apprentice with Hoggarth, the old smith, all he did for the first year was sharpen mason's tools when they were building new Gledstone Hall and that included hardening and tempering. He could sharpen a chisel, harden it and re-temper all in one heat. Wonderful to watch.....
Many thanks for the kind words on the forge, Mick and Stanley. I'd have to say that I'm very pleased, with how well it works!
It's certainly most impressive, to see a skilled blacksmith in action. Quite amazing what they can do, and make it look easy [always the mark of the true professional]! My interest in the trade goes back quite a ways, but was greatly enhanced by a two-weekend course I did a few years ago, instructed by a local tradesman-qualified blacksmith [there are still a few about, down here]. There's no substitute for hands-on training, with this stuff.
That hot chisel in the pic above, was one he re-shaped for me. It looked pretty sad, to start with - badly burred, and with a business edge that had been butchered to a trapezium shape. It took him one heat to re-shape that...
Re: SHED MATTERS 2
Posted: 17 May 2015, 03:50
by Stanley
Jimmy was an artist with a hammer. He made this fire basket and hood for me at Hey Farm...

What fascinated me was his ability to make very delicate rose petals one by one than weld them into an ornamental rose. When he made a coiled end decoration he always drew the end out to a fine edge and coiled it close, he said that was one of the marks of good wrought ironwork. He leff a fine gap in the coil and the only way you could paint it was with a goose feather. His finish was always 'Galvafroid' zinc based paint and matt black. He said that wrought Ironwork should never be painted with gloss paint.....
Wondering where to go next in the shed. A good clean up first I think......
Re: SHED MATTERS 2
Posted: 17 May 2015, 10:33
by Stanley

The first thing I wanted to do this morning was have a good clean up so I cleaned the lathe down and then decided we might as well have a clean tablecloth, or rather turn the mucky one over. Besides, it's a good thing every now and then to clean the big surface plate off and oil it. While I was doing that the 4 plug extension fell off its precarious perch at the back of the bench (again!) and I decided to do something about it. When I was first setting the shop up I propped the extension bar at the back and it's been like that ever since. So I decided to do the job properly, drill the wall, plug a couple of brass screws in and mount the bar on the wall.

15 minutes later and that's better! Why do we put up with these things? A good clean up of the grinding dust in that corner and a few minutes later we had a bit of order restored.

Another small step forwards! Now you might wonder what the lump of steel on the bench is.... Johnny always said that a good test of a turner was to make a gyroscope. This piece of steel has been laid in the tray of the miller for a long time and every time I see it I think there's a gyroscope hidden inside it, so this morning I got it out and decided to have a crack at it.

All my good intentions fell apart when I got it chucked up in the lathe. I thought it was cast but it's not! I realised this when my favourite carbide cutter completely failed. I found that this ceramic tip would take a very fine cut at slow speed but I soon abandoned the idea. It is very highly hardened steel. Far easier to start from scratch so out it came and into the swarf bin in the yard! Then a bit of concentrated grinding on the green grit wheel and remounting it so it's cutting on centre. That brought me near enough to clocking off time so I shall have another think tomorrow.....
Re: SHED MATTERS 2
Posted: 17 May 2015, 19:01
by PanBiker
In your first two pictures there Stanley, the termination to your high current switch on the wall sorry to say looks like its an accident waiting to happen! Electricity is a lot faster than you or anyone else. Insulation looks to be stripped off before the cable enters the housing. Don't forget to isolate before any remedial action.
Re: SHED MATTERS 2
Posted: 18 May 2015, 03:24
by Stanley
Not as bad as it looks Ian, it's very heavy wire and insulation as it's the feed to the welder. Only live when that's being used very infrequently. Will tape it up so it doesn't offend you! (Or you could pop round and make sure I am safe....
)
Re: SHED MATTERS 2
Posted: 19 May 2015, 05:01
by Stanley
Apologies for the no-show yesterday. I woke with a bad wrist and spent the day rubbing it with embrocation. Better this morning so I'll take a view later. Perhaps I've been asking too much of my tired old body!
Re: SHED MATTERS 2
Posted: 20 May 2015, 04:36
by Stanley
Had another day of embrocation and rest and arm is 100% better. I shall be in there today I think.....
Re: SHED MATTERS 2
Posted: 20 May 2015, 10:40
by Stanley

Normal service is resumed. I started by getting the nasty sharp swarf from that hardened steel off the lathe and tidied the cable up that Ian was nattering me about. Then I went into the scrap boxes and sorted out a small piece of rod and a lump of bronze for the flywheel of the gyroscope. I faced one side and drilled it 1/4".

Then I cleaned up the rod, put a tiny centre in each end and reduced it to 5thou above 1/4", a bit much for an interference fit on 1/4" but I thought it would be OK.

Then into the vice and pressed it home. It's a very tight fit, it creaked as it forced its way though. I can't see that shifting in a hurry!

Here it is. One side faced the other all sorts of funny shapes.

Here it is mounted up ready for some light cuts to get the flywheel down to size and properly concentric. I can't imagine it moving on the shaft but we'll find out tomorrow.....
Re: SHED MATTERS 2
Posted: 21 May 2015, 10:36
by Stanley
Mick, you were3 asking me the other day if there was anything I wanted.... Well, this morning I dropped my only 7/64" drill and, you've guessed it, I can't find it! So if you see a couple at a car boot sale, grab them for me please....
My eyes let me down a couple of times this morning but we'll get to that as we go through what I've been doing.

After making sure my set up was still OK I got on with finishing the rotor. Fine cuts and slow feeds with a very sharp tool.

I soon got quite a nicely finished rotor and shaft that seems to run perfectly true....

I got the ends red hot and quenched them to harden the bearing surfaces in the centres at each end.

Then I found this lump of cast iron which looked like a good start....

Back in with the carbide tool and a bit of reducing....

A nice clean CI circle. All well and good but as I made it I began to suspect I was wasting my time because the rotor wasn't going to be heavy enough to control the weight of the frame. The centre shaft is too long.

No point going into a decline, I may be making two gyroscopes here! So I crashed on with threading the rim for the 2BA screws that are going to be the bearings.

Then my eyes let me down again.... I could have sworn these two holes were perpendicular! Actually it shouldn't matter too much but isn't how I intended it. I decided I'd had enough for the morning.
It's been interesting and I have learned quite a bit. The length of the shaft wants to be the same as the diameter of the rotor. The supporting ring needs to be lighter. It may well be that I'll shorten the shaft on the rotor and make another ring and then make a heavier, larger rotor to suit the bigger frame. For the time being I shall crack on, complete it as is and see how it behaves. Who knows, I might have more to learn.....
Re: SHED MATTERS 2
Posted: 22 May 2015, 03:52
by Stanley
I've decided I am making two gyroscopes. I shall make a heavier rotor for the frame and then shorten the shaft on the original rotor and make a smaller frame to fit.....
Re: SHED MATTERS 2
Posted: 22 May 2015, 10:46
by Stanley

I decided to make a heavier rotor for the frame I had. Into the treasure chest and a cylinder cover casting that was partially machined was just the right size.

I cleaned one side up and faced it as accurately as I could, chamfered the edge and reversed it. Same on this side and then I centred it and drilled it 1/4".

A nice result and as accurate as I could possibly make it.

I decided that the two existing holes in the frame would do for fastening the circular guard on the frame and marked two fresh ones at 90 degrees. I took a lot more trouble this time to accurately measure for the two new holes.

Then I made as certain as possible that I had it perpendicular under the drill and popped two 4mm holes in. Full of confidence I went to the vice to thread the holes 2BA... But then....

A bit of a disaster...

I'd used the 4mm tapping drill which was a bit to close for comfort and the tap split the CI ring....
Back to square one! My own fault, I shouldn't have used CI for the frame. I shall have to have a good root in the treasures and find an alternative. I told you I'd be learning, the moral is don't trust CI too far when the wall thickness is fine... Ah well.....
Re: SHED MATTERS 2
Posted: 23 May 2015, 10:29
by Stanley

There were two candidates for stock to take the frame out of for the big rotor, one a piece of bronze but that's cast and so I could be in the same trouble. The other is a piece of 4" diameter EN8 or whatever it is called these days. In case you're wondering why I have big lumps like this, you need them if you're chopping crankshafts out of the solid. At this point it all looked quite easy, use the fixed steady to mount the stock and simply turn the frame out of the end. However, there was a little snag.... The steady isn't big enough to accept 4" steel!

I put the big 4 jaw on and set the blank up within a couple of thou using the clock.

After centring it and popping a 1/4" then a 1/2" drill in I bored the centre out 1 1/4" and put a centre in the bottom of the hole.

This setup gives me a firm and stable workpiece but still allows me access to the end face to bore out the metal I don't need.

All this took time but at last I had a good set up and I could start cutting.

Close of play. I'm ready to get my frame. It took a long time but I wasted a lot of time trying to make the steady work. Never mind, I'm not in any rush!
Re: SHED MATTERS 2
Posted: 23 May 2015, 12:21
by plaques
Stanley you could always make your frame square!
Re: SHED MATTERS 2
Posted: 24 May 2015, 03:24
by Stanley
That thought had occurred to me P but it wouldn't look right! I don't mind the difficulties. One of the glories of blokes in sheds is how they find ways of doing jobs that are far to big for their machines. If I still had my old Wilson lathe I could have made the frame easily by now. Lots to be said for having a big lathe about your person!

Newton with the Wilson at Wellhouse shop in 1979. When they finished there he took it home with him because it was the best facing lathe in the shop. When he moved into his little shed he gave it to me and when I lost my big shed I gave it to John at REW and I used it there to refurb big steam valves for John Ingoe. It got damaged in a flood and scrapped eventually. Made in Keighley it was a good tool.....
Re: SHED MATTERS 2
Posted: 24 May 2015, 10:34
by Stanley

First job was to do some measuring and make sure I knew what I was making! Then into the job. I haven't rushed anything, taken my time and we haven't had any cock-ups (at least, none that I have noticed!)

I honed the tip of my cutter and went looking for my outside diameter...

I had a Stag welded tip side cutting tool that has only been used once so I put that in and shifted metal until it was fouling the cut because of it's shape.

Eventually I had to give up the security blanket of the centre and trust the big 4 Jaw. I took the rest out down to internal diameter with small very careful cuts.

Eventually I had to bite the bullet and part it off. Slowest speed and a lot of oil. In case anyone is thinking I've slipped up by using the centre, not so, the frame overhangs the centre and it just makes sure4 I have the best running workpiece I can.

This was a nice moment.....

Close of play... we have a frame which can be cleaned up on the 3 jaw. I have left all the cleaning up until tomorrow!
Re: SHED MATTERS 2
Posted: 25 May 2015, 10:32
by Stanley

I had a good start, cleaned the lathe off, changed the four jaw for the 3 jaw. Vacuumed the carpet and while I was replacing stock in the treasure chests did some cleaning up there as well.

I cleaned the frame up, broke all the edges marked it up properly. Drilled and tapped it and fitted the 2BA screws. So far so good!

After boring the rotor 5/16" I found a handy piece of steel and made the best job I could of making the spindle. I sharpened the cutter and honed it and checked my centres before I started. I crept up on what I'd decided was OK very carefully. Then cut it to length reversed it and put the centre in the other end.

Then into the vice to force the spindle into p-lace....

The result..... Oh dear! I had given it too much bite and the spindle wouldn't stand it. I have an idea I mistook a measurement somewhere. No matter, I shall have another crack at it tomorrow. I told you it was a learning curve......
Re: SHED MATTERS 2
Posted: 26 May 2015, 10:40
by Stanley

The first job of course was to get the bent shaft out of the rotor. I went back to what Newton taught me, never go for the 'easy' option of knocking it out. I know that that looks like the easy way and would probably work but force always carries the possibility of doing damage. If he had a rod jammed in a piston, or a piston in a bore Newton always bored them out. That way you limit the damage. So, I changed the jaws in the chuck, poked a 1/4" drill down far enough and then followed it with a 5/16" drill.

Dead easy and no damage.

I changed the jaws back, turned the shaft to one thou above the bore size (which was slightly larger after boring the rod out) and in no time I had it coated with Shaftlock and squeezed down to position.

A quick check to make sure I had the length and position right....

Then I popped the assembly in the chuck, put the centre in place and took a very light, slow cut just to make sure I had it concentric. It looked OK actually but no harm in a last skim.

When I'd reversed it and done the other side I took a coup[le of cuts across the periphery. It was a couple of thou out because of the boring but cleaned up nicely.

It's as accurate as I can get it....
I put points on the end of the 2BA screws, adjusted them so there was no play, mounted the frame in the vice and gave it a spin. It runs as steady as a rock and once spinning, if you take it out of the vice it has a powerful gyroscopic effect but there is a problem. I can't spin it fast enough to get the effect strong enough to support the weight. So, in one respect I have been successful, it is accurate, but I can't spin it fast enough to get enough effect to support it at an angle. I suppose the right thing to do would be to find a way of getting more revs on it but I took the coward;s way out....

It becomes an interesting example of turning in my collection.

I shall make a frame for the smaller one and see if I have any better luck. I suspect the trick is to make the frame light enough to be supported by the effect of the rotor..... We shall see!
Re: SHED MATTERS 2
Posted: 26 May 2015, 13:30
by chinatyke
Nice work, Stanley, you got there in the end. Don't you just wrap a piece of string around the shaft and pull it hard to rotate these things?
Re: SHED MATTERS 2
Posted: 27 May 2015, 02:37
by Stanley
Dead right China but It's too heavy for the amount of rotation I can put in it. You can feel the very strong gyroscopic effect if you hold it by the frame and tilt it but it's not enough to counteract the weight of the frame. I'm happy with the accuracy and the quality of the turning but the design is wrong.....