Miscellaneous DIY Projects (or bits of jobs)
-
Stanley

- Global Moderator

- Posts: 106138
- Joined: 23 Jan 2012, 12:01
- Location: Barnoldswick. Nearer to Heaven than Gloria.
Re: Miscellaneous DIY Projects (or bits of jobs)
"I must get a vise, I'm fed up with making do with G-clamps."


Stanley Challenger Graham
Stanley's View
scg1936 at talktalk.net
"Beware of certitude" (Jimmy Reid)
The floggings will continue until morale improves!
Old age isn't for cissies!
Stanley's View
scg1936 at talktalk.net
"Beware of certitude" (Jimmy Reid)
The floggings will continue until morale improves!
Old age isn't for cissies!

Re: Miscellaneous DIY Projects (or bits of jobs)
Got a coat of white gloss on the French door reveals, I reckon it'll need another coat but that can wait until I decorate the rest of the room.
Kev
Stylish Fashion Icon.

Stylish Fashion Icon.

Re: Miscellaneous DIY Projects (or bits of jobs)
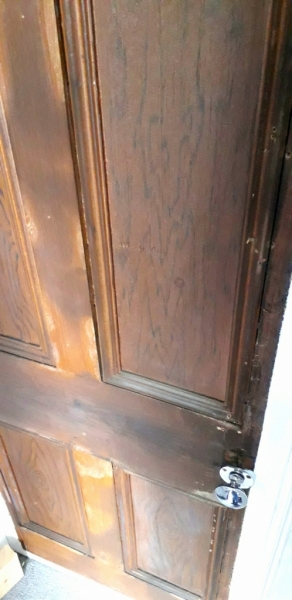
Pulled the plywood off the cellar door today, the original panelling is in very good condition, I reckon the ply went on in the 1960s. I'll flatten back the paint that's around the edges and give it a couple of coats of primer and see how it looks.
Kev
Stylish Fashion Icon.
Stylish Fashion Icon.
-
Stanley
- Global Moderator
- Posts: 106138
- Joined: 23 Jan 2012, 12:01
- Location: Barnoldswick. Nearer to Heaven than Gloria.
Re: Miscellaneous DIY Projects (or bits of jobs)
All the doors here were covered and had multiple layers of paint as well. I took them all off, stripped the facings and took them all to a place in Colne to be stripped with caustic soda. A savage solution. I had surprisingly good results and after minimal sanding and a couple of coats of matt polyurethane varnish went back on. I remember being surprised how heavy they were, they are all Baltic pine. I haven't touched them for 25 years.
Stanley Challenger Graham
Stanley's View
scg1936 at talktalk.net
"Beware of certitude" (Jimmy Reid)
The floggings will continue until morale improves!
Old age isn't for cissies!
Stanley's View
scg1936 at talktalk.net
"Beware of certitude" (Jimmy Reid)
The floggings will continue until morale improves!
Old age isn't for cissies!
Re: Miscellaneous DIY Projects (or bits of jobs)
The doors at Park Street were all stripped, along with the architraves and skirting boards. It looked very good but we fancy a change here, Park Street was open plan on the ground floor and there was plenty of light so I could get away with the darker doors and woodwork. Rightmove kindly keep estate agent details online, it's a lovely house just too big for two of us. The young couple who bought it now have a baby so it's a proper family home now
https://www.rightmove.co.uk/house-price ... ry=england
The 'through' lounge and diner at Park Street
https://www.rightmove.co.uk/house-price ... ry=england
The 'through' lounge and diner at Park Street
You do not have the required permissions to view the files attached to this post.
Kev
Stylish Fashion Icon.
Stylish Fashion Icon.
-
Stanley
- Global Moderator
- Posts: 106138
- Joined: 23 Jan 2012, 12:01
- Location: Barnoldswick. Nearer to Heaven than Gloria.
Re: Miscellaneous DIY Projects (or bits of jobs)
And a brass cannon in the grate.....
Stanley Challenger Graham
Stanley's View
scg1936 at talktalk.net
"Beware of certitude" (Jimmy Reid)
The floggings will continue until morale improves!
Old age isn't for cissies!
Stanley's View
scg1936 at talktalk.net
"Beware of certitude" (Jimmy Reid)
The floggings will continue until morale improves!
Old age isn't for cissies!
Re: Miscellaneous DIY Projects (or bits of jobs)
Indeed, it's in the fireplace here. Youngest grandson (6) is fascinated by it.
Kev
Stylish Fashion Icon.
Stylish Fashion Icon.
-
Stanley
- Global Moderator
- Posts: 106138
- Joined: 23 Jan 2012, 12:01
- Location: Barnoldswick. Nearer to Heaven than Gloria.
Re: Miscellaneous DIY Projects (or bits of jobs)
They tell me Kahara is playing with his beam engine every day. I wonder whether these things are infectious.....
Stanley Challenger Graham
Stanley's View
scg1936 at talktalk.net
"Beware of certitude" (Jimmy Reid)
The floggings will continue until morale improves!
Old age isn't for cissies!
Stanley's View
scg1936 at talktalk.net
"Beware of certitude" (Jimmy Reid)
The floggings will continue until morale improves!
Old age isn't for cissies!

Re: Miscellaneous DIY Projects (or bits of jobs)
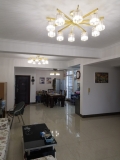
Back to the dining room light saga. The problem was there was an existing ceiling fan which my wife wanted to retain. So I removed the light fitting slung under the fan assembly and arranged to fit a new light fitting to match the new ones in our lounge. The latest light fitting arrived this morning as expected. First attempt was with the crystal light shades hanging downwards and it didn't look right. It was never going to look 100% because the fan and light assembly are not matching. So I fitted a new longer centre support rod and reversed the light shades so they stood erect. Much better but not 100%. My wife looked at it and said "take away the fan and we'll use a portable floor fan when we want one" - Gnash,gnash. Sorry, too much trouble now. I might do it in the future "when I get bored again".


Re: Miscellaneous DIY Projects (or bits of jobs)
They definitely look better as uplighters under the fan, I'm sure your wife will get used to them
Kev
Stylish Fashion Icon.
Stylish Fashion Icon.
Re: Miscellaneous DIY Projects (or bits of jobs)
The follow-on job is put the old lounge light fitting in our upper lounge. The fan and fitting removed from there gets relocated to our bedsitter in Nanning. It's like musical chairs but with lights. I'm left with one and half fittings for spares for the leased apartment, but in reality they will probably remain in a box under the stairs!
Re: Miscellaneous DIY Projects (or bits of jobs)
I have a lot of 'stuff' in a 'box under the stairs' despite a big clearout 18 months ago when we downsized.
Kev
Stylish Fashion Icon.
Stylish Fashion Icon.
-
Stanley
- Global Moderator
- Posts: 106138
- Joined: 23 Jan 2012, 12:01
- Location: Barnoldswick. Nearer to Heaven than Gloria.
Re: Miscellaneous DIY Projects (or bits of jobs)
So have I but it is all essential stuff and material for future projects!
Stanley Challenger Graham
Stanley's View
scg1936 at talktalk.net
"Beware of certitude" (Jimmy Reid)
The floggings will continue until morale improves!
Old age isn't for cissies!
Stanley's View
scg1936 at talktalk.net
"Beware of certitude" (Jimmy Reid)
The floggings will continue until morale improves!
Old age isn't for cissies!
Re: Miscellaneous DIY Projects (or bits of jobs)
I can't live with the fan and light being such different colours, the light is 'green gold' and the fan is bronze. I've ordered a couple of cans of 'green gold' spray paint and I'll dismantle everything and see if I can get a good match. If it doesn't work out I'll consider ditching the fan assembly and just using the light fitting, a suggestion already put forward by my wife. Another fiver spent, Stanley! Keeps me out of mischief!
-
Stanley
- Global Moderator
- Posts: 106138
- Joined: 23 Jan 2012, 12:01
- Location: Barnoldswick. Nearer to Heaven than Gloria.
Re: Miscellaneous DIY Projects (or bits of jobs)
It seems to me that it's a lot simpler living as a singleton and not worrying over much about the internals of the house as long as it is warm and doesn't let the weather in.
Stanley Challenger Graham
Stanley's View
scg1936 at talktalk.net
"Beware of certitude" (Jimmy Reid)
The floggings will continue until morale improves!
Old age isn't for cissies!
Stanley's View
scg1936 at talktalk.net
"Beware of certitude" (Jimmy Reid)
The floggings will continue until morale improves!
Old age isn't for cissies!
Re: Miscellaneous DIY Projects (or bits of jobs)
Fans are essential for comfort here. Ceiling fans are convenient. The alternative is to move a floor standing fan, or shut all the doors and windows and use the air-con. Any tips on spraying metal using an aerosol paint can? I'm guessing clean the work piece well, and then multiple light coats? What can possibly go wrong? I'll have a practice first on a piece of waste metal.
-
Stanley
- Global Moderator
- Posts: 106138
- Joined: 23 Jan 2012, 12:01
- Location: Barnoldswick. Nearer to Heaven than Gloria.
Re: Miscellaneous DIY Projects (or bits of jobs)
An etching primer can help China. Failing that plenty of work to give the paint something to key into.
Stanley Challenger Graham
Stanley's View
scg1936 at talktalk.net
"Beware of certitude" (Jimmy Reid)
The floggings will continue until morale improves!
Old age isn't for cissies!
Stanley's View
scg1936 at talktalk.net
"Beware of certitude" (Jimmy Reid)
The floggings will continue until morale improves!
Old age isn't for cissies!
Re: Miscellaneous DIY Projects (or bits of jobs)
Thanks, didn't think of that. I'll rub it down with sandpaper or a wire brush that fits on my drill. Don't want paint flakes falling in my dinner.
-
Stanley
- Global Moderator
- Posts: 106138
- Joined: 23 Jan 2012, 12:01
- Location: Barnoldswick. Nearer to Heaven than Gloria.
Re: Miscellaneous DIY Projects (or bits of jobs)
You're welcome China.
Stanley Challenger Graham
Stanley's View
scg1936 at talktalk.net
"Beware of certitude" (Jimmy Reid)
The floggings will continue until morale improves!
Old age isn't for cissies!
Stanley's View
scg1936 at talktalk.net
"Beware of certitude" (Jimmy Reid)
The floggings will continue until morale improves!
Old age isn't for cissies!
Re: Miscellaneous DIY Projects (or bits of jobs)
I sprayed the fan and I'm very proud of the result. I got the usual flak from my wife whilst taking down the fan down for disassembly and preparation. She said there is a Chinese saying for making a big job out of a small one: It's like taking off your trousers to fart! She didn't believe that painting it would make any difference and was frightened I was going to make a mess of it.
All re-assembled and re-hung. Sorry, Kev, it is back to being a downlighter with a modified and shortened suspension tube in order to match the other two units. Looks good.
Picture later.
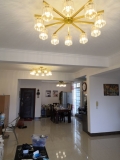

All re-assembled and re-hung. Sorry, Kev, it is back to being a downlighter with a modified and shortened suspension tube in order to match the other two units. Looks good.
Picture later.
Re: Miscellaneous DIY Projects (or bits of jobs)
It does look good, blends in nicely. Top job.
Kev
Stylish Fashion Icon.
Stylish Fashion Icon.
-
PanBiker

- Site Administrator

- Posts: 18218
- Joined: 23 Jan 2012, 13:07
- Location: Barnoldswick - In the West Riding of Yorkshire, always was, always will be.
Re: Miscellaneous DIY Projects (or bits of jobs)
I agree, looking good China.
I am making progress with the bedroom and can now see light at the end of the tunnel I have finally finished the papering of the front wall, glad to see the back of that. I had to put three layers on. After stripping back, first the Wallrock dampstop thermal layer which was a paste the wall job. I put a double layer under the window where the new radiator will be. Next layer was with lining paper which I put on horizontally. Final layer was an Anaglypta (Tudor). Not quite the same as the rest of the room, the original Anaglypta design that we used the last time we papered has been discontinued. That is a small tulip like flower design. The Tudor pattern once up on the front wall you will not notice the difference. It was a 5cm repeat pattern so quite easy to match up. I worked from either end back into the window with any slight mismatch in the pattern in the centre of the 6" deep strip above the window below the ceiling and the 18" under the window bottom which will be behind the radiator. Each side of the window which is the bits you will see is perfectly pattern matched.
It's all drying off nicely and will be ready for the emulsion next, the rest of the walls and ceiling have all been done. Sally has made a start glossing the skirting and architrave at the back of the room. I will give the new skirting on the window wall and the new window bottom a coat this afternoon. Window bottom only needs one more coat, I put two coats of primer on all the new wood.
I have primed a new planed up wooden baton to fit above the window. I will fit it above the existing narrow baton that is only wide enough for a curtain rail. I was going to take that off but on inspection it looks like it is an original fixing from when the house was built. There must be a thin wooden lintel or something behind the plaster as the rail was fasten up with square floorboard nails, about 10 of them in 4ft of rail! I gave up on levering it off (discretion the better part of valour) as it would probably have brought half the plaster with it as well! The new baton is wider and will be easier for fixing pole supports to. The pole rail fixings were originally plugged directly into the wall above the baton. I removed the plugs and filled the holes before papering.
It's taken a while and apart from having to wait for the different layers to dry off I can only do a couple of hours at a time before fatigue sets in. Stepladders are the main spoilers to progress there.
Ian
Re: Miscellaneous DIY Projects (or bits of jobs)
DIY projects on hold here until Thursday. A selection of poking, prodding, scans, infection and having to work scuppered the best laid plans.
Kev
Stylish Fashion Icon.
Stylish Fashion Icon.
-
PanBiker
- Site Administrator
- Posts: 18218
- Joined: 23 Jan 2012, 13:07
- Location: Barnoldswick - In the West Riding of Yorkshire, always was, always will be.
Re: Miscellaneous DIY Projects (or bits of jobs)
Best of luck with the tests Kev. All the DIY jobs will still be there when you are back up to speed.
Ian
-
PanBiker
- Site Administrator
- Posts: 18218
- Joined: 23 Jan 2012, 13:07
- Location: Barnoldswick - In the West Riding of Yorkshire, always was, always will be.
Re: Miscellaneous DIY Projects (or bits of jobs)
Just fixed the knife drawer in the kitchen. I noticed it was not pulling up on the soft close mechanism. Once I had figured out how to remove the drawer from the runners, (nearly six years since I put the units in) it was obvious what the problem was. The right hand runner fixings had worked slightly loose. A quick re-tightening of those and all is back to normal. Note to self, to remove drawers, remove side locking plates, pull off drawer front, press plastic release catches on underside of drawer unit, lift at front and pull back to remove. Easy when you know how!
Ian