SHED MATTERS 2

Locked
User avatar
Stanley
Global Moderator
Global Moderator
Posts: 99371
Joined: 23 Jan 2012, 12:01
Location: Barnoldswick. Nearer to Heaven than Gloria.

Re: SHED MATTERS 2

Post by Stanley »

Later at 11:30. We've got our slippers glued together again, all the tools put away a tidy bench and a newly hoovered carpet!

Image

The3n a major task.... I store my copper pipe along the top of the backing piece of the bench and they annoy me when they slip off. I've been promising myself I would do something about this and so this morning made this major step forward!

Image

Everything cleaned up so I changed the vices on the VM. This one is now dead square.....

Image

I thought that was it but then it struck me that the stop valve on the donkey would look better if it was oriented on the line of the enine so I altered that. I like it better this way....

That's it, I shall go for my sleep with all my ducks in a row.....
Stanley Challenger Graham
Stanley's View
scg1936 at talktalk.net

"Beware of certitude" (Jimmy Reid)
The floggings will continue until morale improves!
Old age isn't for cissies!
User avatar
Stanley
Global Moderator
Global Moderator
Posts: 99371
Joined: 23 Jan 2012, 12:01
Location: Barnoldswick. Nearer to Heaven than Gloria.

Re: SHED MATTERS 2

Post by Stanley »

I am considering what to do next.......
Stanley Challenger Graham
Stanley's View
scg1936 at talktalk.net

"Beware of certitude" (Jimmy Reid)
The floggings will continue until morale improves!
Old age isn't for cissies!
User avatar
Stanley
Global Moderator
Global Moderator
Posts: 99371
Joined: 23 Jan 2012, 12:01
Location: Barnoldswick. Nearer to Heaven than Gloria.

Re: SHED MATTERS 2

Post by Stanley »

Image

I had two things on my mind this morning, the keyless chuck and what to do next..... For a long while the two castings you can see here have been nagging me. They came out of a workshop clearance and at some time someone had decided to make the 1959 Model Engineer beam engine, this was what had survived. I went searching on the web and the castings are still made by Brunel Engineering but will cost about £300. The more I looked at a video on Youtube of one running, the less I liked it so once more, the castings are on the back burner.

Image

The keyless chuck was a bit more successful. I stripped it down and apart from a couple of small rags on what should have been smooth surfaces (no doubt caused by the jaws being loose and cocking over in the slide) I found no0thing wrong so I cleaned the slides up, greased the internals and re-assembled it. It was only then that I realised what had happened. The chuck body had come loose from the sleeve and doubtless because I can't see, I hadn't noticed it. I made sure it was locked tight and the chuck is once more A1 at Lloyd's....

Image

Another thing that has been bugging me is the fact that the Morse taper in the quill of the tailstock hasn't been holding perfectly and I could feel a rag inside it. So, out with the Mo0rse taper reamers and I poked the number 3 into the quill. A bit of quiet reaming and a check with engineer’s blue and I had almost a perfect seat. I didn't want to take too much off and left it at that. Much better, I am getting a positive seat now.
While I was doing a bit of compulsive cleaning I remembered that my 3/4" milling cutter needed a touch up and a new 15 degree relieving cut behind the edge so I did that.
So a morning of small but useful things. I am no nearer the next project but my head's working on it now and I've discarded the ME beam engine for the time being.....
Stanley Challenger Graham
Stanley's View
scg1936 at talktalk.net

"Beware of certitude" (Jimmy Reid)
The floggings will continue until morale improves!
Old age isn't for cissies!
User avatar
Tripps
VIP Member
Posts: 9624
Joined: 23 Jan 2012, 14:56

Re: SHED MATTERS 2

Post by Tripps »

I'm having a quiet chuckle that the man who can do all this, and has the resources of a small factory on the premises, - takes his woolly slippers to the cobblers to have the insole re-glued.
Inevitably brings back thoughts of Peter Sellers as Fred Kite. :smile:
Born to be mild
Sapere Aude
Ego Lego
Preferred pronouns - Thou, Thee, Thy, Thine
My non-working days are Monday - Sunday
User avatar
Stanley
Global Moderator
Global Moderator
Posts: 99371
Joined: 23 Jan 2012, 12:01
Location: Barnoldswick. Nearer to Heaven than Gloria.

Re: SHED MATTERS 2

Post by Stanley »

You're right David but it was the outer sole that was loose. I like sheepskin slippers but they have very thin composition soles so I always get another sole glued on when they are new. One big problem with these new composition rubber substitutes is having the right glue to bond them together. Ordinary impact glues don't cut it but the cobbler has some special glue that is put on hot and then cured. Even this is not perfect but it will last a lot longer than anything I could come up with. Because I am a good customer with my other boots he does them for free so better to go to a specialist. I know my limitations!
I may be absent off parade in the shed today. I have a task to prepare some stuff for the Steeplejacks and it could take a while. I haven't got any further with the next project but I'm beginning to favour a set of castings from Stuart for a very small engine....
On the other hand I have a hankering to break out into fresh fields and make a simple clock. The very old brass lantern clocks with just one hour hand have always attracted me.... The ones with the bell on the top. I think I'll have to consult with John Clayton.....
Stanley Challenger Graham
Stanley's View
scg1936 at talktalk.net

"Beware of certitude" (Jimmy Reid)
The floggings will continue until morale improves!
Old age isn't for cissies!
Gadge
Newbie
Posts: 30
Joined: 19 Aug 2013, 12:26
Location: Victoria, Australia

Re: SHED MATTERS 2

Post by Gadge »

Righto, I've been putting in a bit of 'shed time' of late. Much more primitive technology than Stanley's stuff, though!

First project was to mix up a Molasses and water bath, for de-rusting some old tools I had lying around.

8539

The active bath - stock feed grade molasses diluted about 1+10 with water. It has to ferment a bit before it really starts to act - and it smells about the same way as it looks! Not something to have indoors - so it's set up beside my workshop, and covered with an old washing machine cabinet panel.

A couple of blacksmith's anvil tool heads; de-rusted, surface-passivated by boiling in rainwater, and coated with good old Boiled Linseed Oil. Then re-handled, with recycled tool handles.
Handle shaping was done with a drawknife; the first time I'd used one for this job. Definitely a good jigger!

8540
Hot chisel at top; top fuller below.

8541
View of tool heads

8542

What's known as a 'Ballarat pattern miner's pick' over here; doubtless derived from the Cornish 'poll pick'. Head de-rusted, and part way through being re-pointed by forging.

8543
The forge in action. A side project was to convert an old cast iron car brake drum into a small sized 'fire pot' for my portable forge, for these smaller forging jobs. Quicker to get the fire going, and uses less fuel. Fuel is lump wood charcoal.

Edited to fix image links 12/04/2017
Last edited by Gadge on 12 Apr 2017, 00:08, edited 1 time in total.
Cheers,

Doug
User avatar
Stanley
Global Moderator
Global Moderator
Posts: 99371
Joined: 23 Jan 2012, 12:01
Location: Barnoldswick. Nearer to Heaven than Gloria.

Re: SHED MATTERS 2

Post by Stanley »

I like the molasses and water de-rusting bath Doug. Never come across that one before, I shall have a crack at it! I like the old brake drum for a forge bed as well, you've given me another idea......
I've shouted for help to Andy Gigglepants.... He knows about clocks, John, his brother is the man who makes the clock cases.....
Stanley Challenger Graham
Stanley's View
scg1936 at talktalk.net

"Beware of certitude" (Jimmy Reid)
The floggings will continue until morale improves!
Old age isn't for cissies!
User avatar
Tizer
Global Moderator
Global Moderator
Posts: 19692
Joined: 23 Jan 2012, 19:46
Location: Somerset, UK

Re: SHED MATTERS 2

Post by Tizer »

Gadge wrote:What's known as a 'Ballarat pattern miner's pick' over here; doubtless derived from the Cornish 'poll pick'. Head de-rusted, and part way through being re-pointed by forging.
I took this photo of models of Cornish miners' tools on display in the Royal Cornwall Museum, Truro, a few years ago.
Image
(Click the image for a larger picture.)
Nullius in verba: On the word of no one (Motto of the Royal Society)
User avatar
Stanley
Global Moderator
Global Moderator
Posts: 99371
Joined: 23 Jan 2012, 12:01
Location: Barnoldswick. Nearer to Heaven than Gloria.

Re: SHED MATTERS 2

Post by Stanley »

It just goes to show how important the smith was in those days. Doug mentions that the pick is half way though being sharpened by re-forging. It was Jimmy Thompson, the smith at Marton, who first showed me that this was the only way to sharpen many tools. Until then I knew nothing about it. He told me that when he started his apprentice with Hoggarth, the old smith, all he did for the first year was sharpen mason's tools when they were building new Gledstone Hall and that included hardening and tempering. He could sharpen a chisel, harden it and re-temper all in one heat. Wonderful to watch.....
Stanley Challenger Graham
Stanley's View
scg1936 at talktalk.net

"Beware of certitude" (Jimmy Reid)
The floggings will continue until morale improves!
Old age isn't for cissies!
User avatar
Stanley
Global Moderator
Global Moderator
Posts: 99371
Joined: 23 Jan 2012, 12:01
Location: Barnoldswick. Nearer to Heaven than Gloria.

Re: SHED MATTERS 2

Post by Stanley »

Image

I was watching John Mill's 'Doubleboost' video on Youtube. He has recently got himself a Harrison Lathe very similar to mine and Mick the Shed's and he's been busy sorting it out and getting everything to his liking. Yesterday he was making a retaining nut for his quick change toolpost but one with a handle on so that it saves reaching for a spanner each time you need to make an adjustment. What a good idea! So today I went in the shed to make one for my Harrison quick change post. The existing nut is a good depth and there is room to drill and tap the top for a handle so I popped it into the mill to make a flat in the correct place, I marked it while it was tight on the lathe. That plan soon foundered when I found that Harrison's had, as usual, made a good job of it. It was hardened and the milling cutter just bounced off it so on to Plan B!

Image

I had a dig in the stock pile and found some hexagon bar that was just the job.

Image

It didn't take long to get it to a nice shape on top, part it off and drill and tap it. The Harrison toolpost has a 9/16" BSF thread so I found myself in territory I don't visit too often but the treasure chest came up with the right taps.....

Image

The next job was to decide on a knob for the handle and this came to mind. It';s a bit bigger than what I would have made but I decided to give it a go because it has a story behind it. It's the gear lever knob off a Leyland wagon I ran for a lot of miles. This knob has been constantly to hand for about two years and over 200,000 miles. The reason I have it is that oner of the brothers I worked for was driving one day and managed to bugger the five speed Leyland box. I had to go out to rescue him and take the wagon to the garage the following day for a new box and some other repairs to the valve gear on the engine (he'd managed to go from top to second gear and over-revved it smashing some of the valve gear). They didn't have a replacement Leyland box but they had an Albion box which was the same thing but with a sixth gear in it. It would have cost more in vehicle hire than the difference in price so I fitted the over drive box. The wagon was fast before, it had an Eaton Two Speed back axle, but it was now probably the fastest in the country! Part of the kit was the new knob for the gear lever so I finished up with this one in my pocket as a souvenir. Like the toolpost it was threaded BSF but 7/16". A dig in the treasures and no problem, I have the necessary taps and die.

Image

Another dig in the treasures and I found some 7/16" silver steel so I have the makings of the handle for tomorrow. If the knob looks silly I can soon make one for it that's more in keeping.....
Stanley Challenger Graham
Stanley's View
scg1936 at talktalk.net

"Beware of certitude" (Jimmy Reid)
The floggings will continue until morale improves!
Old age isn't for cissies!
User avatar
Bodger
Senior Member
Posts: 1285
Joined: 23 Jan 2012, 12:30
Location: Ireland

Re: SHED MATTERS 2

Post by Bodger »

Where i served my time we used knobs of various colours, , we would drill through the threaded hole followed by the same thread tap, the company made threading machines, we would clamp a legnth o 3/8" squar bar in the machine and give it a nice twist, then then screw on the balls previously drilled and tapped with spacers of copper, aluminum, and brass etc, once these were all tightened, stick the bar in the lathe and machine the knobs into a multi coloured handle, there was a good demand for these pokers, you could treble your apprentice wages in a week.
Gadge
Newbie
Posts: 30
Joined: 19 Aug 2013, 12:26
Location: Victoria, Australia

Re: SHED MATTERS 2

Post by Gadge »

Stanley wrote:I like the molasses and water de-rusting bath Doug. Never come across that one before, I shall have a crack at it! I like the old brake drum for a forge bed as well, you've given me another idea.......
The molasses bath is only for the patient :laugh5: , as it can take several weeks to clean up heavily rusted items. But unlike acid baths, it won't attack good metal, if it's left in longer than necessary. I've seen mix ratios from 1+5 to 1+10 recommended, but being the thrifty type, reckoned I'd start at the more dilute end of the range. Which is working just fine.

A 'before' pic of those small anvil tool heads: 8555

I can do a bit of a show'n'tell about putting that brake drum firepot together, if you'd like. The drum I used, was selected for a couple of features that made it ideal for my purpose.
Last edited by Gadge on 12 Apr 2017, 00:10, edited 1 time in total.
Cheers,

Doug
User avatar
Stanley
Global Moderator
Global Moderator
Posts: 99371
Joined: 23 Jan 2012, 12:01
Location: Barnoldswick. Nearer to Heaven than Gloria.

Re: SHED MATTERS 2

Post by Stanley »

Do it Doug! This isn't a private topic, all are welcome.
Bodge, Those pokers must have flowed out of the factories like a production line.....Thousands of them about at one time when open fires were the norm.
Looking at that pic of Doug's anvil reminded me of the anvil in the forge at West Marton. It was unusual in that instead of being just steel faced as most English anvils were, it was a Swedish cast steel anvil and rang like a bell. Jimmy used to test his chisels by cutting a notch in the base, if it would cut that it was OK!
I'm going off the gear lever knob.... too big. I'll either turn it down smaller or make a new one with the ball-turning attachment I made.....

Image
Stanley Challenger Graham
Stanley's View
scg1936 at talktalk.net

"Beware of certitude" (Jimmy Reid)
The floggings will continue until morale improves!
Old age isn't for cissies!
User avatar
Stanley
Global Moderator
Global Moderator
Posts: 99371
Joined: 23 Jan 2012, 12:01
Location: Barnoldswick. Nearer to Heaven than Gloria.

Re: SHED MATTERS 2

Post by Stanley »

Image

I'll not bother you with the boring details of making and threading the silver steel for the handle and drilling and tapping the new nut. Let's start with a clean lathe and a lump of brass chucked ready for cutting. I'm going to make a bronze knob for the handle....

Image

Once I had the blank cut to the right size I drilled and tapped it 7/16" BSF, cleaned the threads properly and screwed the blank on the rod with some shaftlock to make sure it didn't move.

Image

Ready for a bit of ball turning.

Image

The ball turning attachment fastens directly onto the saddle so the cross slide had to come off. I gave it a good clean and put this pic in the show how the frosting of the original scraped finish is still there on the base. It was fitting to this standard that made Harrison Lathes as good as they are.

Image

The attachment bolted on the saddle on the studs that normally hold the cross slide.

Image

I forgot to chamfer the ends of the blank off to give me a start but no matter, I just started cutting.

Image

As soon as I started cutting I realised I hadn't got it set up for a circular ball but all I was after was a comfortable handle that looks OK so I crashed on....

Image

The attachment puts a good finish on but I gave it a bit of a polish. Here's the finished article, looks OK I reckon..... Also, on reflection, the elliptical shape is kinder the the hand than a round hard ball.
Stanley Challenger Graham
Stanley's View
scg1936 at talktalk.net

"Beware of certitude" (Jimmy Reid)
The floggings will continue until morale improves!
Old age isn't for cissies!
User avatar
Stanley
Global Moderator
Global Moderator
Posts: 99371
Joined: 23 Jan 2012, 12:01
Location: Barnoldswick. Nearer to Heaven than Gloria.

Re: SHED MATTERS 2

Post by Stanley »

Image

The first job this morning was to put the cross slide back on the Harrison, clean up and tidy the bench. I quite like my new handle....

Image

This is the compound machine vice that sits permanently on the drill press table. An El Cheapo Chinese make from the early days when they put no finish at all on their often inferior wares. However, despite the rough appearance it's well made of good castings and the slides are tight and accurate. They have never been adjusted since I got it about thirty years ago. But one thing has always nagged me, the terrible quality and fit of the hand wheels on the screws controlling the slides. They re never tight and definitely let the side down. You wouldn't believe the number of times I have promised myself that I would improve them. Well. today is Der Tag!
I went into the treasure chest and sorted out two candidates, a handy slice of round brass bar that was just the right size and a clack valve out of a three ran feed pump. You know what I always say about the scrap box, you are never sure what you are working with. The valve looked different and turned out to be what I'd describe as a very high nickel content bronze, very tough and obviously non rusting. However, it turned well and incidentally the handle on the tool post is fine....

Image

I had to put the square in the discs the old fashioned way. The bronze was easy but the nickel alloy took some filing out, it's tough stuff!

Image

Image

At clocking off time I had reached the stage where both discs have a tight fitting square cut in them. Tomorrow I'll make and fit the handles.....
Stanley Challenger Graham
Stanley's View
scg1936 at talktalk.net

"Beware of certitude" (Jimmy Reid)
The floggings will continue until morale improves!
Old age isn't for cissies!
User avatar
Stanley
Global Moderator
Global Moderator
Posts: 99371
Joined: 23 Jan 2012, 12:01
Location: Barnoldswick. Nearer to Heaven than Gloria.

Re: SHED MATTERS 2

Post by Stanley »

News this morning that Mick the Shed has found me a 4 jaw chuck for the 1927 lathe and it's in the post. I've never regarded my refurbishment of Johnny's lathe as complete because it didn't have a 4 jaw. I can rectify that as soon as it arrives! Another small step towards perfection....... Thanks Mick......
Stanley Challenger Graham
Stanley's View
scg1936 at talktalk.net

"Beware of certitude" (Jimmy Reid)
The floggings will continue until morale improves!
Old age isn't for cissies!
User avatar
Stanley
Global Moderator
Global Moderator
Posts: 99371
Joined: 23 Jan 2012, 12:01
Location: Barnoldswick. Nearer to Heaven than Gloria.

Re: SHED MATTERS 2

Post by Stanley »

Not a great lot to report this morning. I have finished the better handles for the combination vice on the drill press.

Image

I soon had the blanks centre drilled and opened up to tapping size. I stuck to BSF and made the handles out of the scrap stem of the clack valve.

Image

1/2" BSF and I used the old fashioned tapping drill of 7/16" which is slightly larger than the modern metric equivalent. Makes tapping a bit easier and the nickel alloy is tough stuff. Same applied to threading the handles, I made them a couple of thou smaller than 1/2".

Image

Close of play. it looks a bit more cared for now! You know me by now. I had a good clean up and put everything away. I didn't put the non ferocious in John's bin. I might be wrong about the nickel alloy and I don't want to contaminate John's metal.
Stanley Challenger Graham
Stanley's View
scg1936 at talktalk.net

"Beware of certitude" (Jimmy Reid)
The floggings will continue until morale improves!
Old age isn't for cissies!
User avatar
Stanley
Global Moderator
Global Moderator
Posts: 99371
Joined: 23 Jan 2012, 12:01
Location: Barnoldswick. Nearer to Heaven than Gloria.

Re: SHED MATTERS 2

Post by Stanley »

Image

I've started early this morning with a bit of a dilemma. I know that sometime today or tomorrow I'm going to get delivery of a new 4" four jaw independent chuck that Mick has bought for me. It's the final stage in the complete refurbishment of Johnny's 1927 lathe, for some reason the chuck was missing. I'll need to make a back plate for it that fits the nose of the 1927 lathe, I can do the heavy lifting on the Harrison of course and then do the final turning and fitting with the back plate mounted on its own nose on the 1927 lathe. My dilemma is that I'm not sure of the overall diameter of the new chuck. My assumption is that it will actually be a 200mm chuck.

Image

I've done my digging in the treasure chest and come up with this lump which will clean up to about 4" which should be just about right as the recess on the back of the chuck will of course be less than 200mm. I've decided that in the absence of the new chuck I can clean this up until it's a useful piece of stock. If the new chuck arrives while I am doing this all well and good, if it's too small I can chuck it back in the chest and start with another far bigger lump and reduce it. If the chuck doesn't arrive I think I'll take a chance and make the fitting for the nose, it'll keep me off the street corners!
I came on to post because I knew it would clear my mind to write the problem down and it's worked. I've made my mind up! I shall go and make some swarf......
Stanley Challenger Graham
Stanley's View
scg1936 at talktalk.net

"Beware of certitude" (Jimmy Reid)
The floggings will continue until morale improves!
Old age isn't for cissies!
User avatar
Bodger
Senior Member
Posts: 1285
Joined: 23 Jan 2012, 12:30
Location: Ireland

Re: SHED MATTERS 2

Post by Bodger »

Stanley, heres what you could do with your bit of metal, turn three cubes, one within the other
https://www.youtube.com/watch?v=AuS6HDHc7XE
User avatar
Tripps
VIP Member
Posts: 9624
Joined: 23 Jan 2012, 14:56

Re: SHED MATTERS 2

Post by Tripps »

That's not possible?
Now I've watched it and I still don't quite believe it. :smile:
Amazing - thanks.
Born to be mild
Sapere Aude
Ego Lego
Preferred pronouns - Thou, Thee, Thy, Thine
My non-working days are Monday - Sunday
User avatar
Stanley
Global Moderator
Global Moderator
Posts: 99371
Joined: 23 Jan 2012, 12:01
Location: Barnoldswick. Nearer to Heaven than Gloria.

Re: SHED MATTERS 2

Post by Stanley »

Fascinating.... he (or she) is faster and more clever than I am.... After the Lord Mayor's procession.....

Image

I took a cut with what I had on the toolpost to find out for sure what I was dealing with. Scrap box syndrome, never make assumptions.

Image

It was cast iron so out with one of my favourite carbide cutters and off we go. I've started on the most eccentric end so I can preserve as big a diameter as possible at the other end.

Image

Once I had a flat end get the sides parallel with some fairly severe cuts....

Image

We have a clean piece of CI. Bigger at one end than the other but I've managed to get just a tad shy of 200mm out of it which ought to do.

Image

I wanted a piece 1 1/2" deep for the chuck back so I got brave (foolish) and put my thin parting tool on the slowest auto cross feed and lit my pipe....

Image

Image

I got 3/4" in and the inevitable happened. Ah well, Life is an extended learning experience! I still need to get it in two.

Image

So I went back to my old standby, left a sliver and cut that with a sharp hacksaw blade.

Image

Close of play. I have two good pieces of CI, one of which could be the new chuck back. With a bit of luck the chuck will arrive before start of play tomorrow. Even if this piece won't do, I have two good concentric pieces of CI stock.
Stanley Challenger Graham
Stanley's View
scg1936 at talktalk.net

"Beware of certitude" (Jimmy Reid)
The floggings will continue until morale improves!
Old age isn't for cissies!
Gadge
Newbie
Posts: 30
Joined: 19 Aug 2013, 12:26
Location: Victoria, Australia

Re: SHED MATTERS 2

Post by Gadge »

Here we go with the brake drum forge project; thanks for the invitation, Stanley.

8583

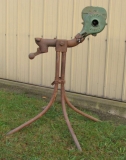
This is what I started out with. A folding portable riveter's/farrier's forge blower and stand, picked up at a deceased estate 'clearing sale' auction, some years ago. My files show that it cost me AU$21 [roughly £10]. These were originally fitted with a light sheet metal 'fire tray', which was relined with fireclay at each worksite. Most of those have rusted out over the years, and been discarded.

8584
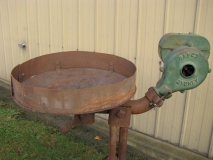
The 'Mk I' replacement fire tray, made from an old plough disc, to replicate the original reasonably closely. Wind shield is attached with solid riveted brackets, and has a removable 'gap piece' to accommodate long workpieces. I had to spot anneal the disc to drill the rivet holes; it's tough steel! This will accommodate quite a big fire, but needs a big fuel heap to get a deep fire.

8596

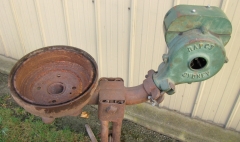
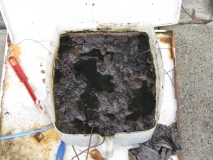
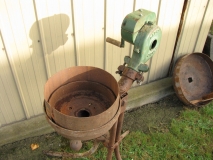
The brake drum selected for the 'Mk II fire pot''. Desired features were overall size, a centre hole that's a reasonably good fit to the forge tuyere [or air discharge outlet], and the 'double lip' at the outer edge, to retain the wind shield. It was a bonus that the wheel stud holes were a perfect pitch circle match to the mounting lug bolt holes on the tuyere!

8597

The 14ga sheet steel blank for the wind shield. The last of the piece which was also used for the Mk I's wind shield; this was an offcut from another 'recycle/repurpose' project.

8598

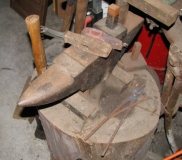
The wind shield formed to shape. Cold bent over the anvil horn, using a rubber mallet to do the ends. As will be visible in later pics, I then trimmed one end back a bit, to make a wider gap. Again, this is to make heating of long workpieces more convenient.

For example, I've converted a fair few discarded 6' air leg rock drill steels to light crowbars. They make very good ones, as they're made from a very tough air-hardening alloy steel.

8600
For a bottom mounted tuyere, a grate or air diffuser is a very good idea, on a number of counts. These are often made of steel plate or cast iron. But my thought was that light gauge stainless steel would work just as well, as it doesn't need a 'corrosion allowance' factor in its thickness. If it melts, I'll just make up something of thicker section.

I just happened to have a piece of ready-perforated 304 stainless steel sheet on hand, from a discarded clothes dryer drum end. This is backed up with a 3mm mild steel backing plate, again a leftover from a previous project [practicing flame cutting of circle segments, for a letterbox door]. Just needed cleaning up of the edges, and cutting/drilling the required holes. As well as clamping the diffuser plate, this blanks off the unused wheel stud holes in the brake drum.
8601
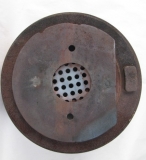
Bottom view of the completed fire pot assembly, less mounting bolts.

8602
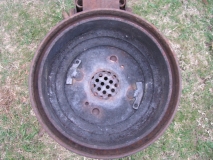
Top view. The tabs welded on the mounting coach bolt heads are to prevent them from spinning, when undoing the nuts.

8603
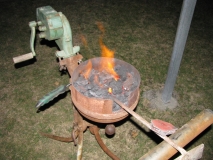
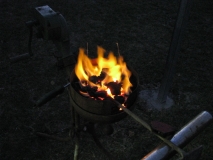
The earlier 'in action' pic in this thread was shot as available light; here's a flash-illuminated one of the Mk II fire pot's first heat.

8604

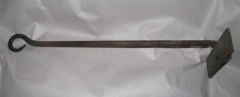
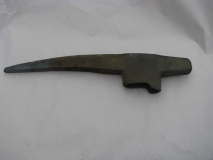
And to finish off, here's the first completed job. A traditional tapered loop handle, on a small fire rake I'd made up for this forge. Entirely hammer and anvil work.
Last edited by Gadge on 12 Apr 2017, 00:29, edited 1 time in total.
Cheers,

Doug
micktoon
Regular User
Posts: 366
Joined: 05 Feb 2012, 21:23
Location: Newcastle upon Tyne

Re: SHED MATTERS 2

Post by micktoon »

Hi Doug , nice forge there and nice finished job too, nice to see another persons project too, looks like you have made a good job of the fire rake. Well done.

Hi Stanley more good work in the shed I am glad to see and hope you have the goods to now make a back plate, you have mentioned 200mm a few times but also 4 inch which is the size of chuck thats on its way.....that is 4 inch or 100mm.
I am hoping you have just been saying 200mm meaning 100mm or the new chuck is going to be too small :surprised: , I am sure you said 3 or 4 inch and we went for the larger and I think its a 6 inch chuck you have so that would make the blank probably the 4 inch size.
I will check back tomorrow, hopefully you will get the chuck tomorrow too.
Cheers Mick
User avatar
Stanley
Global Moderator
Global Moderator
Posts: 99371
Joined: 23 Jan 2012, 12:01
Location: Barnoldswick. Nearer to Heaven than Gloria.

Re: SHED MATTERS 2

Post by Stanley »

Doug, I like it and I envy the space to allow you to make and use it. I love forging but my backyard is full up! Lovely to see you re-using material others have thrown away. The affluent West has forgotten how to do this, a chip goes in a household machine and it's cheaper to buy a new one.

Mick, you're right of course and yes it's 100mm for a 4" chuck. Old farts like me shouldn't be allowed anywhere near Metric, it's foreign country for us. I shall finish the register and thread today ready for the chuck when it arrives. The slight under-size of the outside diameter won't be any problem. I notice you were kind to me and never mentioned my parting tool cock up! I keep thinking I should get a tipped parting tool..... Do they make them with a 1" deep body? Did the cheque arrive?
Stanley Challenger Graham
Stanley's View
scg1936 at talktalk.net

"Beware of certitude" (Jimmy Reid)
The floggings will continue until morale improves!
Old age isn't for cissies!
User avatar
Stanley
Global Moderator
Global Moderator
Posts: 99371
Joined: 23 Jan 2012, 12:01
Location: Barnoldswick. Nearer to Heaven than Gloria.

Re: SHED MATTERS 2

Post by Stanley »

Image

Start of the day, a quick skim to make sure the casting hadn't moved during the night.

Image

All was well so I had a final check on all me measurements, centred the block, drilled it 5/8", the old tapping size drill for 3/4" Whitworth before the world went mm mad.I got a starting and finishing tap from the set of cast steel taps and dies I showed you the other day. I used them because they are almost brand new and I don't want a tight thread on the nose. Quietly away I tapped it out from the chuck side, stopping 3/8" from the register end. Then I turned the register but not too tight. I mention this because I don't believe that the plain register is the arbiter of how the chuck sits on the nose. Like Johnny (and I've dealt with enough of his chucks to know) I believe the final register is the fit on the back end of the nose. If it's an even tight fit there that's what governs the orientation of the chuck. The thread is important too. I got a nice close fit, the sort of fit where you have constant even resistance as you screw it on but no binding. The blank is a perfect fit.

Image

Then back in the Harrison for a bit more heavy lifting. I'm looking for the boss at the nose end here....

Image

Dead on clocking off time, I have the finishing cuts on the back. All the edges chamfered and a nice finish. This has been a good piece of iron tough but no hard shops or blow holes...

Image

Last check, I popped it on the nose of the lathe where it can sit until the chuck gets to me. It's as good as I can get it and I'm well pleased with it.....

Image

Just after I'd finished posting a nice lady gave me a present... The chuck is here and very good quality. The back plate looks slightly over size on the pic but it isn't. It's 2mm less than the chuck which is perfect. I can do some chuck back fitting tomorrow.... Thanks Mick!
Stanley Challenger Graham
Stanley's View
scg1936 at talktalk.net

"Beware of certitude" (Jimmy Reid)
The floggings will continue until morale improves!
Old age isn't for cissies!
Locked

Return to “Crafts”